Harnessing the Power of Serverless PHP with Laravel Vapor
I need to start this blog post with a confession. But only if you promise to not tell anything to my tecRacer colleagues, deal? So, I built a monolith. And I loved it. And you will likely love it too if you decide to try out Laravel. Luckily, there is a service called Vapor that will let you deploy your Laravel project on serverless AWS infrastructure. That means I can continue to enjoy the top-notch developer experience of Laravel while also getting all the benefits of serverless technologies (plus, I can maintain a healthy relationship with my colleagues 🎉). But let’s start at the beginning.
What is Laravel?
The PHP Framework for Web Artisans. That’s how Laravel describes itself on its homepage. That’s a powerful statement, right? Who doesn’t want to call themselves an Artisan instead of boring job titles like Consultant, Developer, or Administrator? Regardless of whether the statement is true or not, Laravel is a lot about beauty. Laravel wants you to write clean, maintainable, and readable code.
It is an open-source web framework written in PHP that comes with a bunch of built-in features like authentication and authorization, notifications (e-mail/in-app/Slack/…), job scheduling, job queues, and much more. One of the best features is the integrated Object Relational Mapper (ORM) called Eloquent. After you have defined your models as classes, you can access your data using a powerful, expressive syntax. Let’s say, for example, you have a model flight; this is how you would interact with it.
// Create a model
$flight = Flight::create(['price' => 300, 'destination' => 'Paris']);

// Update a model
$flight->update(['price' => 350, 'destination' => 'London']);

// Retrieve models
$flights = Flight::where('price', '<=', 500)->get();

// Rich API for model interactions
$flights->each->book();
Eloquent automatically translates your model accesses to the query language of your database. This means you have a strong separation between your data model and data storage technology. If your data access patterns change during development, you can switch out the database on the fly. Laravel provides first-party support for five databases: MariaDB, MySQL, PostgreSQL, SQLite, and SQL Server. There are also community implementations, e.g., for DynamoDB or MongoDB. Laravel also provides various ways to integrate your front end, but that is stuff for another blog post.
If you are curious about which companies are using Laravel in production, the fashion brand ABOUT YOU built their whole backend in Laravel. It is also said that some internal Twitch services are written in Laravel. Don’t worry; the advertising block for Laravel will end shortly. However, if I made you curious, I highly recommend the Laravel Bootcamp, which will guide you through your first steps with Laravel.
Deploy Laravel using Vapor
PHP and Serverless!?
Laravel is written in PHP. And if you are now skeptical, then that is justified. Many people still know PHP from the time when they built their first websites. It is also likely that you have already come into contact with PHP in the context of WordPress (remember how every time you upgraded your site, you started praying that it wouldn’t destroy anything?). However, PHP has come a long way since then, featuring object orientation, faster execution times, just-in-time compilation, and more. Additionally, PHP’s ability to efficiently handle concurrent requests and its compatibility with various cloud services make it highly scalable, making it a good fit for serverless architectures. And this is where Vapor comes into play.
Vapor acts as a wrapper around a Laravel application that leverages serverless AWS services. As runtime it uses AWS Lambda. This means that the applications can handle varying loads without the need for manual scaling or server maintenance. Vapor integrates deeply with Laravel, offering all the features a developer uses in traditional monolithic deployments but translated into AWS services. For example, Instead of using a database table as a job queue, Vapor uses Amazon SQS. It also provides managed database and caching solutions using Amazon RDS, DynamoDB, and ElastiCache.
Create your first Laravel Application
Let’s get started with Laravel and Vapor before we dig deeper. For more details and guides, please also refer to Laravels excellent documentation. First, make sure you have PHP and its package manager, composer, installed. On Mac, you can do this in a matter of minutes using Laravel Herd. Then, you can create a new project:
composer create-project laravel/laravel example-app
After that, you can change into the newly created directory and start the local development server:
cd example-app
php artisan serve
Your application will now be accessible in your browser at http://localhost:8000. We now have a small sample application, which we will deploy to Vapor.
Install Vapor
Register yourself at https://vapor.laravel.com. They provide a small free tier that lets you deploy a single project. After that, we will install the Vapor CLI and the Vapor core package into our project:
composer require laravel/vapor-cli --update-with-dependencies
composer require laravel/vapor-core --update-with-dependencies
When the Vapor CLI is installed, you can access the executable using PHP vendor/bin/vapor. You can create an alias in your terminal to save yourself some keystrokes.
Create an IAM User
Since Vapor deploys AWS resources to your account, you need to create an IAM user. For simplicity, I will use the AWS CLI for this. I strongly recommend only attaching the necessary permissions. Refer to the documentation to get the policies and store them as JSON files. Lastly, create access keys for the user and store them in a safe location.
aws iam create-user --user-name vaporuser
aws iam put-user-policy --user-name vaporuser --policy-name PolicyName1 --policy-document file://policy1.json
aws iam put-user-policy --user-name vaporuser --policy-name PolicyName2 --policy-document file://policy2.json
aws iam create-access-key --user-name vaporuser
Initialize Vapor
Initialize your project with vapor init. A wizard will open in your terminal, asking you for a project name and the desired AWS region. If it asks you if you want to use vanity domains, answer with no since this requires a subscription. You also do not need to install the vapor-core package again. Vapor will now generate a vapor.yml file. This is your main configuration file for the deployment. We will leave everything as default here, except we will change the environment from production to development.
id: 12345
name: trc-blog-example-app
environments:
    development:
        memory: 1024
        cli-memory: 512
        runtime: 'PHP-8.2:al2'
        build:
            - 'COMPOSER_MIRROR_PATH_REPOS=1 composer install --no-dev'
            - 'PHP artisan event:cache'
            - 'npm ci && npm run build && rm -rf node_modules'
After saving the file, use the command vapor env development to register our new development environment.
Deploy to AWS
When the initial configuration is done, deployment is easy. Make sure to run npm run build at least once before your first deployment because vapor needs a current package-lock.json file.
vapor deploy development
Vapor begins by packaging and uploading your application’s code to AWS. This includes all your Laravel files, assets, and dependencies.
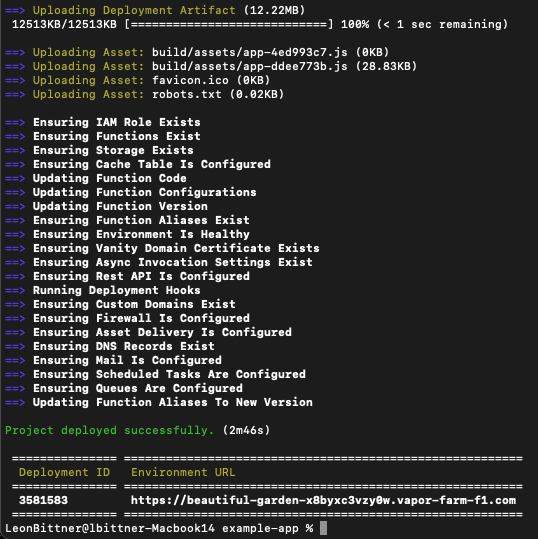
Once the deployment is done, you will get a deployment URL. Let’s open the Vapor dashboard to take a look at our newly created project. I am subscribed to Vapor, that is why automatically three environments have been created.
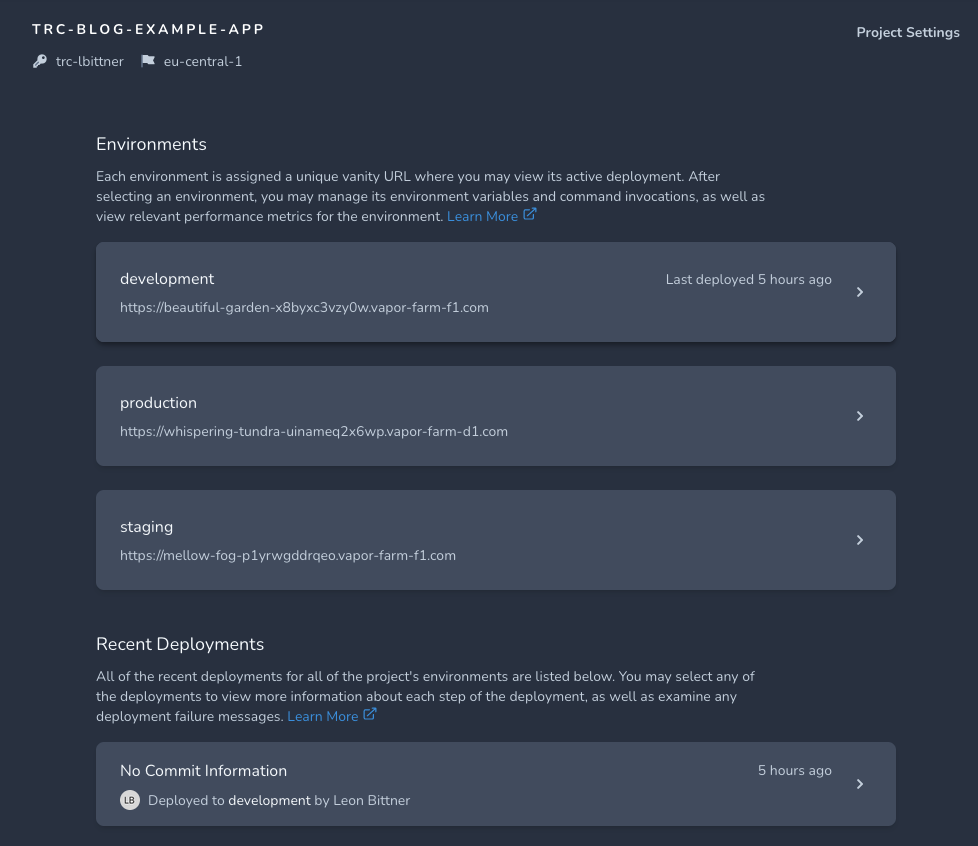
Clicking on any of the three environment URLs will bring us to the homepage of our application. Nice!
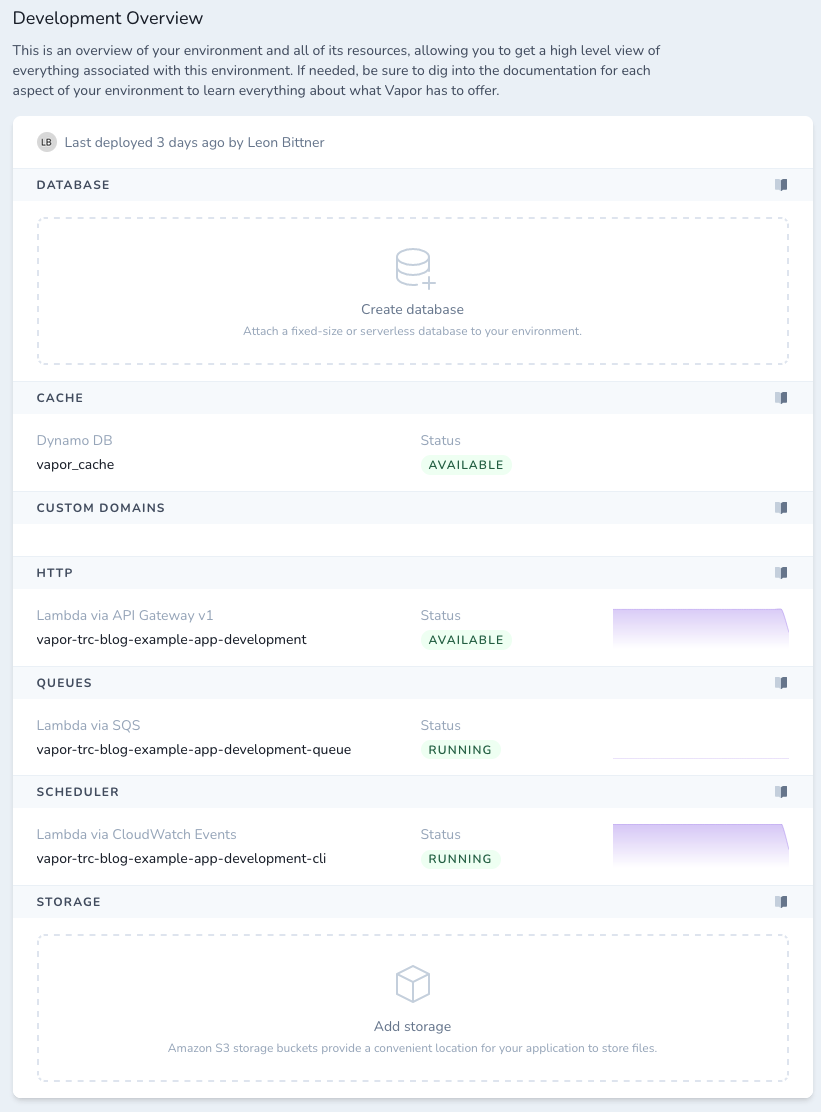
Opening the environment in the Vapor dashboard will give us an overview on how the different AWS services are translated to Laravel components:
Examining the Infrastructure
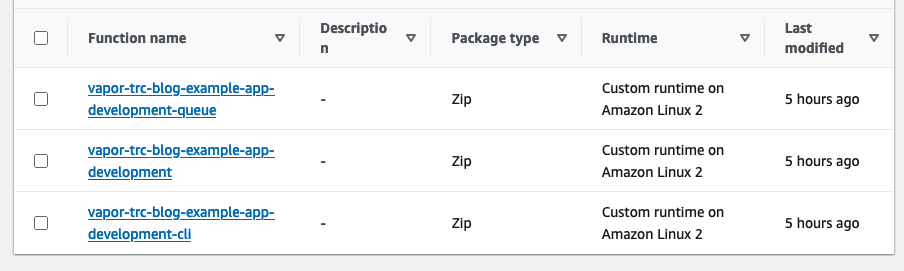
Now that our application is deployed let’s head into AWS to examine the infrastructure created by Vapor. There are three Lambda functions created for our project. One for handling web requests, one for processing the job queue, and one for artisan, the Command Line Interface (CLI) of Laravel. Depending on the request, one of the three functions gets invoked. They all share the same codebase, however, which includes our whole application code and all necessary packages, such as the Laravel kernel.
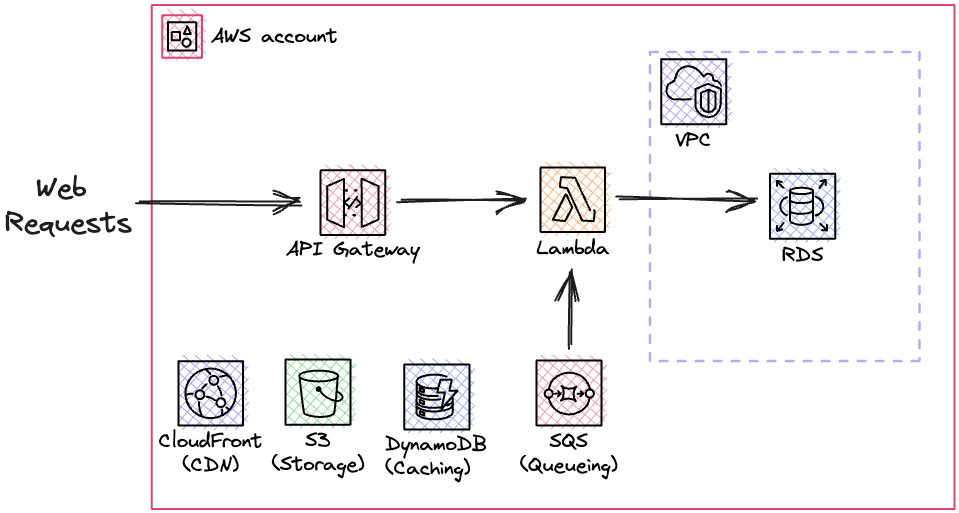
There is one API gateway that points to our application’s Lambda function. It seems like it does nothing more than just forwarding the requests. We can also see that a CloudFront Distribution has been created by Vapor. As origin, it points to an S3 Bucket containing some static assets such as JavaScript files. In addition to that, a VPC has been created containing two public and two private subnets. The private subnets are used to deploy our database once we decide to create one. I created a small picture showing the different components deployed by Vapor.
Summary
Let’s wrap it up at this point. There is so much more to learn about Laravel and Vapor, but that is stuff for a future blog post. We have seen that with Vapor, you can deploy applications that essentially work as a monolith on serverless infrastructure. This gives you a great developer experience while also enjoying all the benefits of serverless technologies, such as scalability and cost efficiency. As with all technical solutions, there are, of course, some caveats. This architecture will not beat a powerful EC2 instance in terms of response time, for example. As always, you should carefully consider all the pros and cons before settling on one technology. However, if I made you curious, I highly advise you to try out Laravel and Vapor. Feel free to reach out if you have any questions!
— Leon
Title Photo by Finn Pietsch on Pexels