Serverless Swagger UI for AWS API Gateway
When implementing REST APIs in AWS there is one service that always comes to mind - Amazon API Gateway. Even though feature-rich, properly documenting your API may become a time-consuming task relatively quickly.
In this post, I would like to show you how you can use Swagger UI in combination with a serverless deployment to automatically generate interactive and up-to-date documentation for your APIs.
Introduction
When implementing REST APIs in AWS there is one service that always comes to mind. Amazon API Gateway. For those of you who are not familiar with API Gateway, API Gateway is a fully managed AWS service that allows developers to create and manage APIs at any scale. It offers features like monitoring, authentication, and throttling and lets you set up publicly available APIs in no time. It is an amazing service that I myself have used in multiple projects.
Despite all those features, one thing I observe in a lot of projects that involve API Gateway is the lack of proper documentation. We all know how important proper documentation is. Be it for onboarding, process and quality control, or general knowledge transfer, having a high-quality, single source of truth that everyone can reference is invaluable. Even though the importance of documentation is obvious, there is one inconvenience that more often than not leads to outdated project files - Time. Keeping documentation up to date takes time.
In the case of APIs, it could take a lot of time and become complicated quickly. Why? Image you build an API and release its first version. There will come a time in the future when your API will outgrow its original scope and adjustments have to be made. When new features are added to an API, proper versioning is required to ensure stability and reliability. Backward compatibility is fundamental when working with APIs to not negatively affect downstream consumers. Amazon API Gateway for example makes it extremely easy to quickly add and remove resources and methods, introduce and strip features, or create new stages and versions of your API. All those versions and features will have to be properly documented and staying on top of all those changes is a challenge.
One Solution to this problem is the introduction and use of Swagger UI. Swagger UI is a collection of open-source tools that allow developers to automatically generate interactive API documentation based on OpenAPI (formerly known as Swagger) specifications. The interactive documentation can then be used by the developers themselves or consumers to test, validate or simply interact with the API.
In this blog, I would like to show you how you can set up your own serverless Swagger UI for your API Gateway with Terraform.
Architecture
Before we start implementing our Terraform code, I would like to guide you through the example infrastructure that we will set up. As seen in the architecture diagram below, we will create a simple API Gateway with four resources.
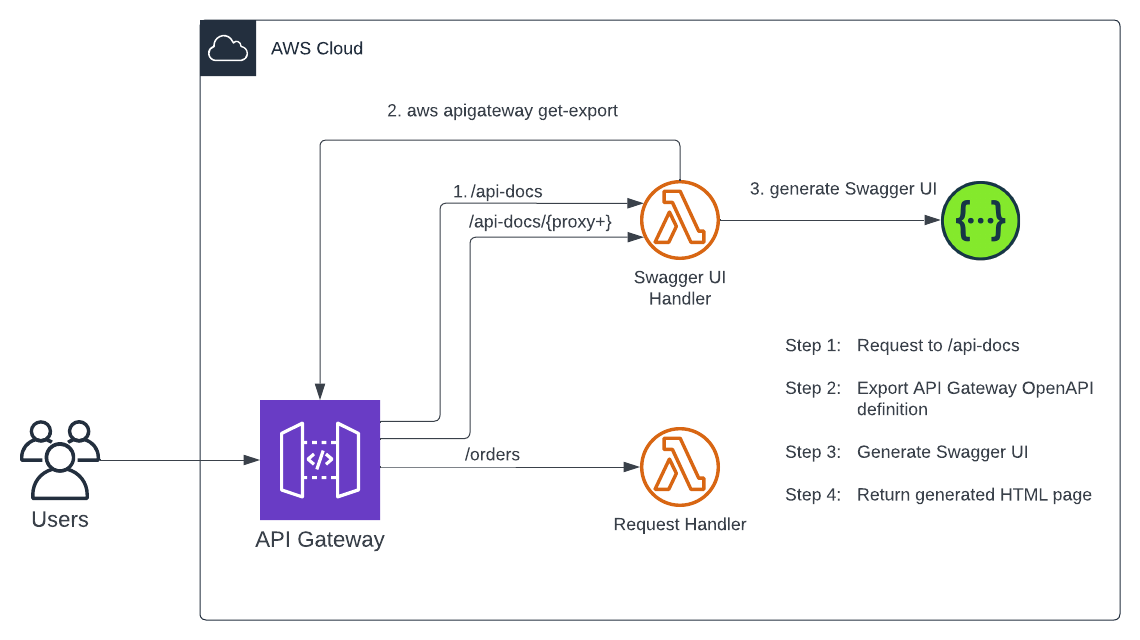
The resource /orders is an example that I chose to demonstrate the functionality of Swagger UI. Feel free to rename or replace it if you like. /api-docs and /api-docs/{proxy+} will be the resources via which our Swagger UI will be reachable. Do not change the names of these resources.
├── /api-docs
│   └── /{proxy+}
├── /orders
Each resource used as part of this example will use AWS Lambda functions in combination with API Gateway proxy integrations to handle user requests. As this example focuses on the implementation and setup of the Lambda function that will generate the Swagger UI, let’s call it the Swagger UI Handler from now on, I won’t go too deeply into the logic of the other functions.
The workflow of the Swagger UI Handler can be divided into four steps. The process starts with a GET request to /api-docs which will trigger the Swagger UI Handler. Once the handler has been triggered, Lambda will export the current API Gateway OpenAPI specification. This ensures that the Swagger UI is generated based on the most recent API definition and the documentation is always up to date. Afterward, an express web server will be started that will serve the HTML page of our Swagger UI. The HTML page will be generated based on the API Gateway OpenAPI Export. The resulting Swagger UI can then be used to test, validate or interact with the API.
Setup Project Structure
Enough banter, let’s start. First I would like to create our project file structure to give you an overview of what we will need to implement. Please create the following files and folders. We will fill them with life later on.
├── src/
│   └── orders/
│       └── orders.js
│   └── swagger-ui/
│       └── build/
│       └── layers/
│           └── commonLibs/
│               └── nodejs/
│                   └── package.json
│       └── app.js
├── main.tf
├── outputs.tf
├── api-gateway-definition.yaml
The files main.tf and outputs.tf will contain our Terraform code. The api-gateway-definition.yaml will contain our OpenAPI specification. It is possible to create an API Gateway using Terraform resources only. To keep this example as basic as possible, we will create all resources, methods, and integrations based on an OpenAPI specification. This will also allow you to use your own Swagger or OpenAPI definition in the future. The file orders.js will contain the logic of the request handler for the /orders resource. The file app.js will contain the logic of the Swagger UI Handler while the folder swagger-ui/layers/commonLibs/nodejs/ will contain the package.json which we need to define our nodejs dependencies.
Create the API Gateway
Once you created the file structure we will start by creating the API Gateway without the Swagger UI Handler first. As mentioned above, we will use an OpenAPI specification and a single Terraform resource. Simple enough, let’s get started. Please add the following code to your main.tf. This code will create an API Gateway REST API based on the YAML specification.
resource "aws_api_gateway_rest_api" "this" {
  name        = "serverless-swagger-ui"
  description = "This is a test API Gateway to demonstrate the use of Swagger UI"

  body = file("${path.module}/api-gateway-definition.yaml")

  endpoint_configuration {
    types = ["REGIONAL"]
  }
}
For the specification, you can add the following definitions to your api-gateway-definition.yaml.
---
swagger: "2.0"
info:
  version: "1.0"
  title: "serverless-swagger-ui"
schemes:
- "https"
paths:
  /orders:
    get:
      produces:
      - "application/json"
      parameters:
      - name: "orderDate"
        in: "query"
        required: false
        type: "string"
      - name: "userid"
        in: "query"
        required: false
        type: "string"
      responses:
        "200":
          description: "200 response"
          schema:
            $ref: "#/definitions/ordersResponse"
definitions:
  ordersDataObject:
    type: "object"
    properties:
      user:
        type: "string"
      shippingAddress:
        type: "string"
      invoiceAddress:
        type: "string"
      orderDate:
        type: "string"
        format: "date"
    title: "Orders Data Object"
  ordersQueryParameters:
    type: "object"
    properties:
      userid:
        type: "string"
      orderDate:
        type: "string"
        format: "date"
    title: "Orders Query Parameters"
  ordersResponse:
    type: "object"
    properties:
      orders:
        type: "array"
        items:
          $ref: "#/definitions/ordersResponseObject"
      queryParameters:
        $ref: "#/definitions/ordersQueryParameters"
    title: "Orders Response"
  ordersResponseObject:
    type: "object"
    properties:
      orderId:
        type: "number"
      data:
        $ref: "#/definitions/ordersDataObject"
    title: "Orders Response Object"
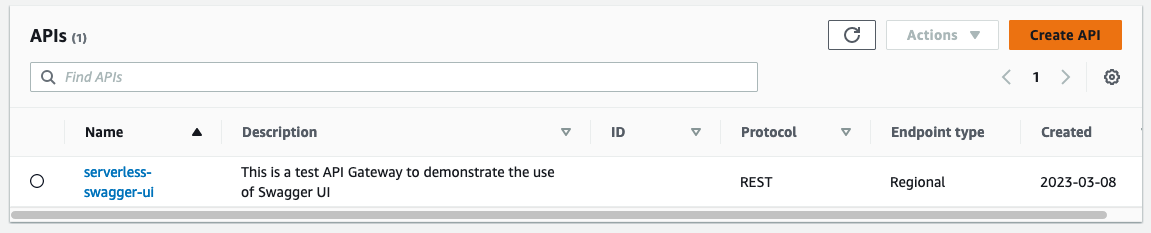
Let’s run terraform init to initialize the Terraform providers and terraform apply to deploy the infrastructure. Check it out in the AWS console. As you can see, a REST API has just been created.
One important component that is still missing is the request handler for the /orders resource. If you look into the console you will also see that we don’t have an integration request defined yet. Let us do both of these things next in order to get a fully functional API.
Create /orders Request Handler
We will start by implementing the request handler logic. The Lambda function which serves requests for the resource /orders will be a simple JavaScript function that returns a single string. As shown below the Lambda function will return Hello from Lambda! Orders Response. If you want to make this exercise a bit more challenging you are more than welcome to implement a bit more logic and extract actual data from a database like RDS. As this example focuses on the implementation of Swagger UI, the simple return is more than enough. Copy the code below into the orders.js file we created earlier.
module.exports.handler = async (event, context) => {
    let response = {
        statusCode: 200,
        body: JSON.stringify('Hello from Lambda! Orders Response')
    };
    return response;
};
Next, we will create our Lambda function including its executing role in Terraform. Start by copying the code below into your main.tf.
resource "aws_lambda_function" "orders_handler" {
  function_name = "orders-handler"
  role          = aws_iam_role.orders_handler.arn

  filename         = data.archive_file.orders_handler.output_path
  source_code_hash = data.archive_file.orders_handler.output_base64sha256
  handler          = "orders.handler"
  runtime          = "nodejs18.x"

}

data "archive_file" "orders_handler" {
  type        = "zip"
  source_file = "${path.module}/src/orders/orders.js"
  output_path = "${path.module}/src/orders/orders.zip"
}

resource "aws_iam_role" "orders_handler" {
  name = "orders-handler"

  assume_role_policy = jsonencode({
    Version = "2012-10-17"
    Statement = [
      {
        Action = "sts:AssumeRole"
        Effect = "Allow"
        Principal = {
          Service = "lambda.amazonaws.com"
        }
      },
    ]
  })
}

resource "aws_iam_role_policy_attachment" "orders_handler" {
  role       = aws_iam_role.orders_handler.name
  policy_arn = "arn:aws:iam::aws:policy/service-role/AWSLambdaBasicExecutionRole"
}
To Continue, we will have to give our API Gateway permission to trigger our request handler every time a request is made. To do this we have to define a Lambda resource policy. Without this resource policy, our API Gateway would not be allowed to forward requests to the Lambda function.
resource "aws_lambda_permission" "orders_handler" {
  function_name = aws_lambda_function.orders_handler.function_name

  action     = "lambda:InvokeFunction"
  principal  = "apigateway.amazonaws.com"
  source_arn = "${aws_api_gateway_rest_api.this.execution_arn}/*"
}
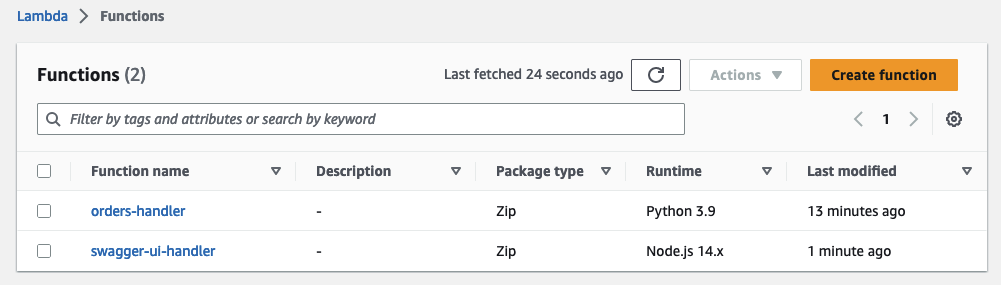
Run run terraform init and terraform apply again to deploy the Lambda function. You will find a new Lambda function in the console once Terraform has finished the deployment.

But wait…there is still one thing missing. We need to connect our API and Lambda via an integration request. But how does it work? Good question!
Add Integration Request
To connect our API and the Lambda we need to adjust both our Terraform configuration as well as the OpenAPI definition. Please replace the /orders path definition in the api-gateway-definition.yaml with the snippet below. You might notice that we added a new section called x-amazon-apigateway-integration. This section is also called an API Gateway extension. These extensions can be used to define API Gateway-specific API integrations via OpenAPI specifications. As we create our API based on an OpenAPI specification, we will use an extension to create an integration request and connect our API Gateway and Lambda functions.
You might also have noticed that we started introducing the template placeholder ${orders_handler_arn}. You could also enter the ARN of the Lambda function as a hardcoded string. I thought using variable replacements would make our whole setup a bit more dynamic and flexible.
  /orders:
    get:
      produces:
      - "application/json"
      parameters:
      - name: "orderDate"
        in: "query"
        required: false
        type: "string"
      - name: "userid"
        in: "query"
        required: false
        type: "string"
      responses:
        "200":
          description: "200 response"
          schema:
            $ref: "#/definitions/ordersResponse"
      x-amazon-apigateway-integration:
        uri: "arn:aws:apigateway:eu-central-1:lambda:path/2015-03-31/functions/${orders_handler_arn}/invocations"
        httpMethod: "POST"
        passthroughBehavior: "when_no_match"
        timeoutInMillis: 29000
        type: "aws_proxy"
To render the template and replace the variable with an actual value, we need to make a few adjustments to our main.tf. Please adjust your API Gateway Terraform resource to look like the snippet below. Not much has changed. We only replaced file() with templatefile() to be able to render the template and assigned the ARN of our Lambda function to the variable orders_handler_arn.
resource "aws_api_gateway_rest_api" "this" {
  name        = "serverless-swagger-ui"
  description = "This is a test API Gateway to demonstrate the use of Swagger UI"

  body = templatefile("${path.module}/api-gateway-definition.yaml",
    {
      orders_handler_arn     = aws_lambda_function.orders_handler.arn
    }
  )

  endpoint_configuration {
    types = ["REGIONAL"]
  }
}
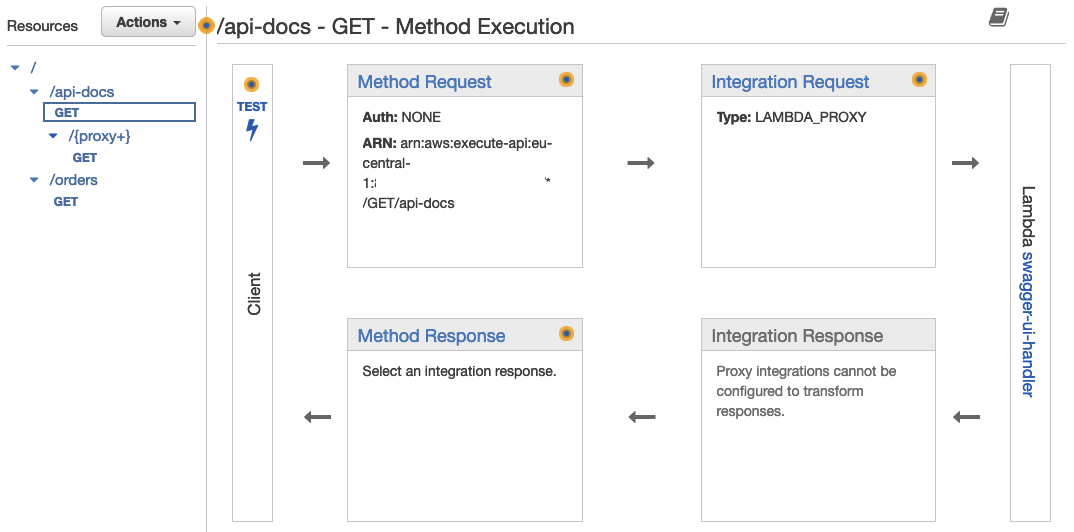
Run terraform apply again to deploy the changes. Once deployed you should see that we successfully added an integration request to our API Gateway /orders resource.

To test that everything works correctly you can open the GET method and perform a client test. Your client test should return Hello from Lambda! Orders Response.

Good job. You just created an API including a request handler in a few minutes. Now we will create the infrastructure necessary to generate our interactive Swagger UI documentation.
Create Swagger UI Handler Function
To generate our Swagger UI documentation we need to do two things. We need to implement the handler itself and adjust our API Gateway by adding the necessary resources and integration requests. We will start by implementing and deploying the handler. As the Swagger UI Handler is basically just another request handler, you will recognize the majority of the Terraform code we will add to our main.tf. But let’s start with the logic itself. You can add the following code to the app.js file we created in the beginning.
const AWS = require('aws-sdk')
const express = require('express')
const serverless = require('serverless-http')
const swaggerUI = require('swagger-ui-express')

var apigateway = new AWS.APIGateway({apiVersion: '2015-07-09'});

const app = express()

module.exports.handler = async (event, context) => {
    const apiId = event.requestContext.apiId
    const stage = event.requestContext.stage

    var params = {
        exportType: 'swagger',
        restApiId: apiId,
        stageName: stage,
        accepts: 'application/json'
      };

    var getExportPromise = await apigateway.getExport(params).promise();

    var swaggerJson = JSON.parse(getExportPromise.body)

    delete swaggerJson['paths']['/api-docs/{proxy+}']
    delete swaggerJson['paths']['/api-docs']

    app.use('/api-docs', swaggerUI.serve, swaggerUI.setup(swaggerJson))
    const handler = serverless(app)
    const ret = await handler(event, context)
    return ret
 };
The logic of the Swagger UI Handler is a bit more complex than the handler we implemented before. Let’s go through the code step by step. The first few lines are just a definition of packages we will need.
const AWS = require('aws-sdk')
const express = require('express')
const serverless = require('serverless-http')
const swaggerUI = require('swagger-ui-express')
aws-sdk: AWS SDK for JavaScript. Needed to communicate with the Amazon API Gateway API to get an OpenAPI export of our API.express: Web framework for nodejs. We will set up a web server via express to serve our generate Swagger UI HTML.serverless-http: Allows us to ‘wrap’ our web server for serverless use. We will use it to wrap our express web server.swagger-ui-express: Allows us to serve auto-generated swagger-ui API docs from express.
After importing the packages, we will create a new API Gateway instance via the AWS SDK as well as an express application. We will use the API Gateway instance to export the OpenAPI specification of our API. The express app will be used to mount our middleware function that will serve our Swagger UI page.
var apigateway = new AWS.APIGateway({apiVersion: '2015-07-09'});
const app = express()
The code which is contained in the module.exports.handler function will be executed every time the Lambda is triggered. In this case our API Gateway will trigger the Lambda every time a request to /api-docs is made. The Event object which is part of every trigger event contains a lot of additional information. We will extract the API ID and the Stage name from the object. This makes our function a lot more dynamic and allows you to reuse the function for multiple APIs and different Stages. Afterward, we will export the OpenAPI specification of our API. Next, we will delete the resources /api-docs and /api-docs/{proxy+} from our export. This is less of a necessity and more of a beauty correction.
const apiId = event.requestContext.apiId
const stage = event.requestContext.stage

var params = {
    exportType: 'swagger',
    restApiId: apiId,
    stageName: stage,
    accepts: 'application/json'
    };

var getExportPromise = await apigateway.getExport(params).promise();
var swaggerJson = JSON.parse(getExportPromise.body)

delete swaggerJson['paths']['/api-docs/{proxy+}']
delete swaggerJson['paths']['/api-docs']
The only task left to do is to mount the function which will generate our Swagger UI HTML page, wrap the express app in the serverless package, and return the handler.
app.use('/api-docs', swaggerUI.serve, swaggerUI.setup(swaggerJson))
const handler = serverless(app)
const ret = await handler(event, context)
return ret
Now that we discussed the logic in detail we will quickly deploy the Lambda via Terraform. To deploy our function and for it to work correctly we not only have to define our app.js but also download and zip the dependencies. In contrast to the simple orders request handler we created earlier, our Swagger UI Handler depends on a lot more packages that are not included by default. We will use the package.json to define our dependencies. Please copy the following snippet into your package.json.
{
    "name": "swagger-ui",
    "version": "1.0.0",
    "main": "app.js",
    "license": "MIT",
    "dependencies": {
      "serverless-http": "^2.6.1",
      "swagger-ui-express": "^4.1.6"
    }
  }
Next, navigate into the folder src/swagger-ui/layers/commonLibs/nodejs and run npm install. This will download all packages needed. Next zip the whole src/swagger-ui/layers/commonLibs/ directory and copy the commonLibs.zip into the folder src/swagger-ui/build/. I recommend doing this using an inbuild Terraform data resource called archive_file. You can copy the code below into your main.tf.
data "archive_file" "commonLibs" {
  type = "zip"

  source_dir  = "${path.module}/src/swagger-ui/layers/commonLibs"
  output_path = "${path.module}/src/swagger-ui/build/commonLibs.zip"
}
Once done we can finally start writing the Terraform code for our handler.
The Terraform code we need for our Swagger UI Handler looks nearly the same as the code we wrote for our simple /orders handler. Start by adding the function itself plus IAM role to your main.tf. You might have noticed that we introduced a new resource aws_lambda_layer_version. aws_lambda_layer_version will create a Lambda layer for us to make the dependencies we just downloaded accessible to our Lambda function. Make sure to include the depends_onstatement to ensure that the commonLibs.zip file is created first. In addition to the IAM policy AWSLambdaBasicExecutionRole this Lambda need permission to extract the OpenAPI specification from our API. To keep things simple I just added the policy AmazonAPIGatewayAdministrator. I advise you to be a lot more restrictive in regard to permissions when implementing actual infrastructure.
resource "aws_lambda_function" "swagger_ui_handler" {
  function_name = "swagger-ui-handler"
  role          = aws_iam_role.swagger_ui_handler.arn

  filename         = data.archive_file.swagger_ui_handler.output_path
  source_code_hash = data.archive_file.swagger_ui_handler.output_base64sha256
  handler          = "app.handler"
  layers           = [aws_lambda_layer_version.swagger_ui_handler.arn]
  runtime          = "nodejs14.x"
}

data "archive_file" "swagger_ui_handler" {
  type        = "zip"
  source_file = "${path.module}/src/swagger-ui/app.js"
  output_path = "${path.module}/src/swagger-ui/app.zip"
}

resource "aws_lambda_layer_version" "swagger_ui_handler" {
  layer_name = "swagger-ui-commonLibs"

  filename            = "${path.module}/src/swagger-ui/build/commonLibs.zip"
  compatible_runtimes = ["nodejs14.x"]

  depends_on = [
    data.archive_file.commonLibs
  ]
}

resource "aws_iam_role" "swagger_ui_handler" {
  name = "swagger-ui-handler"

  assume_role_policy = jsonencode({
    Version = "2012-10-17"
    Statement = [
      {
        Action = "sts:AssumeRole"
        Effect = "Allow"
        Principal = {
          Service = "lambda.amazonaws.com"
        }
      },
    ]
  })
}

resource "aws_iam_role_policy_attachment" "swagger_ui_handler_cloudwatch_access" {
  role       = aws_iam_role.swagger_ui_handler.name
  policy_arn = "arn:aws:iam::aws:policy/service-role/AWSLambdaBasicExecutionRole"
}

resource "aws_iam_role_policy_attachment" "swagger_ui_handler_api_gateway_access" {
  role       = aws_iam_role.swagger_ui_handler.name
  policy_arn = "arn:aws:iam::aws:policy/AmazonAPIGatewayAdministrator"
}
As before we will have to give our API Gateway permission to trigger our Swagger UI Handler every time a request to /api-docs is made.
resource "aws_lambda_permission" "swagger_ui_handler" {
  function_name = aws_lambda_function.swagger_ui_handler.function_name

  action     = "lambda:InvokeFunction"
  principal  = "apigateway.amazonaws.com"
  source_arn = "${aws_api_gateway_rest_api.this.execution_arn}/*"
}
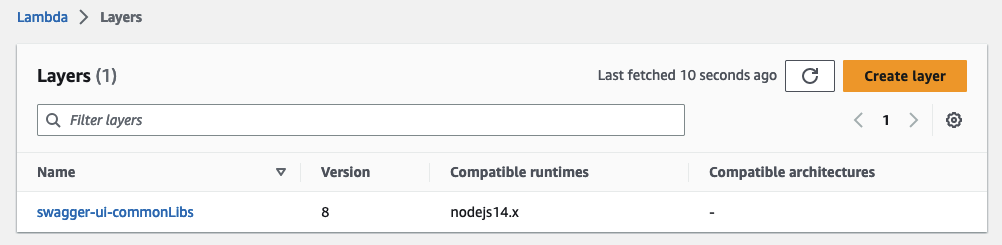
Run terraform apply to deploy the additional infrastructure. Once deployed, a new Lambda function and a new Lambda layer should have been created.
This is all good, but the function won’t be of much use to us on its own. We also have to implement the new resources in our API and add the integration request. We will do that next.
Add /api-docs to API Gateway
In order to access our Swagger UI documentation via /api-docs we first have to create /api-docs. We will accomplish this by adjusting our api-gateway-definition.yaml again. Please add the following snippet to the paths: section. The snippet below will add the resources /api-docs and /api-docs/{proxy+}. It also includes the API Gateway extensions necessary to create the integration request.
  /api-docs:
    get:
      responses: {}
      x-amazon-apigateway-integration:
        uri: "arn:aws:apigateway:eu-central-1:lambda:path/2015-03-31/functions/${swagger_ui_handler_arn}/invocations"
        httpMethod: "POST"
        passthroughBehavior: "when_no_match"
        timeoutInMillis: 29000
        type: "aws_proxy"
  /api-docs/{proxy+}:
    get:
      parameters:
      - name: "proxy"
        in: "path"
        required: true
        type: "string"
      responses: {}
      x-amazon-apigateway-integration:
        uri: "arn:aws:apigateway:eu-central-1:lambda:path/2015-03-31/functions/${swagger_ui_handler_arn}/invocations"
        httpMethod: "POST"
        passthroughBehavior: "when_no_match"
        timeoutInMillis: 29000
        type: "aws_proxy"
The last thing we need to do is to add a new entry to our templatefile() section in the aws_api_gateway_rest_api resource to replace the variable swagger_ui_handler_arn with the ARN of our Swagger UI Handler ARN.
resource "aws_api_gateway_rest_api" "this" {
  name        = "serverless-swagger-ui"
  description = "This is a test API Gateway to demonstrate the use of Swagger UI"

  body = templatefile("${path.module}/api-gateway-definition.yaml",
    {
      orders_handler_arn     = aws_lambda_function.orders_handler.arn
      swagger_ui_handler_arn = aws_lambda_function.swagger_ui_handler.arn
    }
  )

  endpoint_configuration {
    types = ["REGIONAL"]
  }
}
Run terraform apply to apply the changes. When checking in the API Gateway console you should see the new resources and integration requests.
Publish API
The final step of this example is to deploy our API into a stage. By creating a stage we will make the API publicly available and the endpoints reachable. The deployment can be done via the Console or via Terraform. Which method you choose is up to you.
Console Deployment
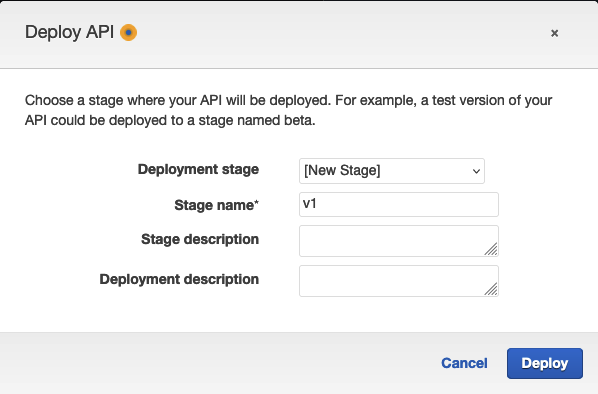
To Deploy the API via the Console click on Actions and Deploy API.

Now create a new stage and pick a suitable name. Click Deploy.
Terraform Deployment
To deploy our API and create a stage via Terraform use the code snippet below.
resource "aws_api_gateway_deployment" "this" {
  rest_api_id = aws_api_gateway_rest_api.this.id

  lifecycle {
    create_before_destroy = true
  }
}

resource "aws_api_gateway_stage" "this" {
  deployment_id = aws_api_gateway_deployment.this.id
  rest_api_id   = aws_api_gateway_rest_api.this.id
  stage_name    = "v1"
}
In order to comfortably retrieve the URL for our Swagger UI once everything has been deployed, we will add a Terraform output to the output.tf. Add the following snippet to the output.tf.
output "swagger_ui_endpoint" {
  description = "Endpoint Swagger UI can be reached over"
  value       = "https://${aws_api_gateway_rest_api.this.id}.execute-api.eu-central-1.amazonaws.com/v1/api-docs/"
}
Attention
Deploying an API using Terraform comes with a few quirks you should be aware of. Every time you make changes to your API you need to deploy those changes to a stage for them to come into effect. You can create a new stage or overwrite an existing stage. When using the Console this can be easily done. When using Terraform this process can be a bit tricky. To make a redeployment of our API we have to redeploy the Terraform resource aws_api_gateway_deployment. The problem is that Terraform will only redeploy resources if changes to resources are detected. But changing our API will not change the aws_api_gateway_deployment resource itself. In order to perform a redeployment you have to manually instruct Terraform to recreate the resource via the command terraform apply -replace=aws_api_gateway_deployment.this.
Result
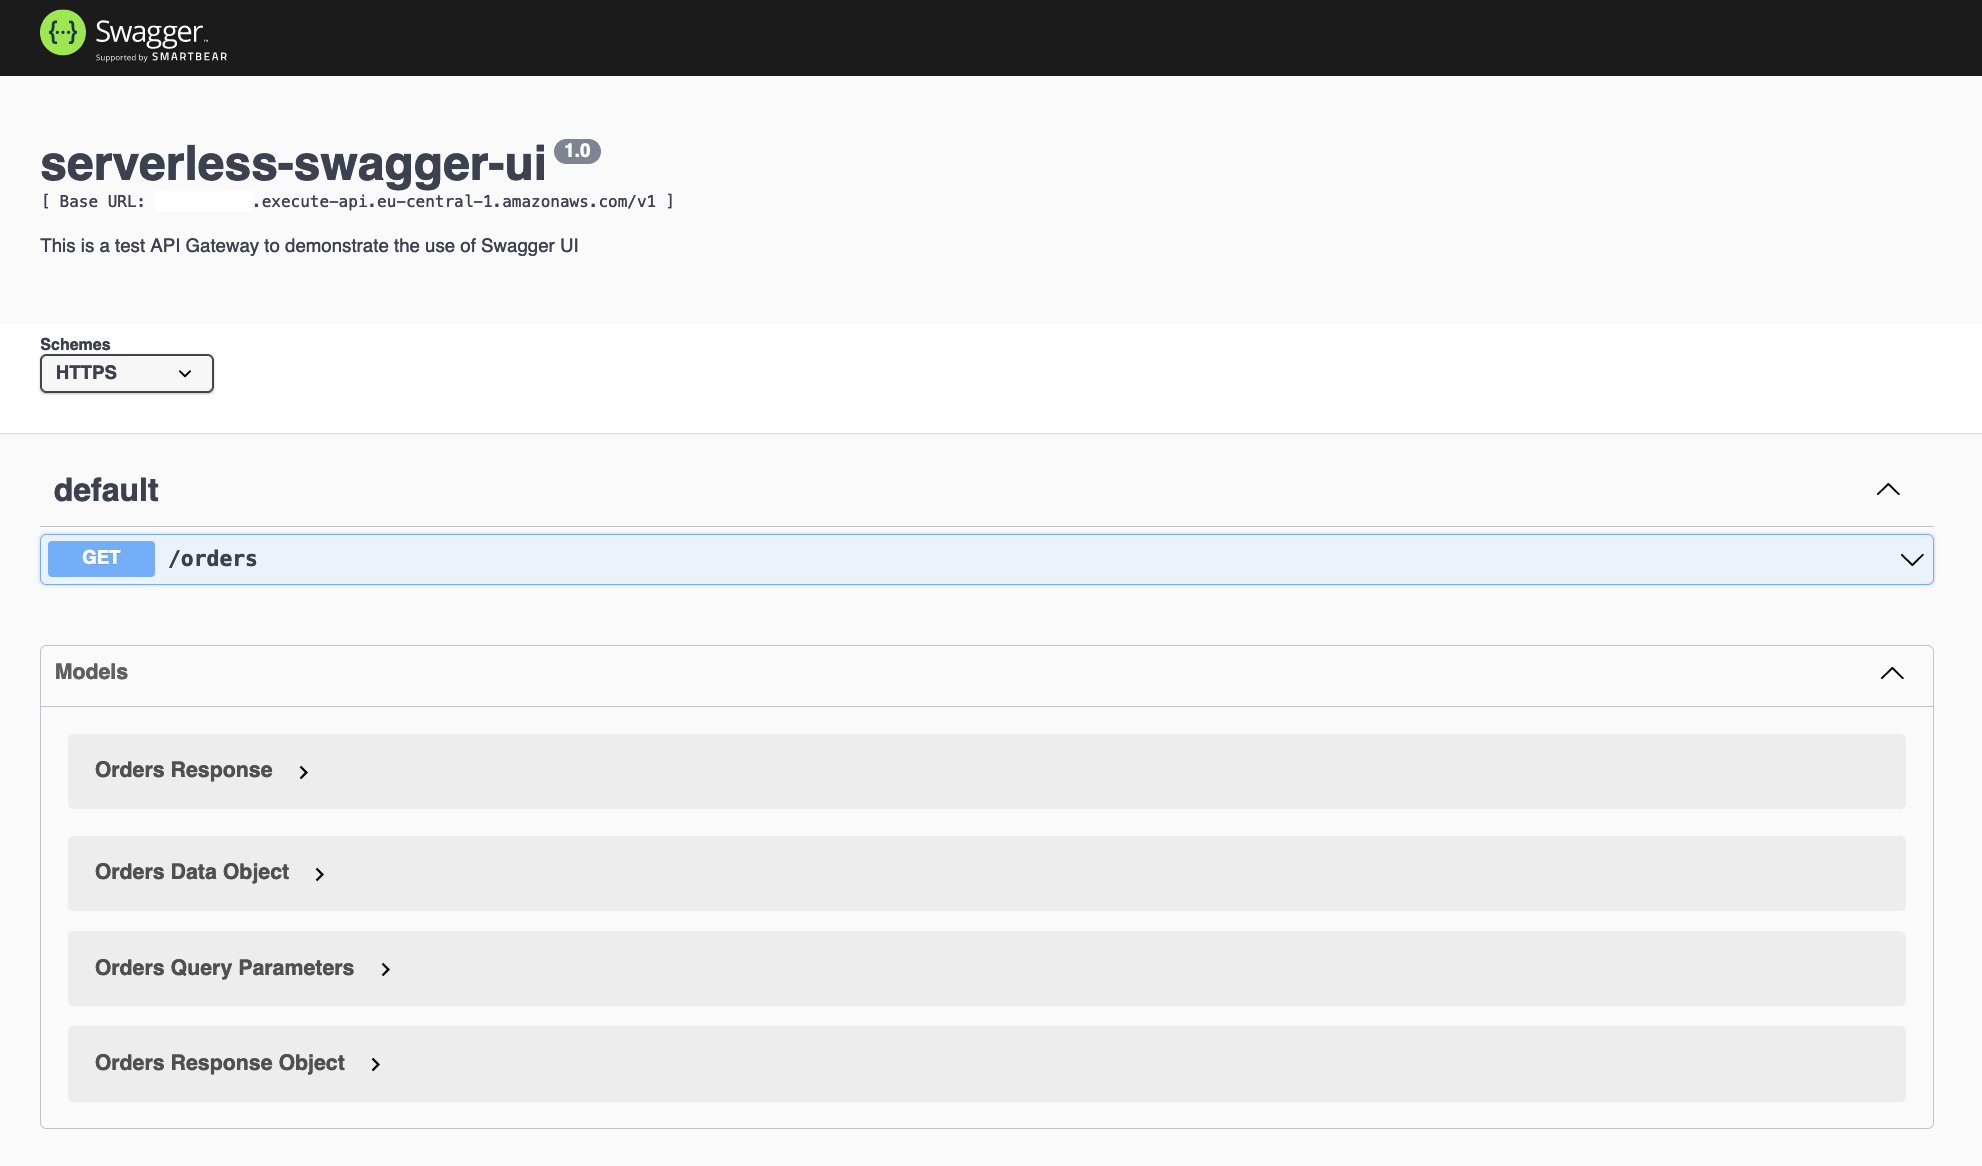
Once everything is deployed you should be able to access the Swagger UI via the URL which is displayed by the Terraform output. Congratulations, you just created a simple API including Swagger UI. Feel free to experiment with the API to get a better understanding of how everything works.
Summary
As you can see it is not that complicated to create an API via Amazon API Gateway nor to add interactive documentation using Swagger UI. Using this serverless approach will ensure that your documentation is always up to date and you won’t need extra resources to host or maintain it. Having Swagger UI in place when developing your API via API Gateway will allow you to focus more on the actual development process.
I hope you had fun and learned something new while working through this short example. I am looking forward to your feedback and questions. If you want to take a look at the complete example code please visit my Github.
— Hendrik
References
This solution was inspired by the AWS SAML repo aws-api-gateway-swagger-ui.