Automated ECS deployments using AWS CodePipeline
When developing applications, particularly in the realm of containerization, CI/CD workflows and pipelines play an important role in ensuring automated testing, security scanning, and seamless deployment. Leveraging a pipeline-based approach enables fast and secure shipping of new features by adhering to a standardized set of procedures and principles. Using the AWS cloud’s flexibility amplifies this process, facilitating even faster development cycles and dependable software delivery.
In this blog post, I aim to demonstrate how you can leverage AWS CodePipeline and Amazon ECS alongside Terraform to implement an automated CI/CD pipeline. This pipeline efficiently handles the building, testing, and deployment of containerized applications, streamlining your development and delivery processes.
Architecture
To begin, let’s delve into the architecture we intend to deploy for this example. The diagram below provides a high-level overview of the setup we aim to simulate. Our primary objective here is to establish a CI/CD pipeline utilizing AWS CodePipeline. This pipeline will automate the processes of building, testing, and deploying Docker images to an ECS cluster hosted within the AWS Cloud.
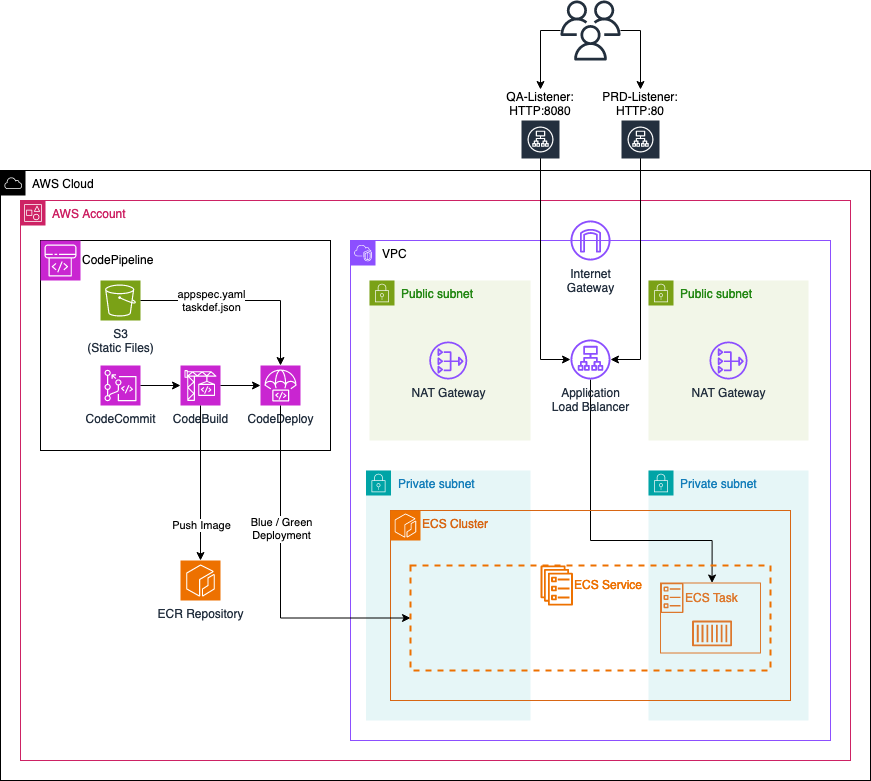
We’ll configure a VPC with two private and two public subnets. Our ECS cluster will reside in the private subnets, while each public subnet will host a NAT gateway. These gateways will enable ECS tasks to communicate with AWS services or the public Internet.
Next, we’ll implement an ECS service with a single ECS task initially running a simple Apache web server. This ECS task will be made accessible through an Application Load Balancer (ALB). The ALB will have two Target Groups and two Listeners:
-
PRD-Listener: Listens on port HTTP:80 for normal production traffic. It forwards this traffic to the
primaryTarget Group, directing it towards the ECS task currently running. -
QA-Listener: Listens on port HTTP:8080 for test traffic (used for Blue/Green deployment). This traffic is forwarded to the
secondaryTarget Group, which initially won’t contain any ECS tasks.
For automated deployments of new application versions, we’ll utilize AWS CodePipeline. This pipeline will include:
-
CodeCommit Repository: Used by developers for application development, including a Dockerfile.
-
S3 Bucket: Contains two static files, appspec.yaml and taskdef.json, required by the CodeDeploy step for Blue/Green deployment.
-
CodeBuild Step: Utilizes the provided Dockerfile to build a new Docker image of the application. This image is then pushed to an Amazon ECR repository.
-
CodeDeploy Step: Utilizes the static files along with the new Docker image from the ECR repository to perform a Blue/Green deployment.
This setup enables automated building, testing, and deploying of Docker images to the ECS cluster, streamlining the development and deployment processes.
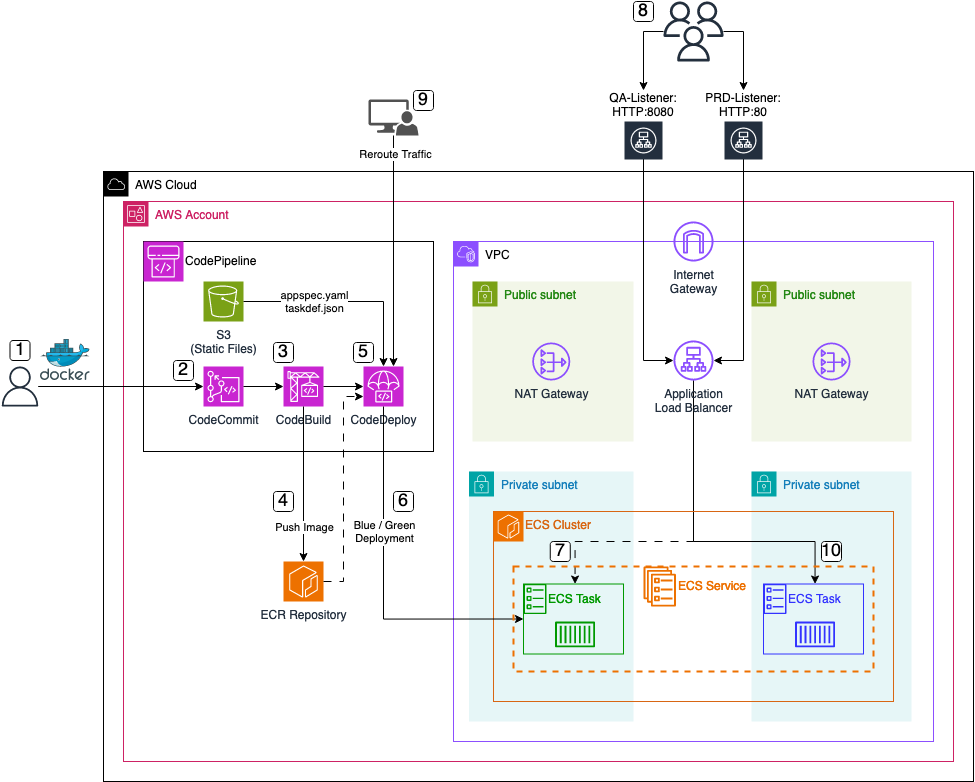
Pipeline Workflow
Now, let’s delve into the overarching workflow when employing the ECS pipeline to deploy new application versions.
-
Application Preparation: The process kicks off with the creation of a
Dockerfilealong with all necessary application files. -
CodeCommit Repository Update: Upon completion of the new application version, developers push the code and files into the AWS CodeCommit repository. This action serves as the trigger for the AWS CodePipeline execution.
-
Build Stage Execution: Following the trigger, the CodeBuild step initiates the building of a new
Dockerimage using the committed Dockerfile. -
Image Storage in ECR: Once the image is built, it is pushed into an AWS ECR repository for future utilization.
-
CodeDeploy Step Initiation: Subsequently, the CodeDeploy step starts, utilizing the newly build Docker image from the ECR repository along with two essential static files, namely
appspec.yamlandtaskdef.json, retrieved from the S3 bucket. -
Blue/Green Deployment Initialization: Facilitated by the CodeDeploy step, a Blue/Green deployment is initiated. This entails launching a new task within the ECS Service, using the freshly generated Docker image as its foundation.
-
Task Registration in Secondary Target Group: Upon task launch, it is registered within the previously mentioned
secondaryTarget Group of the Application Load Balancer (ALB). This configuration enables test traffic from theQA-ListeneronHTTP:8080to be directed to the new application version. -
Testing Phase: With the task successfully registered, users, developers, or administrators gain access to the new application version via the
QA-ListeneronHTTP:8080. This facilitates comprehensive testing of the new version and its features before transitioning to production. -
Traffic Rerouting: Upon successful testing, administrators trigger traffic rerouting within the CodeDeploy step. This action adjusts the rules of the
PRD-Listener, redirecting traffic to the currentsecondaryTarget Group. Consequently, thesecondaryTarget Group assumes the role of the newprimaryTarget Group, allowing users to access the new application version via thePRD-ListeneronHTTP:80. The previous application version becomes inaccessible at this point. -
Finalization of Deployment: To conclude the deployment process, the old application task is terminated, ensuring a seamless transition to the new version.
Bootstrap Environment
The code associated with this blog post is hosted on GitHub. Feel free to either clone the repository or manually copy the code to your local machine. Within the provided directory, you’ll find the complete Terraform configuration for the ECS CI/CD pipeline.
There are no adjustments to be made at this moment. Execute terraform init to initialize the Terraform providers, and then use terraform apply to deploy the infrastructure. Once the entire infrastructure has been successfully deployed, we will proceed to analyze the the newly created CI/CD pipeline as well as the ECS cluster.
Please be aware that the attribute force_destroy has been set on all S3 Buckets for easier deletion of the infrastructure. It is advised to remove this attribute if the infrastructure is used as part of a production workload.
Test Web Server
To verify the functionality of our web server and ensure the proper operation of our infrastructure, we will proceed by opening a web browser and navigating to the URL provided in the Terraform output, labeled webserver_url. This URL corresponds to the DNS name of our Application Load Balancer. Upon accessing this URL, a basic web page should be visible.
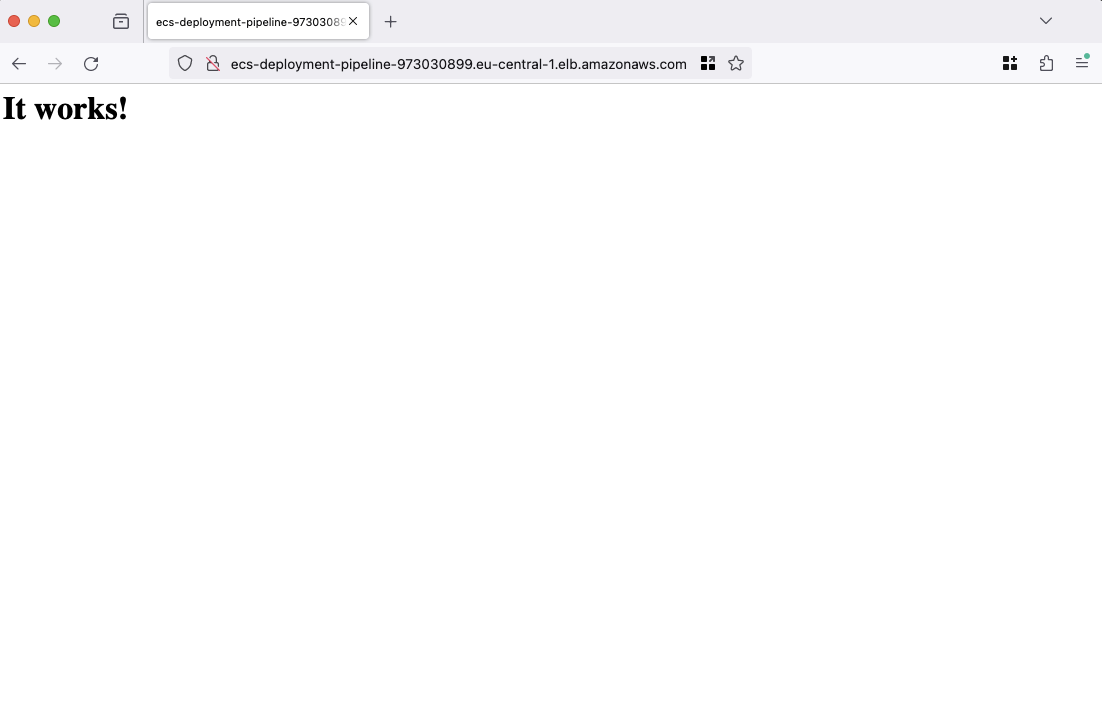
Once the webpage loads successfully, it indicates that our ECS cluster is operational and functioning as expected. With this confirmation, we will proceed to utilize our CI/CD pipeline to initiate the building and deployment of a new version of our web server.
Build and Deploy new Web Server version
Clone Repository
We will now utilize our CodePipeline to facilitate the building and deployment of a new version of our web server. Begin by cloning the CodeCommit repository that was created as part of this demonstration. You can utilize either the Terraform output codecommit_clone_url_http or codecommit_clone_url_ssh to clone the repository.
Customize Web Server
Once the repository has been successfully cloned, proceed by transferring the files and directories located within the codecommit-files directory into the newly cloned repository. At this stage, your CodeCommit repository should contain the Dockerfile alongside the src folder.
FROM httpd:2.4.58
COPY ./src/ /usr/local/apache2/htdocs/
The provided Dockerfile is configured to utilize an httpd image as its base, subsequently copying the contents of the src directory into the apache htdocs folder. Within the src directory resides the updated version of our web server, comprising an index.html, ccs styles, and icons. You have the liberty to modify the index.html file to align with your requirements, including adjusting links and names as per your preferences.
<!DOCTYPE html>
<html lang="en">
  <head>
    <meta charset="UTF-8" />
    <meta name="viewport" content="width=device-width, initial-scale=1.0" />
    <title>Hendrik.dev</title>
    <link rel="icon" href="icons/favicon.ico" />
    <link rel="stylesheet" href="icons/font-awesome/css/all.css" />
    <link rel="stylesheet" href="styles/main.css" />
  </head>
  <body>
    <div class="content-wrapper">
      <h1>Hi, I'm Hendrik</h1>
      <p>
        Cloud Consultant <span class="divider"> | </span> AWS Ambassador
        <span class="divider"> | </span> Blogger
      </p>
      <a href="https://github.com/Eraszz">
        <i class="icon fab fa-github fa-2x"></i>
      </a>
      <a href="https://www.tecracer.com/blog/authors/hendrik-hagen.html">
        <i class="icon fas fa-book fa-2x"></i>
      </a>

    </div>
  </body>
</html>
Deploy new Web Server
After making necessary adjustments, proceed to commit and push the files and folders in your CodeCommit repository. This action will trigger the CodePipeline, initiating the deployment process.
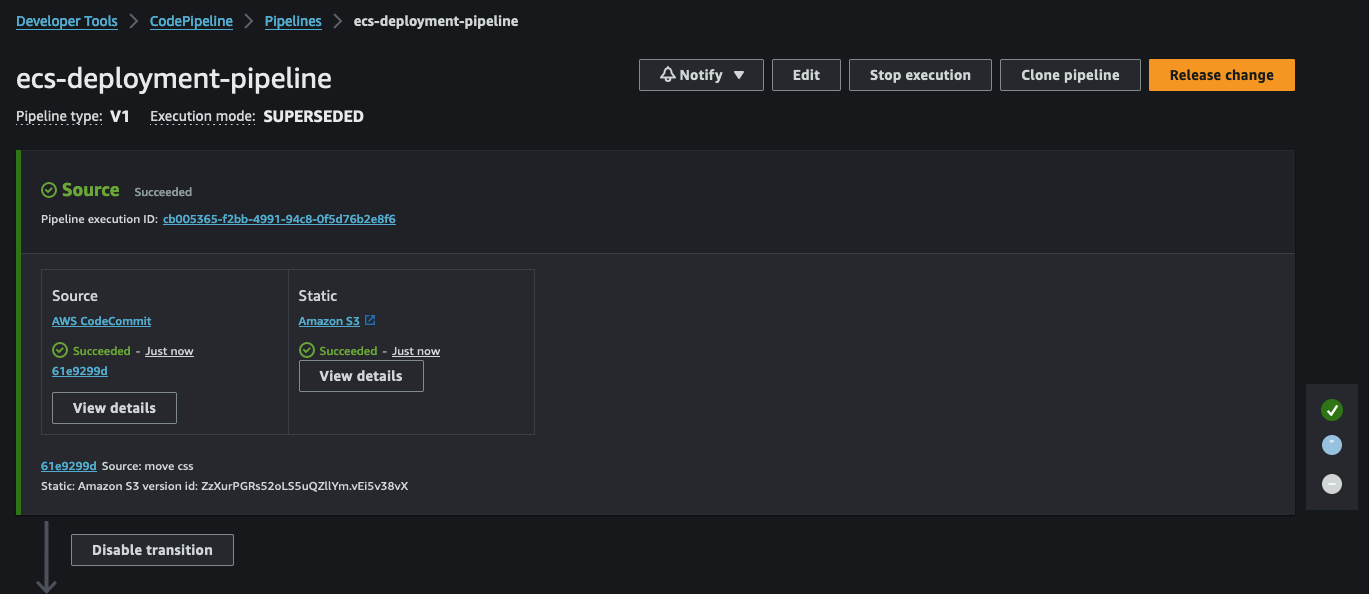
Following the Source stage, CodeBuild will start. This step involves building a new Docker image based on our Dockerfile.

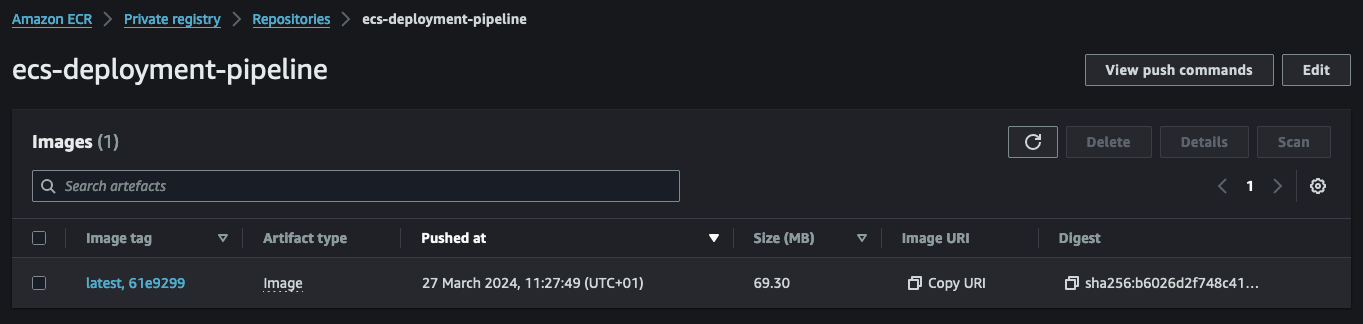
Once the image is built, it will be pushed to our ECR repository. The image will receive a tag based on the commit hash and the latest tag if it’s the newest image.
Upon successful completion of the CodeBuild step, CodePipeline will initiate CodeDeploy. CodeDeploy will utilize the new image along with the static files, appspec.yaml and taskdef.json, to create a new deployment.
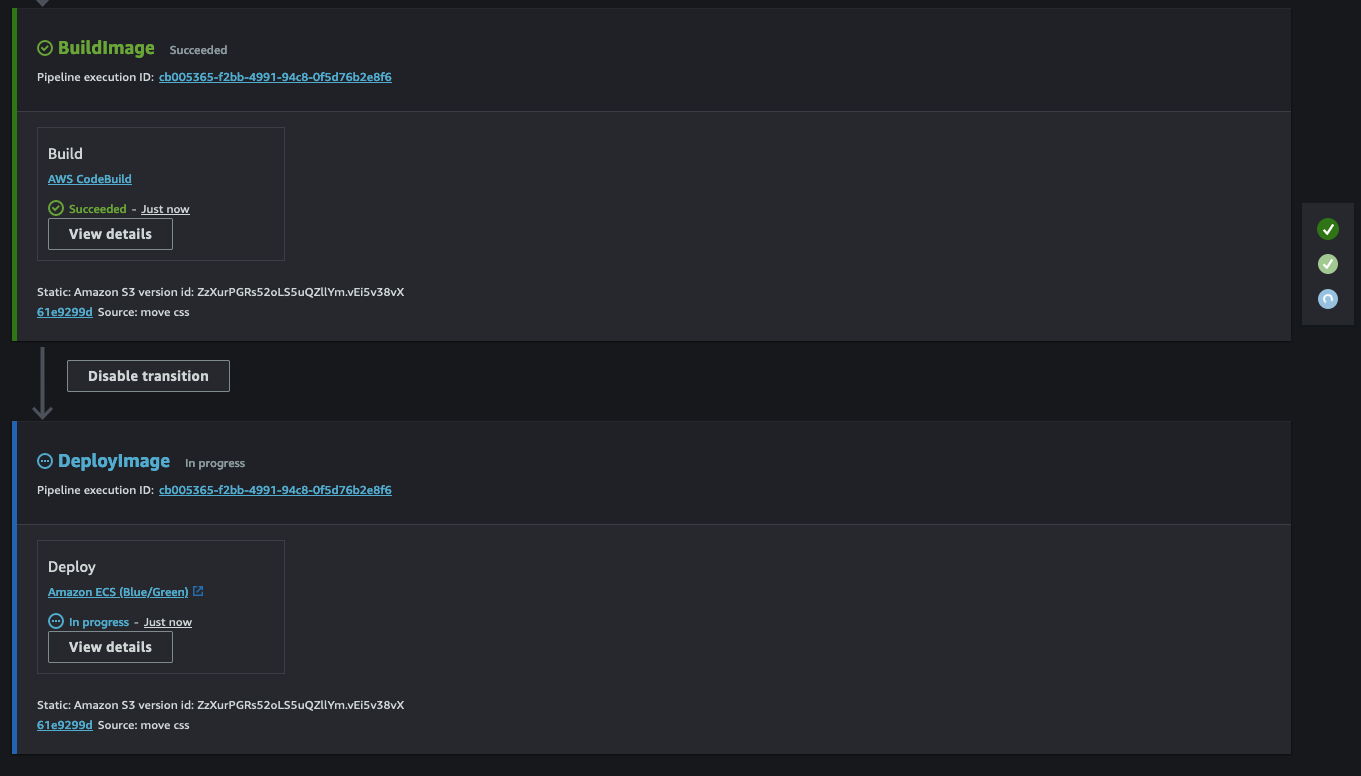
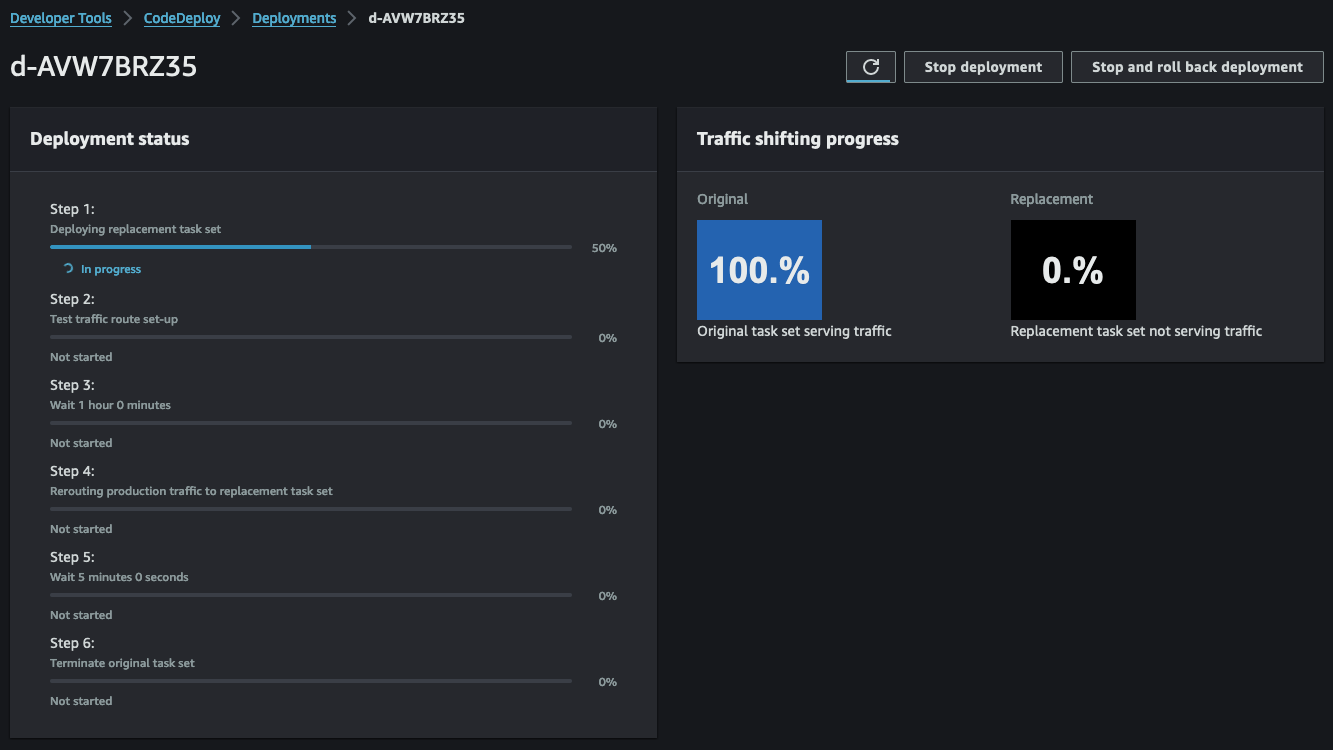
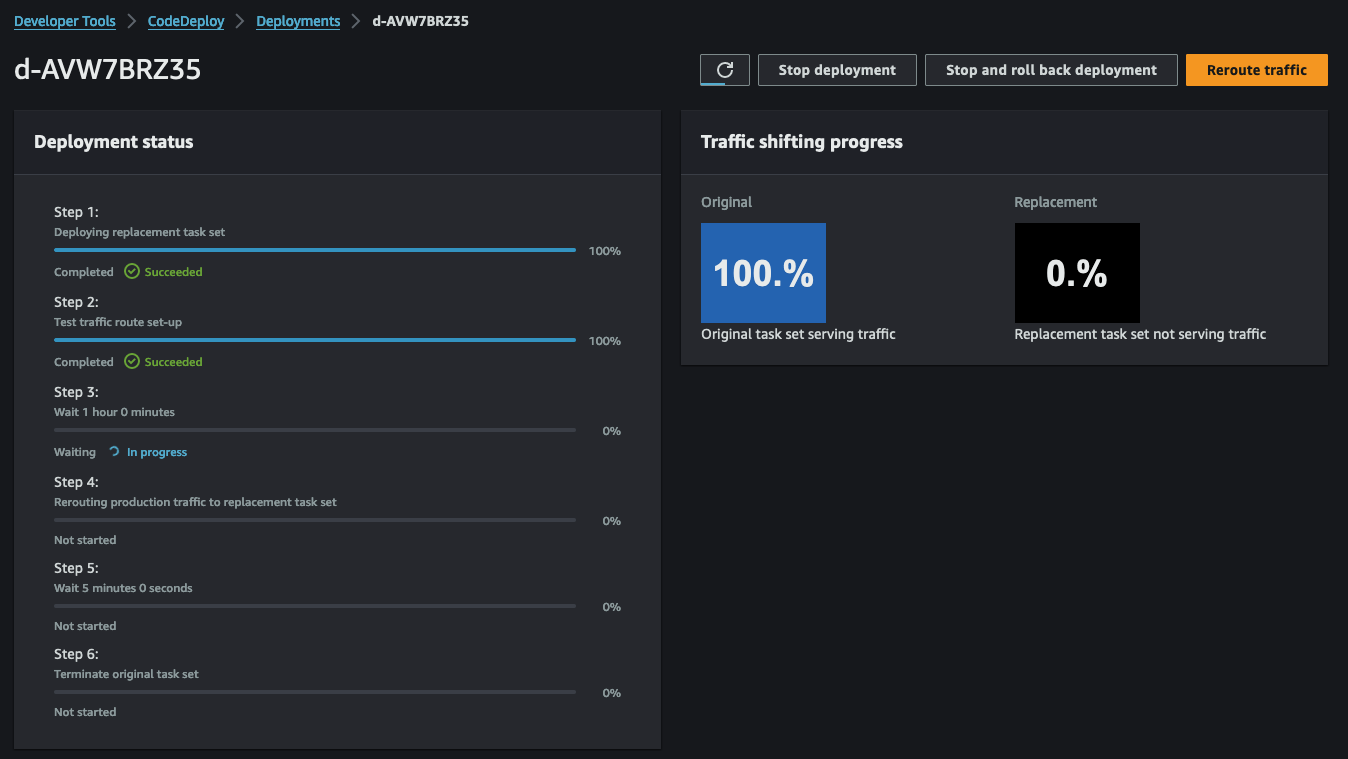
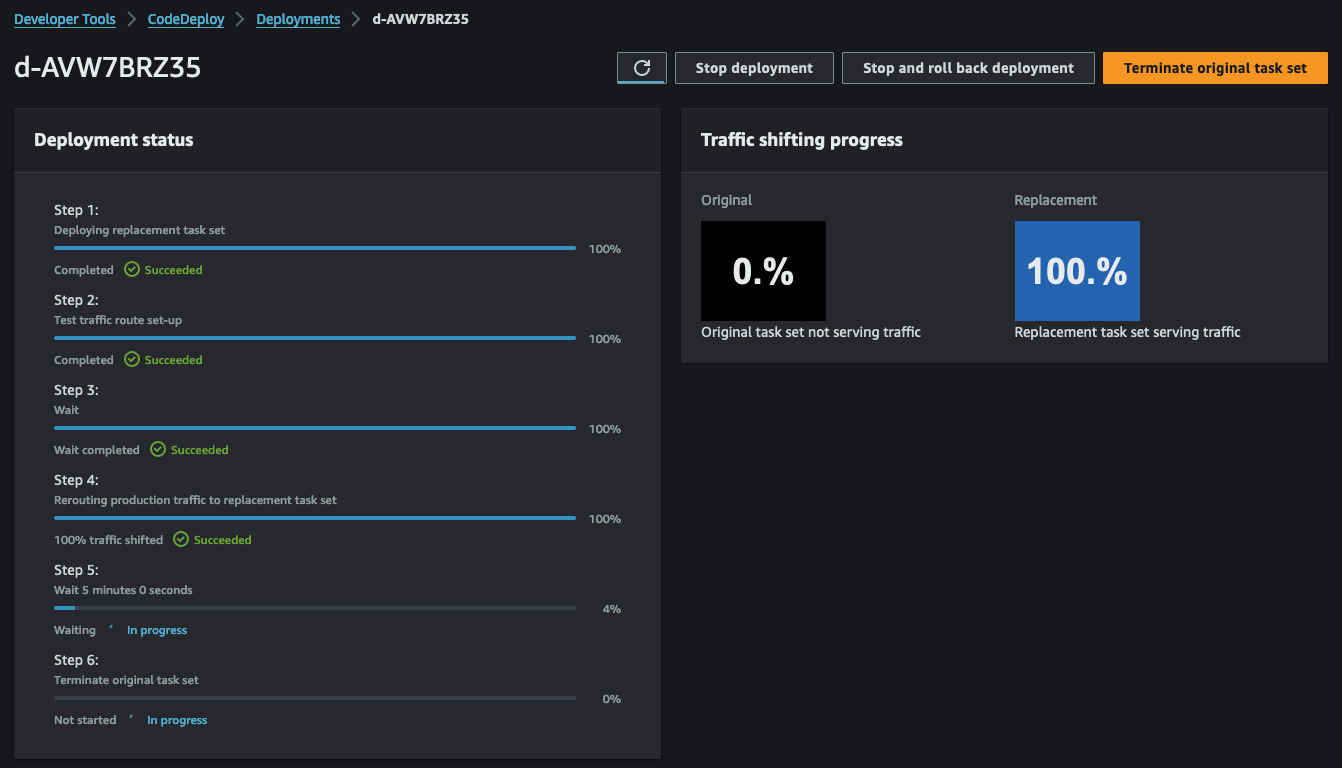
CodeDeploy is made up of multiple steps. The initial step involves starting the Blue/Green deployment and deploying a new task set within the ECS service.
With step 1 completed, our ECS service will now host two tasks - the old version of the web server and the new version based on our Dockerfile.
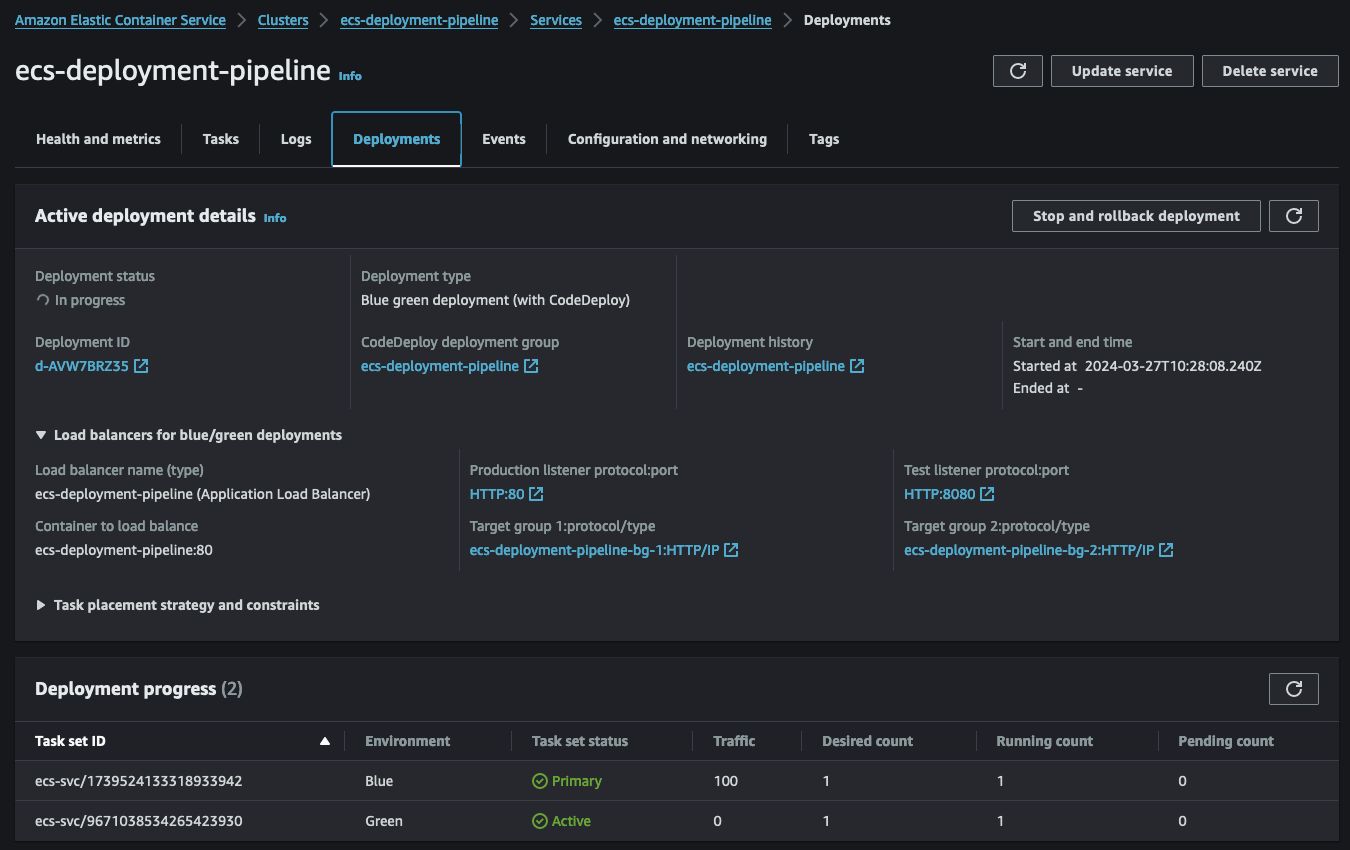
Subsequently, step 2 of CodeDeploy allows us to test the new version of our web server before transitioning to production. To conduct this test, we set up a second listener, QA-Listener, listening on HTTP:8080.
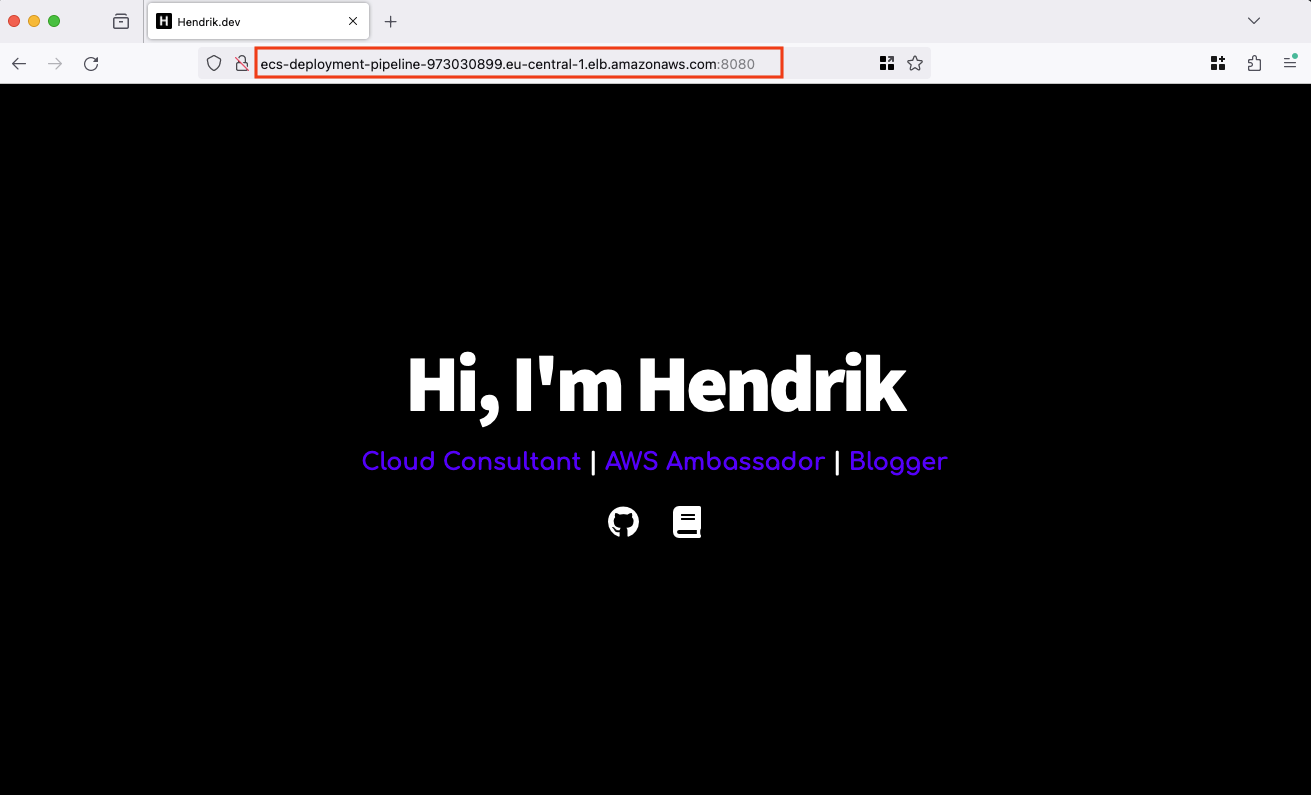
Open a web browser and access the URL displayed in the Terraform output webserver_url_qa. Depending on the adjustments made to the index.html, you should see the following web page.
Upon satisfactory testing, proceed to switch the traffic from QA to Production. This action replaces the old version with the new version. After completion, the new version will be accessible using the Terraform output webserver_url. Click the button Reroute traffic in the upper left corner of the CodeDeploy console.
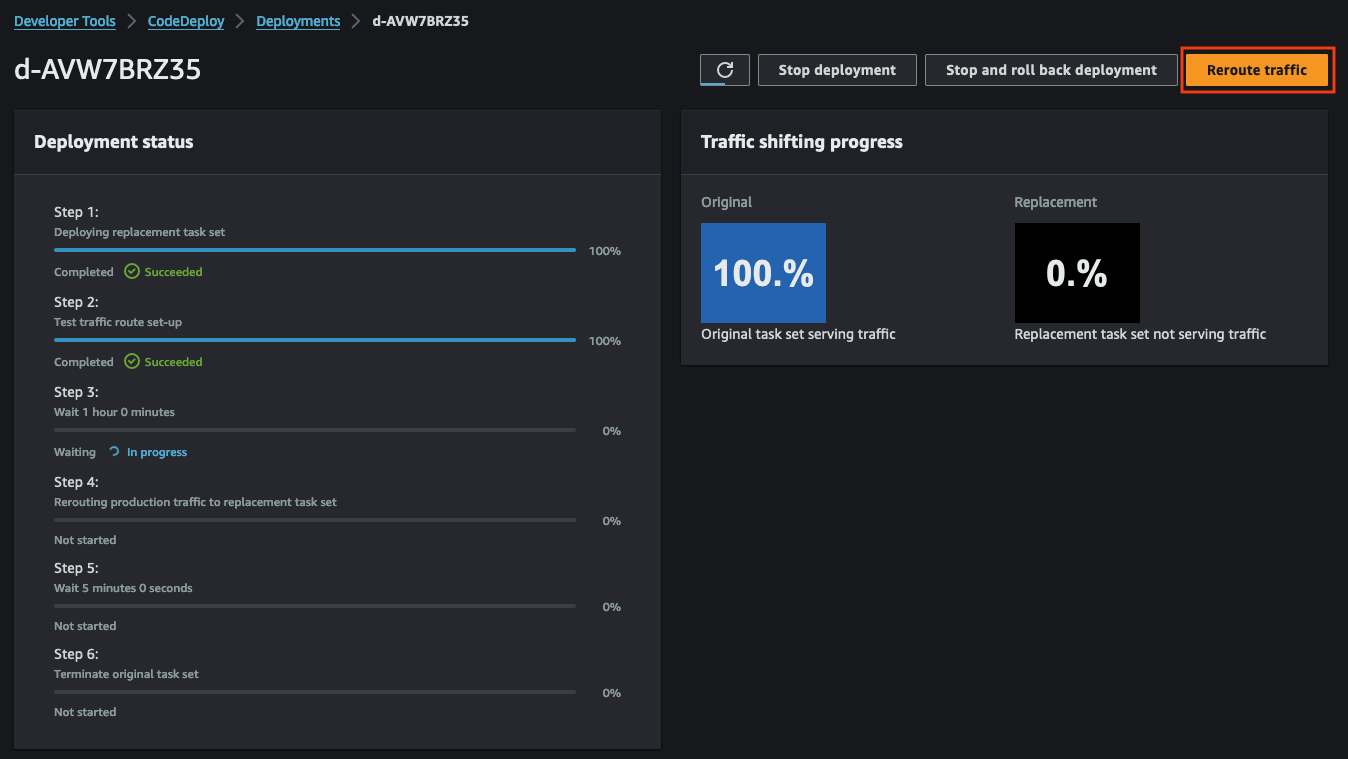
For this demonstration, we’ve opted for the reroute option ECSAllAtOnce, directing all traffic immediately. Alternatively, you can select other options for a more gradual transition.
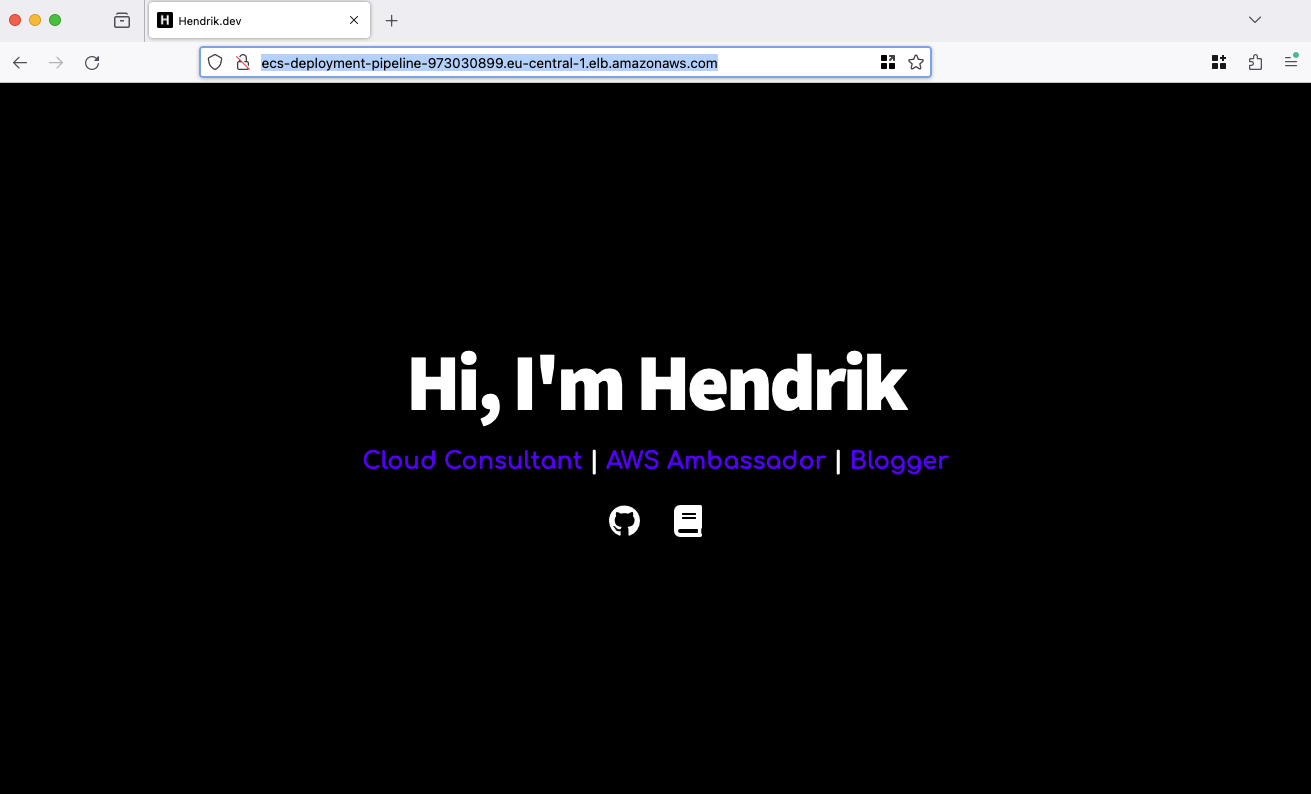
Once traffic is rerouted, the new version of the web server will be accessible via the production URL provided in the Terraform output webserver_url.
The final steps of CodeDeploy involve cleaning up the original web server. Our deployment configuration ensures the original web server task remains active for an additional 5 minutes before termination. This buffer allows for a rollback in case of unexpected issues.
After the 5-minute grace period, CodeDeploy will terminate the task, concluding the deployment process.
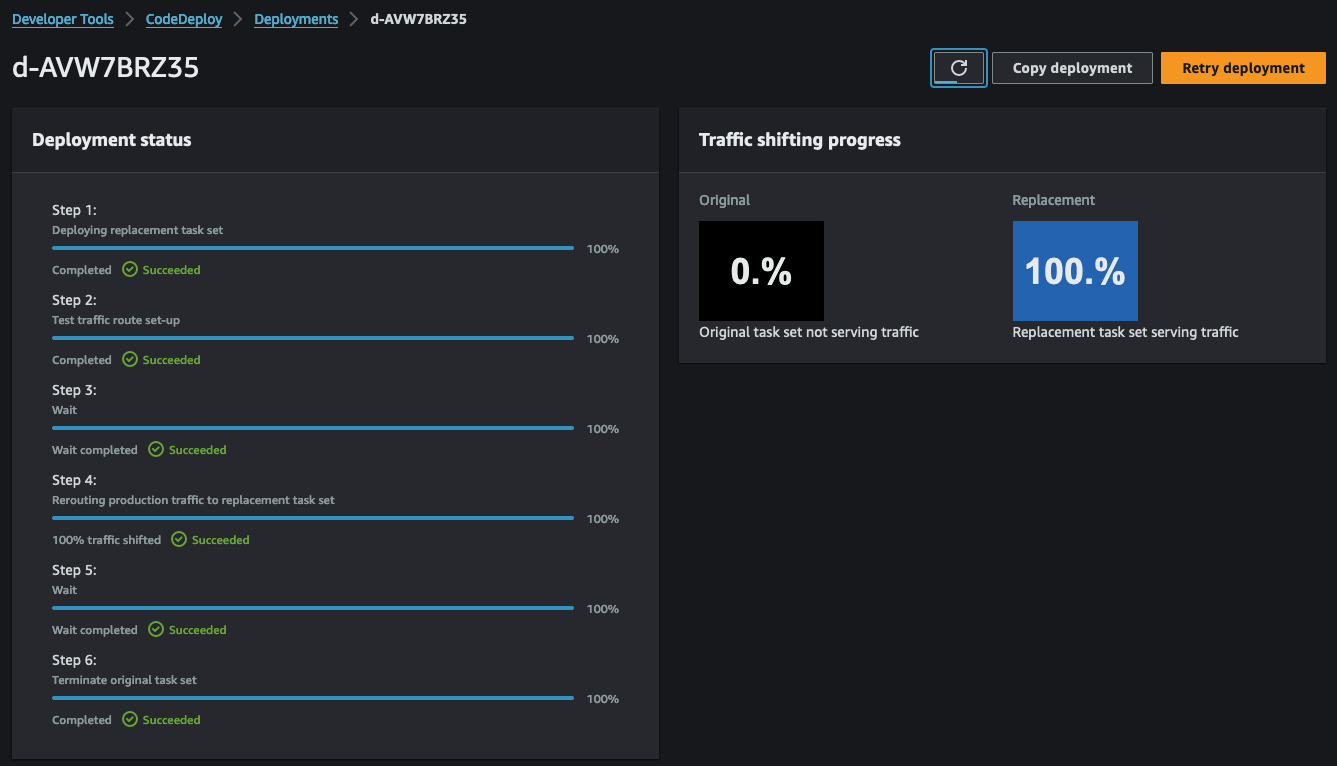
Congratulations! You just build and tested a CI/CD pipeline for ECS.
Summary
The architecture we’ve just implemented serves as a foundational example, open to optimization for enhanced robustness and efficiency. Transitioning from HTTP to HTTPS would be an important enhancement. Additionally, integrating Docker caching via ECR presents an opportunity to speed up the build process of new Docker images. An insightful offical blog post by AWS sheds some light on how an implementation could look like.
I hope you had fun and learned something new while working through this example. I am looking forward to your feedback and questions. If you want to take a look at the complete example code please visit my Github.
— Hendrik
Title Photo by Frank Mckenna on Unsplash