Build Terraform CI/CD Pipelines using AWS CodePipeline
When deciding which Infrastructure as Code tool to use for deploying resources in AWS, Terraform is often a favored choice and should therefore be a staple in every DevOps Engineer’s toolbox. While Terraform can increase your team’s performance quite significantly even when used locally, embedding your Terraform workflow in a CI/CD pipeline can boost your organization’s efficiency and deployment reliability even more. By adding automated validation tests, linting as well as security and compliance checks you additionally ensure that your infrastructure adheres to your company’s standards and guidelines.
In this blog post, I would like to show you how you can leverage the AWS Code Services CodeCommit, CodeBuild, and CodePipeline in combination with Terraform to build a fully-managed CI/CD pipeline for Terraform.
Introduction
When deploying infrastructure in AWS, Infrastructure as Code (IaC) is the de-facto standard. Even though there are many different IaC tools to choose from, they all have one common goal - faster and more consistent infrastructure deployments by leveraging code and eliminating manual processes. One tool that is regularly employed is Terraform. Created by HashiCorp as an open-source IaC solution, it has become one of the most popular DevOps tools today. Thanks to its large and active community as well as its extensible provider architecture, Terraform offers a rich and expanding ecosystem.
Teams that start to integrate Terraform into their workflow usually start out by using their local CLI to deploy AWS resources. Commands like terraform plan, terraform apply, and terraform destroy should be familiar to everyone who has been using Terraform for some time. While using your local machine to execute Terraform CLI commands is a valid approach when first starting out and getting some experience, it prevents you from unlocking Terraform’s full potential.
Like with any other programming language, IaC tools allow you to leverage to full benefits of CI/CD workflows for your infrastructure deployments. Switching from manual infrastructure orchestration via local CLI command to automated CI/CD pipelines should therefore be the goal of every team that wishes to use Terraform more efficiently. Automated pipelines allow for more efficient team collaboration, reliable infrastructure reviews and tests as well as more consistent resource deployments. Therefore, changes can be shipped more quickly and reliably while ensuring that company security standards and compliance policies are met.
Choosing a CI/CD tool for your automated Terraform deployments can be a daunting task. Like with IaC tools, there are many options to choose from. Jenkins, GitLab, GitHub, and CircleCI to just name a few. I myself wrote a blog series focused on using Jenkins on AWS as a CI/CD tool for Terraform deployments. While most of these third-party tools are valid solutions, they come with a maintenance overhead and do not always offer the best AWS integration possible. Especially when the major of workloads running on AWS, choosing managed AWS services instead of self-managed solutions provides multiple benefits in terms of permission management, service integration, scalability, and durability.
One solution that is able to meet the requirements and is often overlooked when talking about CI/CD pipelines is the use of AWS code services. Consisting of AWS CodeCommit, CodeBuild, CodeDeploy, and CodePipeline, AWS code services offer a fully-managed and fully-integrated AWS experience when setting up your automation workflows. They are highly flexible, reliable, and scalable and eliminate the need to set up, update and manage your build and deployment environments.
In the blog post, I would like to show you how you can leverage AWS code services in combination with Terraform to build a fully-managed, scalable, and highly available CI/CD pipeline for your infrastructure deployments.
Architecture
First, I would like to guide you through the infrastructure that we will set up as part of this blog post. The diagram below displays the target architecture that we will build and deploy.

We will deploy an AWS CodePipeline consisting of multiple stages. The pipeline itself will consist of CodeCommit, CodeBuild, and Approval stages. AWS CodBuild will use a custom Docker image we will create and store in an AWS ECR. To propagate artifacts between stages, we will set up an S3 Bucket.
The first stage will be the Source stage. The source stage is the entry point for every CodePipeline and the first stage of every pipeline needs to contain at least one source action. In our example, we will use the AWS native source control repository CodeCommit. As we will build a CI/CD pipeline for Terraform, we will use CodeCommit as the entry point to our automation workflow and to store the Terraform configuration we want to deploy via the pipeline.
The second stage is the Validation stage. The validation stage will be used to validate our Terraform configuration and to run automated security and compliance checks. By running these checks at the start of the workflow, we follow the ‘fail fast’ philosophy and ensure that mistakes and compliance breaches are detected as soon as possible. This allows us to quickly intervene and make the necessary adjustment.
The third stage is the Terraform Plan stage. After having successfully passed the Validation stage, our pipeline will perform a terraform plan in order to compare our Terraform configuration with the existing AWS infrastructure and to evaluate the changes Terraform intends to make. We will store the plan output in a Terraform-specific binary file in our S3 artifact bucket. By capturing all changes in a binary artifact, we are able to reliably propagate the Terraform plan between stages. This ensures that only the changes that were reviewed are applied later. Adjustments that were introduced at a later stage and that aren’t part of the binary file, are ignored.
The fourth stage is the Manual Approval stage. After having generated a Terraform plan output and before applying the changes, we will implement an approval step. This step will guarantee, that our Terraform plan has been reviewed before the deployment. We will leverage AWS SNS to send notifications to the reviewer once this stage has been reached.
The fifth stage is the Terraform Apply stage. Once the Terraform plan output has been reviewed and approved, we will run terraform apply to deploy out Terraform configuration. The previously created plan binary will be used to ensure that only the reviewed changes are applied.
The sixth and seventh stage, Manual Approval and Terraform Destroy, are optional stages and are used in this example to provide a comfortable way to clean up the infrastructure after the Terraform deployment. The second Manual Approval stage will be used to approve the destruction of the infrastructure, while the Terraform Destroy stage is used to run the terraform destroy command. Afterward, the previously created resources will be gone.
Workflow
After having discussed the overarching architecture, I would like to take a look at the Terraform deployment workflow in a bit more detail. The workflow can be seen in the picture below.
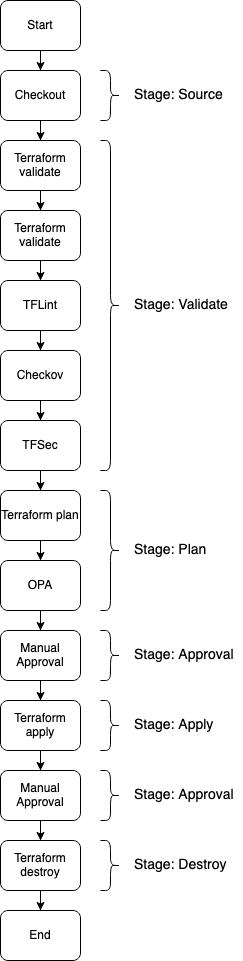
As you can see, the workflow consists of multiple steps that match the CodePipeline architecture already discussed above. The stages Source, Approval, Apply as well as Destroy are relatively straightforward as they only contain a single action. Therefore, I won’t explain these stages any further. The two stages I would like to focus on in this section are the Validate and Plan stage.
The Validation stage contains multiple steps that are all part of the validation workflow and are executed sequentially. The first action is the execution of the Terraform native validation command terraform validate. Validate runs checks that verify whether a Terraform configuration is syntactically correct and internally consistent.
After the Terraform validation, we will execute TFLint. TFLint is a linter for Terraform that allows us to analyze our Terraform configuration for possible errors and to enforce best practices and stylistic conventions. By using a linter we ensure consistent code quality and adherence to coding guidelines within our development team.
Next, we will run Checkov. Checkov is a static code analysis tool for infrastructure as code and helps us detect security and compliance misconfigurations before our Terraform code is deployed. It offers a wide range of built-in policies that cover AWS security and compliance best practices. By using a static analysis tool like Checkov at the beginning of our CI/CD workflow, we ensure that security risks and compliance breaches are detected and remediated as soon as possible.
At last, we will execute a TFSec scan of our Terraform configuration. TFSec is a static code analysis tool for Terraform and is similar to Checkov. It focuses on detecting security issues and risks in our code before changes take effect. In combination with Checkov, TFSec ensure that all possible infrastructure weaknesses are analyzed and remediated before our configuration is deployed.
The next stage I would like to look at is the Plan stage. Similar to the Validation stage, the Plan stage consists of multiple steps. The first step is the execution of terraform plan and the creation of the binary plan file already discussed above. The second step uses OPA to enforce policies across our Terraform Code. OPA, or Open Policy Agent, is a Policy as Code tool that allows automated and unified policy enforcement as well as security and compliance validation across a company’s technology stack. By expressing policies and guardrails as code, testing, sharing, and enforcement becomes possible at nearly any scale. Reduction of human error and a higher level of overall security and compliance are the end result. We will use OPA in our example to enforce IaC policies across our Terraform configuration to ensure that only approved changes can be applied and approved resources can be deployed.
Please be aware that this blog post won’t go into much detail regarding OPA. If you are looking for a more detailed overview of the possibilities of OPA in combination with Terraform, please read the following blog post Open Policy Agent for Terraform. You can also visit the official website to get a deeper understanding of OPA functionality.
Project Structure
Before we start setting up our Terraform configuration, I would like you to create the project structure. Please create the following files and folders.
├── docker
│   └── Dockerfile
├── state-storage.tf
├── codebuild.tf
├── codecommit.tf
├── codepipeline.tf
├── ecr.tf
├── kms.tf
├── s3.tf
├── sns.tf
├── outputs.tf
├── terraform.tfvars
└── variables.tf
As this example will be quite extensive, we will split up our Terraform configuration into separate files. The name of each file corresponds to the AWS service which configuration is contained within.
Create Custom CodeBuild Image
When working with CodeBuild, you can choose between AWS-provided Docker images or provide your own custom image. While AWS-managed Docker images are useful for generic use cases, custom images offer the benefit of tailored build environments. To start this example, we will create our own Docker image for CodeBuild which will include all the necessary tools like Terraform, OPA, Checkov, TFSec, and TFLint. By creating a custom image we decrease our CodeBuild start-up time by avoiding the tool download and installation process. Copy the following snippet into the Dockerfile you just created.
FROM --platform=linux/amd64 public.ecr.aws/ubuntu/ubuntu:22.04

USER root

RUN \
# Update
apt-get update -y && \
# Install Unzip
apt-get install unzip -y && \
# need wget
apt-get install wget -y && \
# vim
apt-get install vim -y && \
# git
apt-get install git -y && \
# curl
apt-get -y install curl && \
## jq
apt-get -y install jq && \
# python3
apt-get install python3 -y && \
# python3-pip
apt-get install python3-pip -y

# update python3
RUN python3 -m pip install --upgrade pip

# install terraform 1.4.4
RUN wget https://releases.hashicorp.com/terraform/1.4.4/terraform_1.4.4_linux_amd64.zip
RUN unzip terraform_1.4.4_linux_amd64.zip
RUN mv terraform /usr/local/bin/

# install TFLINT
RUN curl -L "$(curl -s https://api.github.com/repos/terraform-linters/tflint/releases/latest | grep -o -E -m 1 "https://.+?_linux_amd64.zip")" > tflint.zip && \
unzip tflint.zip && \
rm tflint.zip
RUN mv tflint /usr/bin/

# install checkov
RUN pip3 install --no-cache-dir checkov

# install TFSEC
RUN curl -L "$(curl -s https://api.github.com/repos/aquasecurity/tfsec/releases/latest | grep -o -E -m 1 "https://.+?tfsec-linux-amd64")" > tfsec && \
chmod +x tfsec
RUN mv tfsec /usr/bin/

# install OPA
RUN curl -L -o opa https://openpolicyagent.org/downloads/v0.52.0/opa_linux_amd64_static
RUN chmod 755 ./opa
RUN mv opa /usr/bin/
The Docker image will be based on the AWS Ubuntu 22.04 image public.ecr.aws/ubuntu/ubuntu:22.04. We will download a few helper tools like curl, git, and jq before installing all the necessary tools mentioned in the Workflow section. For this demo, we will use Terraform version 1.4.4. Feel free to download and use a different version.
Execute docker build -t codebuild-image . in the docker folder to build the custom CodeBuild image. The flag -t is used to tag the image codebuild-image.
To make sure that CodeBuild has access to our newly created Docker images, we have to upload them to a container repository. Feel free to use your personal Docker Hub. For this example, we will use the AWS native container registry ECR to store our Docker images. We will create ECR with Terraform. Please copy the following snippet into the ecr.tf
resource "aws_ecr_repository" "this" {
  name                 = var.application_name
  image_tag_mutability = "IMMUTABLE"

  image_scanning_configuration {
    scan_on_push = true
  }
}
Run terraform init and terraform apply to deploy the infrastructure. Once the ECR has been deployed, we will push our custom image. In order to push an image to ECR, we have to follow a few specific steps. The detailed documentation can be found here. Follow the documentation to push your Docker image to your ECR.
Setting Up CodeCommit and CodeBuild
After having pushed our custom image to ECR, it is time to set up our CodeCommit repository and our CodeBuild project. As CodePipeline will be used to orchestrate our CodeCommit and CodeBuild workflow, we have to create both first. Let’s start by implementing a few variables we will use during this example. Copy the following snippet into the variables.tf.
variable "application_name" {
  description = "Name of the application"
  type        = string
}

variable "sns_endpoint" {
  description = "Terraform version to install in CodeBuild Container"
  type        = string
}
To manage the values of our defined variables, we will create a terraform.tfvars file. This will help us to keep our Terraform configuration clean and readable. Please define the following values for our variables in the terraform.tfvars file.
application_name  = "codepipeline-terraform-deployment"
sns_endpoint      = "XXX@test.de"
The variable sns_endpoint will be used later to send notifications via e-mail once the approval steps have been reached. Please enter your own e-mail addresse if you wish to receive notifications.
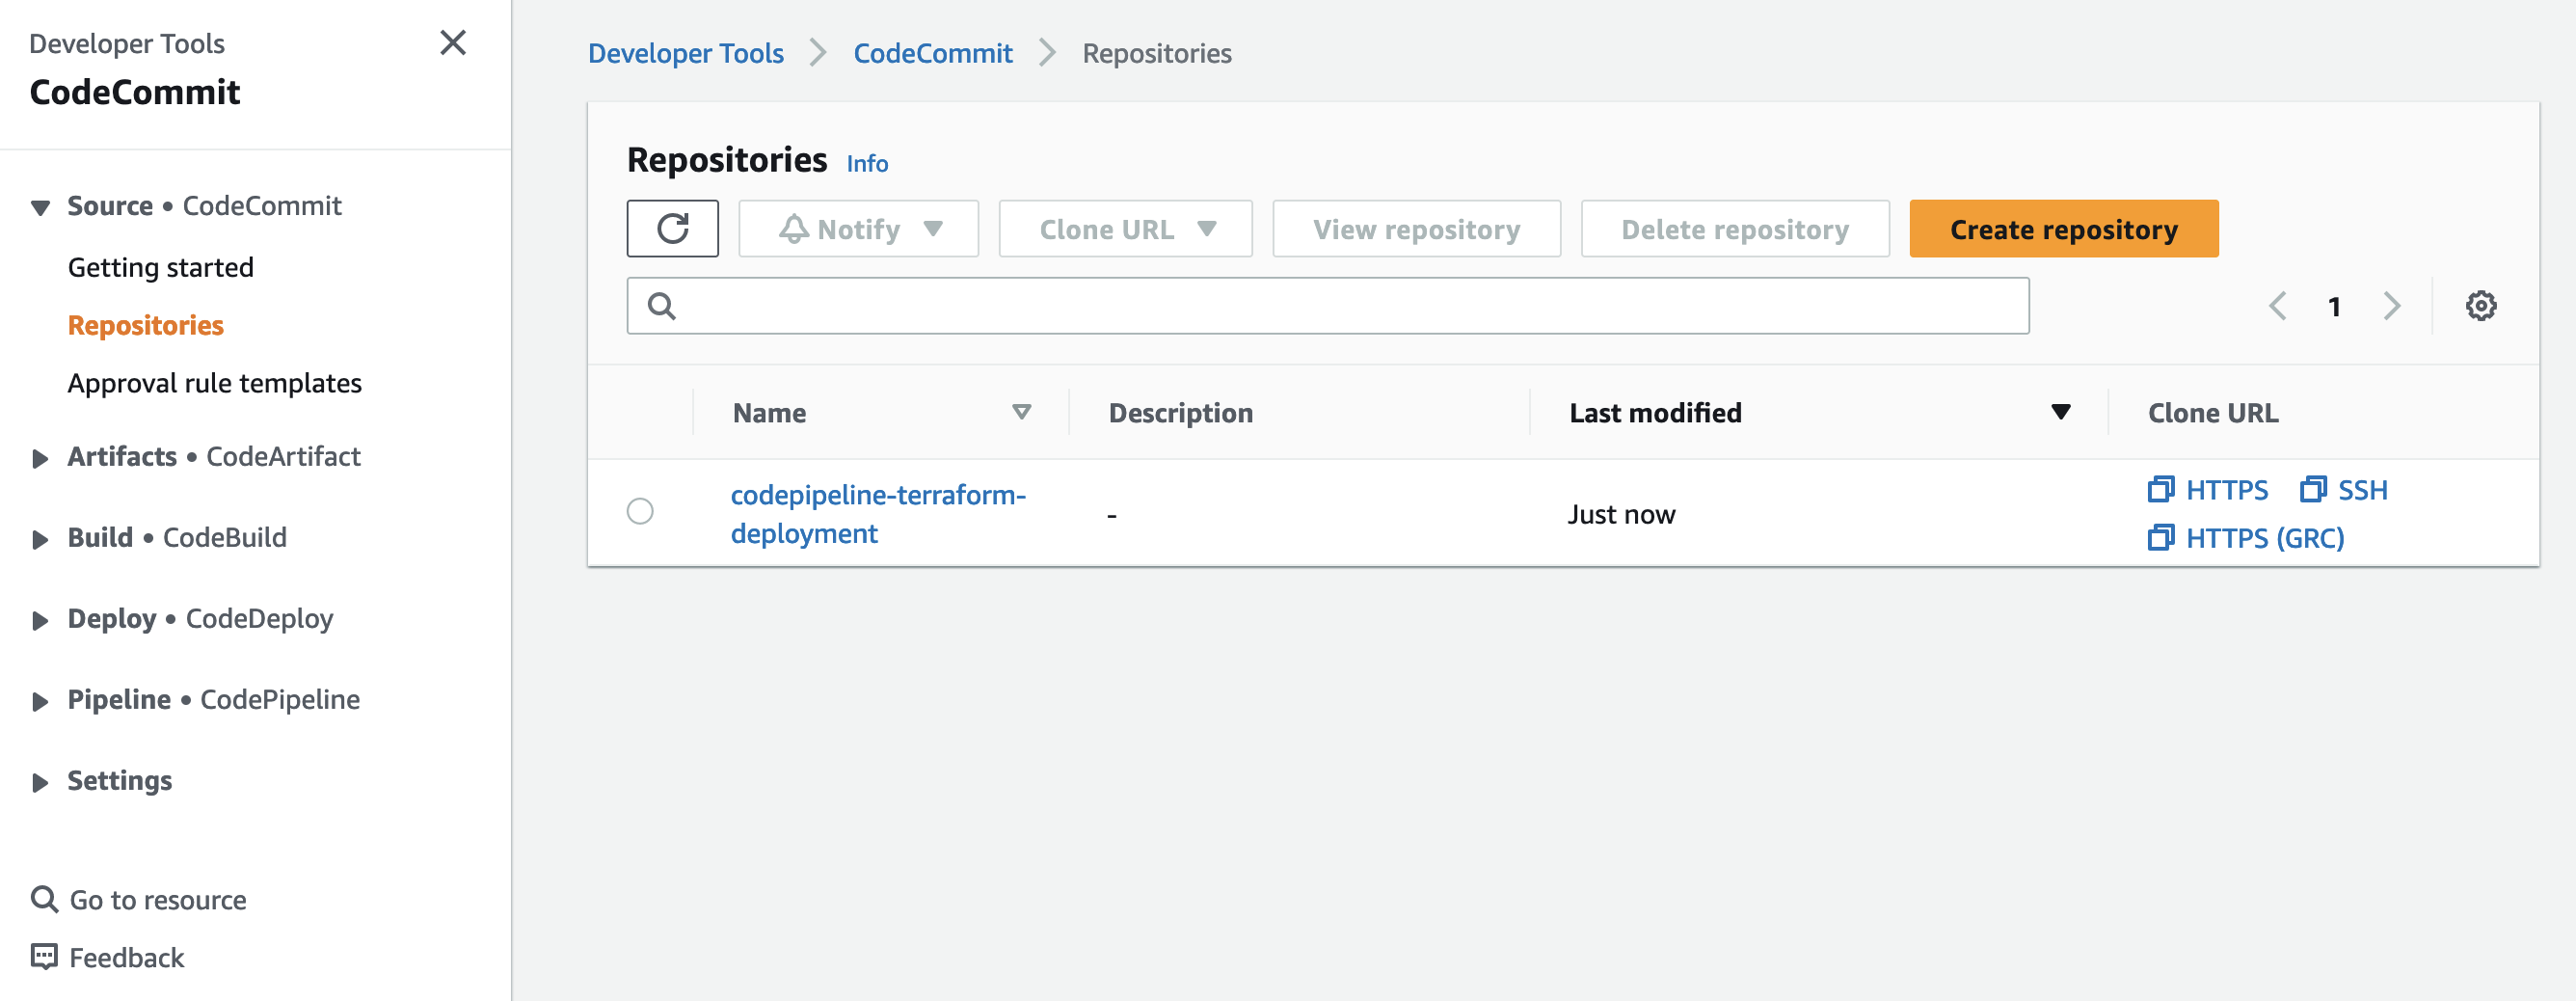
Once the variables have been defined, we can implement our CodeCommit repository. Please copy the following Terraform configuration into the codecommit.tf.
resource "aws_codecommit_repository" "this" {
  repository_name = var.application_name
}
As you can see, creating a CodeCommit repository only requires three lines of Terraform code. Next, we will implement the CodeBuild project.
Please be aware that we will only create a single CodeBuild project for all the different stages. This will keep the example as simple as possible. It is advised to set up distinct CodeBuild projects for each stage in production environments to ensure stage isolation.
Please copy the following snippet into codebuild.tf.
################################################################################
# CodeBuild Project
################################################################################

resource "aws_codebuild_project" "this" {
  name                   = var.application_name
  service_role           = aws_iam_role.codebuild.arn
  concurrent_build_limit = 1

  environment {
    type            = "LINUX_CONTAINER"
    image           = "${aws_ecr_repository.this.repository_url}:codebuild-image"
    compute_type    = "BUILD_GENERAL1_SMALL"
    image_pull_credentials_type = "SERVICE_ROLE"
    privileged_mode = false
  }

  artifacts {
    type = "CODEPIPELINE"
  }

  source {
    type      = "CODEPIPELINE"
    buildspec = file("${path.module}/buildspec.yaml")
  }

  logs_config {
    cloudwatch_logs {
      group_name = aws_cloudwatch_log_group.this.name
      status     = "ENABLED"
    }
  }
}


################################################################################
# Cloudwatch Log Group
################################################################################

resource "aws_cloudwatch_log_group" "this" {
  name = "/aws/codebuild/${var.application_name}"

  retention_in_days = 30
}


################################################################################
# IAM Role for CodeBuild
################################################################################

resource "aws_iam_role" "codebuild" {
  name = "${var.application_name}-codebuild"

  assume_role_policy = jsonencode({
    Version = "2012-10-17"
    Statement = [
      {
        Action = "sts:AssumeRole"
        Effect = "Allow"
        Principal = {
          Service = "codebuild.amazonaws.com"
        }
      },
    ]
  })
}

resource "aws_iam_role_policy_attachment" "codebuild" {
  role       = aws_iam_role.codebuild.name
  policy_arn = "arn:aws:iam::aws:policy/AdministratorAccess"
}
To keep this example as simple as possible, the CodeBuild IAM role was granted Administrator Access. Make sure to implement IAM roles and policies by following the principle of least privilege when working in production environments.
The Terraform configuration will deploy a single CodeBuild project including CloudWatch Log Group and IAM role. The CodeBuild project will use our custom Docker image and a buildspec.yaml to configure commands which CodeBuild will execute during the build process. Before we can deploy our Terraform resources, we will have to define our buildspec.yaml. Please copy the following YAML configuration into the buildspec.yaml.
version: 0.2

phases:
  build:
    on-failure: ABORT
    commands:
      - cd ${CODEBUILD_SRC_DIR}
      - |-
        if [ ${ACTION} = "VALIDATE" ] ; then

          echo "==== Running: Terraform Validate ===="
          terraform init
          terraform validate

          echo "==== Running: TFLINT ===="
          tflint --init
          tflint

          echo "==== Running: Checkov ===="
          checkov --framework terraform -d .

          echo "==== Running: TFSEC ===="
          tfsec .

        elif [ ${ACTION} = "PLAN" ] ; then

          echo "==== Running: Terraform Plan ===="
          terraform init
          terraform plan -out=tfplan -input=false -no-color
          terraform show -json tfplan > tfplan.json

          echo "==== Running: OPA ===="
          OPA_CHECK=$(opa exec --decision terraform/analysis/authz -b policy/ tfplan.json | jq -r ".result[] |.result")
          echo "OPA Evaluation Check = $OPA_CHECK"
          if ! $OPA_CHECK; then
            printf '%s\n' "OPA evaluation failed" >&2
            exit 1
          fi

        elif [ ${ACTION} = "APPLY" ] ; then

          echo "==== Running: Terraform Apply ===="
          terraform init
          terraform apply -no-color -auto-approve tfplan

        elif [ ${ACTION} = "DESTROY" ] ; then

          echo "==== Running: Terraform Destroy ===="
          terraform init
          terraform destroy -no-color -auto-approve
        fi

artifacts:
  files:
    - "**/*"
As already mentioned earlier, we will only use a single CodeBuild project to implement all the different CodePipeline stages. Therefore, the buildspec.yaml contains an IF statement with four distinct sections. Each section is executed based on an environment variable ${ACTION} that will be set by CodePipeline when starting the CodeBuild process.
The first section will be executed when the variable ${ACTION} is set to VALIDATE. This section will execute all the commands we need for validating our Terraform configuration. We will run terraform validate, tflint, checkov, and tfsec to validate our Terraform code and check for compliance and security issues.
The second section will be executed when the variable ${ACTION} is set to PLAN. We will run terraform plan -out=tfplan to generate a Terraform plan out and store the output in a Terraform-specific binary format. Afterward, we will run an OPA policy check based on the generated plan to enforce our defined infrastructure policies.
The third section will be executed when the variable ${ACTION} is set to APPLY. In case the first to stage passed successfully, we will deploy our Terraform configuration by running terraform apply. We will use the previously generate binary plan output as input to ensure only reviewed changes are deployed.
The fourth section will be executed when the variable ${ACTION} is set to DESTROY. This step is not necessary and is only used in this example to clean up the infrastructure at the end. We will run terraform destroy to remove the created resources.
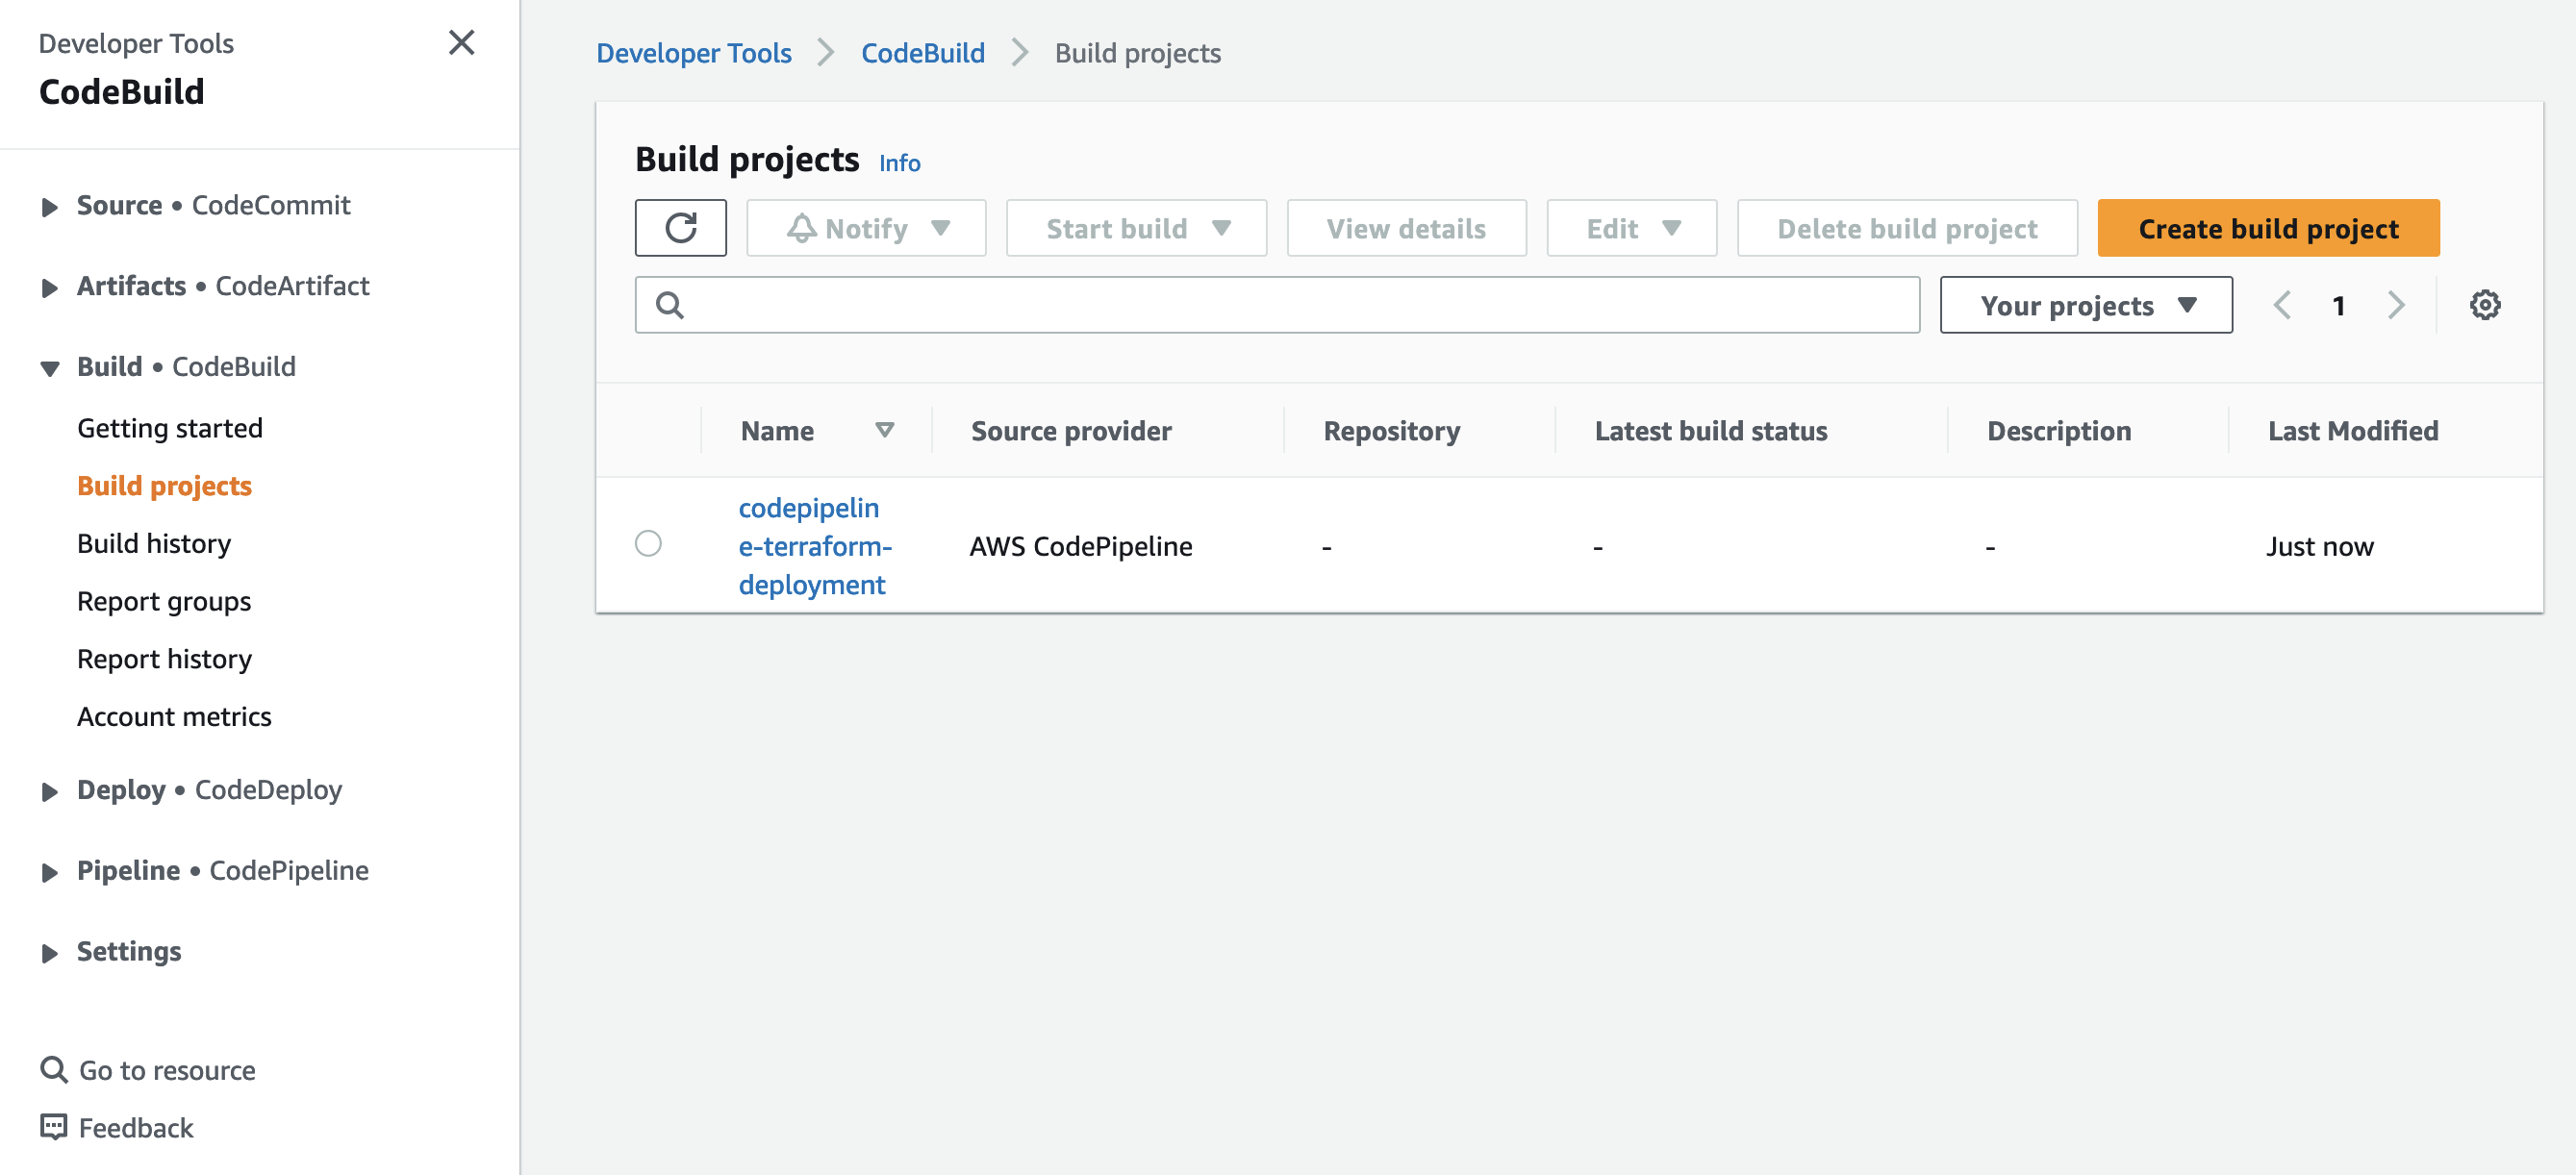
Let’s run terraform init to initialize Terraform and terraform apply to deploy the CodeCommit and CodeBuild infrastructure. Once Terraform has deployed the configuration, you should see a new repository and CodeBuild project in the AWS console.
Set Up CodePipeline
Now that we have created the two major components of our automation workflow, it is time to implement our CodePipeline. Copy the following Terraform configuration into the codepipeline.tf.
################################################################################
# CodePipeline
################################################################################

resource "aws_codepipeline" "this" {

  name     = var.application_name
  role_arn = aws_iam_role.codepipeline.arn

  artifact_store {

    location = aws_s3_bucket.this.id
    type     = "S3"

    encryption_key {
      id   = aws_kms_key.this.id
      type = "KMS"
    }
  }

  stage {
    name = "Source"
    action {
      name             = "Source"
      category         = "Source"
      owner            = "AWS"
      provider         = "CodeCommit"
      version          = "1"
      run_order        = 1
      output_artifacts = ["SOURCE_ARTIFACT"]
      configuration = {
        RepositoryName       = aws_codecommit_repository.this.repository_name
        BranchName           = "main"
        PollForSourceChanges = true
        OutputArtifactFormat = "CODE_ZIP"
      }
    }
  }

  stage {
    name = "TerraformValidate"
    action {
      name             = "Validate"
      category         = "Build"
      owner            = "AWS"
      provider         = "CodeBuild"
      version          = "1"
      run_order        = 2
      input_artifacts  = ["SOURCE_ARTIFACT"]
      output_artifacts = ["VALIDATE_ARTIFACT"]
      configuration = {
        ProjectName = aws_codebuild_project.this.name
        EnvironmentVariables = jsonencode([
          {
            name  = "ACTION"
            value = "VALIDATE"
            type  = "PLAINTEXT"
          }
        ])
      }
    }
  }

  stage {
    name = "TerraformPlan"
    action {
      name             = "Plan"
      category         = "Build"
      owner            = "AWS"
      provider         = "CodeBuild"
      version          = "1"
      run_order        = 2
      input_artifacts  = ["VALIDATE_ARTIFACT"]
      output_artifacts = ["PLAN_ARTIFACT"]
      configuration = {
        ProjectName = aws_codebuild_project.this.name
        EnvironmentVariables = jsonencode([
          {
            name  = "ACTION"
            value = "PLAN"
            type  = "PLAINTEXT"
          }
        ])
      }
    }
  }

  stage {
    name = "ApprovalApply"
    action {
      name      = "Apply"
      category  = "Approval"
      owner     = "AWS"
      provider  = "Manual"
      version   = "1"
      run_order = 3
      configuration = {
        NotificationArn = aws_sns_topic.this.arn
      }
    }
  }

  stage {
    name = "TerraformApply"
    action {
      name            = "Apply"
      category        = "Build"
      owner           = "AWS"
      provider        = "CodeBuild"
      version         = "1"
      run_order       = 4
      input_artifacts = ["PLAN_ARTIFACT"]
      output_artifacts = ["APPLY_ARTIFACT"]
      configuration = {
        ProjectName   = aws_codebuild_project.this.name
        EnvironmentVariables = jsonencode([
          {
            name  = "ACTION"
            value = "APPLY"
            type  = "PLAINTEXT"
          }
        ])
      }
    }
  }

  stage {
    name = "ApprovalDestroy"
    action {
      name      = "Destroy"
      category  = "Approval"
      owner     = "AWS"
      provider  = "Manual"
      version   = "1"
      run_order = 5
      configuration = {
        NotificationArn = aws_sns_topic.this.arn
      }
    }
  }

  stage {
    name = "TerraformDestroy"
    action {
      name            = "Destroy"
      category        = "Build"
      owner           = "AWS"
      provider        = "CodeBuild"
      version         = "1"
      run_order       = 6
      input_artifacts = ["APPLY_ARTIFACT"]
      configuration = {
        ProjectName   = aws_codebuild_project.this.name
        EnvironmentVariables = jsonencode([
          {
            name  = "ACTION"
            value = "DESTROY"
            type  = "PLAINTEXT"
          }
        ])
      }
    }
  }
}


################################################################################
# IAM Role for CodePipeline
################################################################################

resource "aws_iam_role" "codepipeline" {
  name = "${var.application_name}-codepipeline"

  assume_role_policy = jsonencode({
    Version = "2012-10-17"
    Statement = [
      {
        Action = "sts:AssumeRole"
        Effect = "Allow"
        Principal = {
          Service = "codepipeline.amazonaws.com"
        }
      },
    ]
  })
}

data "aws_iam_policy_document" "codepipeline" {
  statement {
    sid = "s3access"
    actions = [
      "s3:GetObject",
      "s3:GetObjectVersion",
      "s3:GetBucketVersioning",
      "s3:PutObjectAcl",
      "s3:PutObject",
      "s3:ListBucket",
    ]

    resources = [aws_s3_bucket.this.arn, "${aws_s3_bucket.this.arn}/*"]
  }

  statement {
    sid = "codecommitaccess"
    actions = [
      "codecommit:GetBranch",
      "codecommit:GetCommit",
      "codecommit:UploadArchive",
      "codecommit:GetUploadArchiveStatus",
      "codecommit:CancelUploadArchive"
    ]

    resources = [aws_codecommit_repository.this.arn]
  }

  statement {
    sid = "codebuildaccess"
    actions = [
      "codebuild:BatchGetBuilds",
      "codebuild:StartBuild"
    ]
    resources = [aws_codebuild_project.this.arn]
  }

  statement {
    sid = "snsaccess"
    actions = [
      "SNS:Publish"
    ]
    resources = [
      aws_sns_topic.this.arn
    ]
  }

  statement {
    sid = "kmsaccess"
    actions = [
      "kms:DescribeKey",
      "kms:GenerateDataKey*",
      "kms:Encrypt",
      "kms:ReEncrypt*",
      "kms:Decrypt"
    ]
    resources = [aws_kms_key.this.arn]
  }
}

resource "aws_iam_policy" "codepipeline" {
  name   = "codepipeline"
  policy = data.aws_iam_policy_document.codepipeline.json
}

resource "aws_iam_role_policy_attachment" "codepipeline" {
  role       = aws_iam_role.codepipeline.name
  policy_arn = aws_iam_policy.codepipeline.arn
}
The code above will create an AWS CodePipeline with the seven steps mentioned in the Architecture section above. There are still a few components we have to add before we can deploy our Terraform configuration. The first component is the S3 Artifact bucket used to store and exchange artifacts between CodePipeline stages. Create the bucket by copying the following snippet into the s3.tf.
################################################################################
# S3 Bucket
################################################################################

resource "aws_s3_bucket" "this" {
  bucket_prefix = var.application_name

  force_destroy = true
}


################################################################################
# S3 Bucket policy
################################################################################

resource "aws_s3_bucket_policy" "this" {
  bucket = aws_s3_bucket.this.id

  policy = data.aws_iam_policy_document.s3.json
}


################################################################################
# S3 Bucket server side encryption Configuration
################################################################################

resource "aws_s3_bucket_server_side_encryption_configuration" "this" {
  bucket = aws_s3_bucket.this.id

  rule {
    apply_server_side_encryption_by_default {
      kms_master_key_id = aws_kms_key.this.arn
      sse_algorithm     = "aws:kms"
    }
  }
}


################################################################################
# S3 Policies
################################################################################

data "aws_iam_policy_document" "s3" {
  statement {
    principals {
      type        = "Service"
      identifiers = ["codepipeline.amazonaws.com"]
    }

    effect = "Allow"
    actions = [
      "s3:GetObject",
      "s3:GetObjectVersion",
      "s3:GetBucketVersioning",
      "s3:PutObjectAcl",
      "s3:PutObject",
      "s3:ListBucket"
    ]

    resources = [aws_s3_bucket.this.arn, "${aws_s3_bucket.this.arn}/*"]

    condition {
      test     = "ArnEquals"
      variable = "AWS:SourceArn"
      values   = [aws_codepipeline.this.arn, aws_codebuild_project.this.arn]
    }
  }
}
To add an extra layer of security, we will use an AWS CMK to encrypt our artifacts in the bucket. Using KMS keys to encrypt our artifacts and data gives us additional control over the lifecycle and permissions of our keys and enables us to monitor the key uses via CloudTrail. Copy the following Terraform configuration into the kms.tf to create a KMS key including key policy.
################################################################################
# Get Current AWS Account ID
################################################################################

data "aws_caller_identity" "current" {}


##################################################
# KMS Key
##################################################

resource "aws_kms_key" "this" {
  key_usage               = "ENCRYPT_DECRYPT"
  deletion_window_in_days = 30
  is_enabled              = true
  enable_key_rotation     = true
}


##################################################
# KMS Key Policy
##################################################

resource "aws_kms_key_policy" "this" {
  key_id = aws_kms_key.this.id
  policy = data.aws_iam_policy_document.key_policy.json
}

data "aws_iam_policy_document" "key_policy" {

  statement {
    effect = "Allow"
    actions = [
      "kms:*"
    ]
    resources = ["*"]
    principals {
      type = "AWS"
      identifiers = [
        "arn:aws:iam::${data.aws_caller_identity.current.account_id}:root"
      ]
    }
  }
}
The last component we have to implement before we can finally deploy our AWS CodePipeline is our SNS notification topic. As already mentioned, we will send out a notification via CodePipeline each time one of the two approval steps has been reached. This will ensure timely reviews and responses from developers. Copy the following code into the sns.tf.
################################################################################
# SNS Topic
################################################################################

resource "aws_sns_topic" "this" {
  name         = var.application_name
  display_name = var.application_name
}


################################################################################
# SNS Topic Policy
################################################################################

resource "aws_sns_topic_policy" "this" {
  arn = aws_sns_topic.this.arn

  policy = data.aws_iam_policy_document.sns.json
}

data "aws_iam_policy_document" "sns" {
  statement {
    actions = [
      "SNS:Publish"
    ]
    principals {
      type        = "Service"
      identifiers = ["codepipeline.amazonaws.com"]
    }
    resources = [
      aws_sns_topic.this.arn
    ]
    condition {
      test     = "ArnEquals"
      variable = "aws:SourceArn"
      values   = [aws_codepipeline.this.arn]
    }
  }
}


################################################################################
# SNS Subscription
################################################################################

resource "aws_sns_topic_subscription" "this" {
  topic_arn = aws_sns_topic.this.arn
  protocol  = "email"
  endpoint  = var.sns_endpoint
}
We now have all components in place to deploy our CodePipeline. Run terraform apply to deploy the new infrastructure. Once the deployment has been finished, you should see the Pipeline in the AWS console.
Create Remote State Storage
Before we use our CodePipeline to deploy the actual Terraform configuration, we will set up a remote backend for Terraform. When automating Terraform deployments in a remote environment, you need to configure remote state storage so Terraform can access and manage your project’s state across runs. We will use S3 for storing our state files and DynamoDB for state file locking. Feel free to use the module provided as part of the blog post repo. Once you added the source code to your project, add the following code to the state-storage.tf.
module "state_storage" {
  source = "./modules/terraform-backend"

  aws_kms_alias                       = "terraform-state-storage"
  tf_state_storage_bucket_name        = "terraform-state-storage"
  tf_state_storage_dynamodb_lock_name = "terraform-state-storage"
  aws_account_id                      = data.aws_caller_identity.current.account_id
}
In order to easier retrieve the values we need to define our remote backend please add the following outputs to the outputs.tf.
################################################################################
# Outputs
################################################################################

output "remote_state_s3_id" {
  description = "The name of the bucket."
  value       = module.state_storage.s3_id
}

output "remote_state_dynamodb_id" {
  description = "The name of the table"
  value       = module.state_storage.dynamodb_id
}

output "remote_state_kms_alias" {
  description = "The id of the KMS key"
  value       = module.state_storage.kms_alias
}
Run terraform apply to deploy the new infrastructure.
Deploy Infrastructure via CodePipeline
As you remember, the goal of this post is to create a deployment pipeline for Terraform that is able to deploy actual Terraform code. While the CodePipeline we just created is fully functional, it is missing an important component - the Terraform code we wish to deploy. To give you a better understanding of how the Pipeline behaves, we will write a simple Terraform script that will deploy an S3 Bucket to AWS and push the code to our newly created CodeCommit repository. Once the code has been pushed, the pipeline will be triggered and our CI/CD workflow will start.
Deploy a NON-Compliant S3 Bucket
We will start by creating an S3 Bucket that is not compliant and does not follow AWS security best practices. This will allow us to observe the function of our validation tools TFLint, Checkov, and TFSec. Afterward, we will remediate the issues and deploy our adjusted Terraform configuration. The first step is to clone the newly created CodeCommit repository. Feel free to use HTTPS or SSH for the cloning process. Once the repo has been cloned, create the following folders and files.
├── main.tf
└── policy
    └── policy.rego
The main.tf will contain our Terraform configuration while the policy.rego will be used to define our OPA policies. We will start by defining the OPA policy. The Terraform configuration for the policy.rego can be found here.
Please be aware that this blog post won’t go into much detail regarding OPA and how to implement REGO policies. If you are looking for a more detailed overview of the possibilities of OPA in combination with Terraform, please read the following blog post Open Policy Agent for Terraform. You can also visit the official website to get a deeper understanding of OPA functionality.
After having implemented the rego policy, we will create the Terraform configuration to deploy a simple S3 bucket. Please copy the following Terraform code into the main.tf. Adjust the bucket as well as the region key in the remote backend configuration block to fit your remote state bucket and region.
################################################################################
# Set required providers and version
################################################################################

terraform {
  backend "s3" {
    bucket = "xxxxxxxxxxxx"
    region = "xxxxxxxxxxxx"
    key    = "terraform.tfstate"
    dynamodb_table = "terraform-state-storage"
    encrypt        = true
    kms_key_id     = "alias/terraform-state-storage"

  }
  required_providers {
    aws = {
      source  = "hashicorp/aws"
      version = ">=4.40.0"
    }
  }
  required_version = ">=1.4.4"
}

provider "aws" {
  region = "eu-central-1"
}


################################################################################
# S3 Bucket
################################################################################

resource "aws_s3_bucket" "this" {
  bucket_prefix = "this-is-a-test-bucket-with-a-name-that-is-way-to-long"
}
Push the changes into CodeCommit by executing the commands git add ., git commit -m "commit non-compliant configuration", and git push. Once the new files have been pushed, the CodePipeline will be triggered. As the bucket is non-compliant on purpose, the Validation stage will fail.
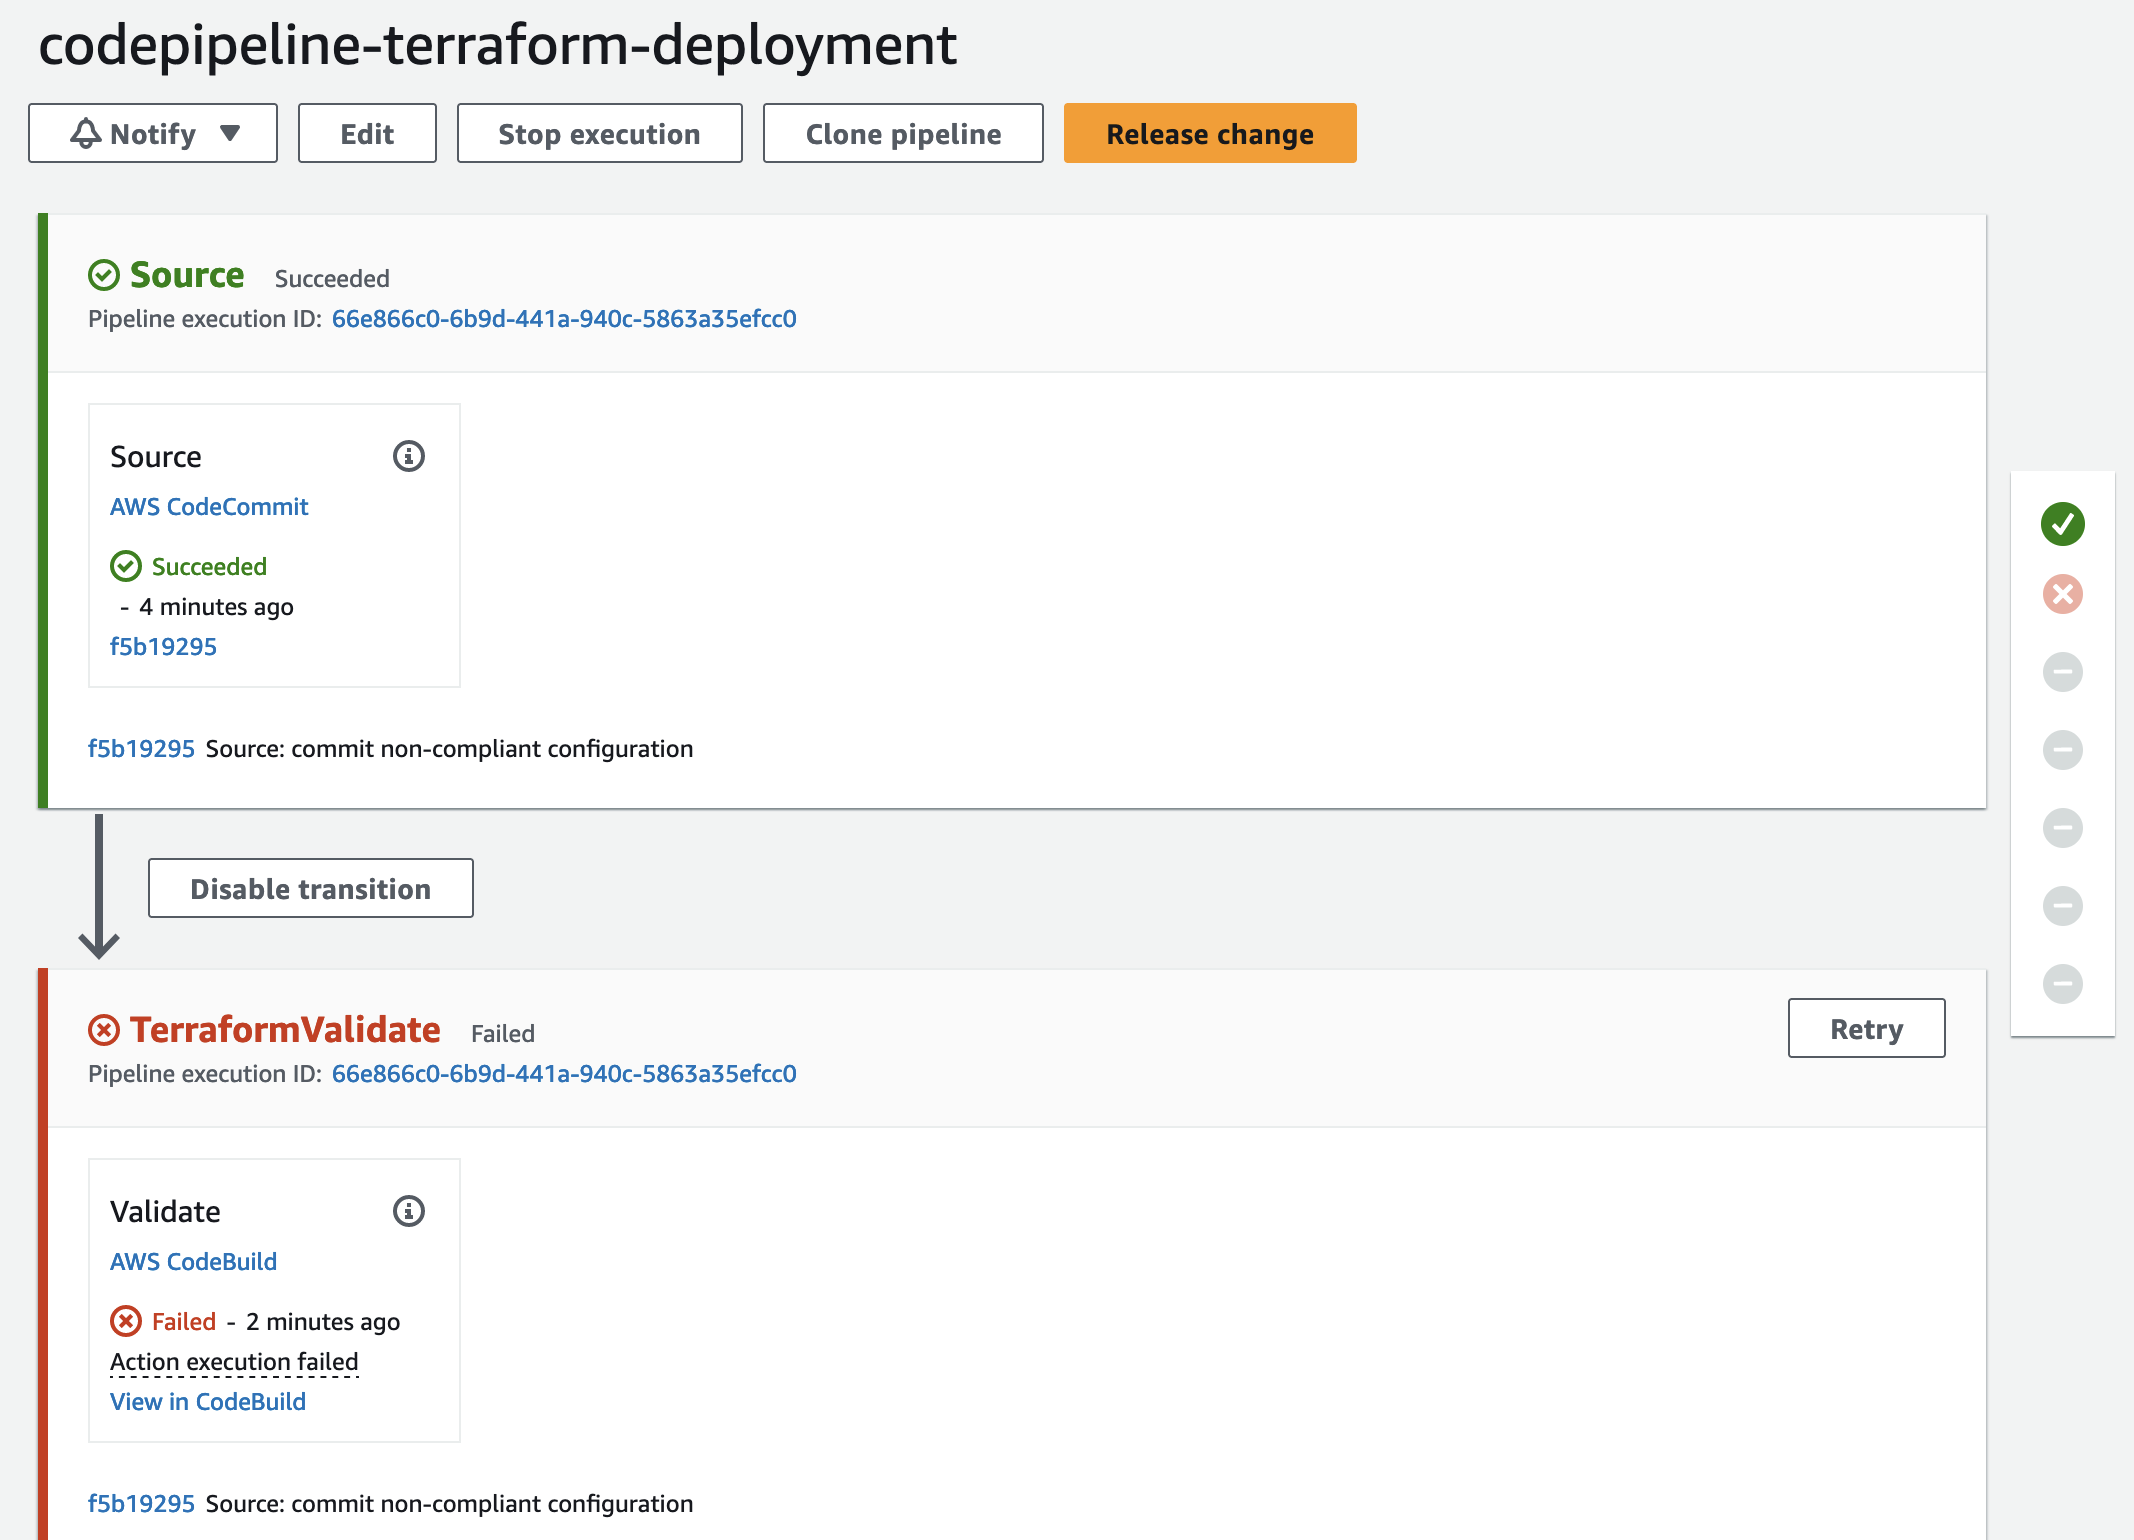
Remediate Security and Compliance Findings
We will use the CodeBuild terminal output to analyze the issues found by our compliance and security check tools. As you can see, both Checkov and TFSec found a few issues regarding our bucket encryption, versioning, and public access.
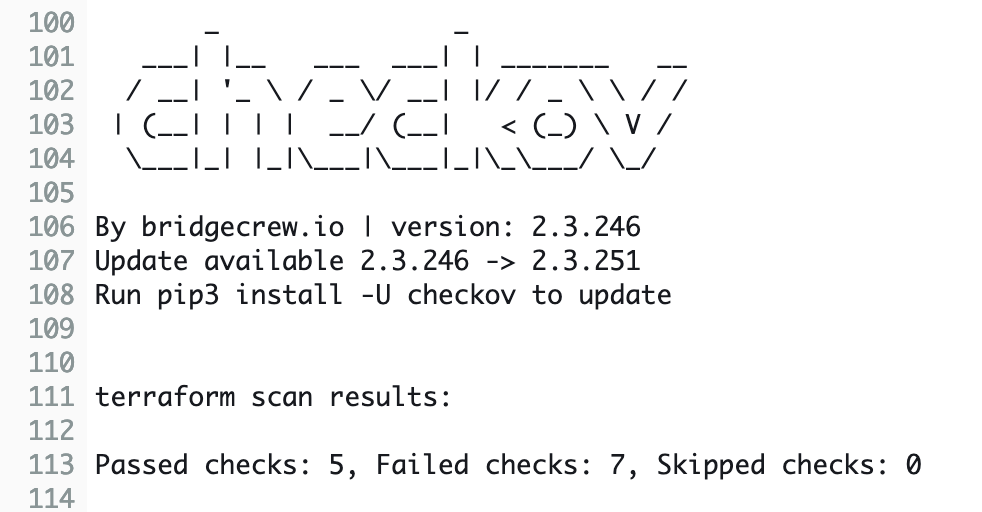
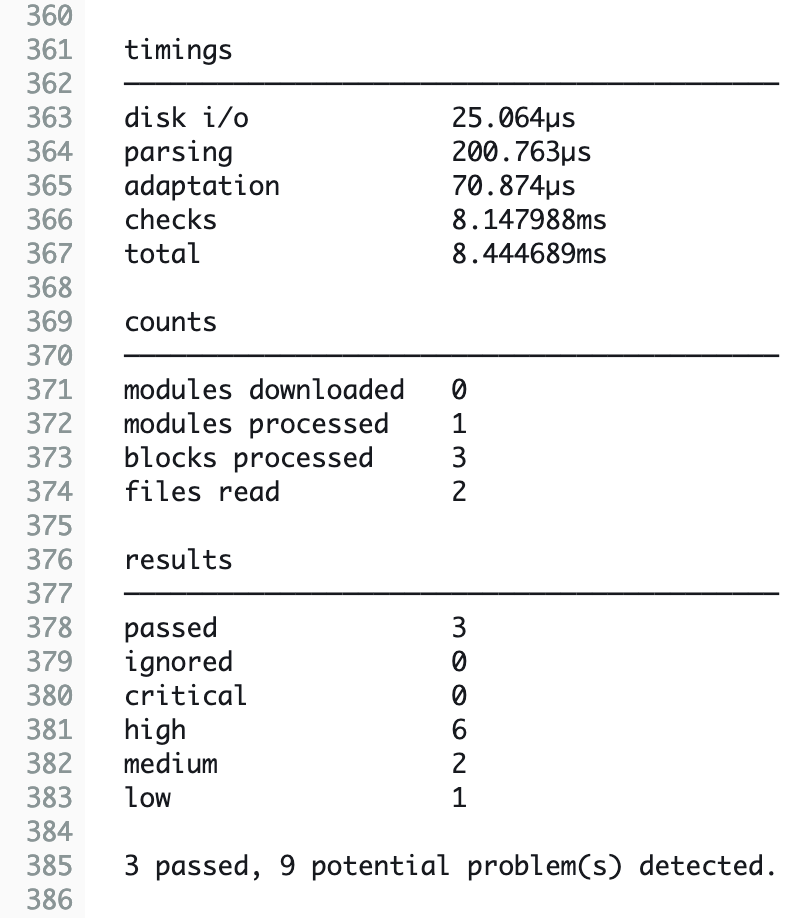
We also have a few findings that we are able to ignore. Depending on the use case, not all findings will be relevant for you. Findings that are irrelevant to your current configuration and project can be ignored.
Please be aware that we will not go into detail regarding the compliance and security checks performed by Checkov, TFLint, and TFSec. For more information, please visit the official documentation of Checkov, TFLint, and TFSec.
To make our S3 bucket compliant, we will make a few adjustments. Besides adding bucket versioning and blocking all public access, we will also enable bucket encryption using AWS CMK. Additionally, we will shorten the bucket name. Please replace the Terraform configuration of your current main.tf, EXCEPT the terraform {} block at the beginning with the following snippet.
################################################################################
# S3 Bucket
################################################################################

#tfsec:ignore:aws-s3-enable-bucket-logging
resource "aws_s3_bucket" "this" {
    #checkov:skip=CKV_AWS_18: "Ensure the S3 bucket has access logging enabled"
    #checkov:skip=CKV_AWS_144: "Ensure that S3 bucket has cross-region replication enabled"
    #checkov:skip=CKV2_AWS_62: "Ensure S3 buckets should have event notifications enabled"
    #checkov:skip=CKV2_AWS_61: "Ensure that an S3 bucket has a lifecycle configuration"

  bucket_prefix = "this-is-a-test-bucket"
}


################################################################################
# S3 Versioning Configuration
################################################################################

resource "aws_s3_bucket_versioning" "this" {
  bucket = aws_s3_bucket.this.id

  versioning_configuration {
    status = "Enabled"
  }
}

################################################################################
# S3 Bucket server side encryption Configuration
################################################################################

resource "aws_s3_bucket_server_side_encryption_configuration" "this" {
  bucket = aws_s3_bucket.this.id

  rule {
    apply_server_side_encryption_by_default {
      kms_master_key_id = aws_kms_key.this.arn
      sse_algorithm     = "aws:kms"
    }
  }
}


################################################################################
# S3 Bucket public access block
################################################################################

resource "aws_s3_bucket_public_access_block" "this" {
  bucket = aws_s3_bucket.this.id

  block_public_acls       = "true"
  block_public_policy     = "true"
  ignore_public_acls      = "true"
  restrict_public_buckets = "true"

}
As you can see, we will ignore a few TFSec and Checkov findings by using the #tfsec:ignore and #checkov:skip statements respectively. We will also create a new file called kms.tf to implement our new encryption key. Create the file kms.tf and add the following Terraform configuration to it.
################################################################################
# Get Current AWS Account ID
################################################################################

data "aws_caller_identity" "current" {}


##################################################
# KMS Key
##################################################

resource "aws_kms_key" "this" {
  key_usage               = "ENCRYPT_DECRYPT"
  deletion_window_in_days = 30
  is_enabled              = true
  enable_key_rotation     = true
}


##################################################
# KMS Key Policy
##################################################

resource "aws_kms_key_policy" "this" {
  key_id = aws_kms_key.this.id
  policy = data.aws_iam_policy_document.key_policy.json
}

data "aws_iam_policy_document" "key_policy" {

  statement {
    effect = "Allow"
    actions = [
      "kms:*"
    ]
    resources = [aws_kms_key.this.arn]
    principals {
      type = "AWS"
      identifiers = [
        "arn:aws:iam::${data.aws_caller_identity.current.account_id}:root"
      ]
    }
  }
}
Push the changes into CodeCommit by executing the commands git add ., git commit -m "commit compliant configuration", and git push. Once the new files have been pushed, the CodePipeline will be triggered again. This time the bucket configuration will be compliant and the Validation stage will be passed successfully.
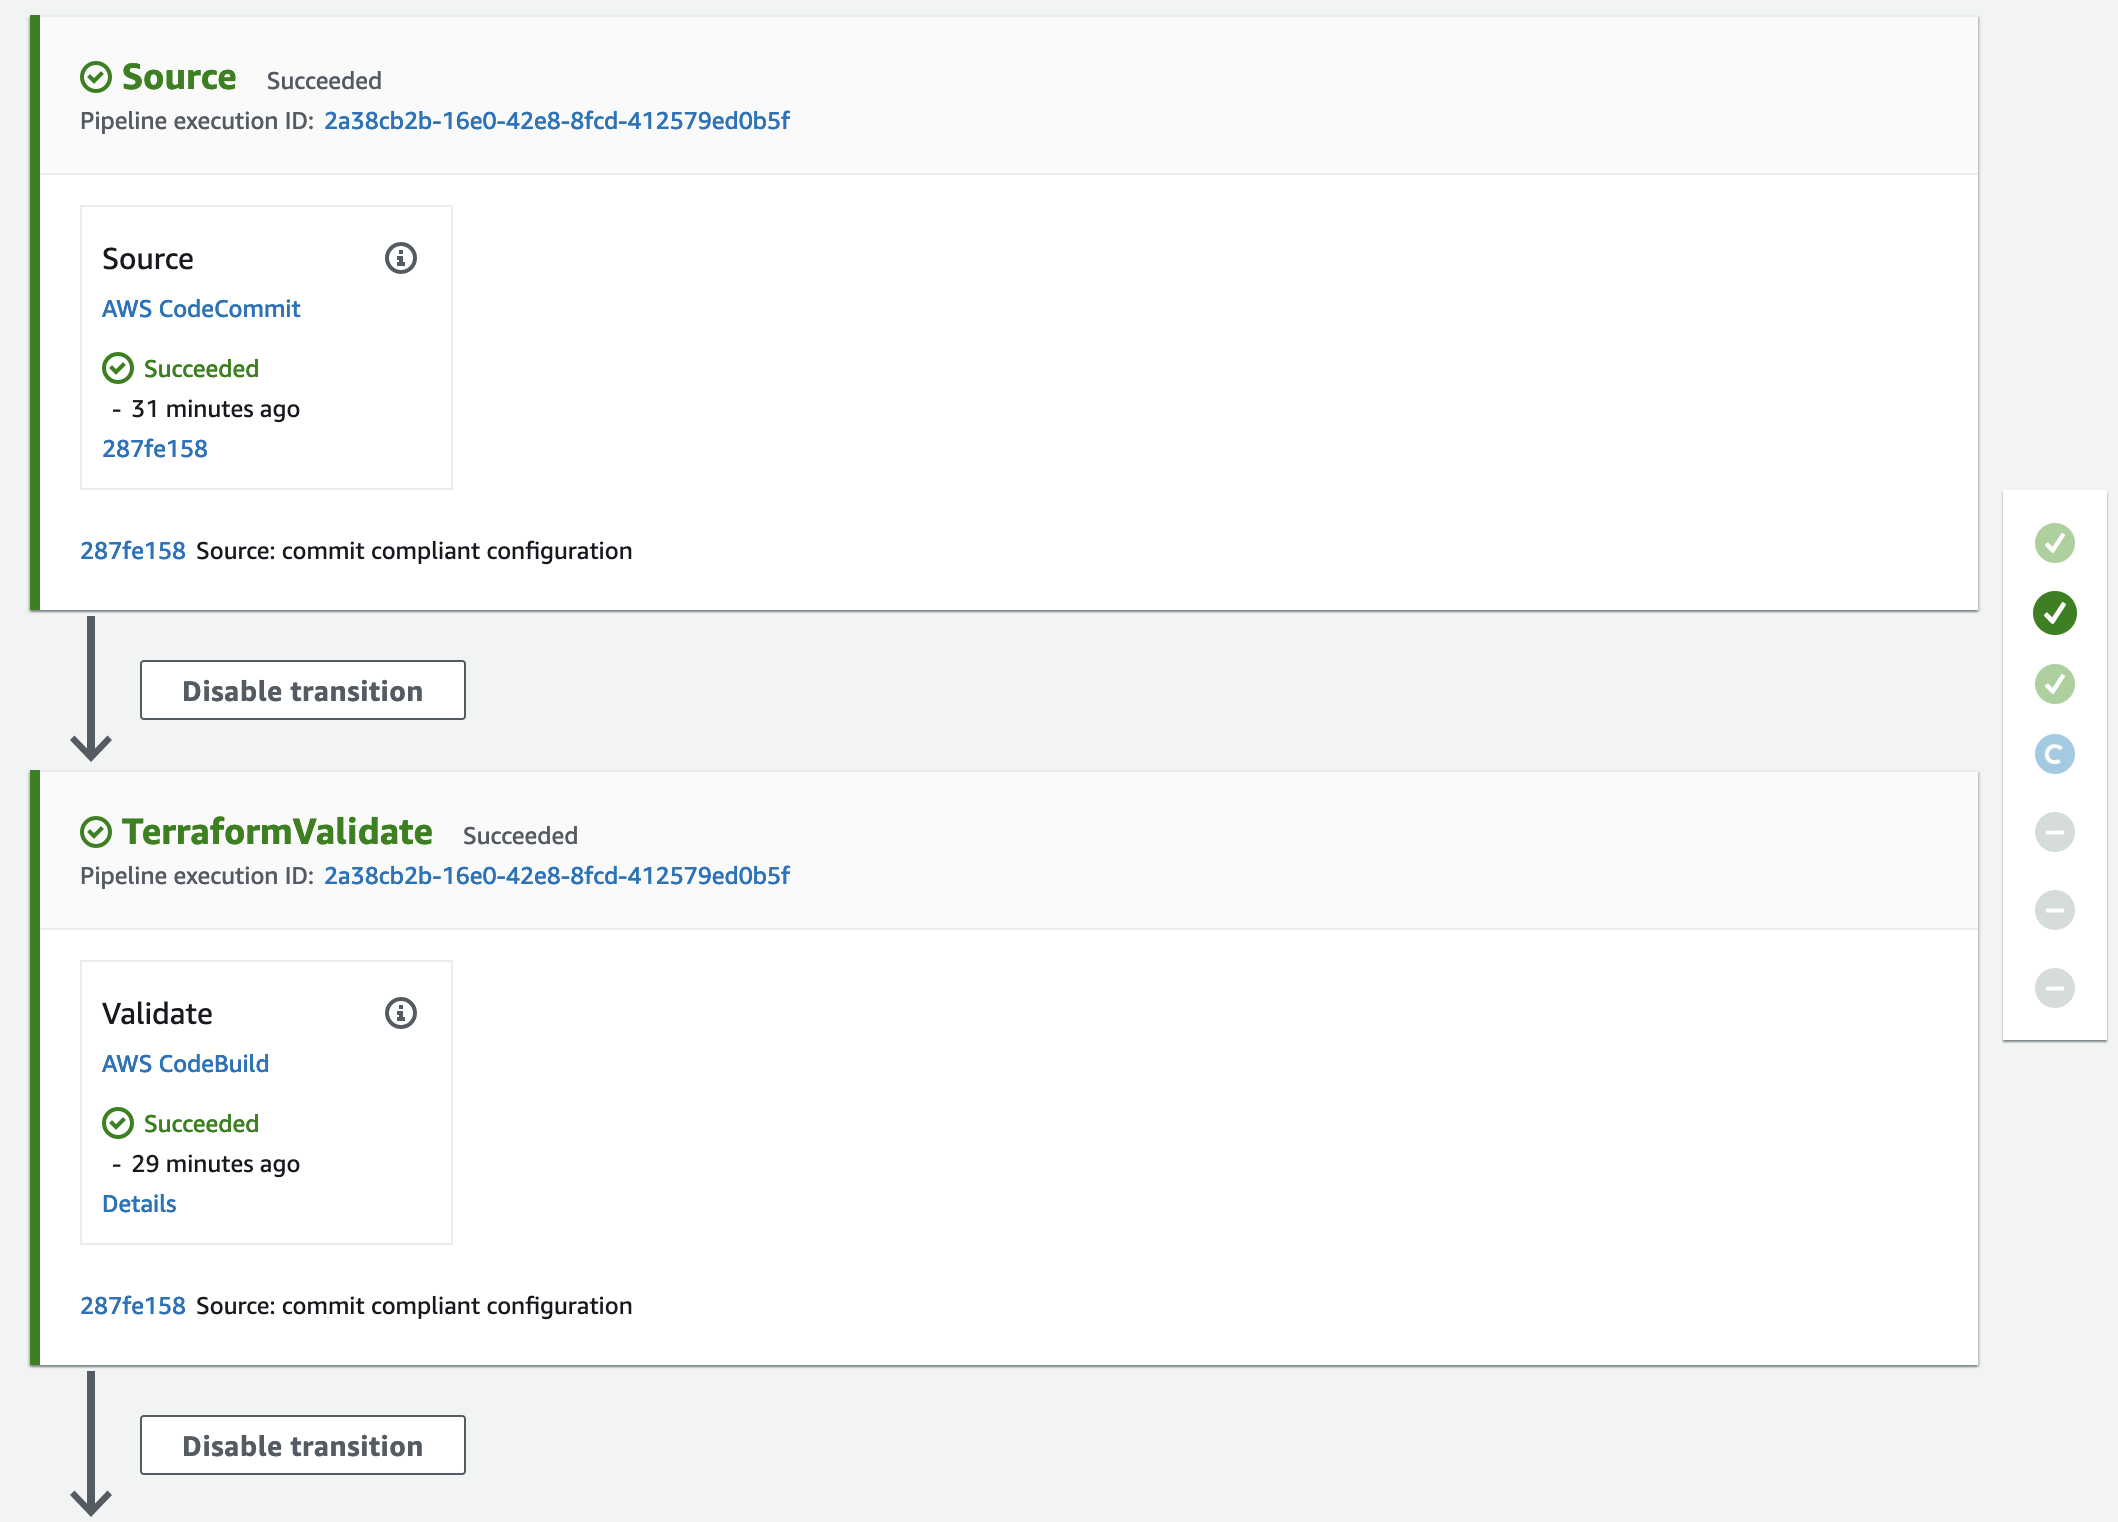
After the Validation stage, the Plan stage will be executed. Both the Terraform Plan and the OPA policy checks will succeed. Afterward, it is time to manually approve the planned infrastructure changes. Feel free to check the Terraform plan output in the CodeBuild Plan stage.
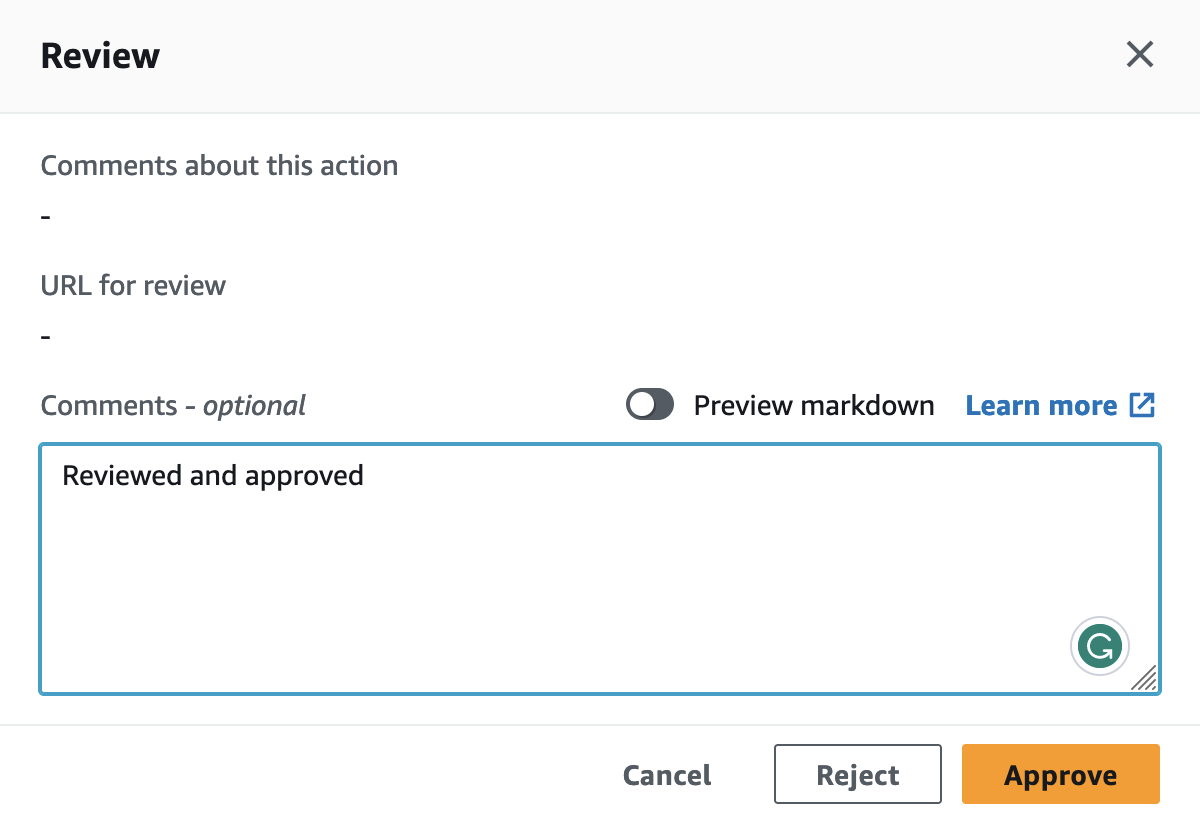
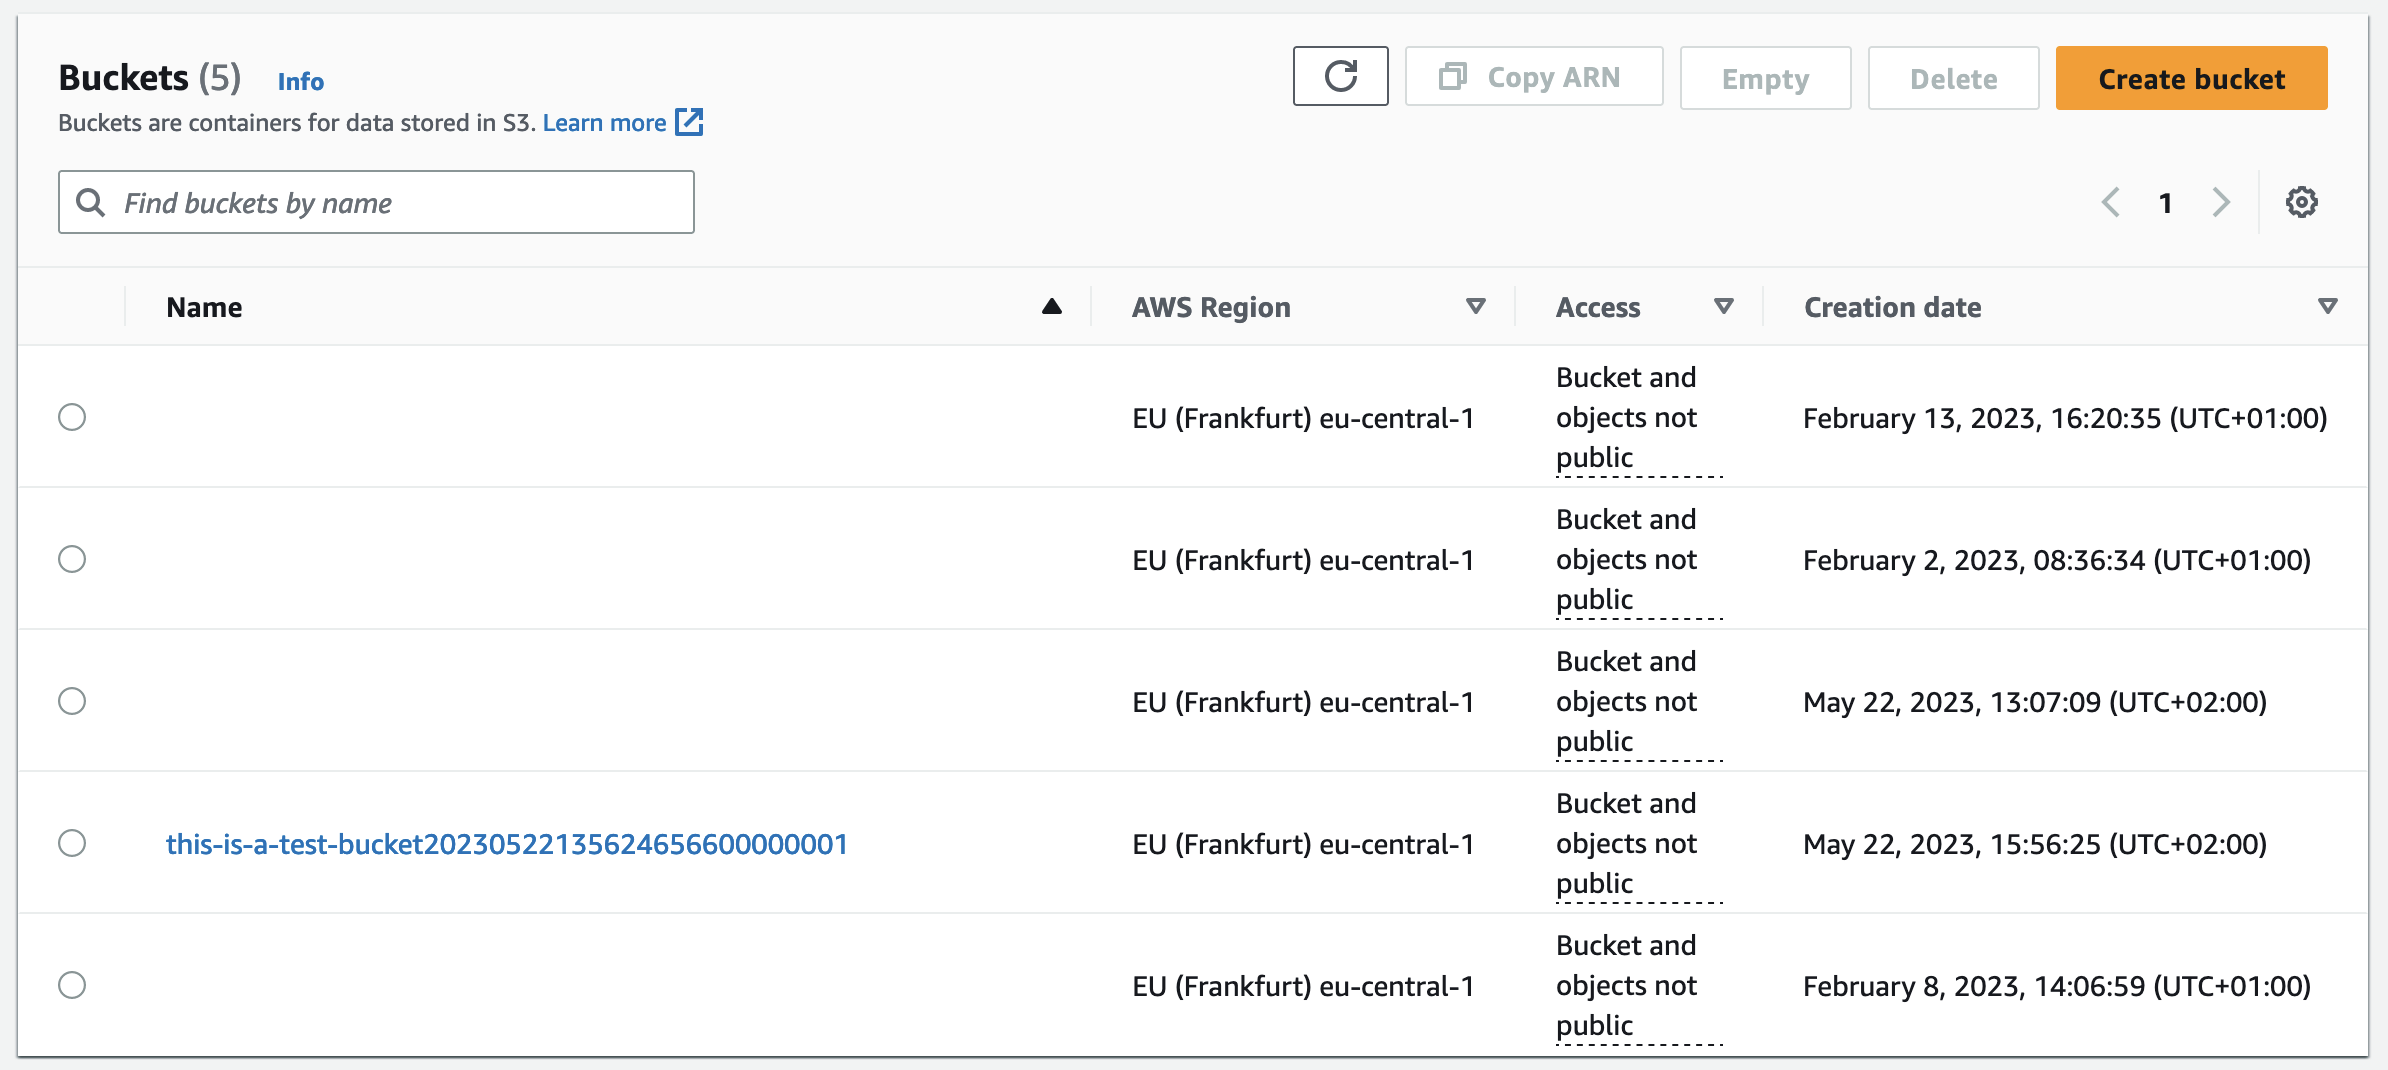
Once the Terraform configuration has been reviewed and approved, CodePipeline will deploy the S3 bucket. Check the AWS Console to find the new S3 bucket.
To clean up the resources at the end of this example, execute the Terraform destruction by approving the manual approval stage.
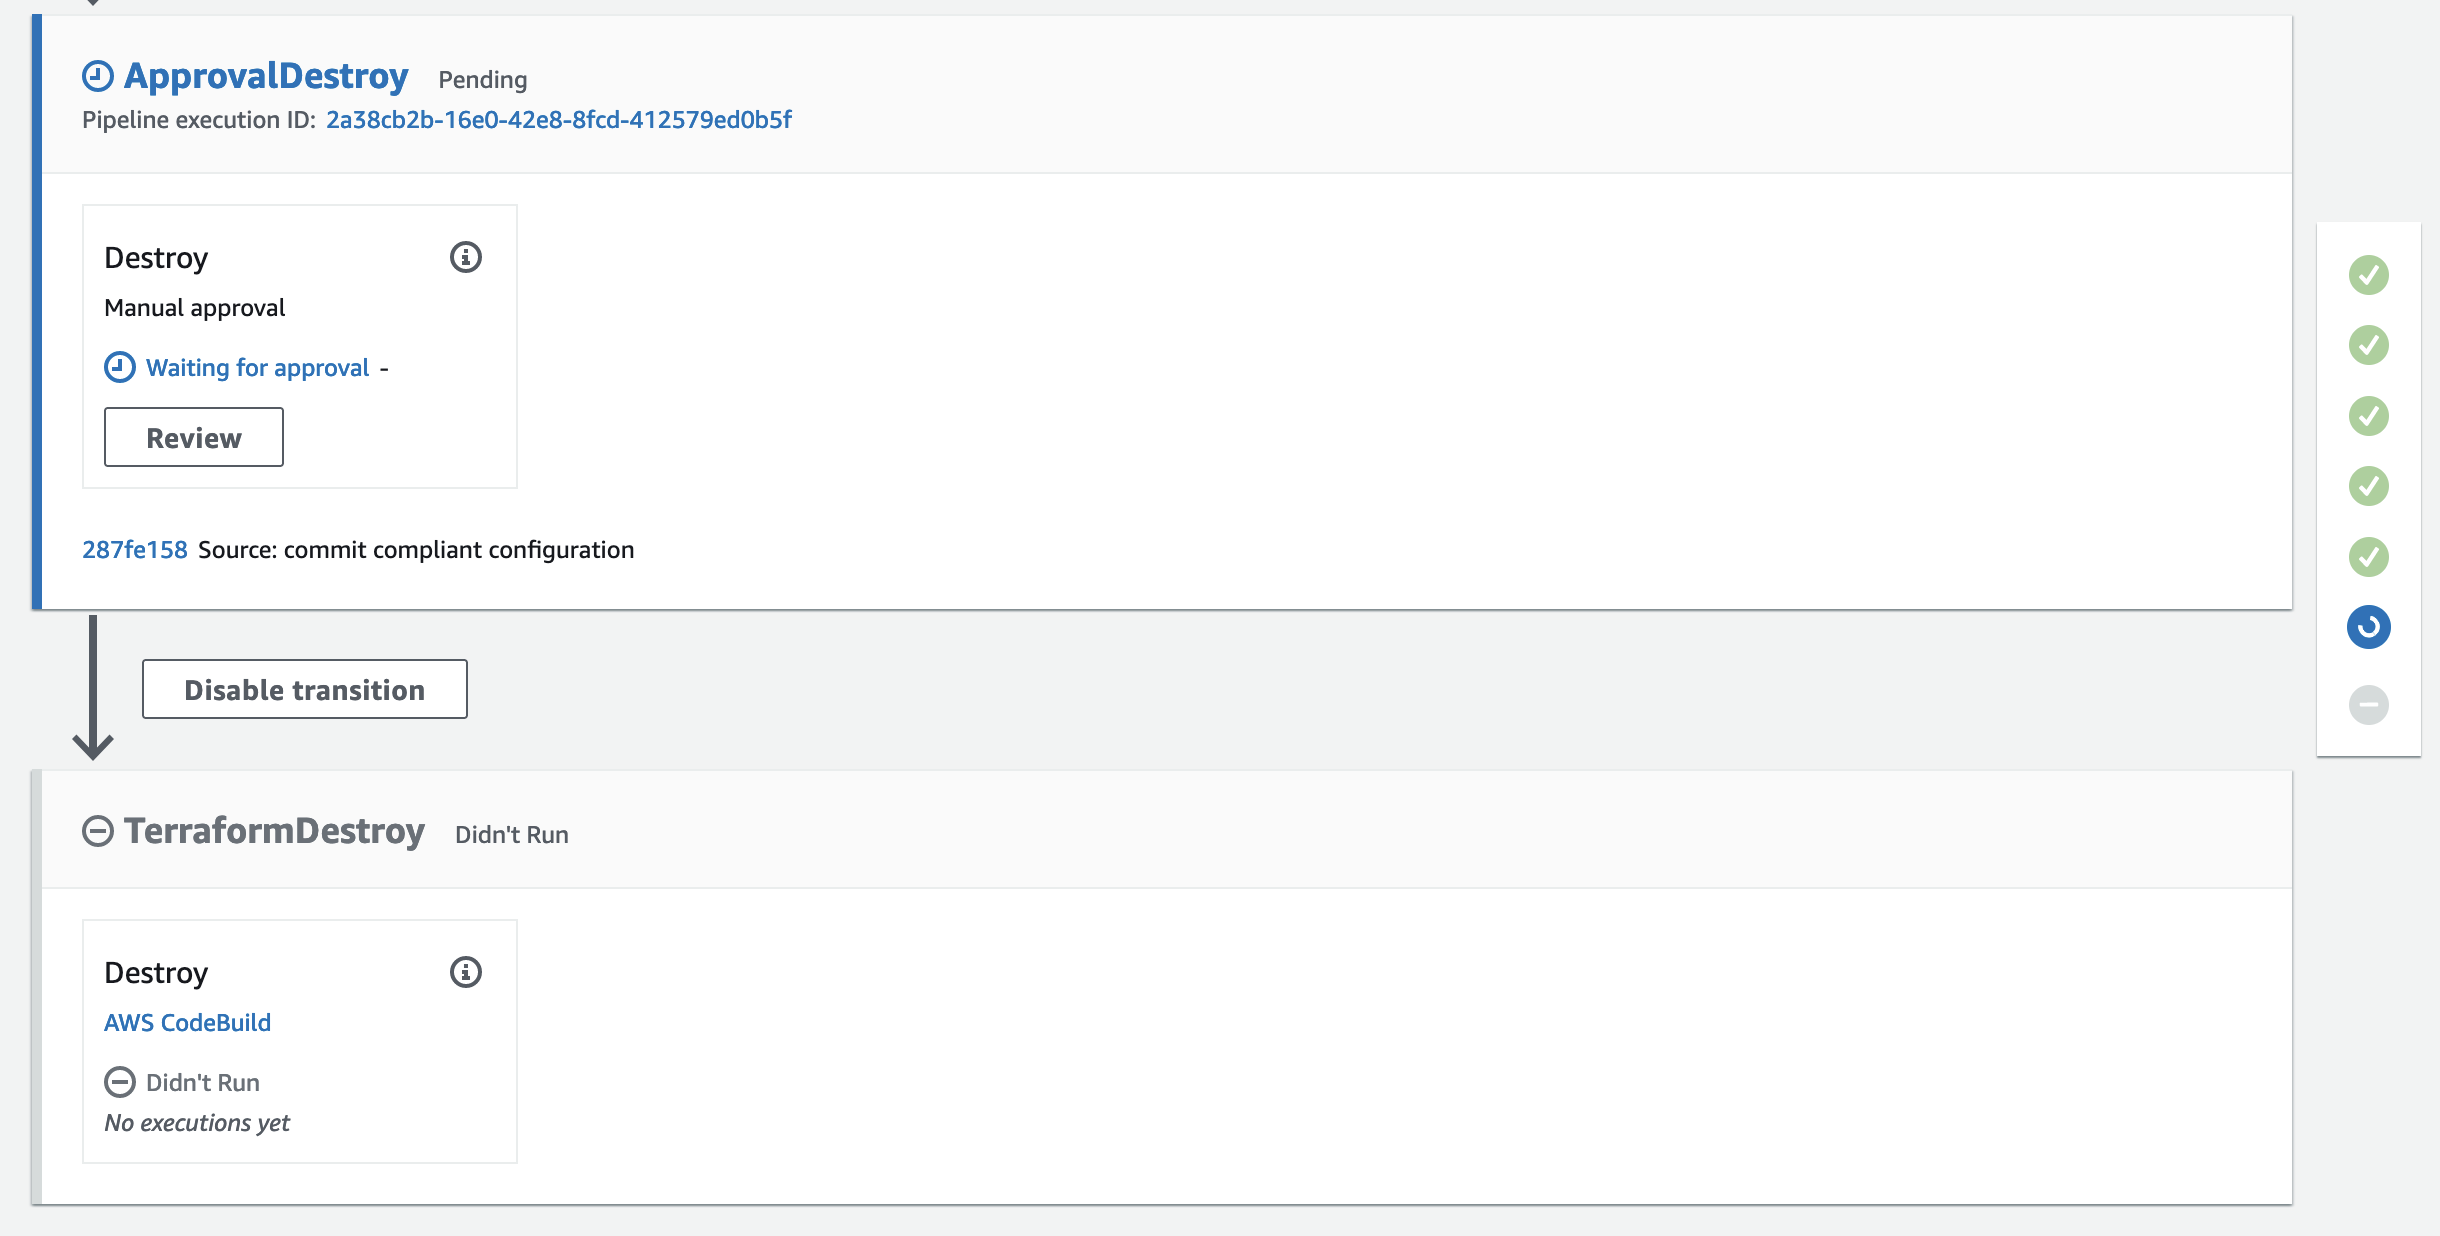
After the approval, terraform destroy will be run and the S3 bucket will be deleted.
Summary
As you can see, it is not complicated to implement a deployment pipeline for Terraform using AWS-managed services like CodePipeline, CodeCommit, and CodeBuild. Using this architecture you are able to quickly set up automation and validation workflows for IaC projects while reducing the operational overhead of self-managed solutions.
The architecture that we just implemented is meant to serve as a starting point and an example. There are multiple ways to make the solution more robust and efficient. Firstly, it is recommended to split up the single CodeBuild project into multiple specific projects to ensure isolation and better control of your build process. Secondly, storing OPA policies alongside your Terraform configuration is not recommended. For production workloads is is always better to manage policies centrally.
I hope you had fun and learned something new while working through this example. I am looking forward to your feedback and questions. If you want to take a look at the complete example code please visit my Github.
— Hendrik