Serverless Jenkins on ECS Fargate: Part 1
When setting up a Jenkins build server on a physical machine, right-sizing can become a challenging task. Long idle times followed by high, irregular loads make it hard to predict the necessary hardware requirements. One solution to this problem is the deployment of a containerized Controller/Agent-based Jenkins setup and to offload workloads to dedicated, transient agents.
This is the first post of a three-post series. In this series, I would like to show you how you can leverage AWS Fargate and Terraform to deploy a serverless as well as fault-tolerant, highly available, and scalable Jenkins Controller/Agent deployment pipeline.
Introduction
When setting up your CI/CD pipeline, there are plenty of tools and solutions to choose from. One tool that is regularly employed is Jenkins. Jenkins is an open-source CI/CD solution and one of the most popular DevOps tools today. It is highly customizable and extensible due to a large variety of plugins and can cover a large number of different use cases.
One challenge when setting up a Jenkins build server is the hardware right-sizing. Whether you are hosting the pipeline on a physical server or a virtual machine, you have to find the right balance between cost and capacity. You want to be able to run multiple jobs concurrently to meet demand during peak times while also trying to anticipate future growth. On the other hand, you don’t want to overprovision your machines and pay for hardware that sits idle for significant periods of time.
One solution is the deployment of distributed build environments by using a Jenkins Controller/Agent setup. The Jenkins Controller is the central node of the Jenkins installation and orchestrates the agents. It is responsible for scheduling jobs on the agents and overall monitoring. The Jenkins Agents can be viewed as a distinct process that manages the task execution on behalf of the Jenkins Controller. They are transient and can be quickly spun up if a specific task needs to be run. Once the task has been executed by the Agent, it is terminated.
Combined with cloud-hosted infrastructure, this allows for a much more granular hardware provisioning strategy and better cost control. The Controller node can be sized a lot smaller, as tasks are no longer run directly on the central node. As Agent nodes are transient, hardware can quickly be provisioned on-demand and terminated once tasks have run successfully. Hardware no longer incurs unnecessary costs by sitting idle for long periods of time. Peak loads can be handled more reliably by leveraging readily available cloud resources. By not relying on physical servers, the setup becomes more reliable and can be set up in a highly available manner.
To improve the setup even more, Jenkins can be run in the cloud as a containerized environment. Not only will this improve the availability and deployment speed, but also allow us to scale workloads more easily. Agents and tasks can be run isolated from one another and be cleaned up reliably afterward. Better cost control is achieved by utilizing resources more efficiently.
In this blog post, I would like to show you how you can set up your own serverless, Controller/Agent-based, containerized Jenkins environment using AWS Fargate and Terraform.
This is the first post of a three-post series.
In the first post, we will set up a Jenkins Controller with Terraform on AWS Fargate.
In the second post Serverless Jenkins on ECS Part 2, we will expand the setup by adding a Jenkins Agent.
We will finish part three Serverless Jenkins on ECS Part 3 by customizing our Controller and Agent docker images and setup a deployment pipeline for Terraform using Jenkins Configuration as Code.
Please be aware that this blog post won’t go into much detail regarding Jenkins itself. We will set up a Jenkins job to deploy Terraform configuration in part three of this series, but won’t do a deep dive into topics like plugin management, task configuration, and user management. For more information, please visit the official Jenkins website.
Architecture
As an introduction, I would like to guide you through the infrastructure that we will set up as part of this blog post. The diagram below displays the target architecture that we will build and deploy.
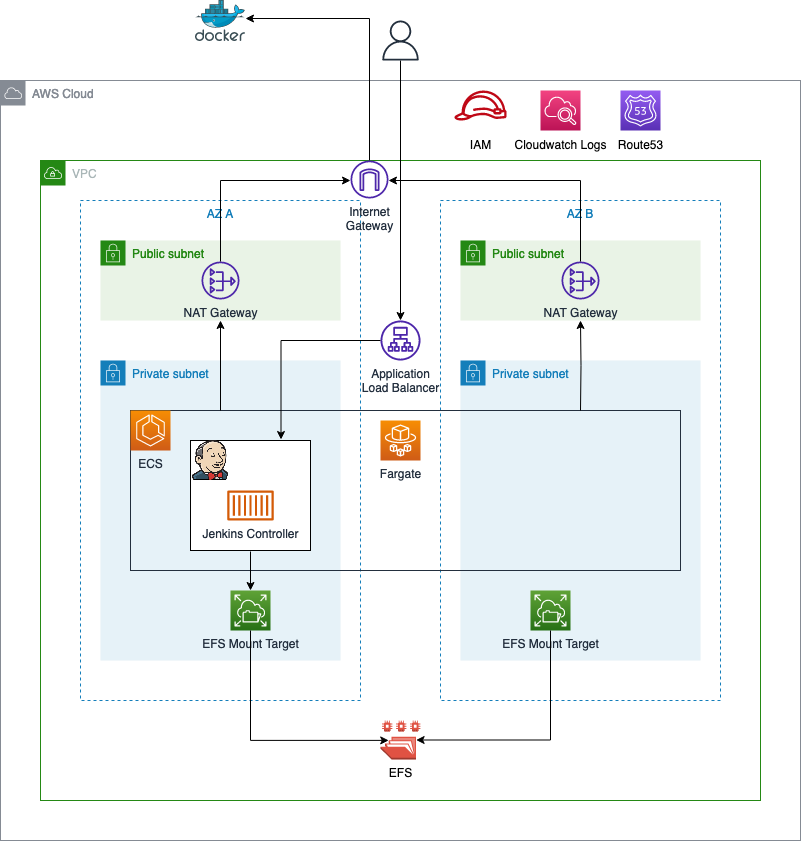
We will start by building the network infrastructure. The network will include the vpc, the subnets, the internet gateway, nat gateways, and route tables. The nat gateways are needed to allow our Jenkins Controller to reach the public Internet. Public Internet access is needed to download container images from Docker Hub and communicate with AWS Service APIs. To keep this setup simple, VPC Endpoints were not used to reach AWS Services securely.
Once the network has been deployed, we will continue by setting up an ECS cluster. The ECS cluster will be used to run our ECS Service and Fargate tasks. In order to store data and the Jenkins configuration highly available across multiple availability zones, an AWS elastic file system (EFS) will be used. Decoupling the storage from the lifecycle of the containers greatly improves the reliability of the solution. In case of a Jenkins node failure, the container can be shut down without data loss. New containers will be able to access the data and configuration via EFS.
To access our Jenkins Controller node from outside AWS, an application load balancer will be deployed.
Project Structure
Before we start setting up our Terraform configuration, I would like you to create the project structure. Please create the following files.
├── container_definition.tftpl
├── alb.tf
├── ecs.tf
├── efs.tf
├── service-discovery.tf
├── vpc.tf
├── data.tf
├── variables.tf
├── outputs.tf
├── terraform.tfvars
As this example will be quite extensive, we will split up our Terraform configuration into separate files. The name of each file corresponds to the AWS service which configuration is contained within.
Network Deployment
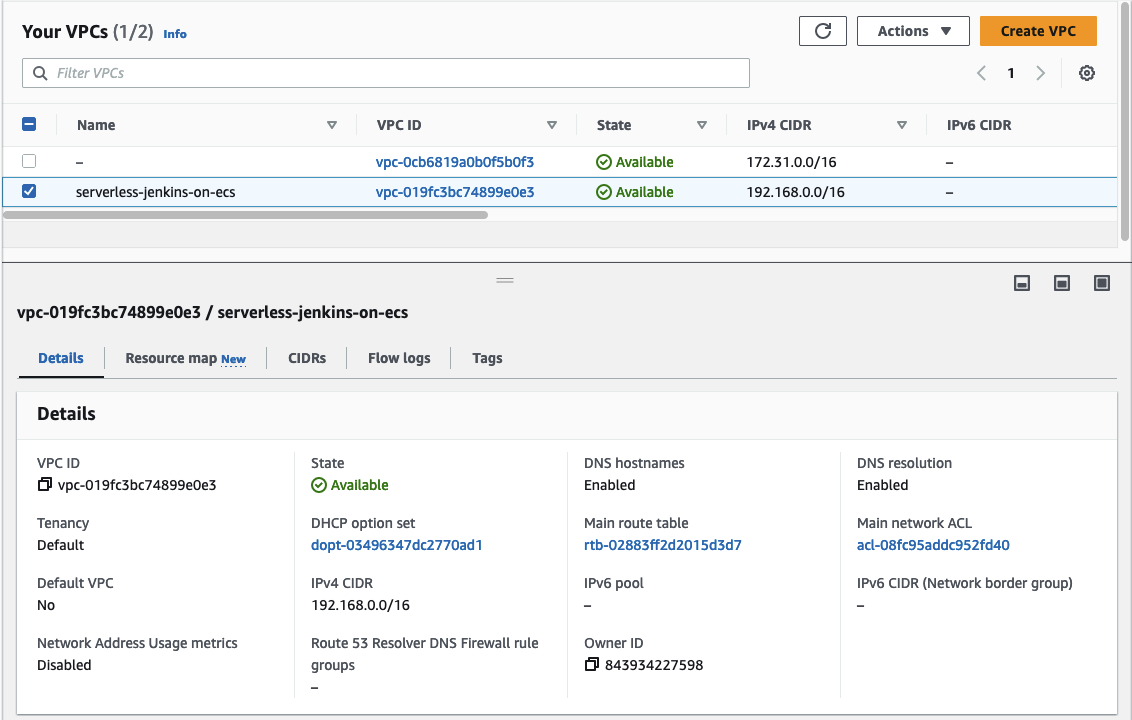
We will start by deploying the network infrastructure. The vpc and all included components will be the basis for the ECS cluster and the EFS. The Terraform configuration for the vpc.tf can be found here.
Before we are able to deploy our network, we have to define a few variables for our VPC and subnets. Please copy the following snippet into the variables.tf.
# variables.tf

variable "vpc_cidr_block" {
  description = "CIDR of vpc"
  type        = string
}

variable "public_subnets" {
  description = "Map of public subnets that should be created"
  type = map(object({
    cidr_block        = string
    availability_zone = string
  }))
}

variable "private_subnets" {
  description = "Map of private subnets that should be created"
  type = map(object({
    cidr_block        = string
    availability_zone = string
  }))
}

variable "application_name" {
  description = "Name of the application"
  type        = string
}
To manage the values of our defined variables, we will create a terraform.tfvars file. This will help us to keep our Terraform configuration clean and readable. Please define the following values for our variables in the terraform.tfvars file.
# terraform.tfvars

vpc_cidr_block = "192.168.0.0/16"

public_subnets = {
  subnet_1 = {
    cidr_block        = "192.168.0.0/24"
    availability_zone = "eu-central-1a"
  }
  subnet_2 = {
    cidr_block        = "192.168.1.0/24"
    availability_zone = "eu-central-1b"
  }
}

private_subnets = {
  subnet_1 = {
    cidr_block        = "192.168.2.0/24"
    availability_zone = "eu-central-1a"
  }
  subnet_2 = {
    cidr_block        = "192.168.3.0/24"
    availability_zone = "eu-central-1b"
  }
}

application_name          = "serverless-jenkins-on-ecs"
Let’s run terraform init to initialize Terraform and terraform apply to deploy the network infrastructure. Once Terraform has deployed the configuration, you should see a new network setup in the AWS console.
Setup Container Environment
After having deployed our network, we will continue by creating the container environment. The container environment will consist of an ECS Cluster and ECS Service, an EFS, and an AWS Application Load Balancer.
As we will need a few additional variables for our Terraform code, let’s start by expanding our variables.tf.
# variables.tf (extended)

variable "jenkins_controller_identifier" {
  description = "Name of the jenkins controller"
  type        = string
}

variable "jenkins_agent_port" {
  description = "Port Jenkins agent uses to connect to controller"
  type        = number
}

variable "jenkins_controller_port" {
  description = "Port used to connect to Jenkins controller"
  type        = number
}
Afterward, we will add the values for the newly created variables to our terraform.tfvars.
# terraform.tfvars (extended)

jenkins_controller_identifier = "jenkins-controller"
jenkins_agent_port        = 50000
jenkins_controller_port       = 8080
We also need two additional data resources to extract the current AWS region as well as the AWS caller identity account id. Add the code to the data.tf.
# data.tf

################################################################################
# Get Current region
################################################################################

data "aws_region" "current" {}


################################################################################
# Get current AWS Account ID
################################################################################

data "aws_caller_identity" "this" {}
Once we have added the additional variables and data resources, we will start with the implementation of EFS. Copy the following Terraform configuration into efs.tf.
# efs.tf

################################################################################
# EFS
################################################################################

resource "aws_efs_file_system" "this" {
  creation_token   = var.application_name
  encrypted        = true
  performance_mode = "generalPurpose"
  throughput_mode  = "bursting"
}


################################################################################
# EFS mount targets
################################################################################

resource "aws_efs_mount_target" "this" {
  for_each = aws_subnet.private

  file_system_id  = aws_efs_file_system.this.id
  subnet_id       = each.value.id
  security_groups = [aws_security_group.efs.id]
}


################################################################################
# EFS security group
################################################################################

resource "aws_security_group" "efs" {
  name   = "efs"
  vpc_id = aws_vpc.this.id
}

resource "aws_security_group_rule" "ecs_ingress" {
  security_group_id = aws_security_group.efs.id

  type                     = "ingress"
  from_port                = 2049
  to_port                  = 2049
  protocol                 = "tcp"
  source_security_group_id = aws_security_group.ecs_service.id
}

################################################################################
# EFS access points
################################################################################

resource "aws_efs_access_point" "this" {
  file_system_id = aws_efs_file_system.this.id

  posix_user {
    gid = 1000
    uid = 1000
  }

  root_directory {
    path = "/home"

    creation_info {
      owner_gid   = 1000
      owner_uid   = 1000
      permissions = 755
    }
  }
}

################################################################################
# EFS access policy
################################################################################

data "aws_iam_policy_document" "this" {
  statement {
    actions = [
      "elasticfilesystem:ClientMount",
      "elasticfilesystem:ClientWrite"
    ]

    effect = "Allow"

    resources = [
      aws_efs_file_system.this.arn,
    ]

    principals {
      type        = "Service"
      identifiers = ["ecs-tasks.amazonaws.com"]
    }

    condition {
      test     = "Bool"
      variable = "aws:SecureTransport"
      values   = ["true"]
    }
  }
}

resource "aws_efs_file_system_policy" "this" {
  file_system_id = aws_efs_file_system.this.id

  policy = data.aws_iam_policy_document.this.json
}
The configuration will create an EFS with a mount target in each availability zone as well as an access point for our containers. The EFS security group allows access on port 2049 from the security group of the ECS service. As the ECS cluster, service, and task currently do not exist, we will create both in the next step. Let’s start with the ECS task container definition which will be the basis for our Jenkins Controller node. Paste the following snippet into the container_definition.tftpl.
// container_definition.tftpl

[
    {
      "name": "${container_name}",
      "image": "${container_image}",
      "portMappings": [
          {
            "containerPort": ${jenkins_controller_port}
          },
          {
            "containerPort": ${jenkins_agent_port}
          }
      ],
      "mountPoints": [
        {
          "sourceVolume": "${source_volume}",
          "containerPath": "/var/jenkins_home"
        }
      ],
      "LogConfiguration":
        {
          "LogDriver": "awslogs",
          "Options":
            {
                "awslogs-group": "${awslogs_group}",
                "awslogs-region": "${awslogs_region}",
                "awslogs-stream-prefix": "jenkins-controller"
            }

        }
    }
  ]
The container definition is a template that will be filled during the deployment. Using a template file allows us to dynamically define settings like container images, mount points, container ports, and AWS CloudWatch Log Groups. This will be useful in part 2 of this blog series where we will create a custom docker image for our Jenkins Controller and Agent.
Now that we have defined our container definition, we will create the ECS infrastructure. Copy the code below into the ecs.tf.
# ecs.tf

################################################################################
# ECS cluster
################################################################################

resource "aws_ecs_cluster" "this" {
  name = var.application_name
}


################################################################################
# ECS task
################################################################################

resource "aws_ecs_task_definition" "this" {
  family = var.application_name
  container_definitions = templatefile("${path.module}/container_definition.tftpl", {
    container_name      = var.jenkins_controller_identifier,
    container_image     = "jenkins/jenkins:2.398-jdk11",
    jenkins_controller_port = var.jenkins_controller_port
    jenkins_agent_port  = var.jenkins_agent_port
    source_volume       = "home",
    awslogs_group       = aws_cloudwatch_log_group.this.name,
    awslogs_region      = data.aws_region.current.name,
    }
  )


  network_mode = "awsvpc"
  cpu          = 1024
  memory       = 2048

  execution_role_arn = aws_iam_role.execution.arn
  task_role_arn      = aws_iam_role.task.arn

  requires_compatibilities = ["FARGATE"]


  volume {
    name = "home"

    efs_volume_configuration {
      file_system_id     = aws_efs_file_system.this.id
      transit_encryption = "ENABLED"

      authorization_config {
        access_point_id = aws_efs_access_point.this.id
        iam             = "ENABLED"
      }
    }
  }
}


################################################################################
# ECS execution role
################################################################################

resource "aws_iam_role" "execution" {
  name = "ecs-execution"

  assume_role_policy = jsonencode({
    Version = "2012-10-17"
    Statement = [
      {
        Action = "sts:AssumeRole"
        Effect = "Allow"
        Principal = {
          Service = "ecs-tasks.amazonaws.com"
        }
      },
    ]
  })
}

resource "aws_iam_role_policy_attachment" "basic_execution_role" {
  role       = aws_iam_role.execution.name
  policy_arn = "arn:aws:iam::aws:policy/service-role/AmazonECSTaskExecutionRolePolicy"
}


################################################################################
# ECS task role
################################################################################

resource "aws_iam_role" "task" {
  name = "ecs-task"

  assume_role_policy = jsonencode({
    Version = "2012-10-17"
    Statement = [
      {
        Action = "sts:AssumeRole"
        Effect = "Allow"
        Principal = {
          Service = "ecs-tasks.amazonaws.com"
        }
      },
    ]
  })
}

data "aws_iam_policy_document" "efs_access" {
  statement {
    actions = [
      "elasticfilesystem:ClientMount",
      "elasticfilesystem:ClientWrite"
    ]

    resources = [
      aws_efs_file_system.this.arn
    ]
  }
}

resource "aws_iam_policy" "efs_access" {
  name   = "efs-access"
  policy = data.aws_iam_policy_document.efs_access.json
}

resource "aws_iam_role_policy_attachment" "efs_access" {
  role       = aws_iam_role.task.name
  policy_arn = aws_iam_policy.efs_access.arn
}

data "aws_iam_policy_document" "ecs_access" {
  statement {
    actions = [
      "ecs:RegisterTaskDefinition",
      "ecs:DeregisterTaskDefinition",
      "ecs:ListClusters",
      "ecs:ListTaskDefinitions",
      "ecs:DescribeContainerInstances",
      "ecs:DescribeTaskDefinition",
      "ecs:DescribeClusters",
      "ecs:ListTagsForResource"
    ]
    resources = [
      "*"
    ]
  }

  statement {
    actions = [
      "ecs:ListContainerInstances"
    ]
    resources = [
      aws_ecs_cluster.this.arn
    ]
  }

  statement {
    actions = [
      "ecs:RunTask",
      "ecs:StopTask",
      "ecs:DescribeTasks"
    ]
    resources = [
      "*"
    ]
    condition {
      test     = "ArnEquals"
      variable = "ecs:cluster"

      values = [
        aws_ecs_cluster.this.arn
      ]
    }
  }
}

resource "aws_iam_policy" "ecs_access" {
  name   = "ecs-access"
  policy = data.aws_iam_policy_document.ecs_access.json
}

resource "aws_iam_role_policy_attachment" "ecs_access" {
  role       = aws_iam_role.task.name
  policy_arn = aws_iam_policy.ecs_access.arn
}

data "aws_iam_policy_document" "iam_access" {
  statement {
    actions = [
      "iam:GetRole",
      "iam:PassRole"
    ]

    resources = [
      aws_iam_role.execution.arn,
      aws_iam_role.agent.arn
    ]
  }
}

resource "aws_iam_policy" "iam_access" {
  name   = "iam-access"
  policy = data.aws_iam_policy_document.iam_access.json
}

resource "aws_iam_role_policy_attachment" "iam_access" {
  role       = aws_iam_role.task.name
  policy_arn = aws_iam_policy.iam_access.arn
}


################################################################################
# ECS agent role
################################################################################

resource "aws_iam_role" "agent" {
  name = "ecs-agent"

  assume_role_policy = jsonencode({
    Version = "2012-10-17"
    Statement = [
      {
        Action = "sts:AssumeRole"
        Effect = "Allow"
        Principal = {
          Service = "ecs-tasks.amazonaws.com"
        }
      },
    ]
  })
}

resource "aws_iam_role_policy_attachment" "admin_access" {
  role       = aws_iam_role.agent.name
  policy_arn = "arn:aws:iam::aws:policy/AdministratorAccess"
}


################################################################################
# ECS service
################################################################################

resource "aws_ecs_service" "this" {
  name            = var.application_name
  launch_type     = "FARGATE"
  cluster         = aws_ecs_cluster.this.arn
  task_definition = aws_ecs_task_definition.this.arn
  desired_count   = 1

  network_configuration {
    subnets          = local.private_subnet_ids
    security_groups  = [aws_security_group.ecs_service.id]
    assign_public_ip = false
  }

  load_balancer {
    target_group_arn = aws_lb_target_group.this.arn
    container_name   = var.jenkins_controller_identifier
    container_port   = var.jenkins_controller_port
  }

  service_registries {
    registry_arn = aws_service_discovery_service.this.arn
    port         = var.jenkins_agent_port
  }
}


################################################################################
# ECS security group for Jenkins controller
################################################################################

resource "aws_security_group" "ecs_service" {
  name   = "ecs-jenkins-controller"
  vpc_id = aws_vpc.this.id
}

resource "aws_security_group_rule" "alb_ingress" {
  security_group_id = aws_security_group.ecs_service.id

  type                     = "ingress"
  from_port                = var.jenkins_controller_port
  to_port                  = var.jenkins_controller_port
  protocol                 = "tcp"
  source_security_group_id = aws_security_group.alb.id
}

resource "aws_security_group_rule" "service_all_egress" {
  security_group_id = aws_security_group.ecs_service.id

  type        = "egress"
  from_port   = 0
  to_port     = 65535
  protocol    = "tcp"
  cidr_blocks = ["0.0.0.0/0"]
}

resource "aws_security_group_rule" "jenkins_agent_ingress" {
  security_group_id = aws_security_group.ecs_service.id

  type                     = "ingress"
  from_port                = var.jenkins_agent_port
  to_port                  = var.jenkins_agent_port
  protocol                 = "tcp"
  source_security_group_id = aws_security_group.ecs_jenkins_agent.id
}

################################################################################
# ECS security group for Jenkins agents
################################################################################

resource "aws_security_group" "ecs_jenkins_agent" {
  name   = "ecs-jenkins-agents"
  vpc_id = aws_vpc.this.id
}

resource "aws_security_group_rule" "agent_all_egress" {
  security_group_id = aws_security_group.ecs_jenkins_agent.id

  type        = "egress"
  from_port   = 0
  to_port     = 65535
  protocol    = "tcp"
  cidr_blocks = ["0.0.0.0/0"]
}

################################################################################
# ECS CloudWatch Logs group
################################################################################

resource "aws_cloudwatch_log_group" "this" {
  name              = var.application_name
  retention_in_days = 30
}
The Terraform configuration for ECS is quite extensive. We create an ECS cluster, service, and task including security groups and IAM roles for the Jenkins Controller and Agent. The ECS service has a configuration block for a load balancer defined. The application load balancer that we will use to access the Jenkins Controller from the Internet does currently not exist. We will implement the Terraform configuration for it next. Copy the code below into alb.tf.
# alb.tf

################################################################################
# ALB
################################################################################

resource "aws_lb" "this" {
  name = var.application_name

  internal           = false
  load_balancer_type = "application"
  security_groups    = [aws_security_group.alb.id]
  subnets            = local.public_subnet_ids
}


################################################################################
# ALB security group
################################################################################

resource "aws_security_group" "alb" {
  name   = "alb"
  vpc_id = aws_vpc.this.id
}

resource "aws_security_group_rule" "http_ingress" {
  security_group_id = aws_security_group.alb.id

  type        = "ingress"
  from_port   = 80
  to_port     = 80
  protocol    = "tcp"
  cidr_blocks = ["0.0.0.0/0"]
}

resource "aws_security_group_rule" "ecs_egress" {
  security_group_id = aws_security_group.alb.id

  type                     = "egress"
  from_port                = 8080
  to_port                  = 8080
  protocol                 = "tcp"
  source_security_group_id = aws_security_group.ecs_service.id
}


################################################################################
# ALB http listener
################################################################################

resource "aws_lb_listener" "this" {
  load_balancer_arn = aws_lb.this.arn
  port              = "80"
  protocol          = "HTTP"

  default_action {
    type             = "forward"
    target_group_arn = aws_lb_target_group.this.arn
  }
}


################################################################################
# ALB target group
################################################################################

resource "aws_lb_target_group" "this" {
  name        = var.application_name
  port        = 8080
  protocol    = "HTTP"
  target_type = "ip"
  vpc_id      = aws_vpc.this.id

  health_check {
    path = "/login"
  }
}
The ALB allows traffic on port 80 from the Internet and will forward the traffic to the target group on port 8080. The target group will be our ECS service. Before we can apply the Terraform configuration, there is one step left.
Once our Jenkins Controller spawns a Jenkins Agent, the Agent needs to be able to connect to the Controller. In order to connect to the Controller, the Agent needs to be aware of the Controller’s IP and the port it can be reached on. We will use AWS Service Discovery to create and manage a DNS namespace for our ECS Service. AWS Service Discovery makes it easy for containerized services to discover and connect with each other. Copy the following code into service-discovery.tf.
# service-discovery.tf

################################################################################
# Service Discovery namespace
################################################################################

resource "aws_service_discovery_private_dns_namespace" "this" {
  name = var.application_name
  vpc  = aws_vpc.this.id
}

################################################################################
# Service Discovery service
################################################################################

resource "aws_service_discovery_service" "this" {
  name = var.jenkins_controller_identifier

  dns_config {
    namespace_id   = aws_service_discovery_private_dns_namespace.this.id
    routing_policy = "MULTIVALUE"

    dns_records {
      ttl  = 60
      type = "A"
    }
    dns_records {
      ttl  = 60
      type = "SRV"
    }
  }
}
To simplify the access to our Jenkins Controller node once Terraform has deployed the infrastructure and to make the setup of the Jenkins Agent easier, we will add a few useful outputs to the outputs.tf.
output "private_subnet_ids" {
  description = "List of private subnet ids"
  value       = join(",", local.private_subnet_ids)
}

output "ecs_jenkins_agent_security_group_id" {
  description = "ID of the Jenkins agent security group"
  value       = aws_security_group.ecs_jenkins_agent.id
}

output "ecs_execution_role_arn" {
  description = "ARN of the ECS execution role"
  value       = aws_iam_role.execution.arn
}

output "ecs_agent_role_arn" {
  description = "ARN of the agent task role"
  value       = aws_iam_role.agent.arn
}

output "ecs_cloudwatch_log_group_name" {
  description = "Name of the ECS CloudWatch Log group"
  value       = aws_cloudwatch_log_group.this.name
}

output "jenkins_controller_agent_tunnel_connection" {
  description = "Tunnel connection string"
  value       = "jenkins-controller.${var.application_name}:50000"
}

output "jenkins_url" {
  description = "URL of the Jenkins server"
  value       = "http://${aws_lb.this.dns_name}"
}
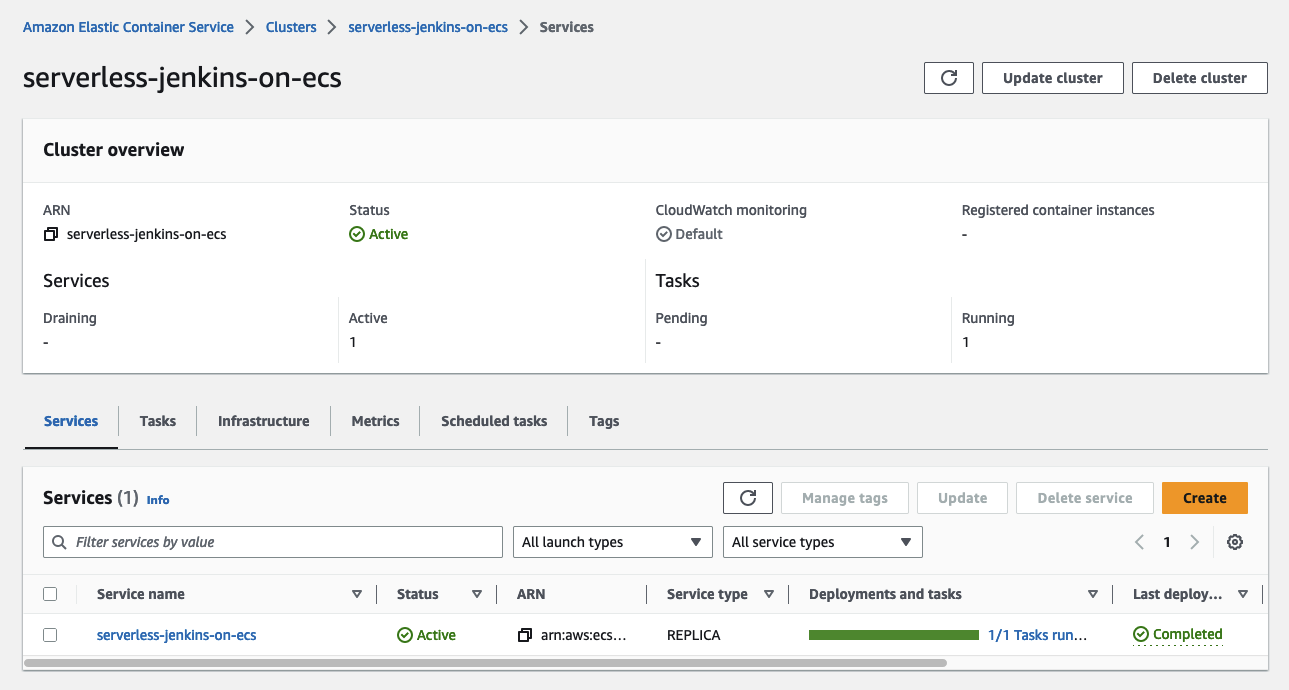
We now have all components in place to deploy our Jenkins environment. Run terraform apply to deploy the new infrastructure. Once the deployment has been finished, you should see the ECS cluster and service in the AWS console.
Jenkins Controller Setup
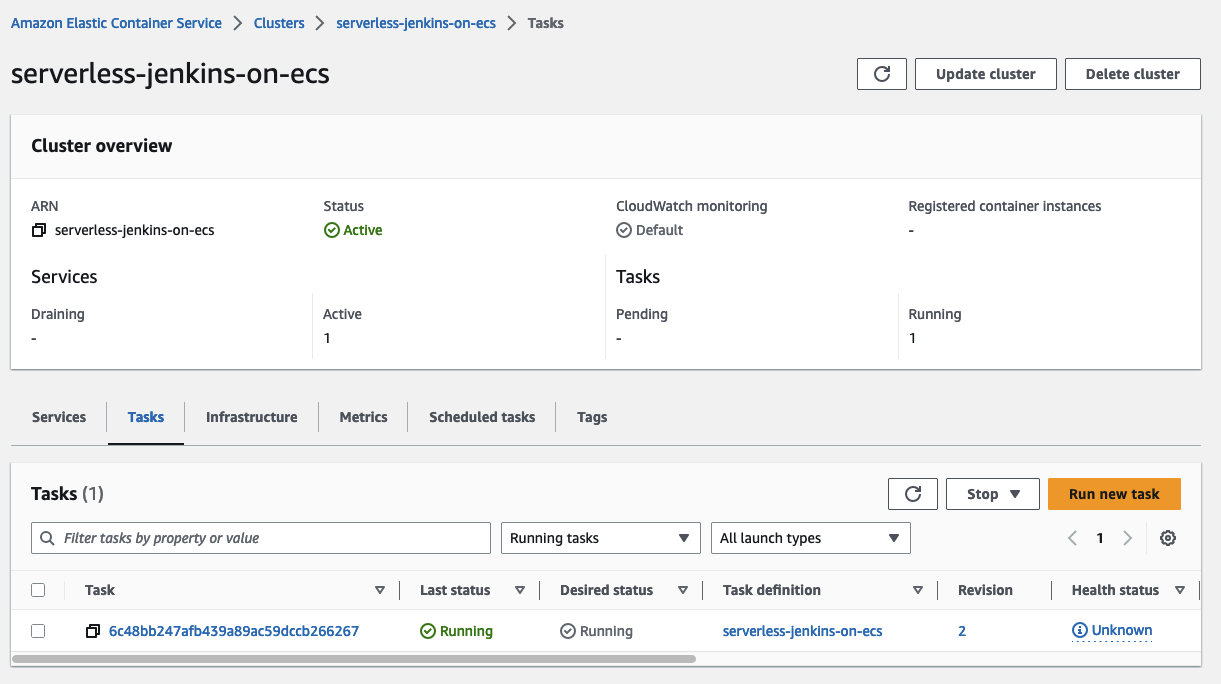
Now that all the infrastructure is in place, it is time to configure the Jenkins Controller. Wait until the ECS task has been started and access the Jenkins Controller node via the ALB DNS name shown under the Terraform output jenkins_url.
You will be greeted by the Jenkins setup screen.
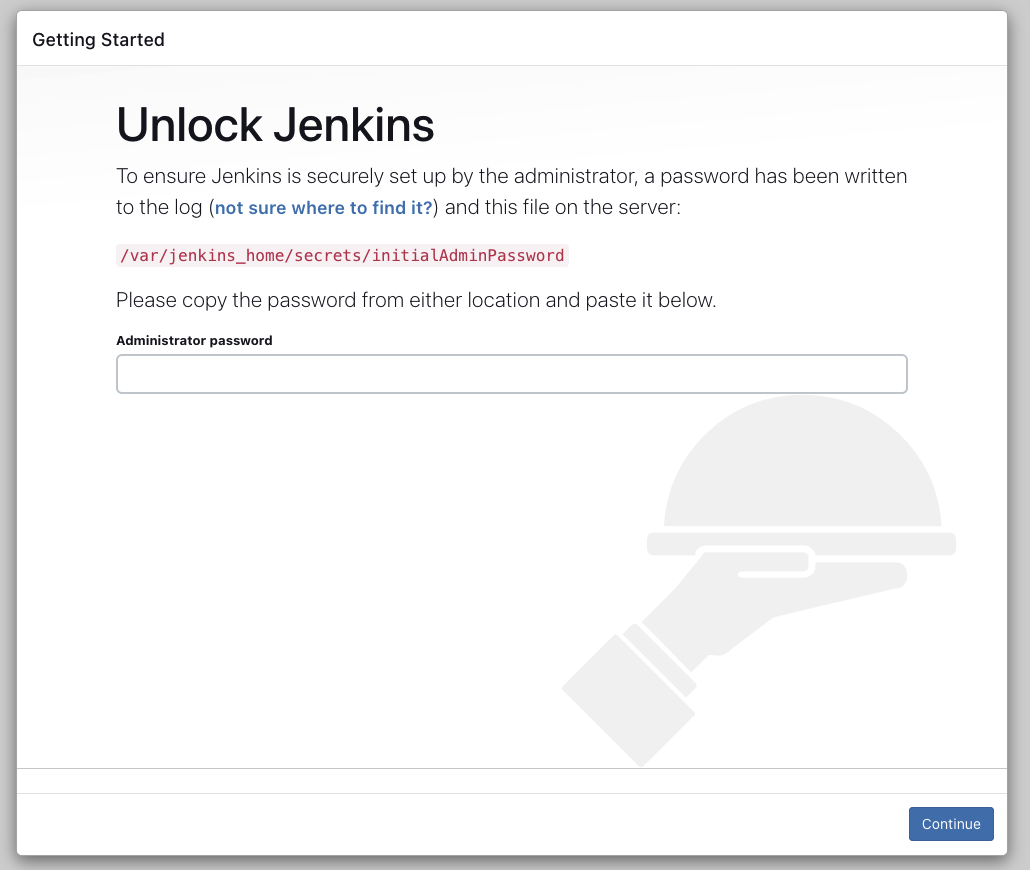
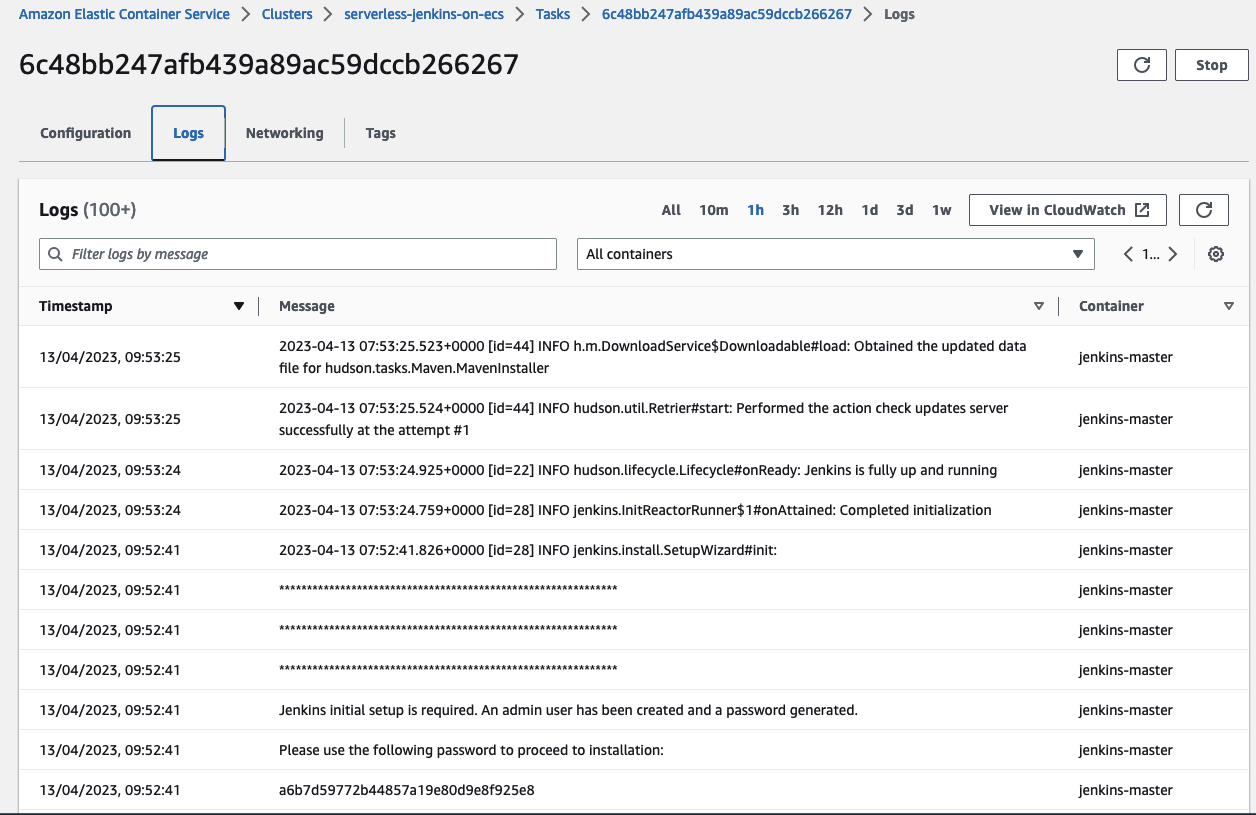
In order to start the Jenkins setup, you need to retrieve the initial password from the Jenkins logs. You will find the logs in the ECS Task console under Logs. The password is mentioned under the log entry Please use the following password to proceed to installation:. Copy and paste the password into the starting page.
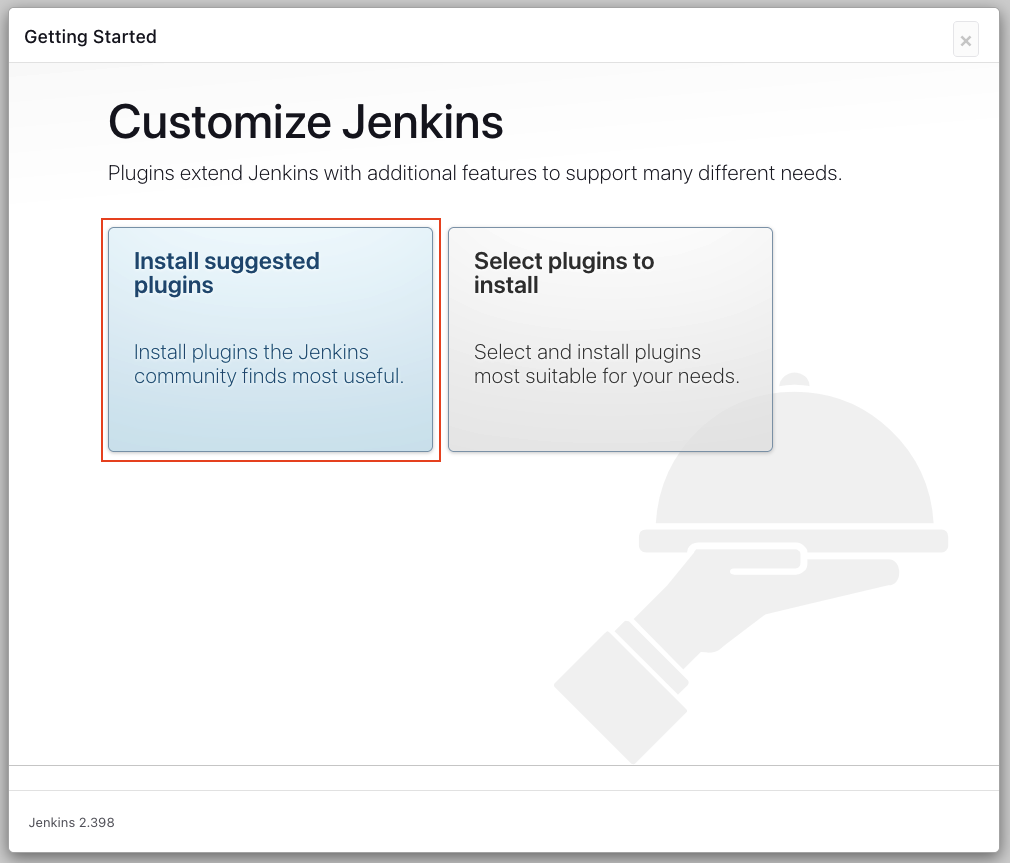
Once you have successfully entered the initial password, you will be able to customize Jenkins by downloading plugins. To keep this step simple install the suggested plugins. This might take a few minutes.
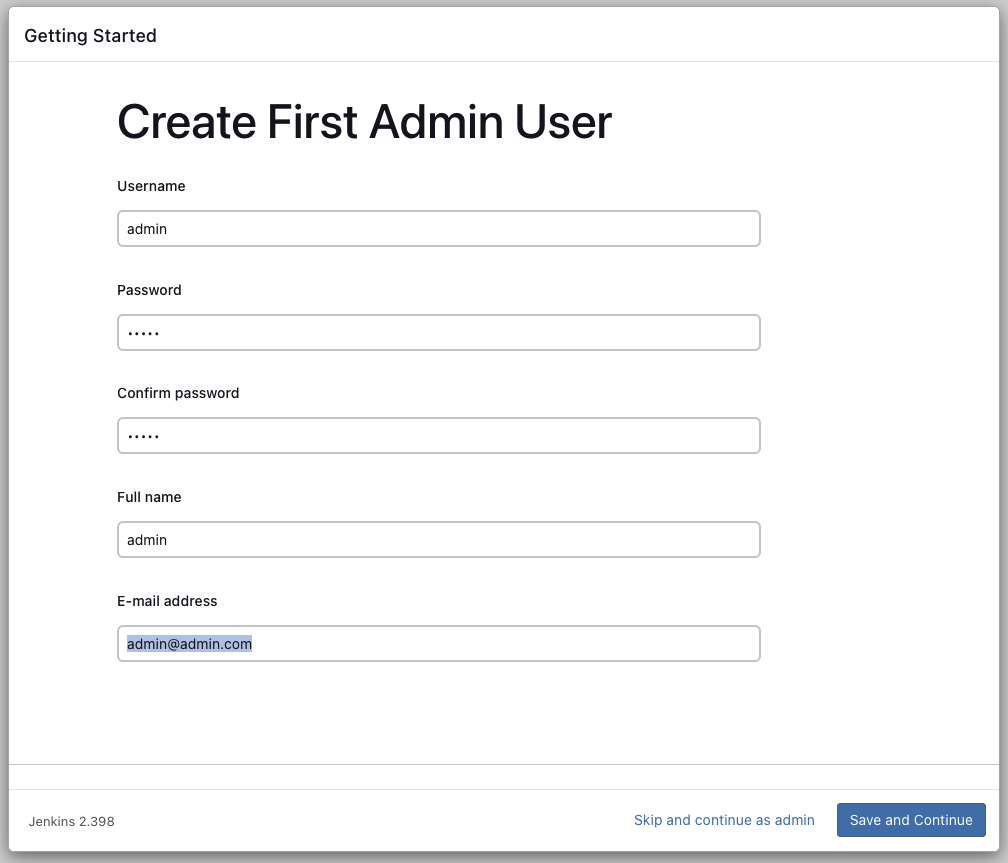
Once the plugins have been downloaded and installed, you will be able to create an account. Create your first admin user.
After having created the admin user the only thing left is to finish the Jenkins setup.
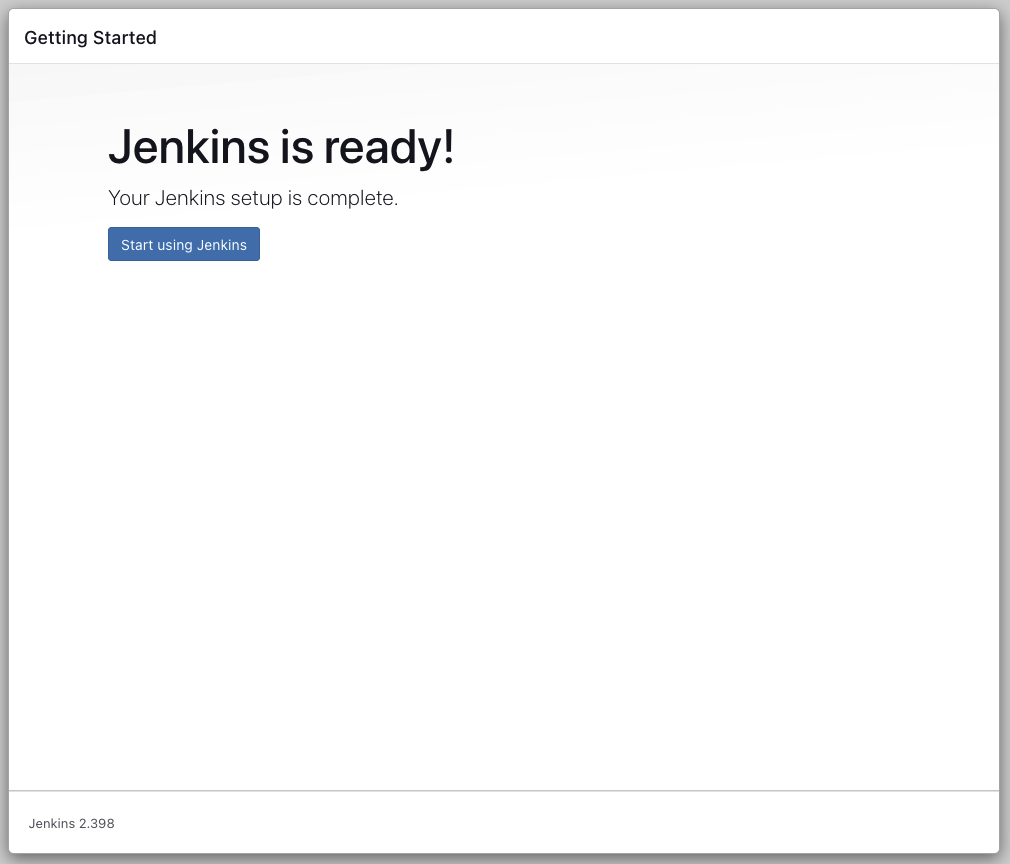
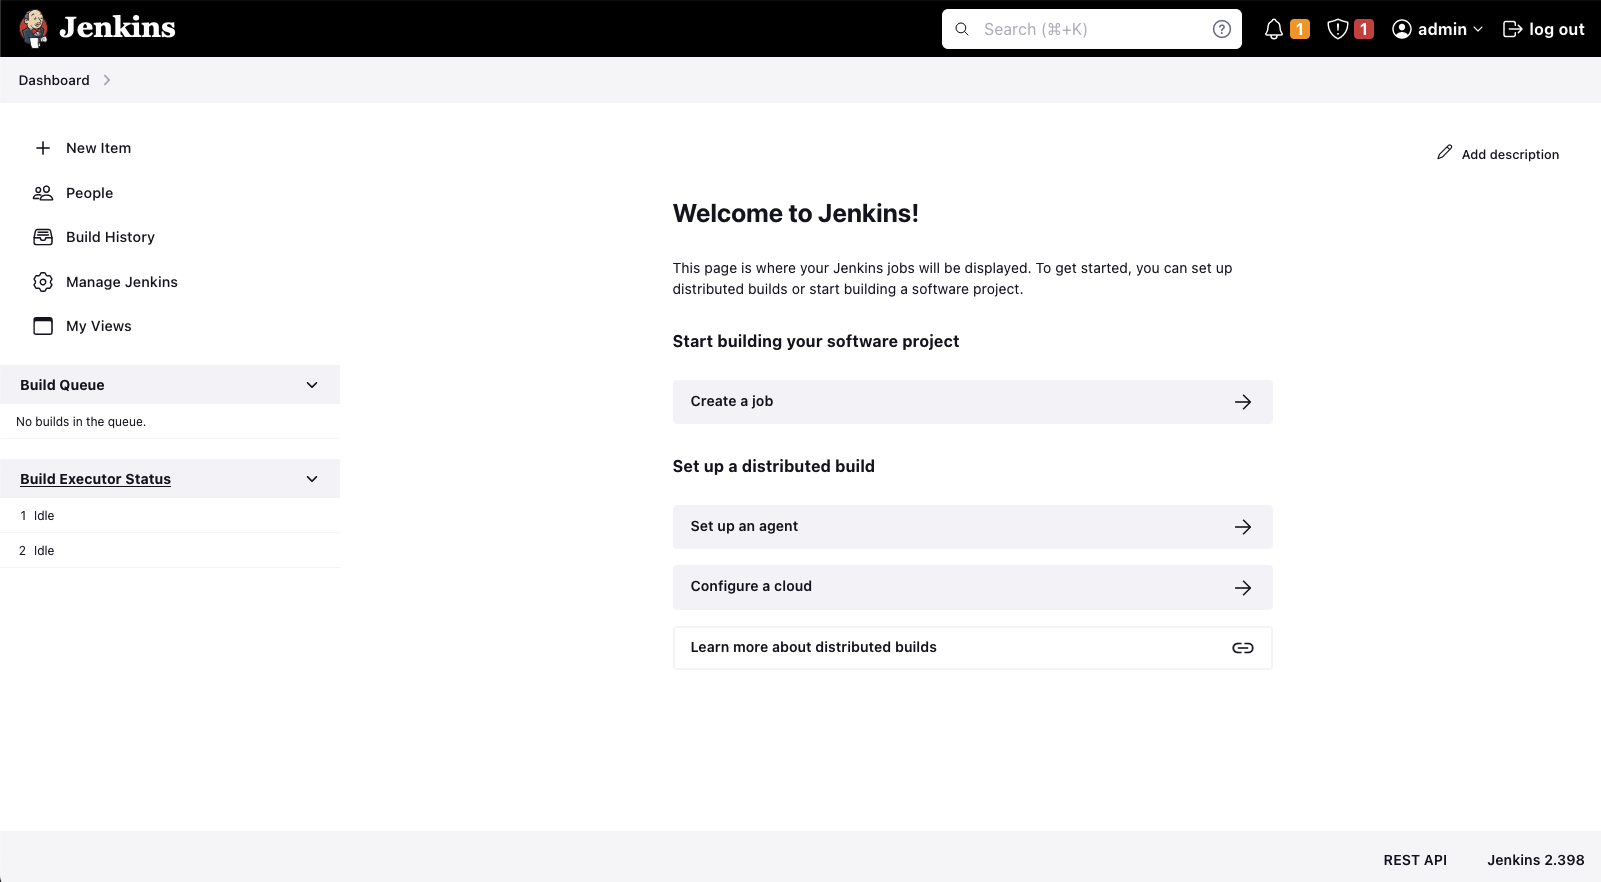
Congratulations! You just finished setting up the Jenkins Controller. The Jenkins Controller is now ready to be used.
In the second part of the series, we will continue the Jenkins setup and configure the Jenkins Agent.
Please be aware that AWS NAT Gateways are quite expensive. If you wish to continue the second part of this series at a later time, make sure to remove the infrastructure by running terraform destroy.
Summary
As you can see, it is not complicated to implement a simple Jenkins Controller node on AWS using Fargate. Using this architecture you are able to run your Jenkins deployment pipelines in a serverless and highly available environment. This will not only make your deployments more reliable but will also speed up the overall development process of your team.
The architecture that we just implemented is meant to serve as a starting point and an example. There are multiple ways to make the solution more robust and efficient. One possibility would be to set up a certificate on the Application Load Balancer and to listen on port 443 instead of port 80. Another point would be to configure Jenkins using Configuration as Code and to employ Jenkins Agents to scale out on demand and handle peak loads. I will show you how to use set up Jenkins Agents in the second part of this series.
I hope you had fun and learned something new while working through this short example. I am looking forward to your feedback and questions. If you want to take a look at the complete example code please visit my Github.
— Hendrik