AWS Client VPN - Access your Virtual Private Cloud
One of the most unknown options to access a VPC is Client VPN. Nearly all customers I am talking to are using a Bastion Host or similar to access services within their VPC. But what about direct access without any jumps in between? After reading this blog, you can create your own Client VPN.
Using a Bastion Host to access private resources is a state-of-the-art approach that everyone would choose first. But this choice requires additional thoughts to be consulted: resource management (at least one EC2 instance) and maintenance work like patching.
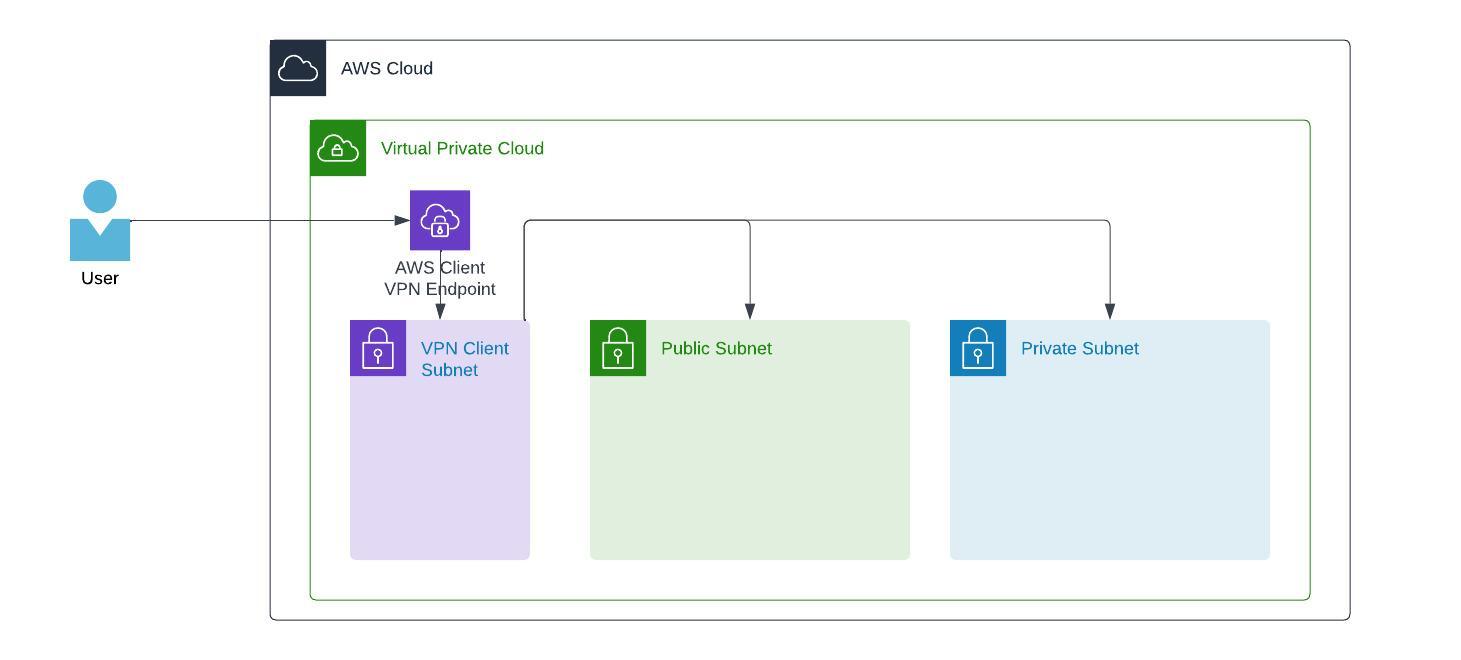
So, looking into an alternative like AWS Client VPN is a good choice. AWS Client VPN consists of an endpoint added to your VPC (with its own Client VPN Subnet), a Security Group, and one or more associated subnets.
The VPN Client can have its dedicated Subnet to prevent interference with the existing infrastructure.
How to configure
To configure AWS Client VPN, we have two different ways of authentication. Mutual authentication is certificate-based, and user-based authentication can be one of Federated (SAML) or Active Directory. In my case, I am focusing on mutual authentication as this is the most comparable way to a bastion host.
The Setup
Preparation
The preparation part is the most important thing. So ensure you have it done before doing anything within AWS. In this step, we will create a local Certificate Authority, server and client certificate. The server and client certificates are then uploaded to AWS Certificate Manager (ACM). I will rely the following steps on a small shell-based tool named easy RSA that does the creation and generation straightforward steps.
- Go to GitHub and download the repository (or clone it with
git clone --depth 1 https://github.com/OpenVPN/easy-rsa.git) to your local file system. - Switch to that direction
cd easy-rsa/easyrsa3 - Run the command
./easyrsa init-pkito initiate PKI creation - Run the command
./easyrsa help build-caand just press enter as the asked field is just for naming and has no impact - Run the command
./easyrsa build-server-full server nopassand confirm the creation with yes - Run the command
./easyrsa build-client-full pschaumburg.tecracer.com nopassand confirm the creation with yes - This step is optional, but recommended: copy all the necessary files into a single directory
VPNDIR=~/awsclientvpn
mkdir $VPNDIR
cp pki/ca.crt $VPNDIR
cp pki/issued/server.crt $VPNDIR
cp pki/private/server.key $VPNDIR
cp pki/issued/pschaumburg.tecracer.com.crt $VPNDIR
cp pki/private/pschaumburg.tecracer.com.key $VPNDIR
cd $VPNDIR
Upload certificates to AWS
The next step is to upload the server and client certificates to AWS Certificate Manager. I assume you are still in your $VPNDIR from the previous step.
The following steps are typical AWS CLI commands where the documentation can be found here
aws acm import-certificate --certificate fileb://server.crt --private-key fileb://server.key --certificate-chain fileb://ca.crt
aws acm import-certificate --certificate fileb://pschaumburg.tecracer.com.crt --private-key fileb://pschaumburg.tecracer.com.key --certificate-chain fileb://ca.crt
Now, when you take a look into AWS Certificate Manager within your AWS Management Console, you will see two certificates.
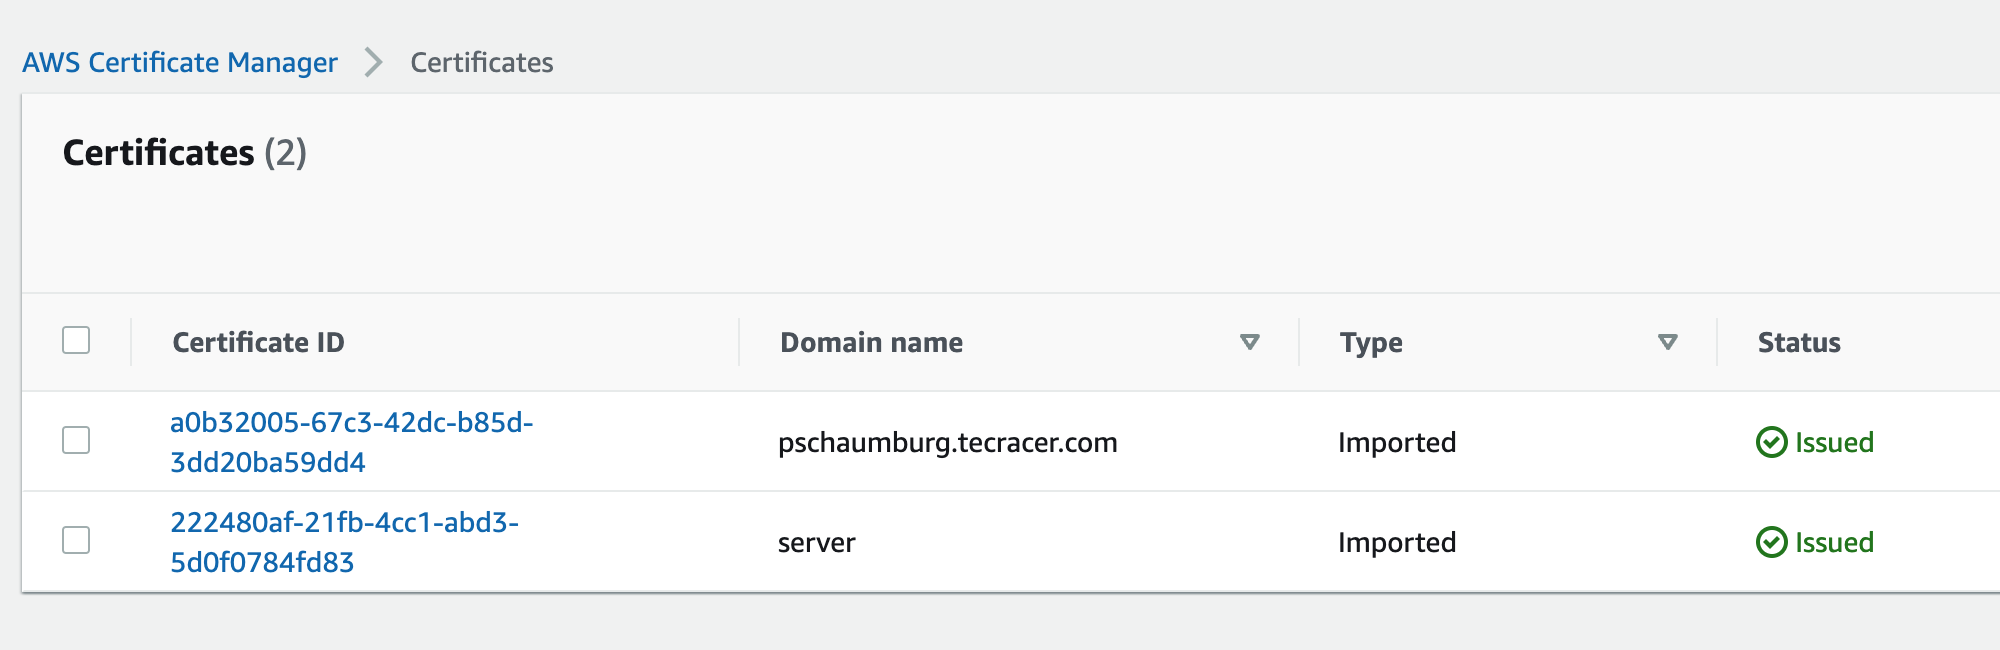
We can now create our AWS Client VPN Endpoint as they are issued and avaiable in ACM.
Client VPN Endpoint
This step will create an endpoint at AWS. It does not have any access to anywhere. Giving access is one of the next steps.
- Go to the AWS Management Console and open VPC
- Select Client VPC endpoints > Create client VPN endpoint
- Fill out the required information
- Client IPv4 CIDR: 172.31.100.0/22
- Authentication Information:
- Server certificate ARN: Select the imported
servercertificate - Authentication options: Check
Use mutual authentication - Client Certificate ARN: Select the imported client certificate
pschaumburg.tecracer.com
- Server certificate ARN: Select the imported
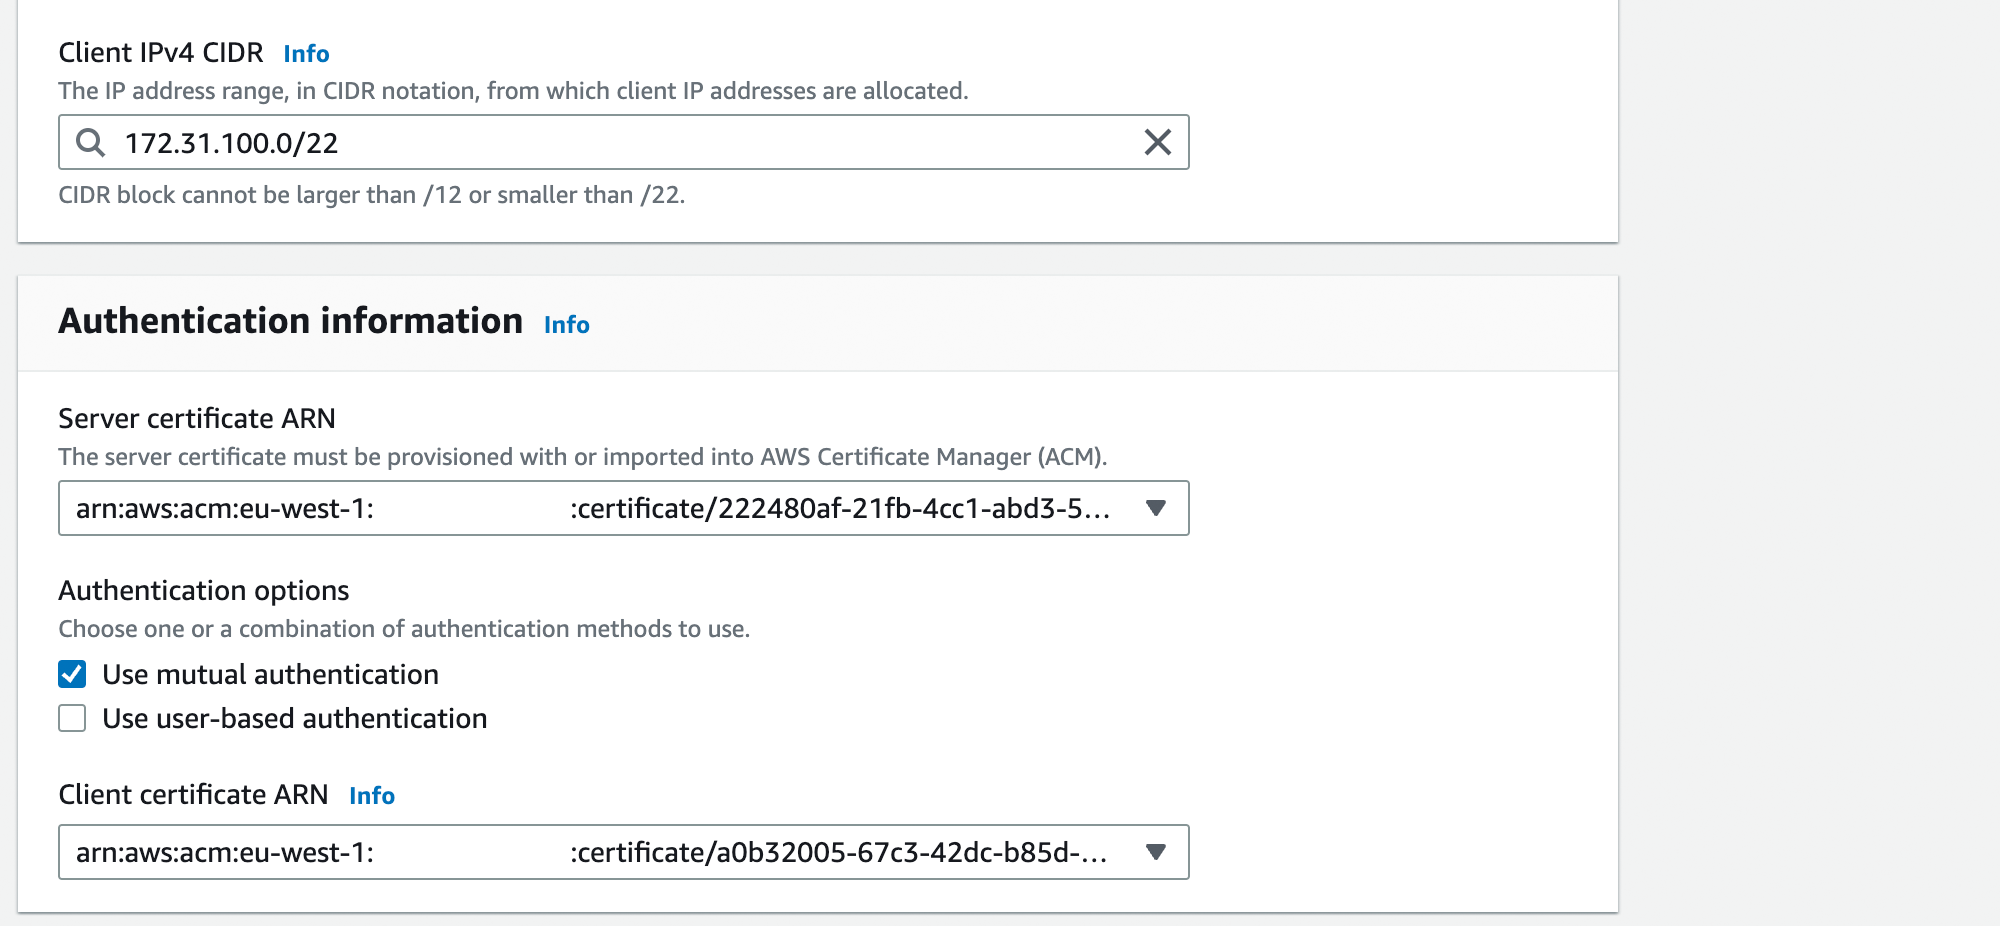
- Now select Create client VPN endpoint
As you might see, the State is continuously in Pending-associate. This state is right, as we now have to associate the Subnets we want to allow access to through the AWS Client VPN.
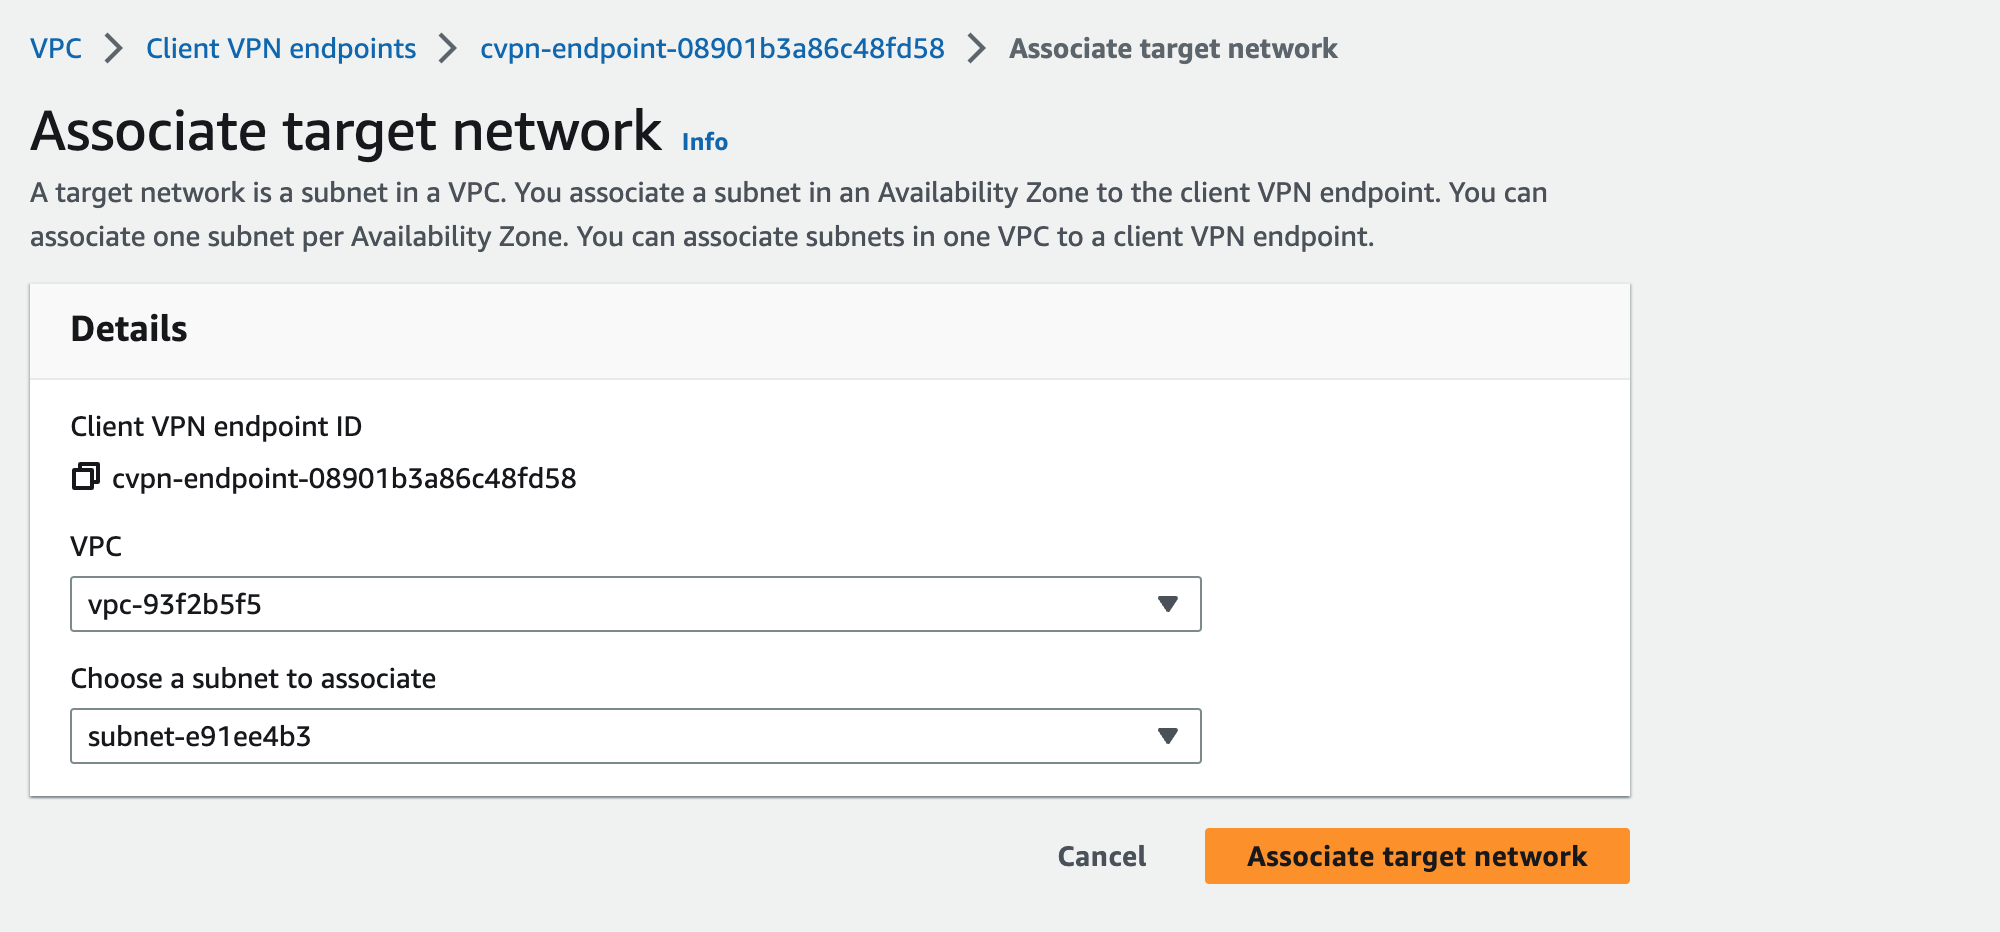
Client VPN Target network association
With this step, we are associating a VPC and a Subnet to our endpoint. To do so, select your endpoint.
- Change to the Tab Target network associations
- Choose Associate target network
- Select your VPC and the desired Subnet (only one Subnet is possible per creation)
- Click Associate target network
This association will need some time and result in a state of Available when at least one association is ready.
We can now head over to the next step.
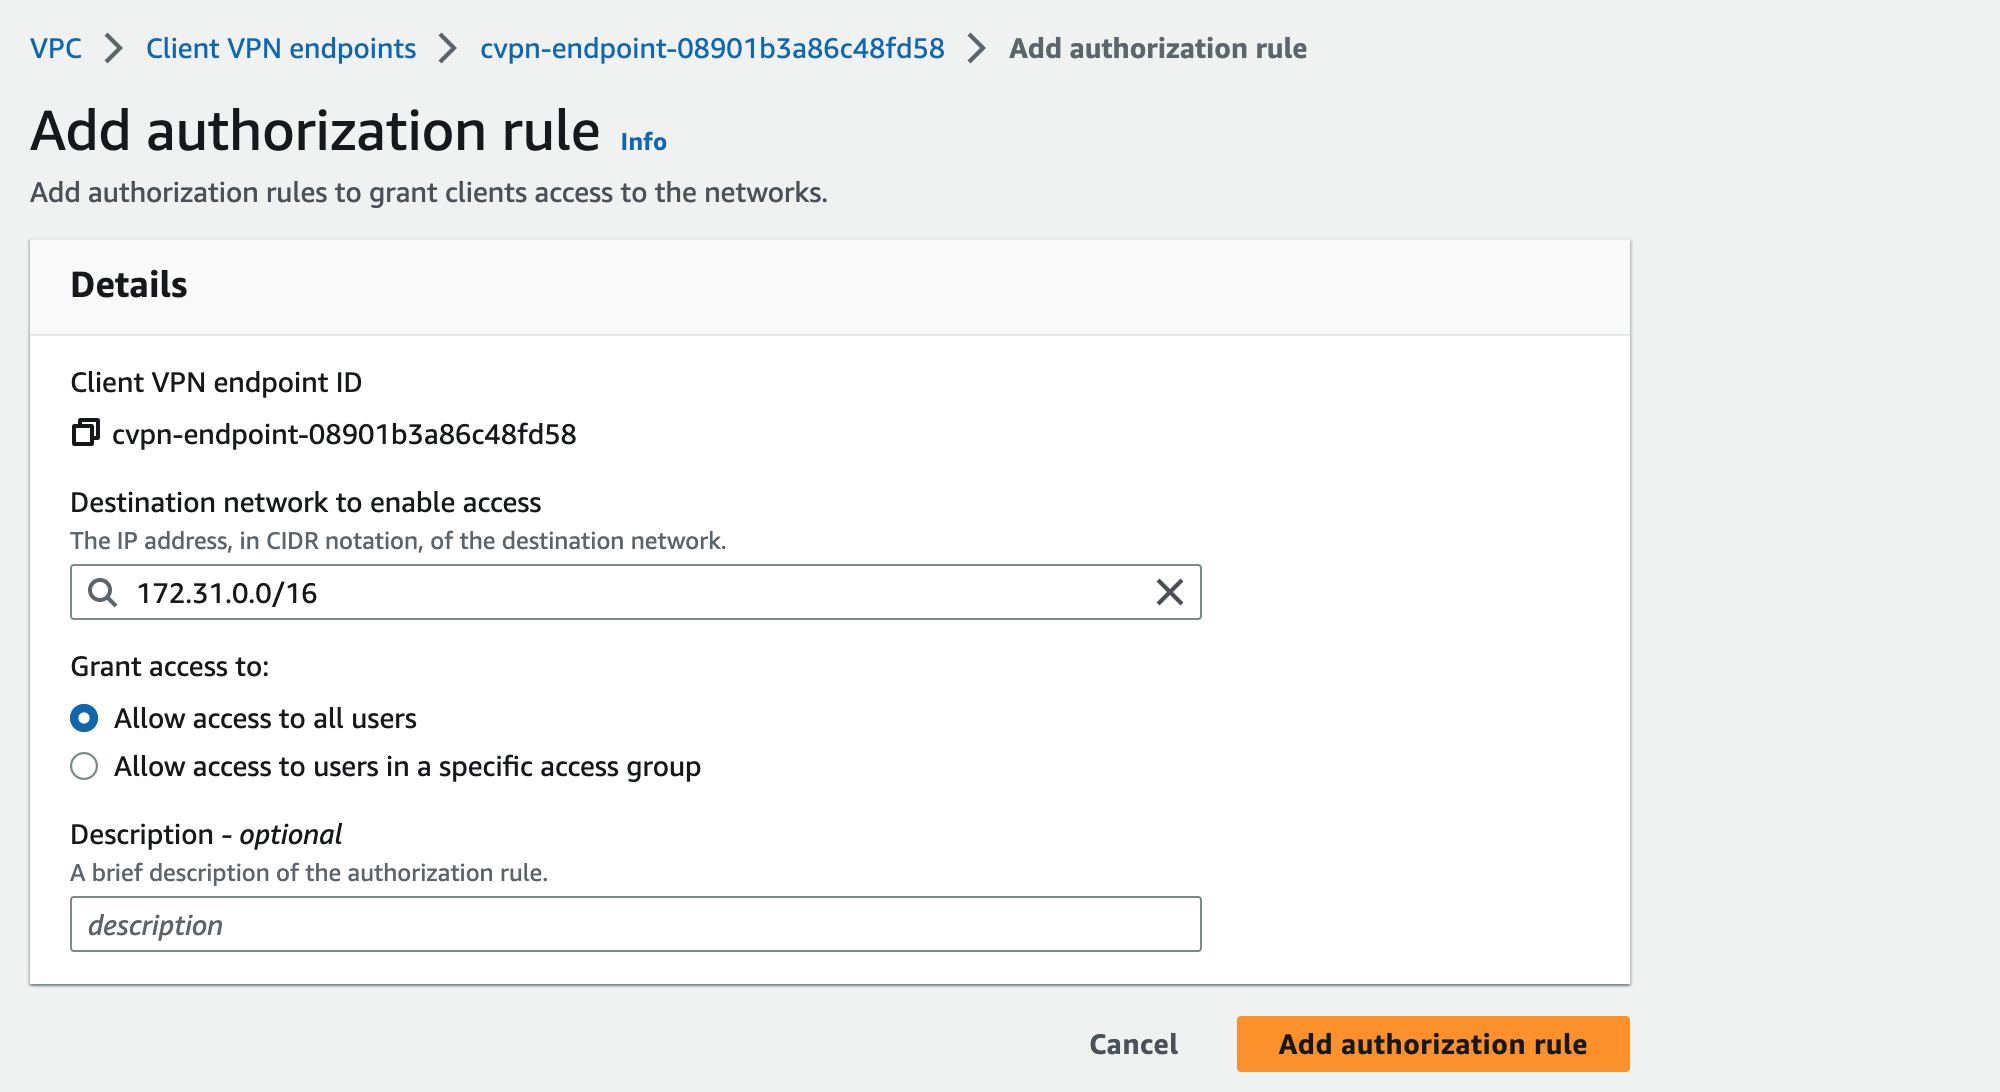
Authorization rules
This is one of the last steps to do within the AWS Management Console. We are allowing access to a specific destination network. Adding such a rule, gives all users or a specific access group access to a specified CIDR range.
In my case, I am giving access to my whole VPC to all users. To do so, select your endpoints Authorization rules Tab, choose Add authorization rule, and add your rule settings.
Start VPN connection
To start a VPN connection, at least a configuration file is necessary. AWS generates a file that must be imported to your preferred VPN Client tool. The configuration file can be downloaded from the AWS Management Console when you have selected your Client VPN endpoint. When selected, choose Download client configuration in the top right.
In my case, the configuration file looks like this.
client
dev tun
proto udp
remote cvpn-endpoint-08901b3a86c48fd58.prod.clientvpn.eu-west-1.amazonaws.com 443
remote-random-hostname
resolv-retry infinite
nobind
remote-cert-tls server
cipher AES-256-GCM
verb 3
<ca>
-----BEGIN CERTIFICATE-----
MIIDSzCCAjOgAwIBAgIUJjo+1niBqhMhvuKHJyjktRP7Ga4wDQYJKoZIhvcNAQEL
BQAwFjEUMBIGA1UEAwwLRWFzeS1SU0EgQ0EwHhcNMjMwOTIwMDkxMTAxWhcNMzMw
OTE3MDkxMTAxWjAWMRQwEgYDVQQDDAtFYXN5LVJTQSBDQTCCASIwDQYJKoZIhvcN
[...]
alvNpusCWrKYRXVGSIQa+W9/s/JhqhRfS46FYddF4Soot2zaJyZgeBAghcO+6dia
1tpkYv2T0aBV/L+wq4EbO27VdwxxvcofPwpIUlrmITiIM4lT6Rl9qpCF/L2mcX8z
oAsaJO9bYJcwkC+vvzk+Fjsl6blIrgWJK7jEUBW/bw==
-----END CERTIFICATE-----

</ca>


reneg-sec 0

verify-x509-name server name
What you immediately can see is that there is only the certificate about the Certificate Authority available. We have to add the private key of the client and the certificate.
Add a <cert> and <key> block behind the </ca> notation. The cert is equal to pschaumburg.tecracer.com.crt The key is equal to pschaumburg.tecracer.com.key
So your configuration file should look like
[...]
-----END CERTIFICATE-----
</ca>

<cert>
-----BEGIN CERTIFICATE-----
MIIDZjCCAk6gAwIBAgIQFjbEkiYnlTKfnoXKtd4rMjANBgkqhkiG9w0BAQsFADAW
MRQwEgYDVQQDDAtFYXN5LVJTQSBDQTAeFw0yMzA5MjAwOTE5MjVaFw0yNTEyMjMw
OTE5MjVaMCMxITAfBgNVBAMMGHBzY2hhdW1idXJnLnRlY3JhY2VyLmNvbTCCASIw
DQYJKoZIhvcNAQEBBQADggEPADCCAQoCggEBAL4DIxX0FUixXHXw1OETGcZTV+C3
...
1Q8SBmaq1pFMCV0ITLoP6iQ1i7p7xMe7ObjMJNnN1uSMWRLkrbh4nxFQJJHOmZIL
ahxh7JX63FgbLyY2rnNWdNj5CUBddTSfd6P0ID9lDZgMVyJOHzMzGAkP86RnMBj1
LDfErAFFl1kE4WpR6WweQK7xjyTQfelt6mX6ZfuPNqxnLPH6oP1/fl844rLA840w
WeTK01d2KMZOUEIBYhxZF06X3/gdMez9op2BnNwCmK/n7PSfyQXduIcfUBQesfC2
K0EIC9lxWX7oWg==
-----END CERTIFICATE-----
</cert>

<key>
-----BEGIN PRIVATE KEY-----
MIIEvQIBADANBgkqhkiG9w0BAQEFAASCBKcwggSjAgEAAoIBAQC+AyMV9BVIsVx1
8NThExnGU1fgt75915bIF7CGlaYdPOFd7sWWzAJi/X/RRjqab0pSeaJ/+yyATCt8
h4RGq+CPF9ku1yMOuICtRBMPZEKE+h3GJT7LZ5jQpZHYT0Jz4WFqnT5rIf7u4CY8
ck7upMnx08S50ArdVXk9t7Y2fUkSrBof+t9WHYYzpJrb/sy8sX7DHHWGJMbFeVvu
...
B0rIbk0MLzHOiNLsKqn9wXXYVWc0aD1b9tZd6Si8ywWU9AaLquP11kwh69v2fhwN
21igNDg9laOzNkdf9xQNxrhg+3qWvb2iOjyjyPzfAoGAS7vnufbSJFIkeQuCQkBy
mJReijFv/SuIQWjp9NlhJ5ghUM/fdzAeqzvy8MQ2LEuDxnbqOqqHPGxp8kuXbszI
lzYGF9wdPmSrOQ/sJlYdRLML7Y1FQ7hYT96UMsiGb3pgnNUZshNTApByROHuDSJW
ZzIHi7H2Iee3Ky9eCYYSQT8=
-----END PRIVATE KEY-----
</key>


reneg-sec 0

[...]
Save the configuration file and import it to your preferred tool. Importing the configuration is mainly done with a double-click on your configuration file. I am using the AWS Client VPN Desktop If you don’t want to install or search for some other tools, scroll a bit down to Tools for Client VPN.
Now click on connect, and you will see a working connection. Some hints on this: It may not work when another VPN Client is installed and running. In addition, we haven’t chosen to split the tunnel in the Client VPN endpoint configuration, the whole network traffic will be forwarded.
As you now have all the necessary steps done and can access your VPC Subnet through AWS Client VPN, we should take a short look into the pricing.
Short pricing comparison
Client VPN in its basic configuration with a single user compared to a bastion host. For a better comparison, I let the user have a connection established 24/7 and do manual maintenance regarding the bastion.
AWS Client VPN
To calculate AWS Client VPN, I am utilizing a single user, like a developer, and a single Subnet that is associated.
- Endpoint association (for each Subnet associated): 0,10 USD per hour = ~73 USD
- VPN connection (user is connected 24/7 the whole month ): 0,05 USD per hour = ~37 USD
= Total: ~110 USD per month
Bastion host
- t3.nano EC2 instance: 0,006 USD = ~5 USD per month
- maintenance (patching, applications, Security Groups): ~100 USD (one hour maintenance per month)
- additional security measurements (Workload + Network Security): 0,011 USD per hour = ~8 USD
- plus additonal costs for IPv4, starting in February 2024, which are not part of this calculation
= Total: ~110 USD per month
This comparison gives us a good view of the real pricing.
In general, the pricing for both is almost the same. The most significant part of using a Bastion host is the maintenance, where you need human interaction. This human interaction is nearly zero when looking into the pricing of AWS Client VPN (besides the fact that no one is connected 24/7 with the VPC).
Tools for Client VPN
I have created a small list of typical applications that most enterprises use. As I am a Mac user, I am using Tunnelblick.
Thoughts for the future
I see Client VPN as a huge advantage fore adding more security to each environment without changes in Security Groups for bastion hosts and similar. Every company should validate if utilizing it is possible. Even the implementation with CloudFormation or Terraform is possible. So when thinking about Terraform I think about creating a Terraform Module for this to simplify things like the certificate creation and other parts.
Thanks for reading!
— Patrick