Build a Site-to-Site IPSec VPN with Public Encryption Domain
When setting up IPSec VPN connections between different companies, the connecting parties often require the tunnel to use public IP addresses as the encryption domain. Especially when establishing a connection to telecommunication partners, the usage of public addresses is often mandatory and ensures that there are no overlapping addresses across other connections.
In this blog post, I would like to show you how you can leverage tools like pfSense and VNS3 in combination with Terraform to build a Site-to-Site IPSec VPN connection between AWS and on-premises networks with a public encryption domain.
Introduction
When migrating to or setting up infrastructure on AWS, there is usually the need to communicate with systems that are currently running on-premises. While using the public Internet to exchange information might work for some workloads, business-critical workloads often require a secure and encrypted connection between peers. One solution that is often employed to establish a connection between AWS and on-premises locations is a Site-to-Site IPSec VPN connection.
Site-to-Site IPSec VPNs ensure that personal and business data is encrypted, IP addresses are masked and communication over the Internet remains anonymous to the outside. As Site-to-Site VPNs create an encrypted tunnel between internal networks over the public Internet, external traffic can be simply blocked and access control of internal users to certain resources can be defined more clearly.
When setting up a Site-to-Site VPN between AWS and on-premises networks, there are multiple different options to choose from. The first and most obvious choice is the AWS-managed Site-to-Site VPN service. AWS Site-to-Site VPN allows you to quickly set up fully-managed and scalable IPSec tunnels between your VPC and your on-premises data center. While AWS Site-to-Site VPN is a service that is easy to set up and offers all the benefits of fully-managed AWS services like scalability and high availability, there is one characteristic that makes it difficult to use this offering when third parties are involved - no support for public encryption domains.
A VPN encryption domain refers to the range of IP addresses of the hosts that will be participating in the encrypted VPN and wants to traverse the VPN tunnel. When setting up a Site-to-Site VPN between the internal system and the company size permits it, private IP ranges can be leveraged for the encryption domain. In case of a limited total number of networks, private IP ranges can be managed and assigned in a way that prevents overlapping CIDRs.
When setting up a connection with third parties like telecommunication partners, this approach is usually not supported. Due to the fact that these organizations have connections to a multitude of different companies, overlapping of private IP ranges cannot be avoided. To circumvent these conflicts, public IP addresses need to be used in the encryption domains of the IPSec VPNs. In the case of AWS, one possible solution is to employ third-party VPN appliances running on EC2 instances in order to create a Site-to-Site IPSec VPN connection between AWS and on-premises networks.
In the blog post, I would like to show you how you can leverage tools like pfSense and VNS3 in combination with Terraform to create a secure Site-to-Site VPN connection between AWS and on-premises networks.
Architecture
Before we start the actual implementation, I would like to guide you through the architecture we are planning to deploy as part of this example. The diagram below displays a high-level overview of the setup we are trying to simulate.
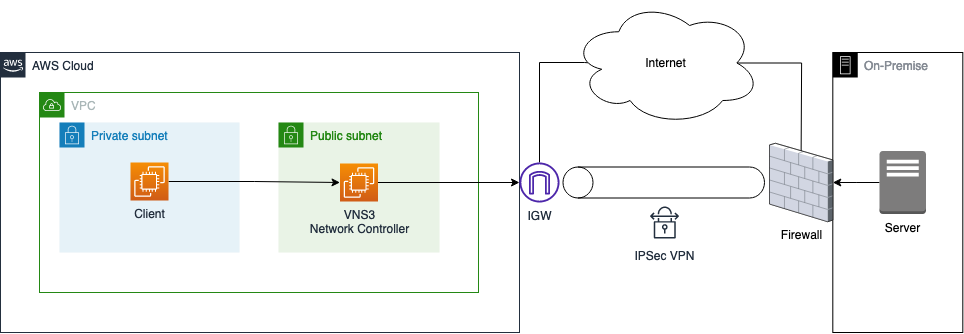
The goal is to create an IPSec Site-to-Site VPN tunnel between AWS and an on-premises data center. As the requirement is to use public encryption domains, we will leverage third-party appliances on EC2 to create the VPN connection. To keep this example as simple as possible, we will set up the AWS as well as the on-premises environment in AWS. The diagram below displays the target architecture in detail that we will build and deploy.
We will set up two VPCs in AWS. The first AWS Cloud VPC on the left-hand side will represent a normal AWS network while the On-Premises VPC on the right-hand side will be used to simulate the on-premises network. Both VPCs will be connected via a Site-to-Site IPSec VPN connection to allow secure and encrypted communication between the networks.
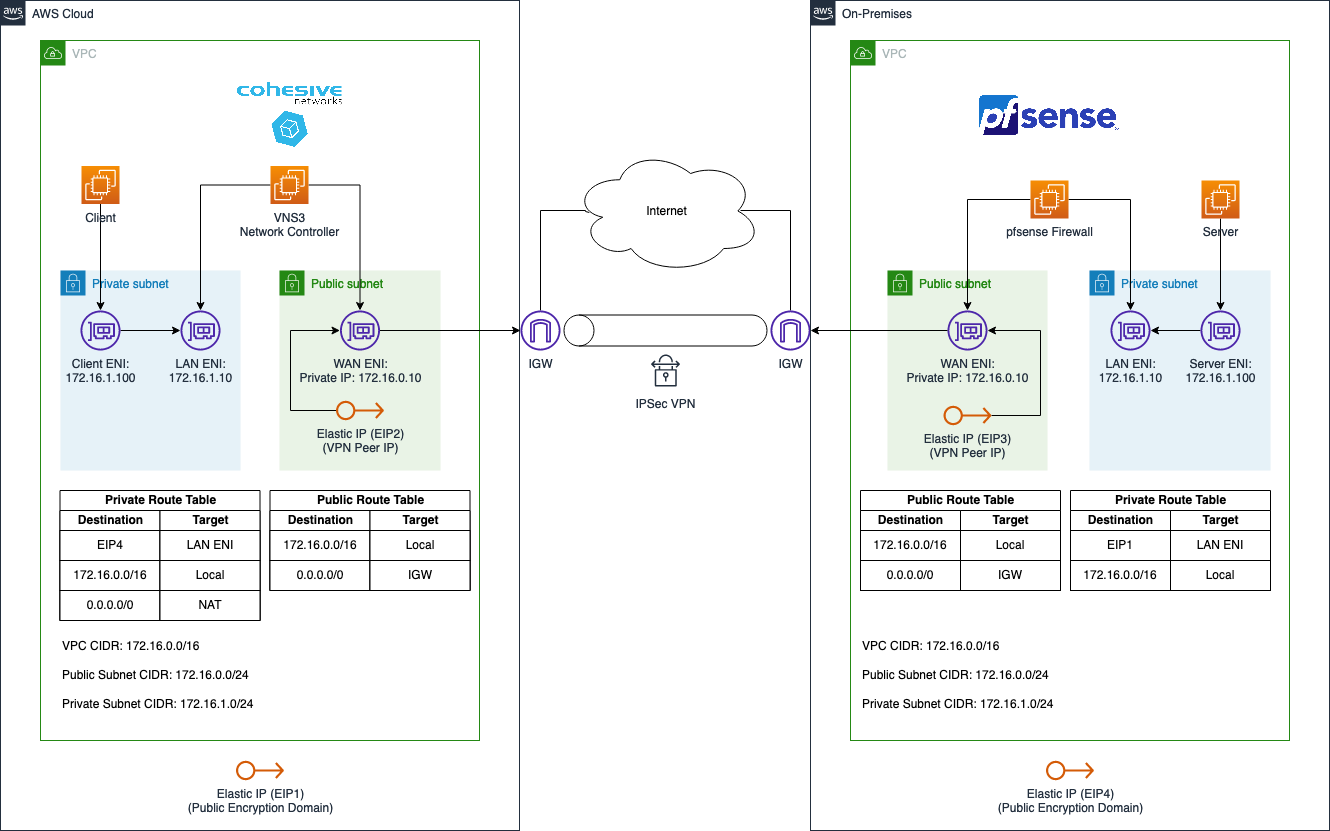
The AWS Cloud VPC will use the CIDR range 172.16.0.0/16 and will consist of two subnets. A private subnet with the IP range 172.16.1.0/24 as well as a public subnet with the IP range 172.16.0.0/24. A client application will be running in the private subnet and will need to communicate with a server running in the On-Premises VPC.
The On-Premises VPC will use the same CIDR range 172.16.0.0/16 and will consist of two subnets as well. A private subnet with the IP range 172.16.1.0/24 as well as a public subnet with the IP range 172.16.0.0/24. A server that needs to be reachable by the client application located in the AWS Cloud VPC will be running in the private subnet of the On-Premises VPC.
To allow communication between server and client, we will set up a Site-to-Site IPSec VPN connection over the public Internet. We will leverage two third-party appliances called VNS3 and pfSense to do so. VNS3 is a software-only virtual router, switch, and firewall appliance that allows users to control access and network topology and secure data in motion across public and private clouds. pfSense is a firewall/router computer software distribution based on FreeBSD.
The VPN connection itself will be set up between two EC2 instances running one of the virtual appliances each. The EC2 instance in the AWS Cloud VPC will be running VNS3 while the EC2 instance in the On-Premises VPC will be running pfSense. Both EC2 instances will have two Elastic Network Interfaces, a LAN ENI as well as a WAN ENI. The LAN ENI will be placed in the corresponding private subnet of each VPC and will allow EC2 instances running in the private subnets to forward VPN traffic to the virtual appliance. The LAN ENI will only be assigned a private IP address. The WAN ENI will be placed in the public subnet of the VPCs and will function as the entry point to the networks. Besides the private IPs, they will also be assigned a static public IP each by using Elastic IPs. The public IPs will be used as the VPN Peer IPs and will allow the creation of an IPSec VPN connection between the two VPCs.
Besides the Elastic IPs (VPN Peer IP), we will also request additional Elastic IPs (Public Encryption Domain). These public IPs will not be assigned to an ENI and will be used for the public encryption domain of our VPN connection. We will use the NAT functionality of the third-party appliances, VNS3 and pfSense, to map the private IPs of the server and client to the unassigned Elastic IP before forwarding the traffic to the other VPC via the VPN tunnel. Traffic originating from the AWS Cloud or On-Premises VPCs will therefore seem to be coming from the corresponding Elastic IPs (Public Encryption Domain).
Even though this solution is meant to give you an overview of how to create a Site-to-Site IPSec VPN between AWS and on-premises networks, the code can also be leveraged to create a secure tunnel between two AWS VPCs.
Project Structure
Before we start setting up our Terraform configuration, I would like you to create the project structure. Please create the following files and folders.
├── eip
│   ├── eip.tf
│   └── outputs.tf
├── aws
│   ├── client.tf
│   ├── network_controller.tf
│   ├── outputs.tf
│   ├── terraform.tfvars
│   ├── variables.tf
│   └── vpc.tf
└── on-premises
    ├── firewall.tf
    ├── outputs.tf
    ├── server.tf
    ├── terraform.tfvars
    ├── variables.tf
    └── vpc.tf
As this example will be quite extensive, we will split up our Terraform configuration into separate files and folders. The Terraform configuration for the AWS Cloud VPC will be contained in the aws folder while the configuration for the On-Premises VPC will be contained in the on-premises folder. The folder eip will be used to deploy the Elastic IPs for the Public Encryption Domain as well as the peer IPs.
Request Elastic IPs for Public Encryption Domain
Before we can deploy both the AWS Cloud and On-Premises VPCs, there are a few steps we need to take first.
First, we will have to create the four Elastic IPs for the Public Encryption Domain and the Peer IPs. Please copy the following snippet into the eip.tf.
resource "aws_eip" "aws_public_encryption_domain" {
  domain   = "vpc"
}

resource "aws_eip" "on_premises_public_encryption_domain" {
  domain   = "vpc"
}

resource "aws_eip" "aws_peer_ip" {
  domain   = "vpc"
}

resource "aws_eip" "on_premises_peer_ip" {
  domain   = "vpc"
}
To get the IP address values, add the following outputs to the eip/outputs.tf.
output "aws_public_encryption_domain" {
    description = "IP of the public encryption domain for the AWS site"
    value = aws_eip.aws_public_encryption_domain.public_ip
}

output "on_premises_public_encryption_domain" {
    description = "IP of the public encryption domain for the On-Premises site"
    value = aws_eip.on_premises_public_encryption_domain.public_ip
}

output "aws_peer_ip" {
    description = "IP of the AWS VPN Peer"
    value = aws_eip.aws_peer_ip.public_ip
}

output "on_premises_peer_ip" {
    description = "IP of the On-Premises VPN Peer"
    value = aws_eip.on_premises_peer_ip.public_ip
}
Run terraform init and terraform apply to deploy the infrastructure. Right down the IP addresses that were created. They will be used later during the VPN setup to define the encryption domain and the peers.
In case of this example, the EIPs that were created had the following values:
aws_public_encryption_domain_ip = 3.78.55.225
aws_peer_ip = 3.78.16.21
on_premises_public_encryption_domain = 18.159.151.185
on_premises_peer_ip = 18.157.192.186
These IPs will be used later on when we configure the virtual VPN appliances. You will recognize the IPs in the screenshots that are used to visualize the configuration steps. Please REPLACE these IPs with the EIPs you created in the section above. Your example will NOT work otherwise.
Subscribe to Marketplace Images
After having created the four EIPs for the Public Encryption Domain and the Peer IPs, we have to subscribe to the Marketplace images of the virtual appliances we are going to use. As discussed earlier, we will leverage VNS3 and pfSense to set up a Site-to-Site VPN connection between the two VPCs. The reason we are going to use two different appliances is to give you a broader overview of possible tools and solutions. Feel free to use different appliances if you feel comfortable.
In order to use the AMIs provided by the tool providers, we have to subscribe to the two images via the AWS Marketplace. We will start with pfSense. Visit the official link and start the subscription process.
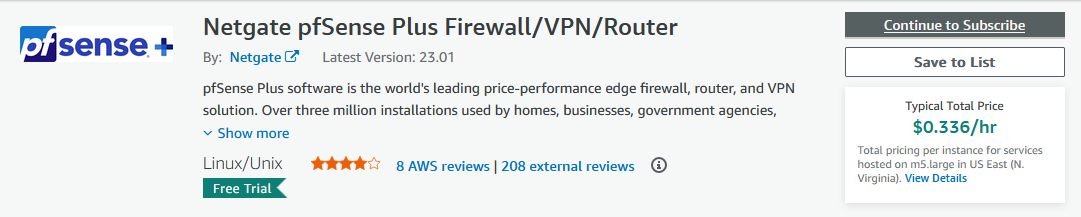
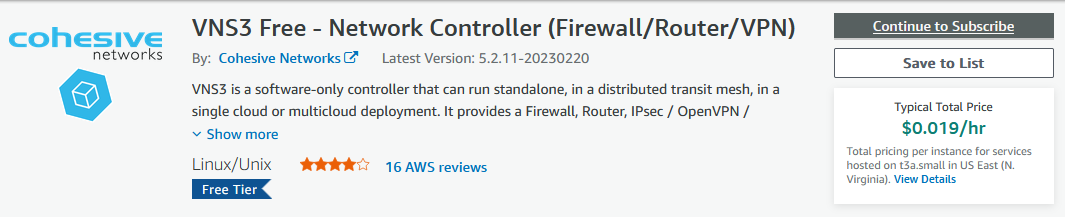
Once you have subscribed to pfSense it is time to continue with VNS3. For this example, we will use the free version of the network controller. Visit the link and start the subscription process.
After having subscribed to both images, you will be able to use the AMIs in the Terraform configuration.
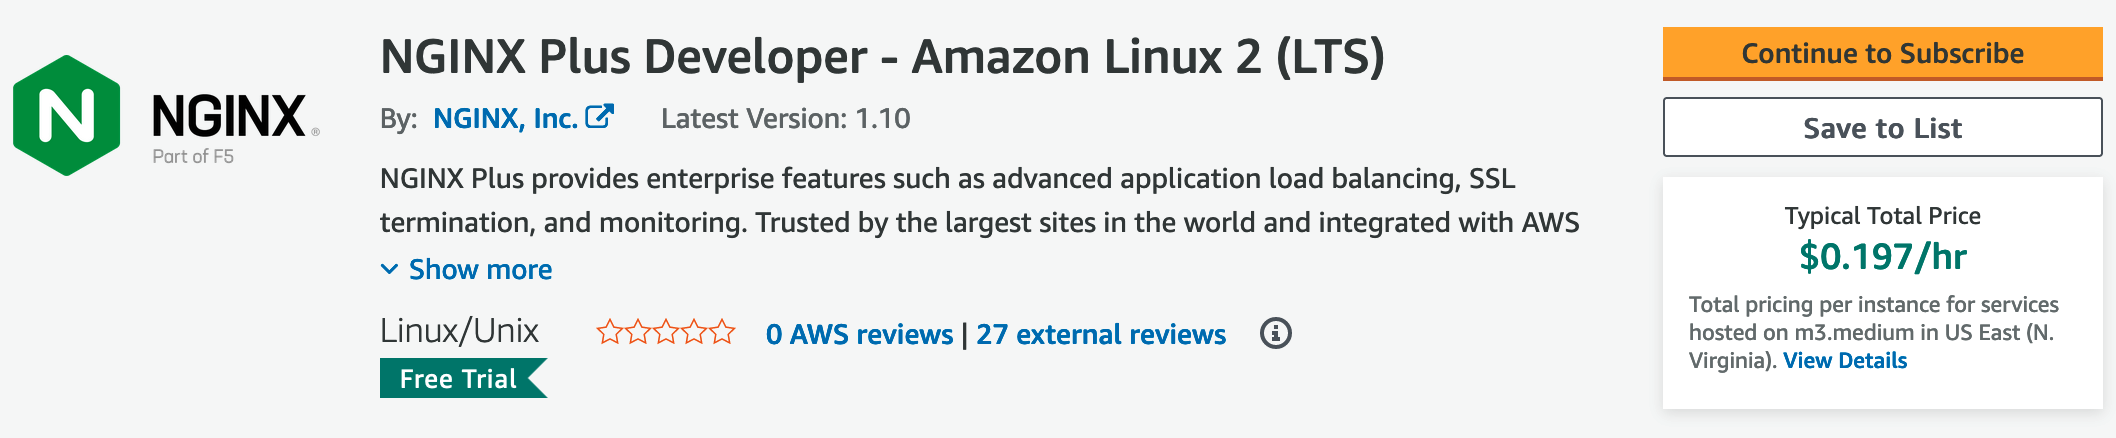
In order to make this example a bit more tangible, we will also use an official NGINX AMI as the basis for our server in the On-Premises VPC. This will allow us, later on, to not only ping the server from the client machine but also curl a proper web server. We will use the NGINX Plus Developer - Amazon Linux 2 (LTS) image. Visit the official link and start the subscription process.
Deploy AWS Cloud VPC
Let’s continue by creating the AWS Cloud VPC and all its components. Please be aware, that we will use Terraform to deploy the infrastructure only. The actual configuration of the virtual appliance VNS3 will be done later once everything has been deployed.
Network Deployment
We will start by deploying the network infrastructure. The VPC and all included components will be the basis for the EC2 instances. The Terraform configuration for the vpc.tf can be found here.
Before we are able to deploy our network, we have to define a few variables for our vpc and subnets. Please copy the following snippet into the variables.tf. Besides the variables for the VPC and subnet cidr blocks, we already included a variable for the application_name, aws_peer_ip, on_premises_peer_ip, and for on_premises_public_encryption_domain.
variable "vpc_cidr_block" {
  description = "CIDR of vpc"
  type        = string
}

variable "public_subnets" {
  description = "Map of public subnets that should be created"
  type = map(object({
    cidr_block        = string
    availability_zone = string
  }))
}

variable "private_subnets" {
  description = "Map of private subnets that should be created"
  type = map(object({
    cidr_block        = string
    availability_zone = string
  }))
}

variable "application_name" {
  description = "Name of the application"
  type        = string
}

variable "on_premises_public_encryption_domain" {
   description = "IP used for the public encryption domain"
  type        = string
}

variable "aws_peer_ip" {
   description = "IP used for the AWS VPN Peer"
  type        = string
}

variable "on_premises_peer_ip" {
   description = "IP used for the On Premises VPN Peer"
  type        = string
}
To manage the values of our defined variables, we will create a terraform.tfvars file. This will help us to keep our Terraform configuration clean and readable. Please define the following values for our variables in the terraform.tfvars file. For aws_peer_ip, on_premises_peer_ip, and on_premises_public_encryption_domain please enter the corresponding EIPs we created in the section above.
vpc_cidr_block = "172.16.0.0/16"

public_subnets = {
  subnet_1 = {
    cidr_block        = "172.16.0.0/24"
    availability_zone = "eu-central-1a"
  }
}

private_subnets = {
  subnet_1 = {
    cidr_block        = "172.16.1.0/24"
    availability_zone = "eu-central-1a"
  }
}

application_name          = "aws-site-vpn-public-encryption-domain"

on_premises_public_encryption_domain = "xxxxxxxxxx"
on_premises_peer_ip = "xxxxxxxxxx"
aws_peer_ip = "xxxxxxxxxx"
Let’s run terraform init to initialize Terraform and terraform apply to deploy the network infrastructure. Once Terraform has deployed the configuration, you should see a new network setup in the AWS console.
VNS3 Deployment
After having implemented the Terraform configuration for the VPC, we will continue by setting up the EC2 instance for the VNS3 appliance. Please copy the following Terraform configuration into the network_controller.tf.
################################################################################
# VNS3 EC2
################################################################################

resource "aws_instance" "network_controller" {
  instance_type          = "t3.micro"
  ami                    = data.aws_ami.vns3.id
  subnet_id              = local.public_subnet_ids[0]
  vpc_security_group_ids = [aws_security_group.wan_eni.id]

  private_ip = "172.16.0.10"
  source_dest_check = false

  root_block_device {
    volume_size           = 50
    volume_type           = "gp3"
    encrypted             = true
    delete_on_termination = true
  }

  tags = {"Name" = "VNS3"}
}

resource "aws_eip_association" "this" {
  network_interface_id = aws_instance.network_controller.primary_network_interface_id
  allocation_id = data.aws_eip.this.id
}

data "aws_eip" "this" {
  public_ip = var.aws_peer_ip
}


################################################################################
# VNS3 LAN ENI
################################################################################

resource "aws_network_interface" "this" {
  subnet_id = local.private_subnet_ids[0]

  security_groups   = [aws_security_group.lan_eni.id]
  source_dest_check = false

  private_ips       = ["172.16.1.10"]
}


resource "aws_network_interface_attachment" "this" {
  instance_id          = aws_instance.network_controller.id
  network_interface_id = aws_network_interface.this.id
  device_index         = 1
}


################################################################################
# Get newest VNS3 AMI
################################################################################

data "aws_ami" "vns3" {
  most_recent = true

  filter {
    name   = "name"
    values = ["vnscubed5211*-aws-marketplace-free_hvm-*"]
  }
  owners = ["679593333241"]
}


################################################################################
# VNS3 LAN ENI Security Group
################################################################################

resource "aws_security_group" "lan_eni" {
  name   = "${var.application_name}-lan-eni"
  vpc_id = aws_vpc.this.id
}

resource "aws_security_group_rule" "lan_eni_ingress" {
  security_group_id = aws_security_group.lan_eni.id

  type        = "ingress"
  from_port   = 0
  to_port     = 0
  protocol    = -1
  cidr_blocks = local.private_subnet_cidrs
}

resource "aws_security_group_rule" "lan_eni_egress" {
  security_group_id = aws_security_group.lan_eni.id

  type        = "egress"
  from_port   = 0
  to_port     = 0
  protocol    = -1
  cidr_blocks = local.private_subnet_cidrs
}

################################################################################
# VNS3 WAN ENI Security Group
################################################################################

resource "aws_security_group" "wan_eni" {
  name   = "${var.application_name}-wan-eni"
  vpc_id = aws_vpc.this.id
}

resource "aws_security_group_rule" "config_ingress" {
  security_group_id = aws_security_group.wan_eni.id

  type        = "ingress"
  from_port   = 8000
  to_port     = 8000
  protocol    = "tcp"
  cidr_blocks = ["0.0.0.0/0"]
}

resource "aws_security_group_rule" "vpn_peer_egress" {
  security_group_id = aws_security_group.wan_eni.id

  type        = "egress"
  from_port   = 0
  to_port     = 0
  protocol    = -1
  cidr_blocks = ["0.0.0.0/0"]
}


resource "aws_security_group_rule" "udp_500_ingress" {
  security_group_id = aws_security_group.wan_eni.id

  type        = "ingress"
  from_port   = 500
  to_port     = 500
  protocol    = "udp"
  cidr_blocks = ["${var.on_premises_peer_ip}/32"]
}

resource "aws_security_group_rule" "udp_4500_ingress" {
  security_group_id = aws_security_group.wan_eni.id

  type        = "ingress"
  from_port   = 4500
  to_port     = 4500
  protocol    = "udp"
  cidr_blocks = ["${var.on_premises_peer_ip}/32"]
}

resource "aws_security_group_rule" "esp_50_ingress" {
  security_group_id = aws_security_group.wan_eni.id

  type        = "ingress"
  from_port   = 0
  to_port     = 0
  protocol    = "50"
  cidr_blocks = ["${var.on_premises_peer_ip}/32"]
}
We will create an EC2 instance using the VNS3 AMI and will attach two Elastic Network Interfaces, the LAN ENI and the WAN ENI. Both of the ENIs will receive a static private IP. The WAN ENI will also be assigned an Elastic IP. The Elastic IP will function as the VPN Peer IP of the AWS Cloud VPC. Besides the ports needed to create an IPSec VPN connection, the security group of the WAN ENI allows ingress traffic on port 8000 from the Internet. This rule is needed to connect to the instance to configure VNS3 via the WEB GUI.
Let’s run terraform apply to deploy the VNS3 EC2 instance. Once Terraform has deployed the configuration, you should see a new instance in the AWS console.
Client Deployment
The last thing to add before we can finish up the AWS Cloud VPC set up, is the addition of the client EC2 instance. Please add the following Terraform configuration to the client.tf.
################################################################################
# Client EC2
################################################################################

resource "aws_instance" "client" {
  instance_type          = "t3.micro"
  ami                    = data.aws_ami.amazon_2.id
  subnet_id              = local.private_subnet_ids[0]
  iam_instance_profile   = aws_iam_instance_profile.this.name
  vpc_security_group_ids = [aws_security_group.client.id]

  private_ip = "172.16.1.100"

  root_block_device {
    volume_size           = 8
    volume_type           = "gp3"
    encrypted             = true
    delete_on_termination = true
  }

  user_data = <<EOF
    #!/bin/bash

    yum update -y
    yum install -y php-curl
  EOF


  tags = {"Name" = "Client"}

}


################################################################################
# Get newest Linux 2 AMI
################################################################################

data "aws_ami" "amazon_2" {
  most_recent = true

  filter {
    name   = "name"
    values = ["amzn2-ami-hvm-*-x86_64-ebs"]
  }
  owners = ["amazon"]
}


################################################################################
# EC2 Instance Profile
################################################################################

resource "aws_iam_role" "this" {
  name = var.application_name

  assume_role_policy = jsonencode({
    Version = "2012-10-17"
    Statement = [
      {
        Action = "sts:AssumeRole"
        Effect = "Allow"
        Principal = {
          Service = "ec2.amazonaws.com"
        }
      },
    ]
  })
}

resource "aws_iam_instance_profile" "this" {
  name = "${aws_iam_role.this.name}-ip"
  role = aws_iam_role.this.name
}

resource "aws_iam_role_policy_attachment" "this" {
  role       = aws_iam_role.this.name
  policy_arn = "arn:aws:iam::aws:policy/AmazonSSMManagedInstanceCore"
}


################################################################################
# Client Security Group
################################################################################

resource "aws_security_group" "client" {
  name   = "${var.application_name}-client"
  vpc_id = aws_vpc.this.id
}

resource "aws_security_group_rule" "client_egress" {
  security_group_id = aws_security_group.client.id

  type        = "egress"
  from_port   = 0
  to_port     = 0
  protocol    = -1
  cidr_blocks = ["0.0.0.0/0"]
}
The client EC2 has also received a static private IP address as well as an Instance Profile. The Instance Profile is necessary to connect to the EC2 instance later on using the AWS System Manager Session Manager. The static private IP address is optional and used in this example to allow an easier setup.
Before we deploy the client instance, we will add a few outputs to our Terraform configuration. These outputs will provide all the values we will need later on during the VNS3 appliance configuration. Add the following snippet to the outputs.tf.
output "network_controller_instance_id" {
    description = "ID of the Network Controller EC2 instance"
    value = aws_instance.network_controller.id
}
Let’s run terraform apply to deploy the client EC2 instance. Once Terraform has deployed the configuration, you should see a new instance in the AWS console.
Deploy On-Premises VPC
After having deployed the AWS Cloud VPC, we will create the On-Premises VPC and all its components. Please be aware, that we will use Terraform to deploy the infrastructure only. The actual configuration of the virtual appliance pfSense will be done later once everything has been deployed.
Network Deployment
We will start by deploying the network infrastructure. The VPC and all included components will be the basis for the EC2 instances. The Terraform configuration for the vpc.tf can be found here.
Before we are able to deploy our network, we have to define a few variables for our vpc and subnets. Please copy the following snippet into the variables.tf. Besides the variables for the VPC and subnet cidr blocks, we already included a variable for the application_name, aws_peer_ip, on_premises_peer_ip, and for aws_public_encryption_domain_ip.
variable "vpc_cidr_block" {
  description = "CIDR of vpc"
  type        = string
}

variable "public_subnets" {
  description = "Map of public subnets that should be created"
  type = map(object({
    cidr_block        = string
    availability_zone = string
  }))
}

variable "private_subnets" {
  description = "Map of private subnets that should be created"
  type = map(object({
    cidr_block        = string
    availability_zone = string
  }))
}

variable "application_name" {
  description = "Name of the application"
  type        = string
}

variable "aws_public_encryption_domain_ip" {
   description = "IP used for the public encryption domain"
  type        = string
}

variable "aws_peer_ip" {
   description = "IP used for the AWS VPN Peer"
  type        = string
}

variable "on_premises_peer_ip" {
   description = "IP used for the On Premises VPN Peer"
  type        = string
}
To manage the values of our defined variables, we will create a terraform.tfvars file. This will help us to keep our Terraform configuration clean and readable. Please define the following values for our variables in the terraform.tfvars file. For aws_peer_ip, on_premises_peer_ip, and on_premises_public_encryption_domain please enter the corresponding EIPs we created in the section above.
vpc_cidr_block = "172.16.0.0/16"

public_subnets = {
  subnet_1 = {
    cidr_block        = "172.16.0.0/24"
    availability_zone = "eu-central-1a"
  }
}

private_subnets = {
  subnet_1 = {
    cidr_block        = "172.16.1.0/24"
    availability_zone = "eu-central-1a"
  }
}

application_name          = "onprem-site-vpn-public-encryption-domain"

aws_public_encryption_domain_ip = "xxxxxxxxxx"
aws_peer_ip = "xxxxxxxxxx"
on_premises_peer_ip = "xxxxxxxxxx"
Let’s run terraform init to initialize Terraform and terraform apply to deploy the network infrastructure. Once Terraform has deployed the configuration, you should see a new network setup in the AWS console.
pfSense Deployment
After having implemented the Terraform configuration for the VPC, we will continue by setting up the EC2 instance for the pfSense appliance. Please copy the following Terraform configuration into the firewall.tf.
################################################################################
# PF Sense Firewall EC2
################################################################################

resource "aws_instance" "firewall" {
  instance_type          = "t3.micro"
  ami                    = data.aws_ami.pf_sense.id
  subnet_id              = local.public_subnet_ids[0]
  vpc_security_group_ids = [aws_security_group.wan_eni.id]

  private_ip = "172.16.0.10"
  source_dest_check = false

  root_block_device {
    volume_size           = 50
    volume_type           = "gp3"
    encrypted             = true
    delete_on_termination = true
  }

  tags = {"Name" = "pfSense"}
}

resource "aws_eip_association" "this" {
  network_interface_id = aws_instance.firewall.primary_network_interface_id
  allocation_id = data.aws_eip.this.id
}

data "aws_eip" "this" {
  public_ip = var.on_premises_peer_ip
}


################################################################################
# PF Sense Firewall LAN ENI
################################################################################

resource "aws_network_interface" "this" {
  subnet_id = local.private_subnet_ids[0]

  security_groups   = [aws_security_group.lan_eni.id]
  source_dest_check = false

  private_ips       = ["172.16.1.10"]
}


resource "aws_network_interface_attachment" "this" {
  instance_id          = aws_instance.firewall.id
  network_interface_id = aws_network_interface.this.id
  device_index         = 1
}


################################################################################
# Get newest PF Sense AMI
################################################################################

data "aws_ami" "pf_sense" {
  most_recent = true

  filter {
    name   = "name"
    values = ["pfSense-plus-ec2-23.01*"]
  }
  owners = ["679593333241"]
}


################################################################################
# Firewall LAN ENI Security Group
################################################################################

resource "aws_security_group" "lan_eni" {
  name   = "${var.application_name}-lan-eni"
  vpc_id = aws_vpc.this.id
}

resource "aws_security_group_rule" "lan_eni_ingress" {
  security_group_id = aws_security_group.lan_eni.id

  type        = "ingress"
  from_port   = 0
  to_port     = 0
  protocol    = -1
  cidr_blocks = local.private_subnet_cidrs
}

resource "aws_security_group_rule" "lan_eni_egress" {
  security_group_id = aws_security_group.lan_eni.id

  type        = "egress"
  from_port   = 0
  to_port     = 0
  protocol    = -1
  cidr_blocks = local.private_subnet_cidrs
}

################################################################################
# Firewall WAN ENI Security Group
################################################################################

resource "aws_security_group" "wan_eni" {
  name   = "${var.application_name}-wan-eni"
  vpc_id = aws_vpc.this.id
}

resource "aws_security_group_rule" "config_ingress" {
  security_group_id = aws_security_group.wan_eni.id

  type        = "ingress"
  from_port   = 443
  to_port     = 443
  protocol    = "tcp"
  cidr_blocks = ["0.0.0.0/0"]
}

resource "aws_security_group_rule" "vpn_peer_egress" {
  security_group_id = aws_security_group.wan_eni.id

  type        = "egress"
  from_port   = 0
  to_port     = 0
  protocol    = -1
  cidr_blocks = ["0.0.0.0/0"]
}

resource "aws_security_group_rule" "udp_500_ingress" {
  security_group_id = aws_security_group.wan_eni.id

  type        = "ingress"
  from_port   = 500
  to_port     = 500
  protocol    = "udp"
  cidr_blocks = ["${var.aws_peer_ip}/32"]
}

resource "aws_security_group_rule" "udp_4500_ingress" {
  security_group_id = aws_security_group.wan_eni.id

  type        = "ingress"
  from_port   = 4500
  to_port     = 4500
  protocol    = "udp"
  cidr_blocks = ["${var.aws_peer_ip}/32"]
}

resource "aws_security_group_rule" "esp_50_ingress" {
  security_group_id = aws_security_group.wan_eni.id

  type        = "ingress"
  from_port   = 0
  to_port     = 0
  protocol    = "50"
  cidr_blocks = ["${var.aws_peer_ip}/32"]
}
We will create an EC2 instance using the pfSense AMI and will attach two Elastic Network Interfaces, the LAN ENI and the WAN ENI. Both of the ENIs will receive a static private IP. The WAN ENI will also be assigned an Elastic IP. The Elastic IP will function as the VPN Peer IP of the On-Premises VPC. Besides the ports needed to create an IPSec VPN connection, the security group of the WAN ENI allows ingress traffic on port 443 from the Internet. This rule is needed to connect to the instance to configure pfSense via the WEB GUI.
Let’s run terraform apply to deploy the pfSense EC2 instance. Once Terraform has deployed the configuration, you should see a new instance in the AWS console.
Server Deployment
The last thing to add before we can finish up the On-Premises VPC setup, is the addition of the server EC2 instance. Please add the following Terraform configuraiton to the server.tf.
################################################################################
# Server EC2
################################################################################

resource "aws_instance" "server" {
  instance_type          = "t3.medium"
  ami                    = data.aws_ami.nginx.id
  subnet_id              = local.private_subnet_ids[0]
  vpc_security_group_ids = [aws_security_group.server.id]

  private_ip = "172.16.1.100"

  root_block_device {
    volume_size           = 50
    volume_type           = "gp3"
    encrypted             = true
    delete_on_termination = true
  }

  tags = {"Name" = "Server"}
}


################################################################################
# Get newest Linux 2 AMI
################################################################################

data "aws_ami" "nginx" {
  most_recent = true

  filter {
    name   = "name"
    values = ["nginx-plus-amazon-linux-2-v1.10-x86_64-developer-*"]
  }
}


################################################################################
# Server Security Group
################################################################################

resource "aws_security_group" "server" {
  name   = "${var.application_name}-server"
  vpc_id = aws_vpc.this.id
}

resource "aws_security_group_rule" "server_http_ingress" {
  security_group_id = aws_security_group.server.id

  type        = "ingress"
  from_port   = 80
  to_port     = 80
  protocol    = "tcp"
  source_security_group_id = aws_security_group.lan_eni.id
}

resource "aws_security_group_rule" "server_icmp_ingress" {
  security_group_id = aws_security_group.server.id

  type        = "ingress"
  from_port   = -1
  to_port     = -1
  protocol    = "icmp"
  source_security_group_id = aws_security_group.lan_eni.id
}
Before we deploy the server instance, we will add a few outputs to our Terraform configuration. These outputs will provide all the values we will need later on during the pfSense appliance configuration. Add the following snippet to the outputs.tf.
output "server_private_ip" {
    description = "Private IP of the Server"
    value = aws_instance.server.private_ip
}
Let’s run terraform apply to deploy the server EC2 instance. Once Terraform has deployed the configuration, you should see a new instance in the AWS console.
pfSense Configuration
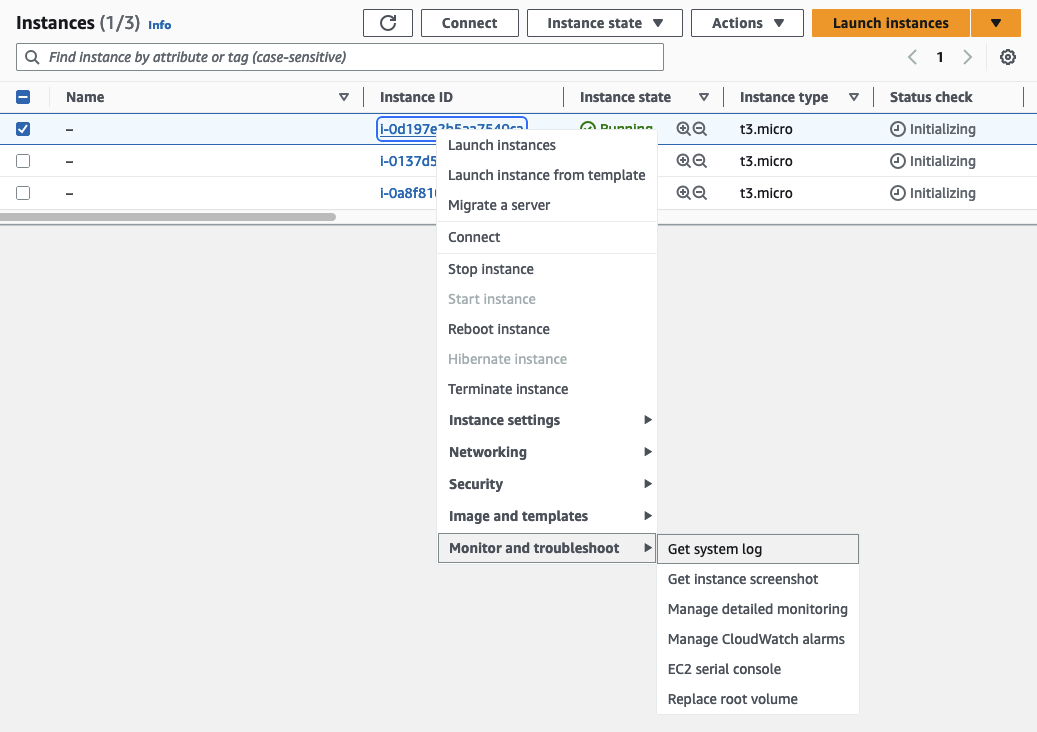
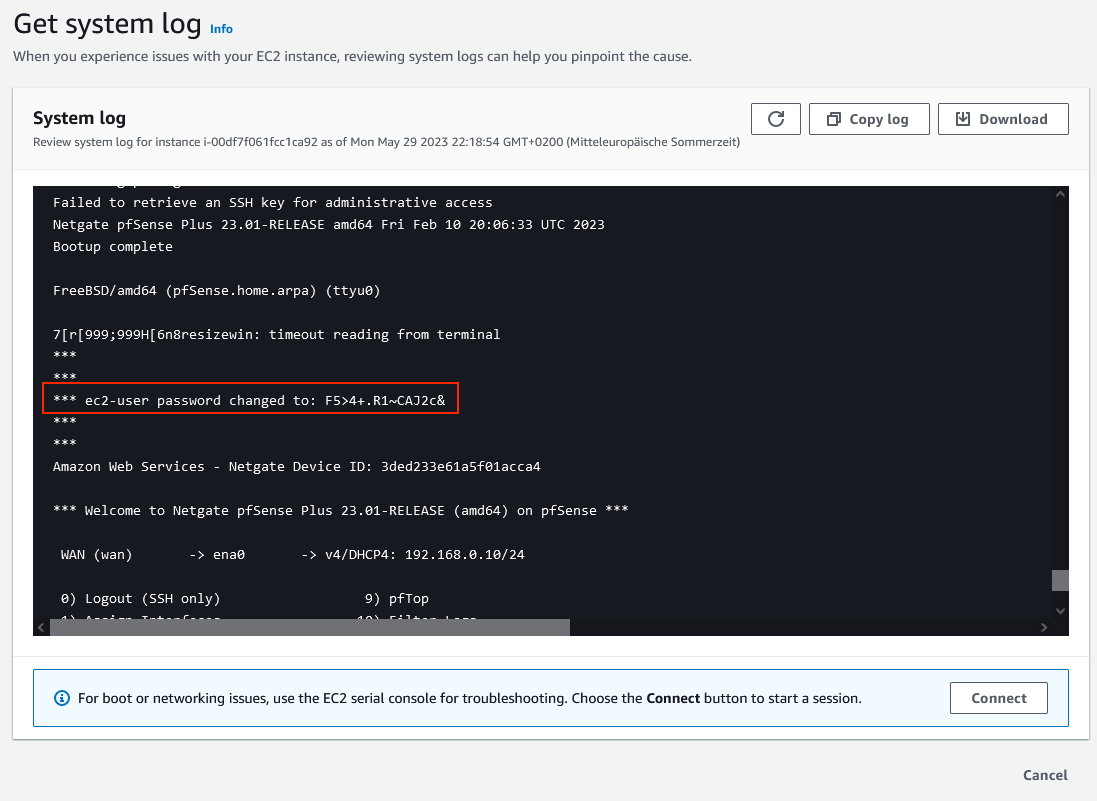
After having deployed both VPCs, we will continue by configuring the pfSense appliance. Before we are able to set up the appliance, we have to retrieve the password needed to log in. Open the AWS Console and navigate to the EC2 service screen. Right-click on the instance running pfSense, choose Monitor and troubleshoot, and select Get system log.
The system log will display the password that needs to be used to log in under ec2-user password changed to:
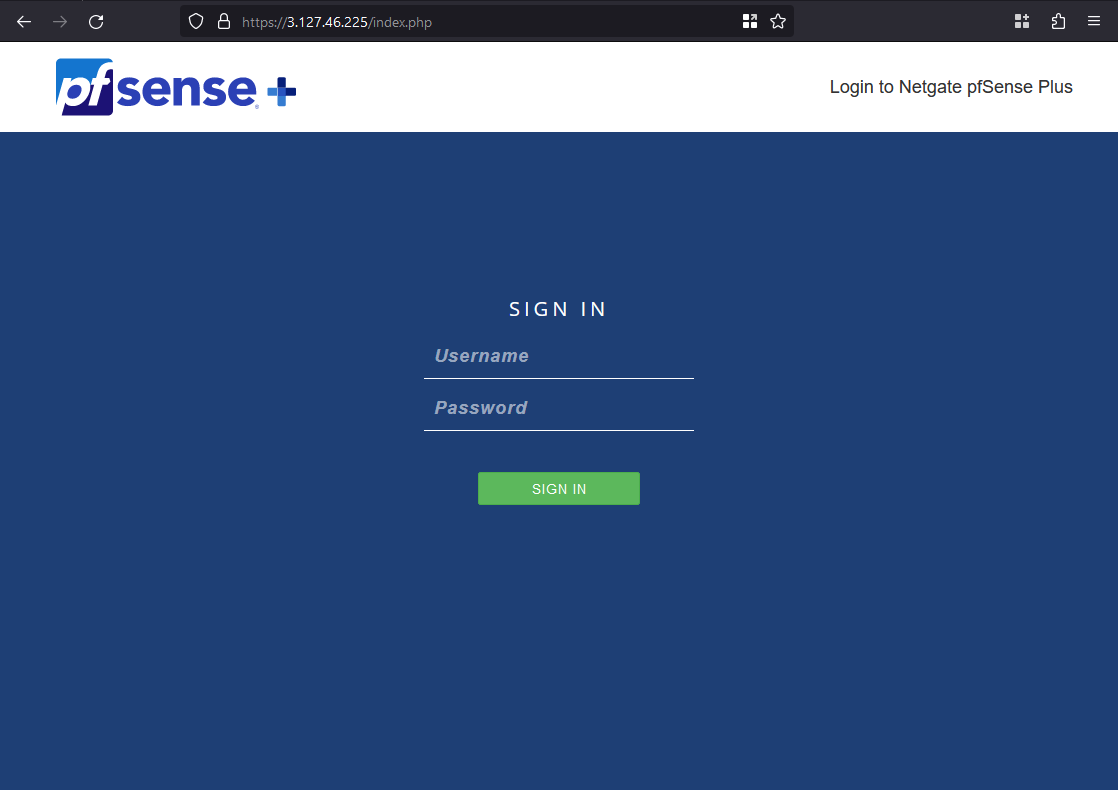
Once you have retrieved the password, log in to the pfSense WEB GUI. Open the GUI by typing https://ON-PREMISES-PEER-IP into the browser. Replace ON-PREMISES-PEER-IP with the EIP you created in the first section of this example. The login page should open. Type in the username adminand the password you just retrieved.
Continue by setting up the interface for the LAN ENI. Navigate to Interfaces and then to Interface Assignments.
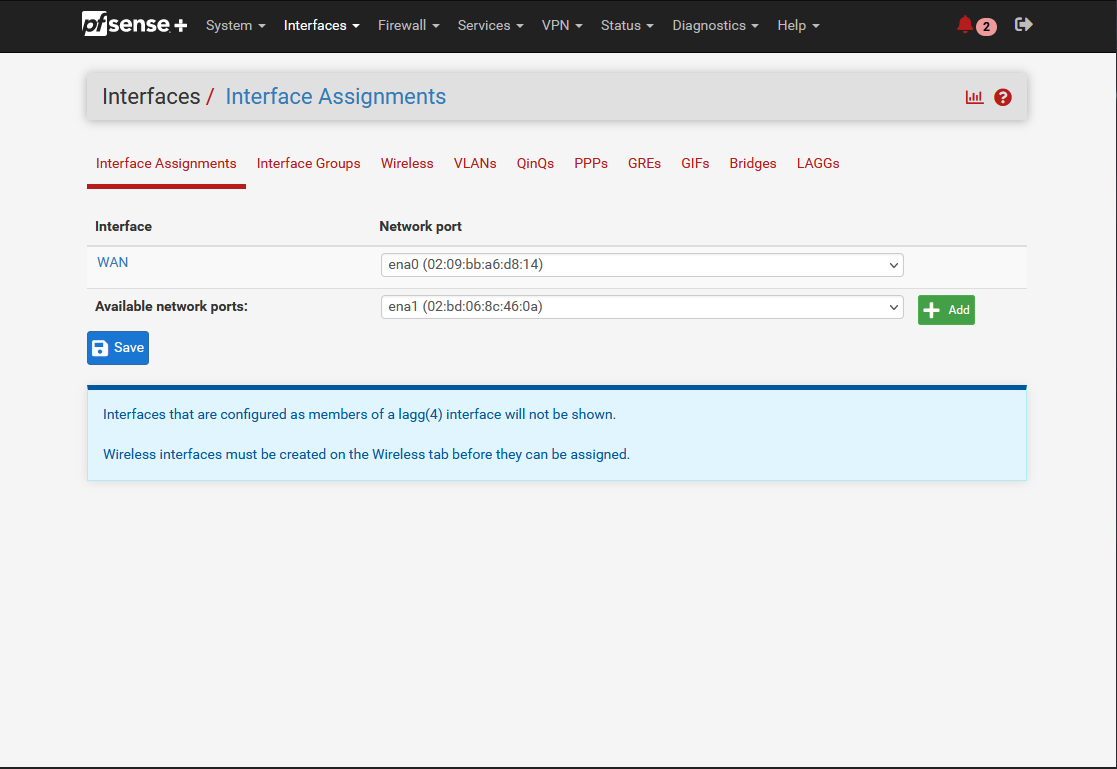
You should see the already created WAN interface. Click on Add to add an additional interface.
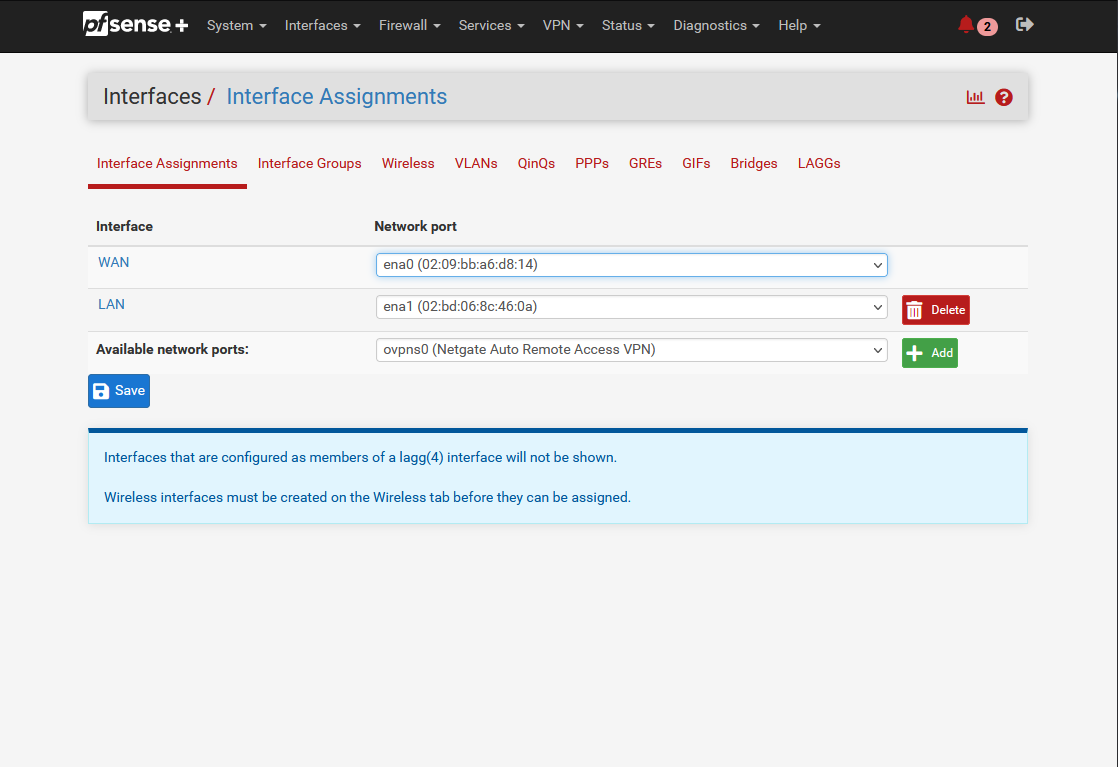
Once the Interface has been created, click on LAN. A new configuration window will open. Enable the interface by checking Enable and set the IPv4 Configuration Type to DHCP.
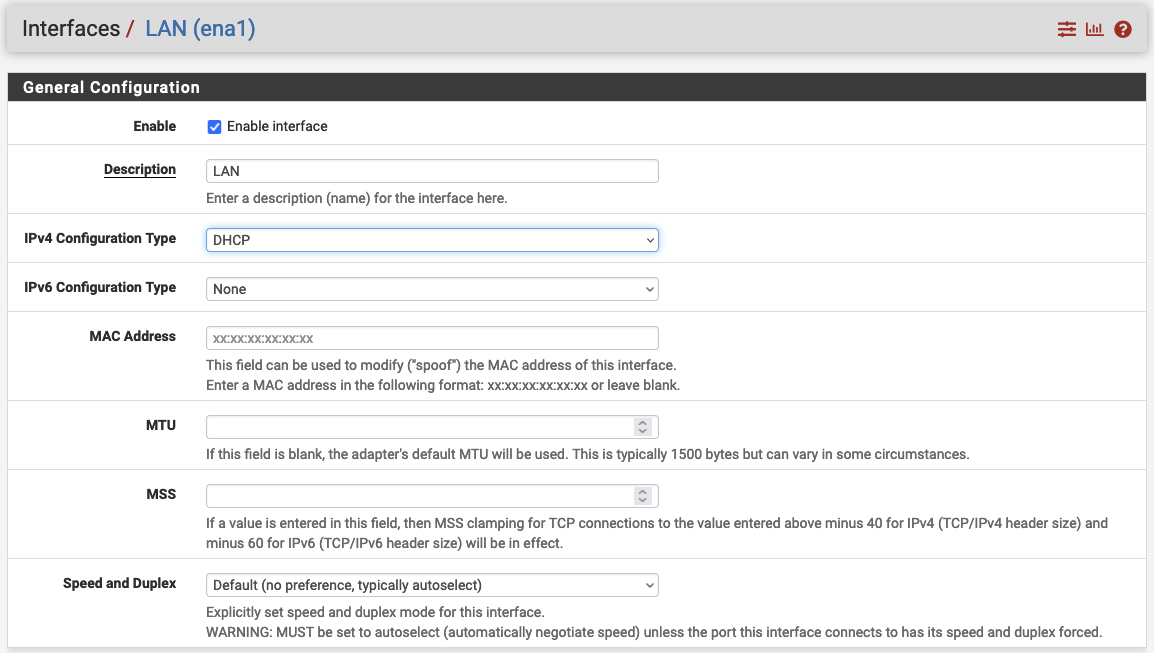
Confirm your configuration by clicking on Apply changes. After having created the LAN interface, it is time to
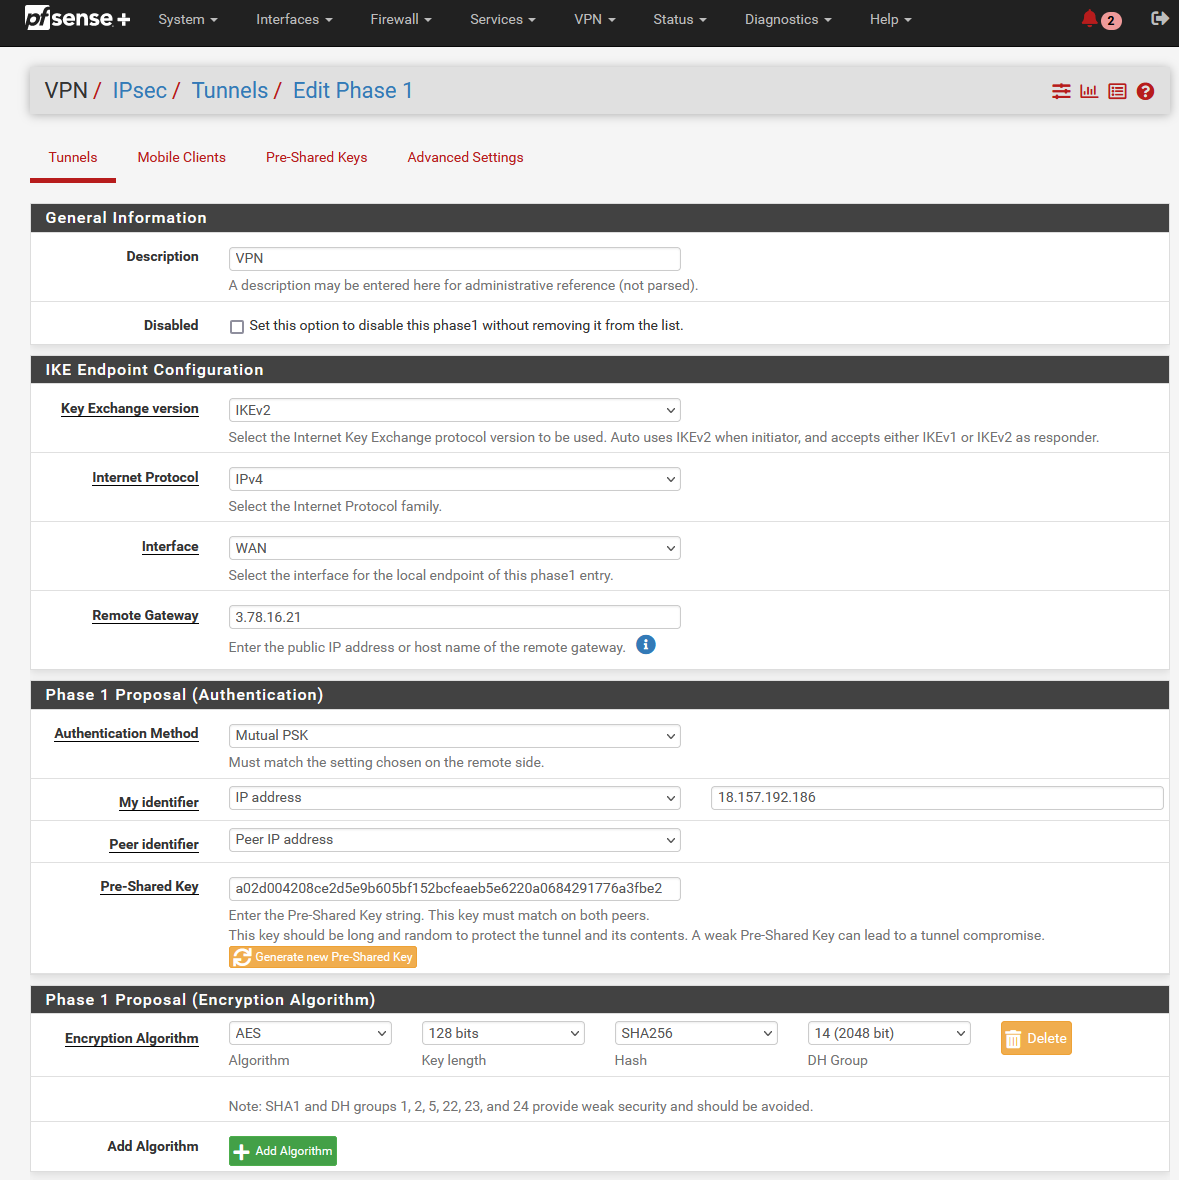
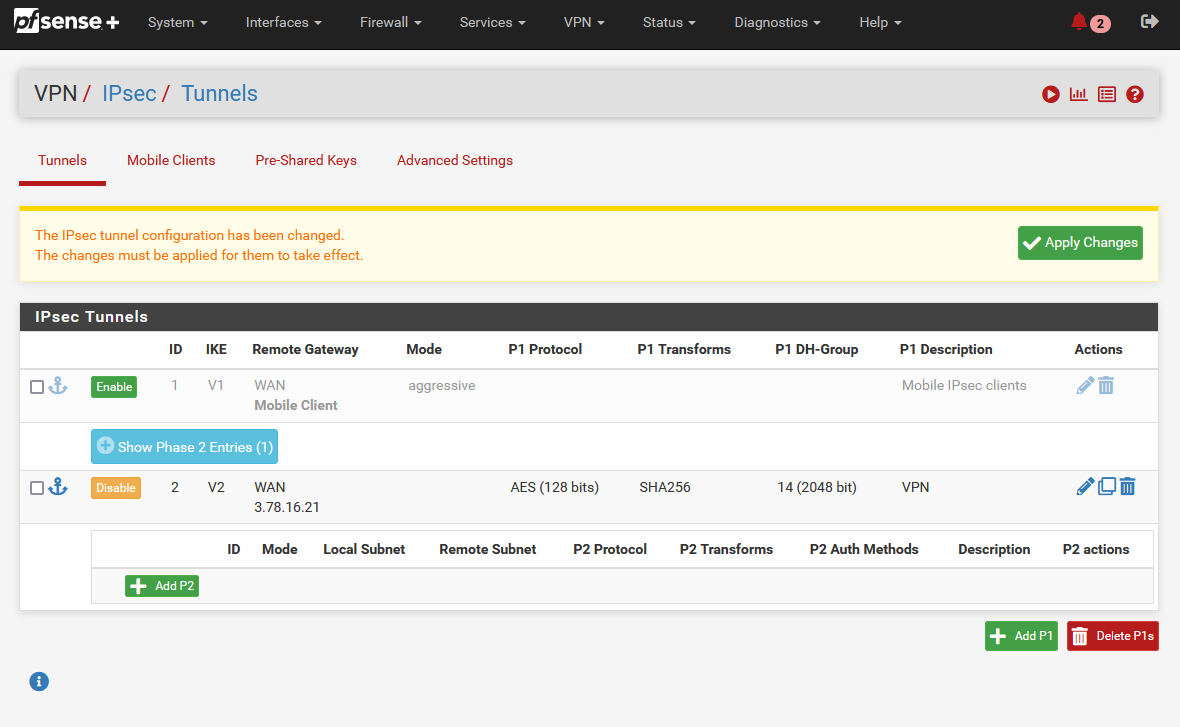
configure the On-Premises connection of the Site-to-Site VPN. Navigate to VPN and click on IPsec. Click on Add P1 in the bottom left corner to create a new Phase 1. A new configuration window will open up.
Make sure the IKE Endpoint Configuration parameters are configured as followed.
| Field name | Value |
|---|---|
| Key Exchange version | IKEv2 |
| Internet Protocol | IPv4 |
| Interface | WAN |
| Remote Gateway | VNS3 Instance Elastic IP (aws_peer_ip) |
Under Phase 1 Proposal (Authentication) set the parameter My identifier to IP address and add the Elastic IP address of the pfSense instance (on_premises_peer_ip). Click Generate new Pre-Shared Key to generate a new key. Write down the key as it will be needed to establish the VPN connection.
To finish up the configuration of Phase 1, scroll down to Advanced Options and set the Child SA Close Action to Restart/Reconnect. Click on Save to create a new Phase 1.
Next, we will create a corresponding Phase 2. Click on Show Phase 2 Entries to open up a new menu. Select Add P2 to create a new Phase 2. A new configuration window will open up.
Make sure the Networks parameters are configured as followed.
| Field name | Value | Address | Terraform Output |
|---|---|---|---|
| Local Network | Address | Private Server IP | server_private_ip |
| NAT/BINAT translation | Address | On-Premises Public Encryption Domain IP | on_premises_public_encryption_domain |
| Remote Network | Address | AWS Public Encryption Domain IP | aws_public_encryption_domain |
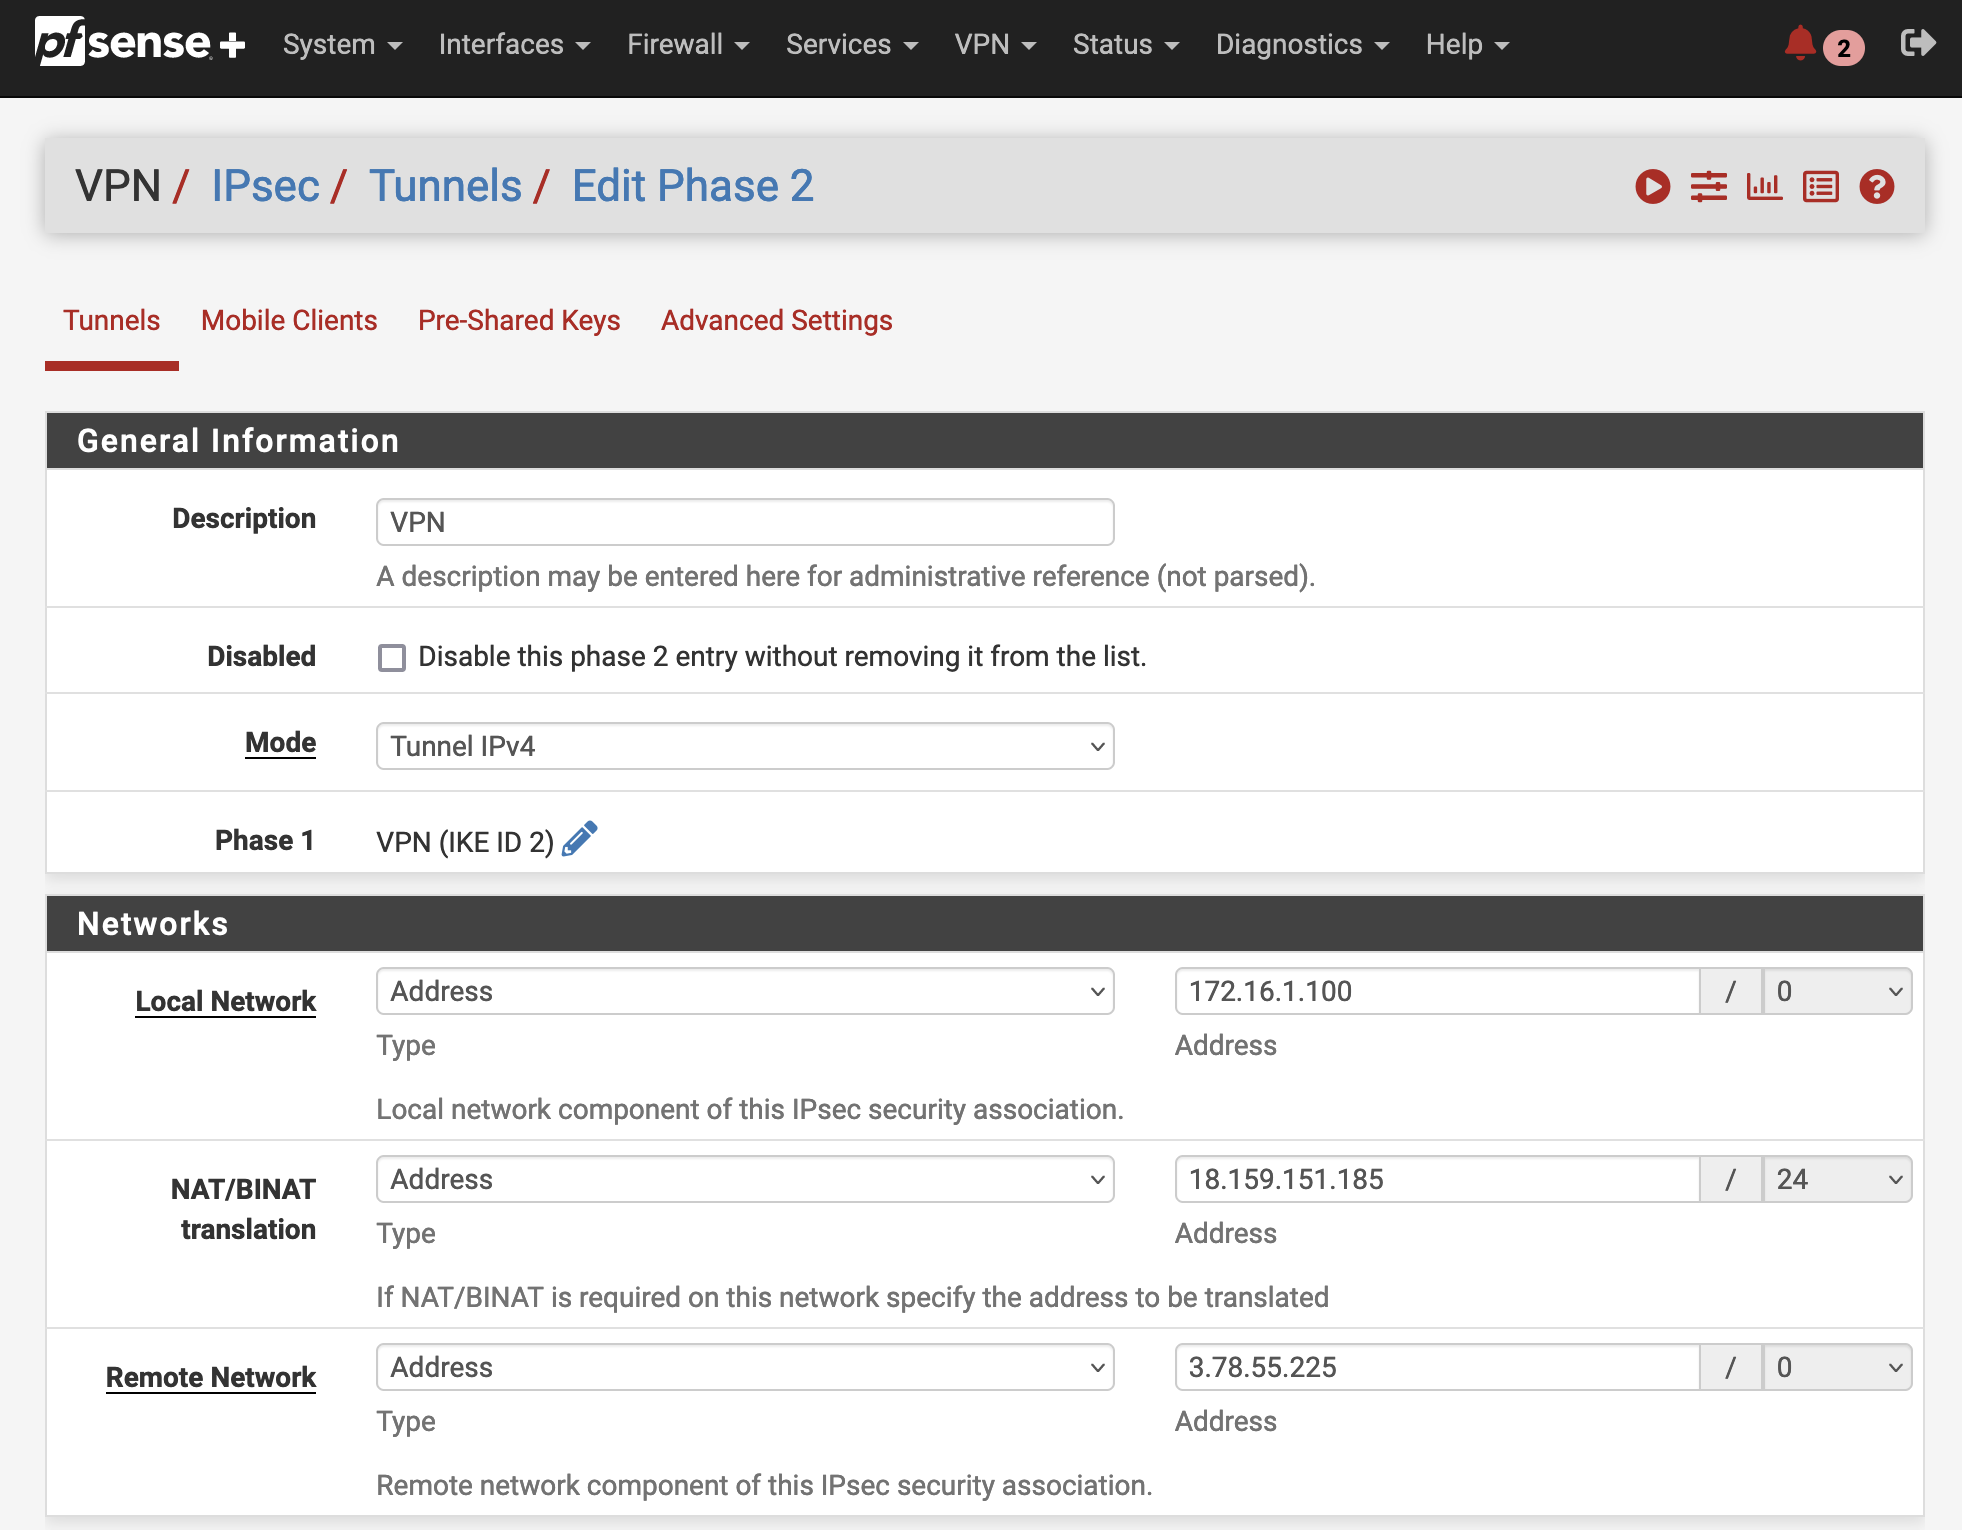
The Parameter NAT/BINAT translation is used to make the local network appear to the remote peer as a different subnet or address. In this example, we will use the feature to hide the local VPC CIDR behind the Public Encryption Domain IP. For more information please visit the official documentation.
Click on Save to save the Phase 2 configuration. Confirm the configuration by clicking Apply Changes.
VNS3 Configuration
After having configured the On-Premises site of the VPN connection, we will set up the VNS3 instance. Open the VNS3 WEB GUI by typing https://AWS-PEER-IP:8000 into the browser . Replace AWS-PEER-IP with the EIP you created in the first section of this example. The login page should open.
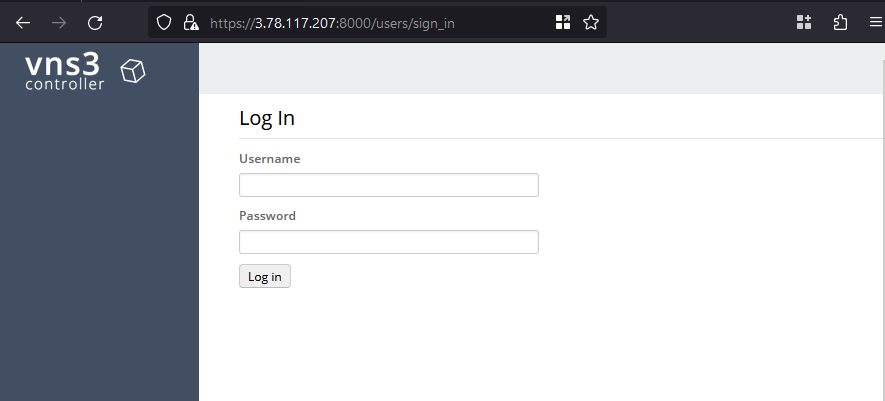
Type in the username vnscubed. The password will be the instance id of the VNS3 instance which can be retrieved via the Terraform output network_controller_instance_id. Once logged in, navigate to the Interfaces menu on the right-hand side under Connections. You should see that the eth1 interface is disabled. The eth1 interface corresponds to the LAN ENI and needs to be enabled to allow traffic from the client to the VNS3 instance. Click on Actions next to the interface and select Enable to enable the interface. The interface should now be up and running.

Next, navigate to IPsec under Connections to set up the AWS Cloud site of the VPN connection. Select New Endpoint to create a new VPN endpoint. For the parameters IP address for remote endpoint: as well as Remote endpoint's Peer ID (sometimes called IKE ID): enter the EIP of the pfSense instance. Make sure that IKEv2 is selected, Enable NAT-Traversal is enabled, and enter the Pre-Shared key that you generated in the pfSense console. We also have to adjust the peer IP of our VNS3 instance. Under Extra configuration parameters (see Configuration Guide): at the bottom of the screen type in local-peer-id=AWS_PEER_IP. Replace AWS_PEER_IP with the EIP generated in the first section.
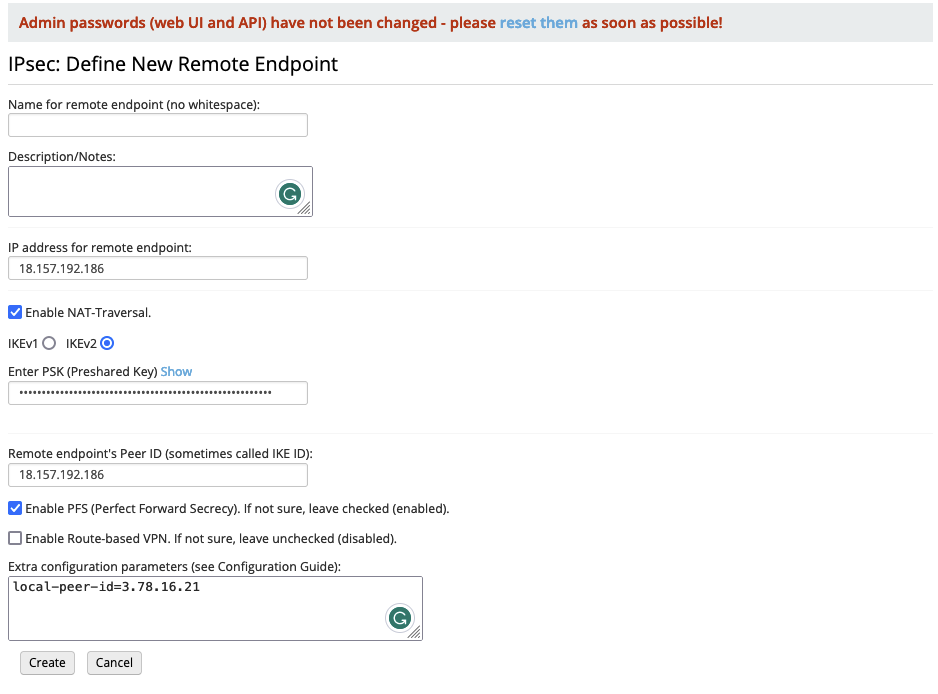
Set an endpoint name and click on Create to create the Endpoint. Next, we will set up a new VPN tunnel. Click on Actions on the right-hand side next to the Endpoint and select New Tunnel. A new configuration window will open. For Enter local (VNS3 side) subnet in CIDR notation enter the Public Encryption Domain IP of the AWS Cloud site. For Enter remote subnet in CIDR notation enter the Public Encryption Domain IP of the On-Premises site.
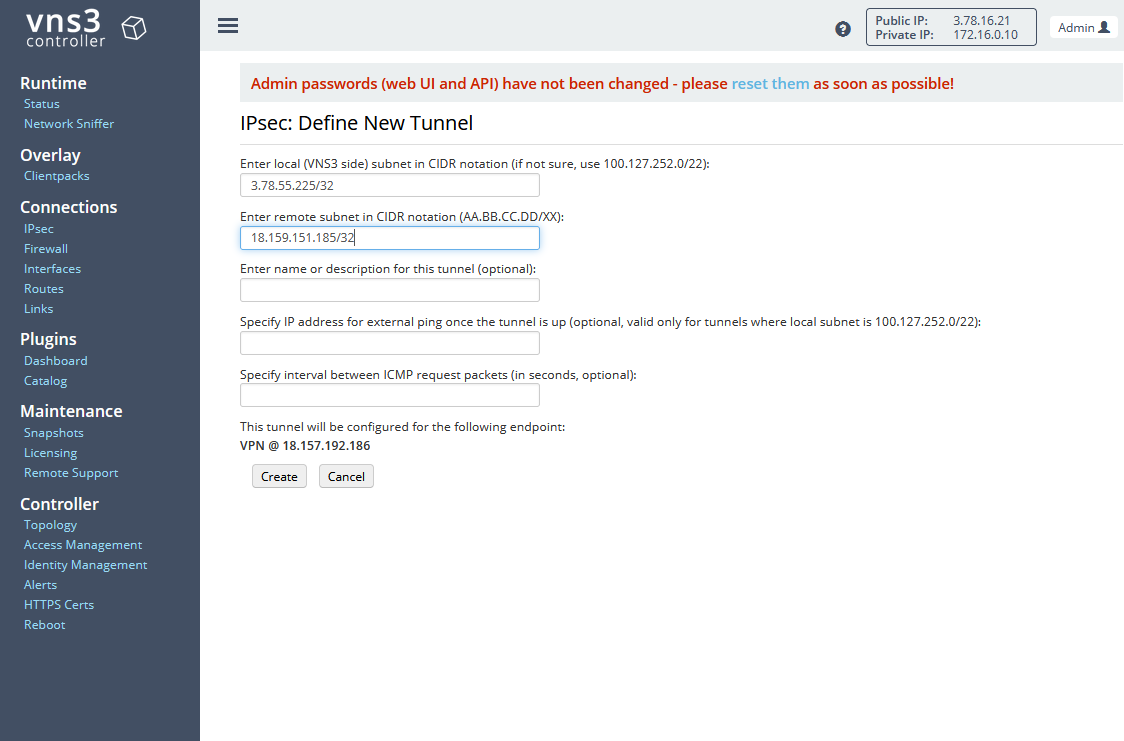
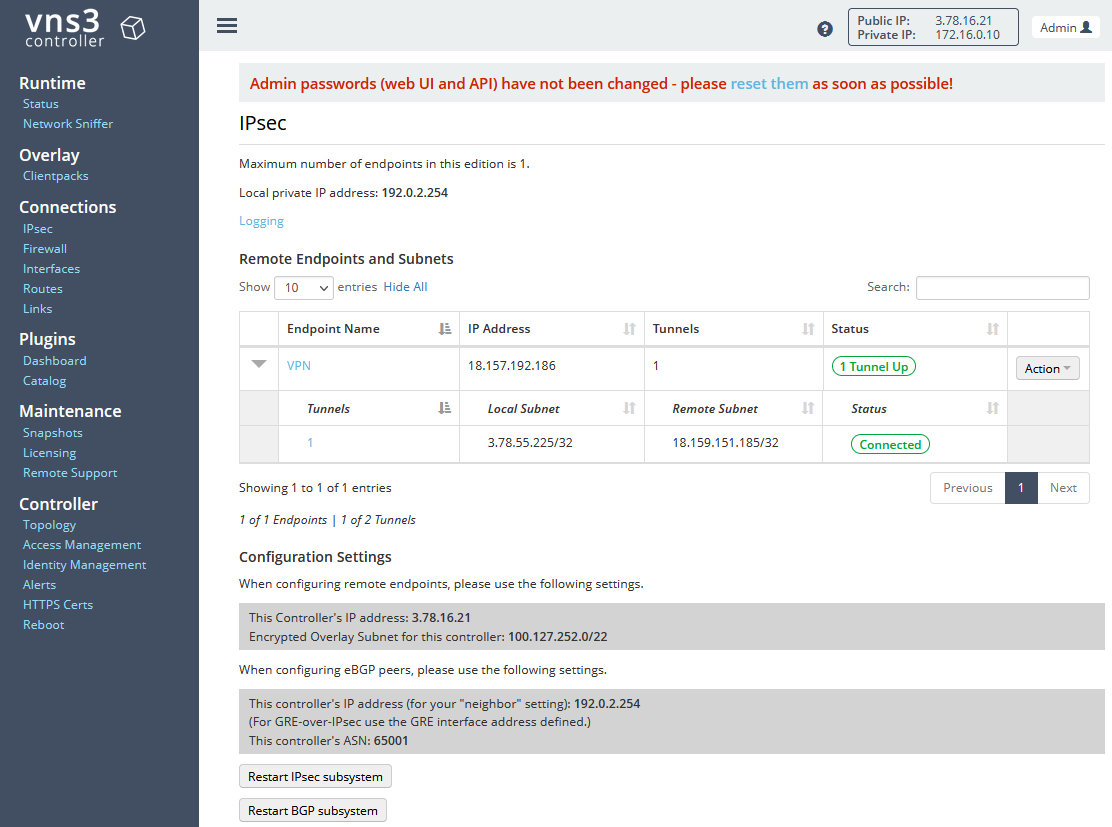
Click on Create to create the tunnel. Wait a few seconds until the endpoint status changes to Tunnel Up and the tunnel status changes to Connected. If the status does not change, try resetting the endpoint by clicking on Action and selecting Reset endpoint.
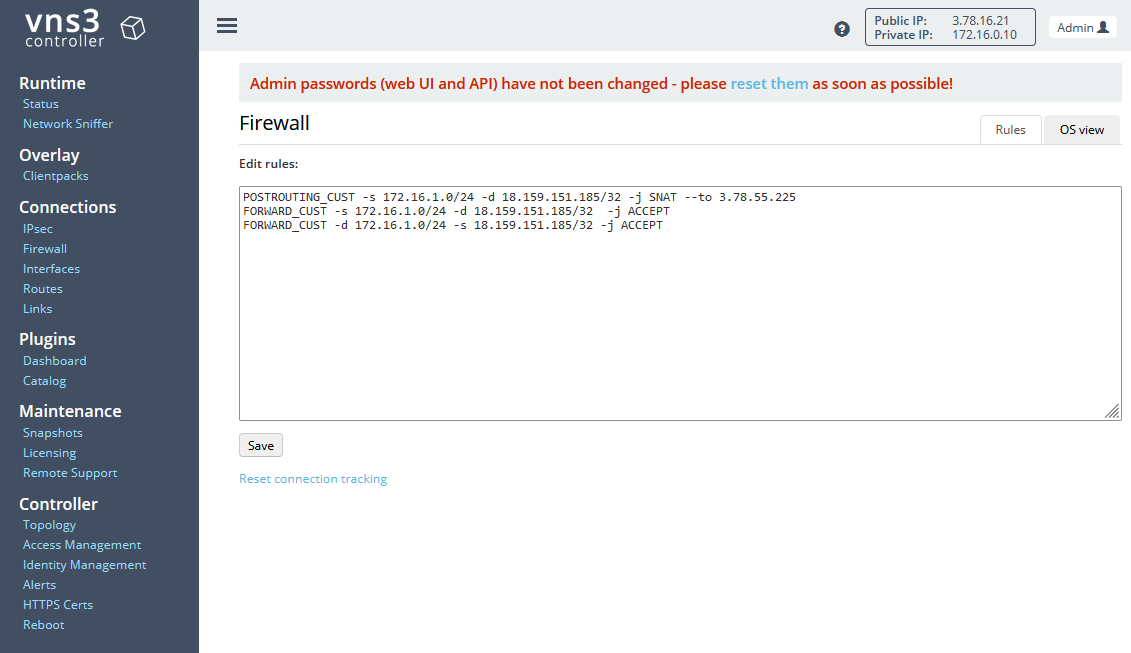
As with pfSense we need to hide our local network behind the EIP used for the Public Encryption Domain. To do so, we will adjust the firewall setting of the VNS3 controller. Navigate to Firewall under Connections. Enter the following commands:
POSTROUTING_CUST -s 172.16.1.0/24 -d ON_PREM_PUBLIC_ENCRYPTION_DOMAIN_EIP -j SNAT --to AWS_PUBLIC_ENCRYPTION_DOMAIN_EIP
FORWARD_CUST -s 172.16.1.0/24 -d ON_PREM_PUBLIC_ENCRYPTION_DOMAIN_EIP -j ACCEPT
FORWARD_CUST -d 172.16.1.0/24 -s ON_PREM_PUBLIC_ENCRYPTION_DOMAIN_EIP -j ACCEPT
The first command will map the traffic coming from our local network and is destined for the On-Premises VPC Public Encryption Domain IP to the AWS Cloud VPC Public Encryption Domain IP. The last two rules ensure that the firewall does not block the traffic. For more information please visit the official documentation.
Click on Save to save the new firewall rules.
Test Client/Server Connection
After having configured both the VNS3 as well as the pfSense appliance, it is time to test the connection between the client EC2 and server EC2 instance. Open the AWS EC2 Console and select the Client EC2 instance. Click on Connect, select the Session Manager tab, and click Connect. Once you have connected to the instance via the Session Manager, execute a ping command to the server. We will not ping the private IP of the server directly. As we are using Public Encryption Domains, we will use the Public Encryption Domain IP of the On-Premises VPC.
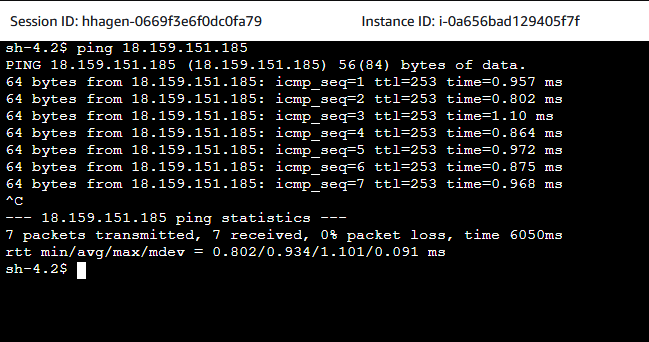
If everything has been set up correctly, the ping should succeed. Next, we will curl the IP. We expect the default NGNIX index page to be returned to us. Execute the command curl ON_PREMISES_PUBLIC_ENCRYPTION_IP and replace ON_PREMISES_PUBLIC_ENCRYPTION_IP with the EIP created previously.
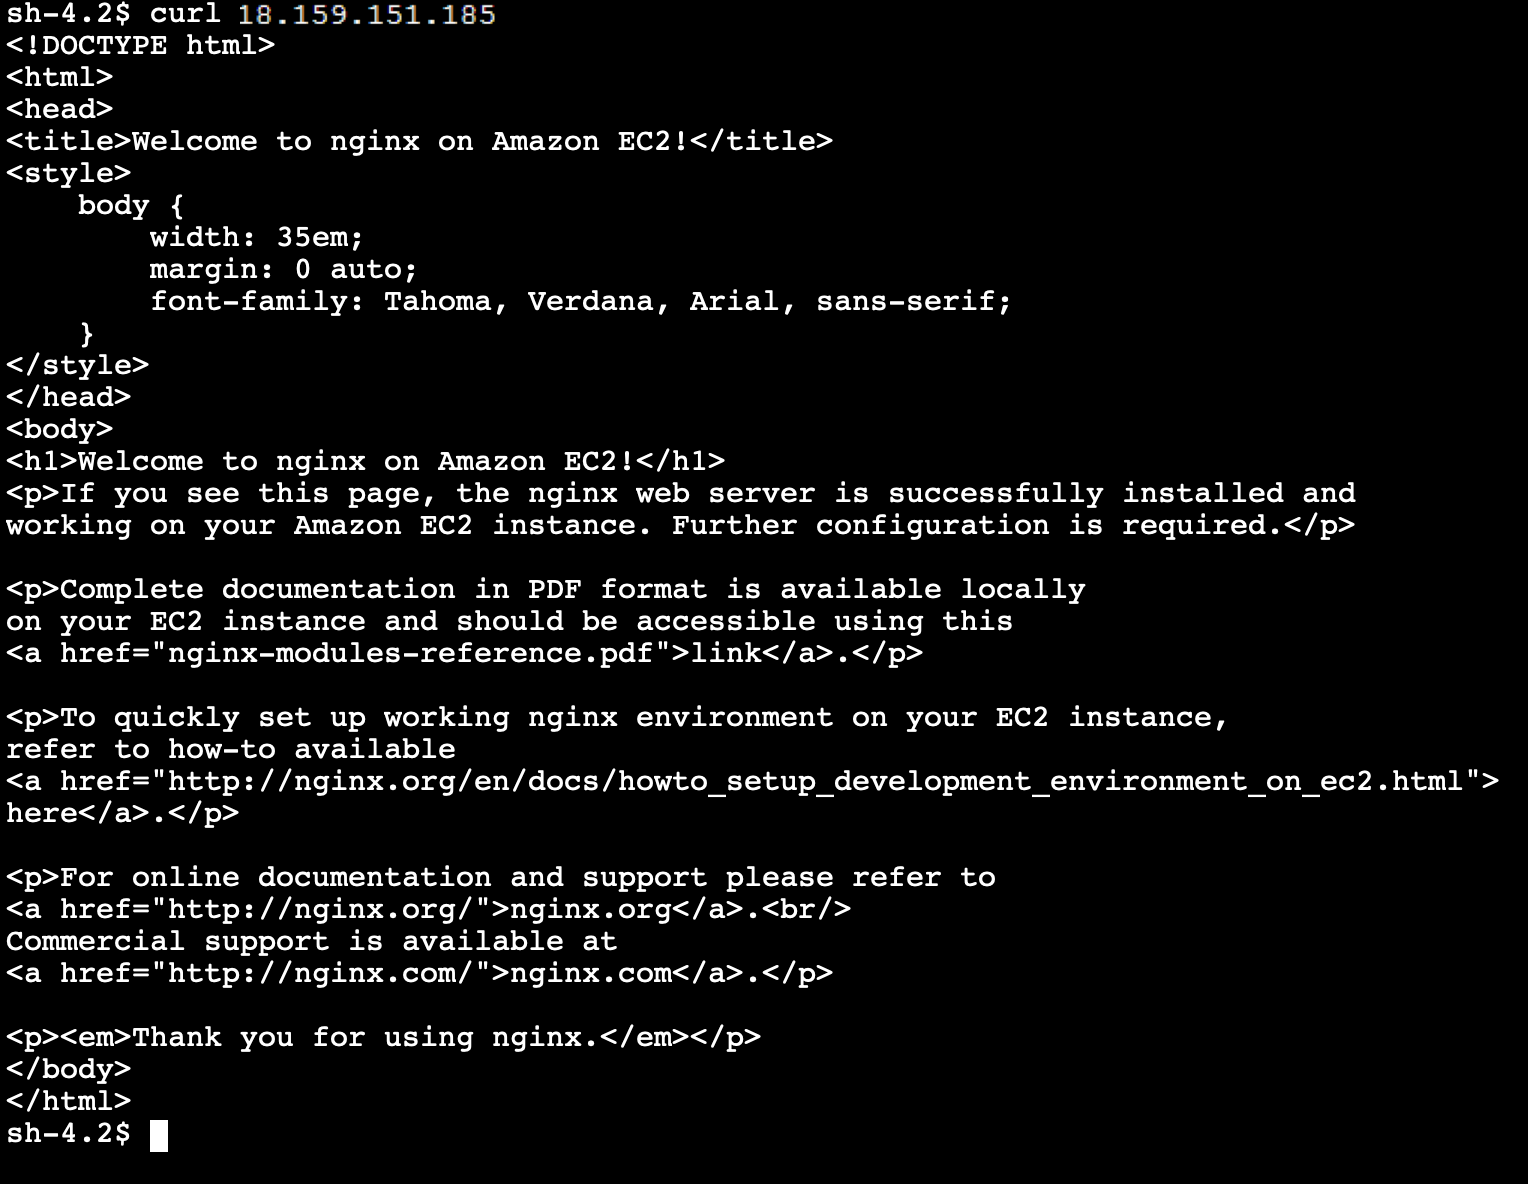
Congratulations, you just set up a Site-to-Site VPN between two AWS VPC using different appliances and a Public Encryption Domain.
Summary
As you can see, it is not complicated to implement Site-to-Site IPSec VPN with a Public Encryption Domain using third-party appliances. The architecture that we just implemented is meant to serve as a starting point and an example. There are multiple ways to make the solution more robust and efficient. Firstly, it is recommended to create multiple tunnels between different VMs to ensure the reliability and high availability of the VPN solution. For more information on how to set up the appliances in a highly available setup, please visit the official documentation of VNS3 as well as pfSense. Secondly, the VPN configuration and settings as well as the firewall definitions could be looked at in more detail. To keep this example as short as possible, default settings were used where possible. Lastly, instead of configuring the appliances via the Internet and allowing ingress traffic on ports 443 and 8000, you could leverage AWS System Manager Session Manager Port Forwarding as described in this official blog post.
I hope you had fun and learned something new while working through this example. I am looking forward to your feedback and questions. If you want to take a look at the complete example code please visit my Github.
— Hendrik