Hybrid DNS resolution using Route 53 Endpoints
When implementing a hybrid cloud solution and connecting your AWS VPCs with corporate data centers, setting up proper DNS resolution across the whole network is an important step to ensure full integration and functionality. In order to accomplish this task, Route53 Inbound and Outbound endpoints can be used. In combination with forwarding rules, they allow you to forward DNS traffic between your AWS VPC and on-premises data centers.
In this blog post, I would like to show you how you can leverage Route53 endpoints in combination with Terraform to establish seamless DNS query resolution across your entire hybrid network.
Architecture
To start, I would like to guide you through the architecture we are planning to deploy as part of this example. The diagram below displays a high-level overview of the setup we are trying to simulate. The overall goal of this example is to create a hybrid network by connecting our AWS and on-premises network using an AWS Site-to-Site VPN. Furthermore, we will set up proper DNS resolution between the sites by leveraging Route53 Inbound and Outbound endpoints.
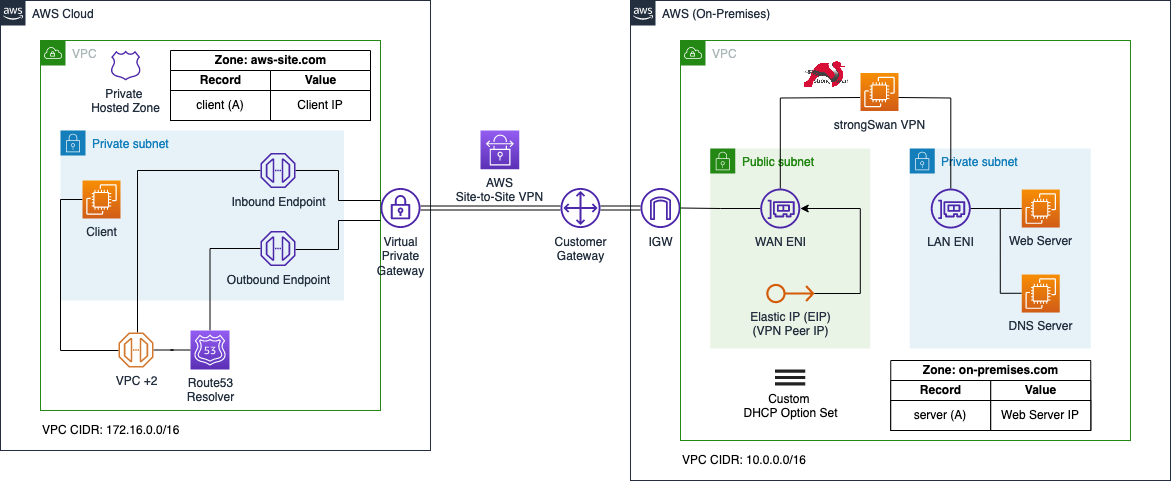
We will set up two VPCs as part of this example. The first VPC on the left-hand side will represent the AWS network while the VPC on the right-hand side will simulate the on-premises network. The on-premises network will be connected to the AWS network using AWS Site-to-Site VPN tunnels. Each network will also receive its own DNS zone. The AWS network will host the zone aws-site.com, while the on-premises network will host the zone on-premises.com.
The AWS VPC will consist of a single EC2 called Client that needs to communicate with the on-premises web server. Furthermore, we will implement a private hosted zone named aws-site.com in Route53 and a single A record called client that will point to the IP address of the Client EC2 instance. To allow DNS forwarding between AWS and the on-premises network, Route53 Inbound and Outbound endpoints will be implemented. The Inbound endpoint will be configured to only allow inbound traffic from the DNS server located in the on-premises network. The Inbound endpoint will receive static private IP addresses. We will configure the on-premises DNS server to forward queries for aws-site.com to these IP addresses.
Once the Outbound endpoint has been created, we can implement forwarding rules and associate these rules with the endpoint. Forwarding rules allow you to forward DNS queries for specific domains to certain IP addresses that you define. In our example, we will create a rule that will forward queries for on-premises.com to the IP address of the on-premises DNS server. In order to establish a connection between the AWS and on-premises network via AWS Site-to-Site VPN, we will set up a Virtual Private Gateway as well as a Customer Gateway in the AWS VPC.
The on-premises environment will consist of a VPC with private and public subnets. The private subnet will contain a Web Server that the Client in the AWS VPC needs to reach. Besides the Web Server, we will also set up a custom DNS Server on an EC2 instance using bind. To ensure that the on-premises instances use our custom DNS server instead of the AWS Route53 Resolver, we will implement a custom DHCP option set and will configure our custom DNS server as the default VPC DNS server. We will configure a DNS zone called on-premises.com on the DNS server. In addition, we will define a single A record named server pointing to the IP of the web server in the zone file. The DNS server will be responsible to forward queries aimed at the zone aws-site.com to the Route53 Inbound endpoint and also to respond to queries for the on-premises.com zone.
The public subnet will contain the strongSwan VPN that we will use to create a Site-to-Site VPN connection between the AWS network and our simulated on-premises setup. The strongSwan EC2 instance will have two Elastic Network Interfaces, a LAN ENI as well as a WAN ENI. The LAN ENI will be placed in the private subnet of the VPC and will allow EC2 instances running in the private subnets to forward VPN traffic to the virtual appliance. The LAN ENI will only be assigned a private IP address. The WAN ENI will be placed in the public subnet of the VPC and will function as the entry point to the on-premises network. Besides the private IP, it will also be assigned a static public IP by using an Elastic IP. The public IP will be used as the VPN Peer IP and will allow the creation of an IPSec VPN connection between the two VPCs.
DNS Flow
Next, I would like to discuss the DNS traffic flow between AWS and the on-premises network when using Route53 Inbound and Outbound endpoints.
Outbound
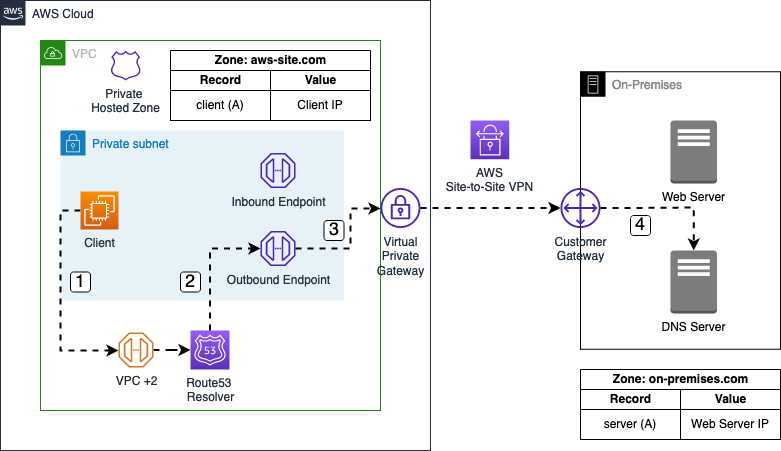
In our example, the flow starts with a DNS query by the AWS Client for server.on-premises.com.
- The DNS query is sent to the IP address located at the VPC network range plus two (VPC + 2) and forwarded to the VPC Route53 resolver.
- A Route53 forwarding rule has been configured to send queries for the
on-premises.comdomain to the IP address of the on-premises DNS server. The DNS query is sent to the Route53 Outbound endpoint. - The Route53 Outbound endpoint forwards the query to the on-premises DNS server via the AWS Site-to-Site VPN connection.
- The on-premises DNS server receives and resolves the DNS query for
server.on-premises.com.
Inbound
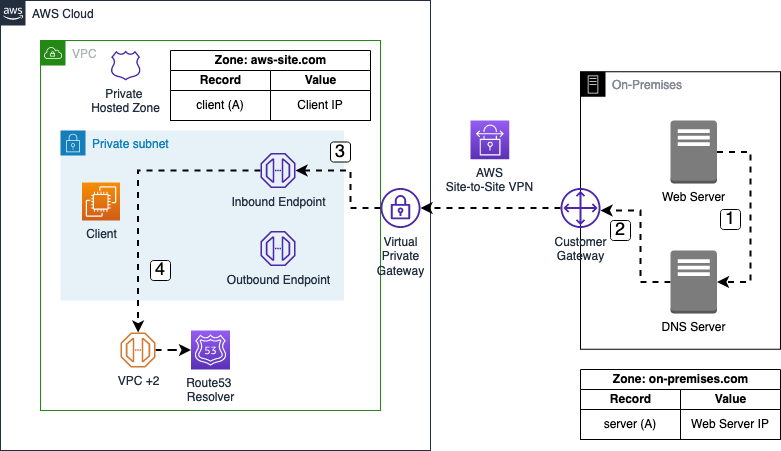
In our example, the flow starts with a DNS query by the on-premises Web Server for client.aws-site.com.
- The DNS query is sent to the on-premises DNS server.
- A forwarding rule has been configured on the DNS server to send queries for the
aws-site.comdomain to the IP addresses of the Route53 Inbound endpoint. The DNS query is sent to the Route53 Inbound endpoint via the AWS Site-to-Site VPN connection. - The DNS query arrives at the Route53 Inbound endpoint.
- The Route53 Inbound endpoint forwards the query to the VPC+2 address which in turn forwards the request to the VPC Route53 resolver. The DNS resolver resolves the DNS query for
client.aws-site.com.
Project Structure
Before we start setting up our Terraform configuration, I would like you to create the project structure. Please create the following files and folders.
├── aws
│   ├── data.tf
│   ├── output.tf
│   ├── route53.tf
│   ├── terraform.tfvars
│   └── variables.tf
├── bootstrap
└── on-premises
    ├── dhcp.tf
    ├── terraform.tfvars
    └── variables.tf
As this example will be quite extensive, we will split up our Terraform configuration into separate files and folders. The Terraform configuration for the AWS network will be contained in the aws folder while the configuration for the on-premises networks will be contained in the on-premises folder. The folder bootstrap contains the Terraform code that will be used to bootstrap the aws and on-premises network.
Bootstrap Environment
Let’s start this example by bootstrapping the AWS and on-premises network. After having completed the bootstrapping process, we will have the following setup.
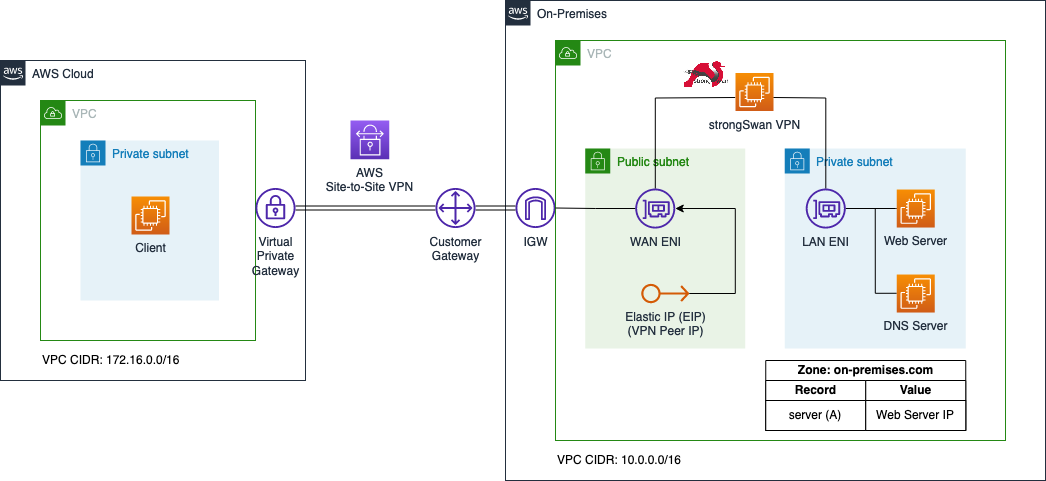
We will leverage an existing Terraform module to quickly bootstrap the AWS and on-premises environments. Please download the module from the Github repository of this blog post and copy it into the folder bootstrap/. The module will create the whole AWS and on-premises infrastructure including VPCs, VPN tunnel, and EC2 instances based on a few input variables.
Once downloaded, go into the bootstrap/ folder and run terraform init and terraform apply to deploy the infrastructure.
Test Connectivity
After having run the bootstrap Terraform configuration, we will test the connection between the Client and the DNS server as well as the on-premises Web server. We will start with the Client -> DNS server connection.
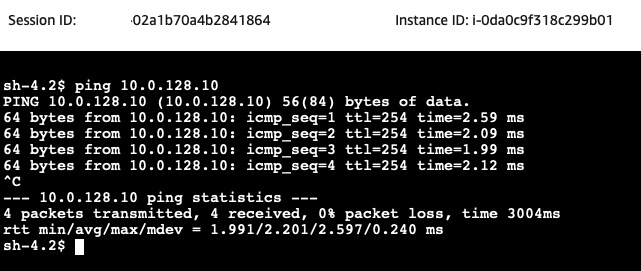
Open the AWS EC2 Console and select the aws-site-Client EC2 instance. Click on Connect, select the Session Manager tab, and click Connect. Once you have connected to the instance via the Session Manager, execute a ping command to the private IP of the on-premises-DNS.
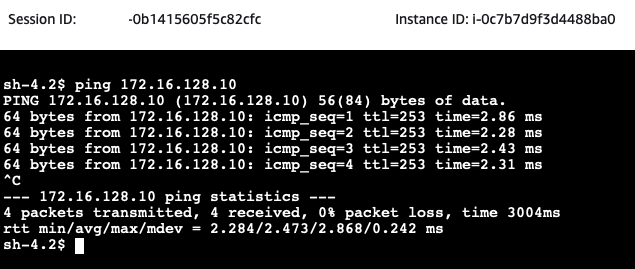
Next, we will test the communication between the on-premises Web server and the AWS Client. Open the AWS EC2 Console and select the on-premises-Web-Server EC2 instance. Click on Connect, select the Session Manager tab, and click Connect. Once you have connected to the instance via the Session Manager, execute a ping command to the private IP of the aws-site-Client.
AWS Configuration
Once the connectivity has been verified, we will continue with the deployment of the Route53 Inbound and Outbound endpoints.
Route53 Endpoint Deployment
Let’s start by defining the Terraform configuration for Route53. Please copy the following code into aws/route53.tf.
locals {
  dns_server_ip_cidr_notation = format("%s/32", var.on_premises_network.dns_server_ip)
}

################################################################################
# Private Hosted Zone
################################################################################

resource "aws_route53_zone" "this" {
  name = format("%s.com", var.application_name)

  vpc {
    vpc_id = data.aws_vpc.this.id
  }
}


################################################################################
# Record
################################################################################

resource "aws_route53_record" "this" {
  zone_id = aws_route53_zone.this.zone_id
  name    = "client"
  type    = "A"
  ttl     = 300
  records = [var.aws_site_client_ip]
}


################################################################################
# Inbound Endpoint
################################################################################

resource "aws_route53_resolver_endpoint" "inbound" {
  name      = "${var.application_name}-inbound"
  direction = "INBOUND"

  security_group_ids = [aws_security_group.inbound.id]

  dynamic "ip_address" {
    for_each = data.aws_subnets.private.ids
    content {
      subnet_id = ip_address.value
    }
  }
}

data "aws_route53_resolver_endpoint" "inbound" {
  resolver_endpoint_id = aws_route53_resolver_endpoint.inbound.id
}


################################################################################
# Outbound Endpoint
################################################################################

resource "aws_route53_resolver_endpoint" "outbound" {
  name      = "${var.application_name}-outbound"
  direction = "OUTBOUND"

  security_group_ids = [aws_security_group.outbound.id]

  dynamic "ip_address" {
    for_each = data.aws_subnets.private.ids
    content {
      subnet_id = ip_address.value
    }
  }
}

resource "aws_route53_resolver_rule" "this" {
  domain_name          = var.on_premises_network.domain_name
  name                 = "outbound"
  rule_type            = "FORWARD"
  resolver_endpoint_id = aws_route53_resolver_endpoint.outbound.id

  target_ip {
    ip = var.on_premises_network.dns_server_ip
  }
}

resource "aws_route53_resolver_rule_association" "this" {
  resolver_rule_id = aws_route53_resolver_rule.this.id
  vpc_id           = data.aws_vpc.this.id
}


################################################################################
# Inbound Endpoint Security Group
################################################################################

resource "aws_security_group" "inbound" {
  name   = "${var.application_name}-inbound-endpoint"
  vpc_id = data.aws_vpc.this.id
}

resource "aws_security_group_rule" "inbound_egress" {
  security_group_id = aws_security_group.inbound.id

  type        = "egress"
  from_port   = 0
  to_port     = 0
  protocol    = -1
  cidr_blocks = [data.aws_vpc.this.cidr_block]
}


resource "aws_security_group_rule" "inbound_udp_ingress" {
  security_group_id = aws_security_group.inbound.id

  type        = "ingress"
  from_port   = 53
  to_port     = 53
  protocol    = "udp"
  cidr_blocks = [local.dns_server_ip_cidr_notation]
}

resource "aws_security_group_rule" "inbound_tcp_ingress" {
  security_group_id = aws_security_group.inbound.id

  type        = "ingress"
  from_port   = 53
  to_port     = 53
  protocol    = "tcp"
  cidr_blocks = [local.dns_server_ip_cidr_notation]
}


################################################################################
# Outbound Endpoint Security Group
################################################################################

resource "aws_security_group" "outbound" {
  name   = "${var.application_name}-outbound-endpoint"
  vpc_id = data.aws_vpc.this.id
}

resource "aws_security_group_rule" "outbound_udp_egress" {
  security_group_id = aws_security_group.outbound.id

  type        = "egress"
  from_port   = 53
  to_port     = 53
  protocol    = "udp"
  cidr_blocks = [local.dns_server_ip_cidr_notation]
}

resource "aws_security_group_rule" "outbound_tcp_egress" {
  security_group_id = aws_security_group.outbound.id

  type        = "egress"
  from_port   = 53
  to_port     = 53
  protocol    = "tcp"
  cidr_blocks = [local.dns_server_ip_cidr_notation]
}

resource "aws_security_group_rule" "outbound_ingress" {
  security_group_id = aws_security_group.outbound.id

  type        = "ingress"
  from_port   = 0
  to_port     = 0
  protocol    = -1
  cidr_blocks = [data.aws_vpc.this.cidr_block]
}
We will deploy a private hosted zone named aws-site.com including an A record client pointing at the private IP address of the AWS Client EC2. In addition, the Inbound and Outbound endpoint will be deployed. Each endpoint will receive its own security group. The Inbound endpoint security group will only allow ingress traffic on port 53 from the IP address of the on-premises DNS server. The Outbound endpoint security group will allow egress traffic on port 53 to the IP address of the on-premises DNS server. Setting up the security groups this way ensures that communication between the endpoints and the on-premises network is restricted.
Before we are able to deploy the endpoints, we have to define a few variables and set up Terraform data resources to retrieve values. We will start with defining the variables. Please copy the following snippet into the aws/variables.tf.
variable "application_name" {
  description = "Name of the application"
  type        = string
}

variable "aws_site_client_ip" {
  description = "IP addresse of the client EC2"
  type        = string
}

variable "on_premises_network" {
  description = "Object of On-Premises network"
  type = object({
    domain_name   = string
    cidr_range    = string
    dns_server_ip = string
  })
}
To manage the values of our defined variables, we will create a aws/terraform.tfvars file. This will help us to keep our Terraform configuration clean and readable. Please define the following values for our variables in the terraform.tfvars file.
application_name   = "aws-site"
aws_site_client_ip = "172.16.128.10"

on_premises_network = {
  domain_name   = "on-premises.com"
  cidr_range    = "10.0.0.0/16"
  dns_server_ip = "10.0.128.10"
}
Besides the Terraform variables, we will retrieve the information regarding the AWS VPC and private subnets dynamically using Terraform data resources. Please copy the following Terraform configuration into the aws/data.tf.
################################################################################
# Get VPC
################################################################################

data "aws_vpc" "this" {
  filter {
    name   = "tag:Name"
    values = [var.application_name]
  }
}


################################################################################
# Get List of private Subnet IDs
################################################################################


data "aws_subnets" "private" {
  filter {
    name   = "vpc-id"
    values = [data.aws_vpc.this.id]
  }
  filter {
    name   = "tag:Name"
    values = ["*private*"]
  }
}
Before we deploy the Route53 Inbound and Outbound endpoints, we will add an output to our Terraform configuration. This output will provide the privat IP addresses of the Inbound endpoint which will be needed to configure the forwarding rule on the on-premises DNS server. Let’s create the output by adding the following configuration to the aws/outputs.tf.
output "route53_inbound_endpoint_ips" {
  description = "IPs of Route53 resolver inbound endpoints"
  value       = data.aws_route53_resolver_endpoint.inbound.ip_addresses
}
Go into the aws folder and run terraform init to initialize Terraform and terraform apply to deploy the Route53 infrastructure.
Test Endpoint Connectivity
After having set up the Route53 endpoints, we will test the connection between the on-premises DNS server and the Route53 Inbound endpoint.
Open the AWS EC2 Console and select the on-premises-DNS EC2 instance. Click on Connect, select the Session Manager tab, and click Connect. Once you have connected to the instance via the Session Manager, execute a telnet command on port 53 to the private IPs of the Route53 Inbound endpoint. The IPs of the Inbound endpoint can be found in the Terraform output route53_inbound_endpoint_ips.
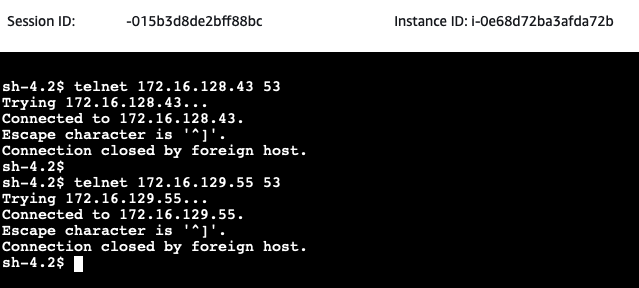
If the telnet command succeeds, the DNS server is able to connect to the Route53 Inbound endpoint on port 53. This will allow the on-premises DNS server to forward queries for aws-site.com to the Route53 Inbound endpoint once the proper forwarding rules are configured on the EC2 instance.
On-Premises Configuration
To finalize the setup, we will have to configure the forwarding rule on the on-premises DNS server and implement a custom DHCP option set to define our custom DNS server as the default DNS server.
Configure Forwarding Rule
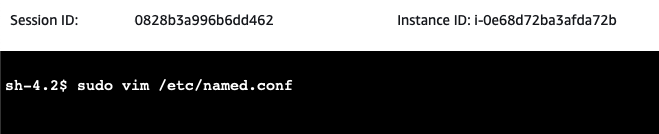
We will start by configuring the forwarding rule for the aws-site.com domain on the DNS server. Open the AWS EC2 Console and select the on-premises-DNS EC2 instance. Click on Connect, select the Session Manager tab, and click Connect. Once you have connected to the instance via the Session Manager, open the file /etc/named.conf. Execute the following command.
sudo vim /etc/named.conf
Scroll down to the bottom. You should see the following, commented-out forwarding rule at the bottom.
//forward zone to AWS
//zone "aws-site.com" {
//    type forward;
//    forward only;
//    forwarders { ;};
//};
Press i to move into INSERT mode. Remove the comments // and add the two IP addresses of the Route53 Inbound endpoints under forwarders { ;};. In our example, the two IP addresses allocated by AWS are 172.16.128.43 and 172.16.129.55. After having removed the comments and having entered the Inbound IP addresses, the forwarding rule should look as follows.
//forward zone to AWS
zone "aws-site.com" {
    type forward;
    forward only;
    forwarders { 172.16.128.43; 172.16.129.55; };
};
Press ESC and type in :x to store the new configuration. Press Enter to confirm. Restart the service by using the command sudo systemctl restart named.
Make sure to NOT remove // in front of //forward zone to AWS.
Deploy DHCP Option Set
After having configured our DNS server, we will configure a custom DHCP option set in our on-premises VPC to ensure that all on-premises EC2 use the custom DNS server as the default DNS server. Copy the following Terraform configuration into the on-premises/dhcp.tf.
################################################################################
# Get VPC
################################################################################

data "aws_vpc" "this" {
  filter {
    name   = "tag:Name"
    values = [var.application_name]
  }
}

################################################################################
# DHCP Option Set
################################################################################

resource "aws_vpc_dhcp_options" "this" {
  domain_name         = format("%s.com", var.application_name)
  domain_name_servers = [var.dns_server_ip]

}

resource "aws_vpc_dhcp_options_association" "this" {
  vpc_id          = data.aws_vpc.this.id
  dhcp_options_id = aws_vpc_dhcp_options.this.id
}
Before we are able to deploy the DHCP option set, we have to define a few variables. We will start with defining the variables. Please copy the following snippet into the on-premises/variables.tf.
variable "application_name" {
  description = "Name of the application"
  type        = string
}

variable "dns_server_ip" {
  description = "IP of the On-Premises DNS server"
  type        = string
}
To manage the values of our defined variables, we will create a aws/terraform.tfvars file. This will help us to keep our Terraform configuration clean and readable. Please define the following values for our variables in the terraform.tfvars file.
application_name = "on-premises"
dns_server_ip    = "10.0.128.10"
Go into the on-premises folder and run terraform init to initialize Terraform and terraform apply to deploy the DHCP infrastructure.
Reboot EC2 Instances
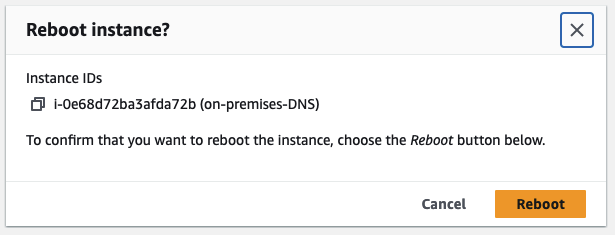
To make sure that the running EC2 instances are configured correctly and are using the custom DNS server as the default DNS server, we will reboot the EC2 instances on-premises-DNS, on-premises-Strongswan, and on-premises-Web-Server. Open the AWS EC2 Console and right-click each of the three instances metioned above. Select the option Reboot Instance to reboot the instance.

Confirm the reboot by clicking on Reboot.
Test Hybrid DNS Resolution
Once the reboot of the EC2 instances has been performed, we will test the hybrid DNS resolution.
We will start by sending a dig command and querying server.on-premises.com from the AWS Client. Open the AWS EC2 Console and select the aws-site-Client EC2 instance. Click on Connect, select the Session Manager tab, and click Connect. Once you have connected to the instance via the Session Manager, execute a dig command to the domain server.on-premises.com to perform a DNS lookup for the on-premises domain.
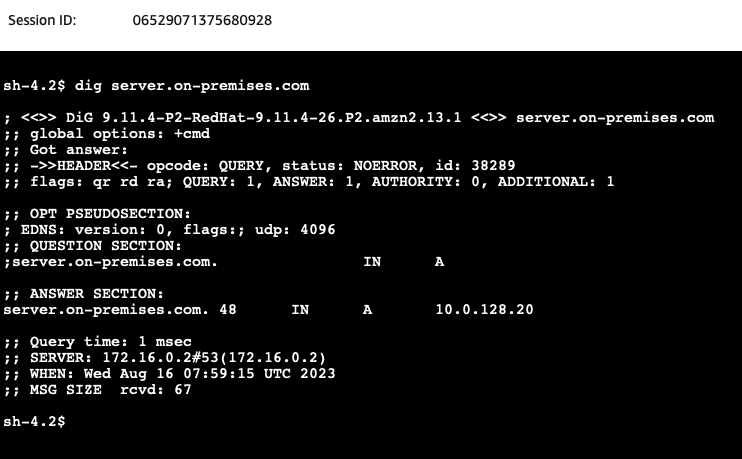
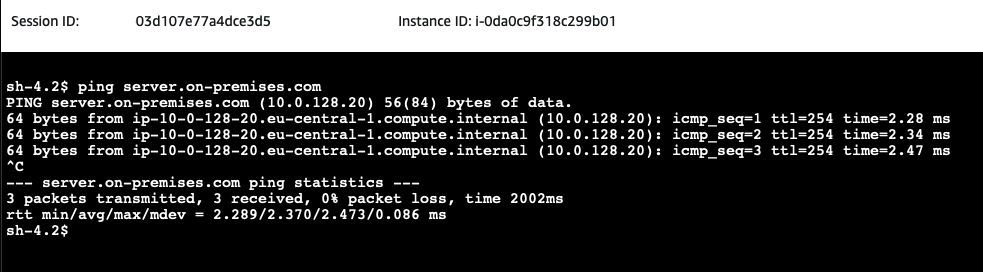
You will see the IP address of the on-premises web server has been returned by the VPC DNS server located at the IP address VPC + 2. Next, issue a ping command to the DNS name of the on-premises-Web-Server.
Next, we will test the communication between the on-premises Web server and the AWS Client. Open the AWS EC2 Console and select the on-premises-Web-Server EC2 instance. Click on Connect, select the Session Manager tab, and click Connect. Once you have connected to the instance via the Session Manager, execute a dig command to the domain client.aws-site.com to perform a DNS lookup for the on-premsies domain.
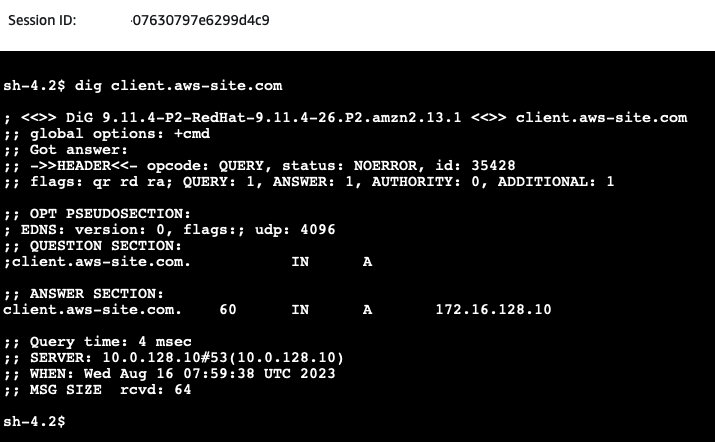
You will see the IP address of the client server has been returned by the on-premises DNS server. Next, issue a ping command to the DNS name of the aws-site-Client.
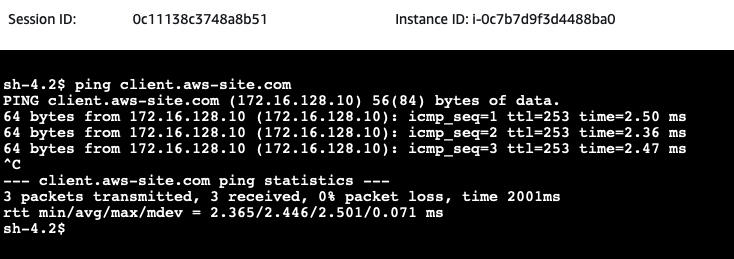
If the DNS Resolution has been set up correctly, the pings should succeed. Congratulations, you just set up a hybrid network including Site-to-Site VPN connections and proper DNS resolution between AWS and a simulated on-premises network!
Summary
The architecture that we just implemented is meant to serve as a starting point and an example. There are multiple ways to make the solution more robust and efficient. For example, we could make the solution more robust by implementing a dynamic AWS Site-to-Site VPN including a Transit Gateway and multiple redundant VPN tunnels. Please see the blog post Multiple Site-to-Site VPN Connections in AWS Hub and Spoke Topology for a detailed explanation.
I hope you had fun and learned something new while working through this example. I am looking forward to your feedback and questions. If you want to take a look at the complete example code please visit my Github.
— Hendrik
Title Photo by Ian Taylor on Unsplash