Serverless Cross-Account Microservices
When setting up a microservice architecture, each individual service is often owned and managed by a different team. To achieve a higher level of resource isolation, and allow for more granular security and cost management, each service team usually deploys its resources into a dedicated AWS account. While this type of distributed approach offers many benefits in terms of productivity, scalability, and resiliency, it introduces another layer of complexity in regard to AWS cross-account communication and microservice consumption.
In this blog post, I would like to show you how you can leverage AWS services like Amazon API Gateway, Lambda, DynamoDB, and VPC Endpoints in combination with Terraform to build a fully-managed and serverless cross-account microservice architecture.
Introduction
Microservices have become increasingly popular over the last couple of years. Especially with the rise and adoption of DevOps and CI/CD, many companies are trying to break down their monolithic structures into smaller and more manageable components called microservices.
The monolithic architecture describes the traditional approach to developing software. Each monolith is built as a self-contained application. While monolithic architectures are not inherently bad, they come with a few drawbacks. Changes to such an application can usually not be performed easily, as the entire structure is heavily interconnected and tightly coupled. Deploying a new feature likely requires the creation of a completely new version of the application which might take a lot of time depending on the size of the codebase. Furthermore, the lack of independent components makes scaling a challenging concept.
Microservices address these problems, by breaking down large, autonomous applications into smaller, individual modules. Each module, also called service, runs as an independent subcomponent and is responsible to handle one core functionality of the application. By splitting elements of an application into self-contained pieces, teams can develop their services in parallel without interfering with each other. As they run independently, each service can also be deployed and scaled according to the demand for their specific functions.
Communication between the services is handled via lightweight APIs. APIs allow you to hide the implementation details of the service and encapsulate it into something resembling a black box. Consumers do not have to worry about the detailed implementation of a service or the technologies used, but rather the core functionality that is being exposed via predefined inputs and outputs. By setting these predefined inputs and outputs, teams are able to leverage completely different technology stacks while developing their service.
As microservices architecture is a cloud-native approach to building software, it is a commonly used pattern when developing applications on AWS. By employing fully-managed and serverless AWS services, microservices running on AWS can be not only made highly available and scalable, but also resilient and quick to deploy. In addition, by providing each team with its own AWS account, resource and service isolation can be achieved easily.
In the blog post, I would like to show you how you can leverage AWS services like Amazon API Gateway, Lambda, DynamoDB, and VPC Endpoints in combination with Terraform to build a fully-managed, resilient, and highly available cross-account microservice architecture.
Architecture
First, I would like to guide you through the infrastructure that we will set up as part of this blog post. The diagram below displays the target architecture that we will build and deploy.
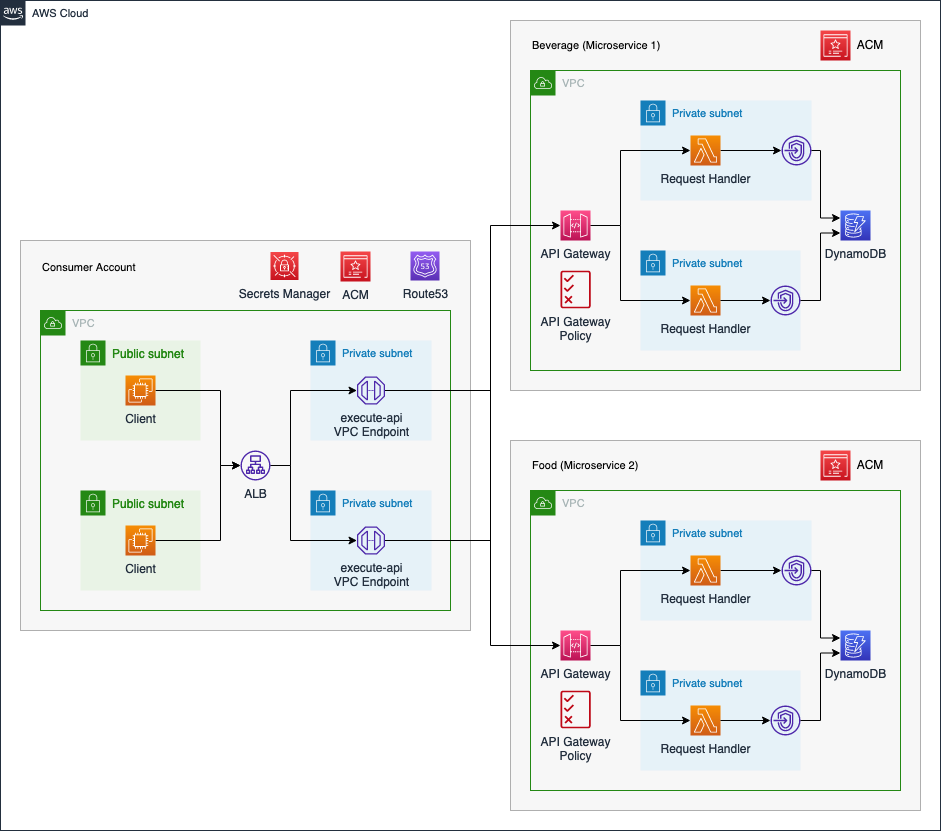
We will deploy a microservice architecture consisting of one Consumer Account and two microservices - Beverage and Food. The microservices can be used by internal clients to order beverages and food. We will use distinct AWS Accounts for both microservices as well as the Consumer Account.
The Consumer Account will serve as a central hub from which the microservices can be consumed. The clients will communicate with each service via an internal Application Load Balancer. We will employ an internal ALB to make sure that only local VPC clients are able to communicate with our microservices. The ALB will forward the traffic to a VPC Endpoint which is connected to the API Gateway Service execute-api.
By leveraging VPC Endpoints, we are able to communicate with the private API Gateways located in the microservice accounts via the internal AWS network. We will set up a private Hosted Zone in Route53 as well as an Alias record for each microservice. This will allow the clients to utilize readable domains when sending requests to the corresponding microservice. To ensure secure connections, we will utilize HTTPS listeners in combination with our ALB. The certificate will be provided via AWS Certificate Manager, ACM. Lastly, we will set up a secret in Secrets Manager to store the ID of the VPC Endpoint. We will share this secret with the microservice accounts to allow them to dynamically retrieve the VPC Endpoint ID and define API Gateway policies to allow traffic from the Consumer Account.
The microservices used as part of this example are meant to serve as a template and are simple in nature. We will set up a private API Gateway with multiple resources and methods. These resources and methods will allow clients to order beverages and food as well as look up past orders. As the goal is to build a serverless microservice architecture, we will use AWS Lambda in the API Gateway Integration Methods and DynamoDB for storage. The Lambda functions will store orders and retrieve data from a DynamoDB table.
To ensure secure and private communication between DynamoDB and AWS Lambda, we will place our Lambda functions inside the VPC and utilize a DynamoDB VPC Endpoint of type Gateway. Lastly, we will define a custom domain for the API Gateways. These domains will match the Alias records defined in the Consumer Account to ensure that connections can be initiated successfully between the Consumer account and the microservices. The certificate needed to define custom domains for the API Gateway will be provided by ACM.
The following diagram will give you a quick overview of the API Gateway resources and methods that are available for each microservice. Both the Food and Beverage microservice will be set up identically.
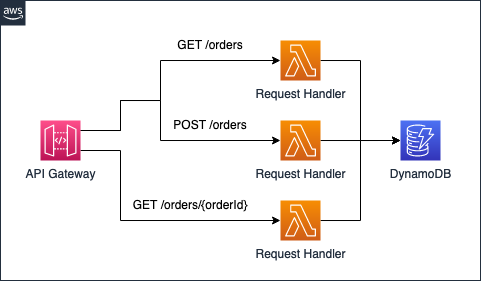
We will set up each microservice with one main resource orders. The resource orders will have a GET and a POST method. The GET method can be used to retrieve all orders that were already issued while the POST method is used to create new orders. Once an order has been created, it can be retrieved individually via orderId and the GET-method of the subresource orders/{orderId}.
Project Structure
Before we start setting up our Terraform configuration, I would like you to create the project structure. Please create the following files and folders.
├── consumer
│   ├── acm.tf
│   ├── alb.tf
│   ├── client.tf
│   ├── route53.tf
│   ├── secret.tf
│   ├── variables.tf
│   ├── vpc.tf
│   └── vpc_endpoint.tf
├── microservices
│   ├── main.tf
│   ├── templates
│   │   └── api-gateway-definition-template.yaml
│   ├── terraform.tfvars
│   └── variables.tf
└── modules
    └── microservice
As this example will be quite extensive, we will split up our Terraform configuration into separate files and folders. The Terraform configuration for the Consumer account will be contained in the consumer folder while the configuration for the microservices will be contained in the microservices folder.
Network Deployment
We will start by deploying the network infrastructure of the Consumer account. The VPC and all included components will be the basis for the Application Load Balancer, VPC Endpoints, and the EC2 instances. The Terraform configuration for the vpc.tf can be found here.
Before we are able to deploy our network, we have to define a few variables for our vpc and subnets. Please copy the following snippet into the variables.tf. Besides the variables for the VPC and subnet cidr blocks, we already included a variable for the application_name, microservices, and for allowed_service_principal_arns. These will be used later when setting up the VPC Endpoint Services.
variable "vpc_cidr_block" {
  description = "CIDR of vpc."
  type        = string
}

variable "public_subnets" {
  description = "Map of public subnets that should be created"
  type = map(object({
    cidr_block        = string
    availability_zone = string
  }))
}

variable "private_subnets" {
  description = "Map of private subnets that should be created."
  type = map(object({
    cidr_block        = string
    availability_zone = string
  }))
}

variable "application_name" {
  description = "Name of the application."
  type        = string
}

variable "microservices" {
  description = "List of microservices to attach."
  type        = set(string)
}

variable "allowed_service_principal_arns" {
  description = "List of the consumer ARNs allowed to connect to the VPC Endpoint Service and access the secret."
  type        = list(string)
}
To manage the values of our defined variables, we will create a terraform.tfvars file. This will help us to keep our Terraform configuration clean and readable. Please define the following values for our variables in the terraform.tfvars file. For allowed_service_principal_arns please add the account ids of the AWS account which will be used for the microservice accounts.
If you do not have access to a second/third AWS account, you can also deploy the Consumer account setup into the same account as the microservice accounts. In this case, please add the account id of the Consumer Account for allowed_service_principal_arns.
vpc_cidr_block = "192.168.0.0/16"

public_subnets = {
  subnet_1 = {
    cidr_block        = "192.168.0.0/24"
    availability_zone = "eu-central-1a"
  }
  subnet_2 = {
    cidr_block        = "192.168.1.0/24"
    availability_zone = "eu-central-1b"
  }
}

private_subnets = {
  subnet_1 = {
    cidr_block        = "192.168.2.0/24"
    availability_zone = "eu-central-1a"
  }
  subnet_2 = {
    cidr_block        = "192.168.3.0/24"
    availability_zone = "eu-central-1b"
  }
}

application_name               = "cross-account-microservices"
microservices                  = ["food", "beverage"]
allowed_service_principal_arns = ["arn:aws:iam::843934227598:root"]
Let’s run terraform init to initialize Terraform and terraform apply to deploy the network infrastructure. Once Terraform has deployed the configuration, you should see a new network setup in the AWS console.
Consumer Deployment
Once the network has been deployed, we will continue with the implementation of the Application Load Balancer and the VPC Endpoint. Please copy the following Terraform configuration into alb.tf.
################################################################################
# ALB
################################################################################

resource "aws_lb" "this" {
  name = var.application_name

  internal           = true
  load_balancer_type = "application"
  security_groups    = [aws_security_group.alb.id]
  subnets            = local.private_subnet_ids
}


################################################################################
# ALB security group
################################################################################

resource "aws_security_group" "alb" {
  name   = "${var.application_name}-alb"
  vpc_id = aws_vpc.this.id
}

resource "aws_security_group_rule" "alb_ingress" {
  security_group_id = aws_security_group.alb.id

  type        = "ingress"
  from_port   = 443
  to_port     = 443
  protocol    = "tcp"
  cidr_blocks = [var.vpc_cidr_block]
}

resource "aws_security_group_rule" "alb_egress" {
  security_group_id = aws_security_group.alb.id

  type                     = "egress"
  from_port                = 443
  to_port                  = 443
  protocol                 = "tcp"
  source_security_group_id = aws_security_group.vpc_endpoint.id
}


################################################################################
# ALB http listener
################################################################################

resource "aws_lb_listener" "this" {
  load_balancer_arn = aws_lb.this.arn
  port              = "443"
  protocol          = "HTTPS"
  ssl_policy        = "ELBSecurityPolicy-TLS13-1-2-2021-06"
  certificate_arn   = aws_acm_certificate.this.arn


  default_action {
    type             = "forward"
    target_group_arn = aws_lb_target_group.this.arn
  }
}


################################################################################
# ALB target group
################################################################################

resource "aws_lb_target_group" "this" {
  name        = var.application_name
  port        = 443
  protocol    = "HTTPS"
  target_type = "ip"
  vpc_id      = aws_vpc.this.id

  health_check {
    path = "/login"
  }
}


################################################################################
# ALB target group attachement
################################################################################

resource "aws_lb_target_group_attachment" "this" {
  count = length(aws_subnet.private)

  target_group_arn = aws_lb_target_group.this.arn
  target_id        = data.aws_network_interface.this[count.index].private_ip
  port             = 443
}

data "aws_network_interface" "this" {
  count = length(aws_subnet.private)
  id    = tolist(aws_vpc_endpoint.this.network_interface_ids)[count.index]
}
The Application Load Balancer will be equipped with an HTTPS listener to ensure that the communication between the clients and the microservices is secure and encrypted. The attached Security Group allows ingress traffic on port 443 from the local VPC CIDR while only allowing egress on port 443 to the Security Group of the VPC Endpoint.
In order for this setup to work, we will have to implement two additional components - an SSL certificate and the VPC Endpoint itself. We will start with the SSL certificate needed by the HTTPS listener. We will use ACM to import our own certificate. Please copy the following snippet into acm.tf.
################################################################################
# ACM Self-Signed certificate
################################################################################

resource "tls_private_key" "this" {
  algorithm = "RSA"
}

resource "tls_self_signed_cert" "this" {
  private_key_pem = tls_private_key.this.private_key_pem

  subject {
    common_name = "*.${var.application_name}.com"
  }

  validity_period_hours = 12

  allowed_uses = [
    "key_encipherment",
    "digital_signature",
    "server_auth",
  ]
}

resource "aws_acm_certificate" "this" {
  private_key      = tls_private_key.this.private_key_pem
  certificate_body = tls_self_signed_cert.this.cert_pem
}
The certificate we will create and import into ACM will be a self-signed certificate and will be valid for 12 hours.
Please be aware that we will be using self-signed certificates throughout this example. Self-signed certificates are best utilized in test environments or for applications that just need to be privately recognized. Please request a CA-signed certificate when setting up infrastructure in production environments.
Afterward, we will implement the API Gateway service VPC Endpoint. This Endpoint will be used to communicate with our private API Gateways located in the microservice accounts via the internal AWS network. Please copy the following snippet into vpc_endpoint.tf.
################################################################################
# VPC Endpoint
################################################################################

resource "aws_vpc_endpoint" "this" {
  service_name      = "com.amazonaws.${data.aws_region.current.name}.execute-api"
  vpc_endpoint_type = "Interface"

  vpc_id             = aws_vpc.this.id
  security_group_ids = [aws_security_group.vpc_endpoint.id]
  subnet_ids         = local.private_subnet_ids
}

################################################################################
# Endpoint Security Group
################################################################################

resource "aws_security_group" "vpc_endpoint" {
  name   = "${var.application_name}-vpc-endpoint"
  vpc_id = aws_vpc.this.id
}

resource "aws_security_group_rule" "vpc_endpoint_ingress" {
  security_group_id = aws_security_group.vpc_endpoint.id

  type                     = "ingress"
  from_port                = 443
  to_port                  = 443
  protocol                 = "tcp"
  source_security_group_id = aws_security_group.alb.id
}
To ensure a proper security setup, the VPC Endpoint will only allow traffic from the Security Group of the Application Load Balancer on port 443.
While the ALB will receive a static domain by AWS, our clients should be able to consume the microservices by using easy-to-understand domain names. We will leverage Route53 and Alias records to create a record for each microservice. Copy the following code into route53.tf to create the microservice records.
################################################################################
# Route53 hosted zone
################################################################################

resource "aws_route53_zone" "this" {
  name = "${var.application_name}.com"

  vpc {
    vpc_id     = aws_vpc.this.id
    vpc_region = data.aws_region.current.name
  }
}


################################################################################
# ALB Alias record
################################################################################

resource "aws_route53_record" "this" {
  for_each = var.microservices

  zone_id = aws_route53_zone.this.id
  name    = each.value
  type    = "A"

  alias {
    name                   = aws_lb.this.dns_name
    zone_id                = aws_lb.this.zone_id
    evaluate_target_health = true
  }
}
The last two components that will be implemented before we deploy our Terraform configuration, will be a test client as well as a secret in AWS Secrets Manager. The client is optional and can be used once the microservices have been set up in order to test our infrastructure and send requests to the different endpoints.
The secret is used by the microservice accounts to dynamically retrieve the VPC Endpoint ID. The VPC Endpoint ID is used by the microservice accounts to create API Gateway policies. These policies are mandatory to allow communication between the client in the Consumer account and the private API Gateways in the microservice accounts. Let’s start with the AWS Secrets Manager secrets. Copy the following snippet into secret.tf.
################################################################################
# Secrets Manager Secret
################################################################################

resource "aws_secretsmanager_secret" "this" {
  name = var.application_name
}

resource "aws_secretsmanager_secret_version" "this" {
  secret_id     = aws_secretsmanager_secret.this.id
  secret_string = aws_vpc_endpoint.this.id
}


################################################################################
# Secret Policy
################################################################################

resource "aws_secretsmanager_secret_policy" "this" {
  secret_arn = aws_secretsmanager_secret.this.arn
  policy     = data.aws_iam_policy_document.secret.json
}

data "aws_iam_policy_document" "secret" {
  statement {
    effect = "Allow"

    principals {
      type        = "AWS"
      identifiers = var.allowed_service_principal_arns
    }

    actions   = ["secretsmanager:GetSecretValue"]
    resources = [aws_secretsmanager_secret.this.arn]
  }
}
Continue by setting up the client. To keep this example as simple as possible, we will use a t3.micro EC2 instance. Copy the Terraform configuration into client.tf.
################################################################################
# Client EC2
################################################################################

resource "aws_instance" "client" {
  instance_type          = "t3.micro"
  ami                    = data.aws_ami.amazon_2.id
  subnet_id              = local.public_subnet_ids[0]
  iam_instance_profile   = aws_iam_instance_profile.this.name
  vpc_security_group_ids = [aws_security_group.client.id]

  root_block_device {
    volume_size           = 8
    volume_type           = "gp3"
    encrypted             = true
    delete_on_termination = true
  }

  user_data = <<EOF
    #!/bin/bash

    yum update -y
    yum install -y php-curl
  EOF


  tags = { "Name" = "Client" }

}


################################################################################
# Get newest Linux 2 AMI
################################################################################

data "aws_ami" "amazon_2" {
  most_recent = true

  filter {
    name   = "name"
    values = ["amzn2-ami-hvm-*-x86_64-ebs"]
  }
  owners = ["amazon"]
}


################################################################################
# EC2 Instance Profile
################################################################################

resource "aws_iam_role" "client" {
  name = "${var.application_name}-client"

  assume_role_policy = jsonencode({
    Version = "2012-10-17"
    Statement = [
      {
        Action = "sts:AssumeRole"
        Effect = "Allow"
        Principal = {
          Service = "ec2.amazonaws.com"
        }
      },
    ]
  })
}

resource "aws_iam_instance_profile" "this" {
  name = "${aws_iam_role.client.name}-ip"
  role = aws_iam_role.client.name
}

resource "aws_iam_role_policy_attachment" "client" {
  role       = aws_iam_role.client.name
  policy_arn = "arn:aws:iam::aws:policy/AmazonSSMManagedInstanceCore"
}


################################################################################
# Client Security Group
################################################################################

resource "aws_security_group" "client" {
  name   = "${var.application_name}-client"
  vpc_id = aws_vpc.this.id
}

resource "aws_security_group_rule" "client_egress" {
  security_group_id = aws_security_group.client.id

  type        = "egress"
  from_port   = 0
  to_port     = 0
  protocol    = -1
  cidr_blocks = ["0.0.0.0/0"]
}
Now that we have implemented everything needed to set up the Consumer account, it is time to deploy the resources. Run terraform apply to deploy the infrastructure.
Microservice Deployment
After having set up the Consumer account, we will continue by implementing our two microservices. We will leverage an existing Terraform microservice module to quickly deploy both services. Please download the module from the Github repository of this blog post and copy it into the folder modules/microservices. The module will create the whole microservice infrastructure including VPC, API Gateway, Lambda functions, and DynamoDB tables based on a few input variables. We will start by creating the variables necessary. Please copy the following snippet into the variables.tf.
The Terraform module is only meant to serve as a general example. Feel free to create your own microservices based on the provided template.
variable "vpc_cidr_block" {
  description = "CIDR of VPC."
  type        = string
}

variable "private_subnets" {
  description = "Map of private subnets that should be created."
  type = map(object({
    cidr_block        = string
    availability_zone = string
  }))
}

variable "application_name" {
  description = "Name of the application."
  type        = string
}

variable "microservices" {
  description = "List of microservices to create."
  type        = map(list(string))
}
To manage the values of our defined variables, we will create a terraform.tfvars file. This will help us to keep our Terraform configuration clean and readable. Please define the following values for our variables in the terraform.tfvars file.
vpc_cidr_block = "192.168.0.0/16"

private_subnets = {
  subnet_1 = {
    cidr_block        = "192.168.2.0/24"
    availability_zone = "eu-central-1a"
  }
  subnet_2 = {
    cidr_block        = "192.168.3.0/24"
    availability_zone = "eu-central-1b"
  }
}

application_name = "cross-account-microservices"

microservices = {
  beverage = ["tea", "coffee", "water"],
  food     = ["pizza", "hamburger", "salat"]
}
As you can see, the only thing we have to define when setting up our microservices using the provided module, are the name of the microservice and the objects which you can order via the variables microservices. In our case, we can order tea, coffee, or water via the beverage microservice and pizza, hamburgers, or a salad via the Food microservice. Once we have defined the variables, we will continue by calling the module in order to create our services. Copy the following Terraform configuration into the main.tf.
module "microservice" {
  for_each = var.microservices

  source = "../modules/microservice"

  vpc_cidr_block  = var.vpc_cidr_block
  private_subnets = var.private_subnets

  api_gateway_definition_template = "${path.module}/templates/api-gateway-definition-template.yaml"
  application_name                = var.application_name
  microservice_name               = each.key
  microservice_order_options      = each.value
  domain_name                     = format("%s.%s.com", each.key, var.application_name)
}
By leveraging the provided module, we are able to keep the Terraform configuration of our microservice short and clean. The module will be called using the Terraform for_each statement to create multiple identical instances of the module. Before we can deploy our services, we have to provide an api_gateway_definition_template. This template defines the API Gateway resources as well as methods and will be rendered dynamically inside the microservice module based on the input variables. Please find the template in the [Github] repository of this blog post and copy it into the api-gateway-definition-template.yaml.
Once you have added the template, it is time to deploy our microservices. Run terraform apply to deploy our infrastructure.
Test Microservices
After having deployed all the AWS infrastructure, we will finally test the communication between our client EC2 and our microservices. We will do so by ordering some food as well as beverages. To connect to the EC2 instance, open the AWS EC2 Console and select the Client EC2 instance. Click on Connect, select the Session Manager tab, and click Connect. Once you have connected to the instance via the Session Manager, we will execute a few curl commands to order food and beverages.
To order food or beverages we will utilize the POST-Method of our orders resource. The payload will be a simple JSON in the following format:
{
  "fullName": "NAME",
  "food": "FOOD"
}
{
  "fullName": "NAME",
  "beverage": "FOOD"
}
Execute the following command to order some tea for Max Mustermann. Please write down the orderId from the response.
curl -k -X POST https://beverage.cross-account-microservices.com/v1/orders \
-H "Content-Type: application/json" \
-d '{"fullName":"Max Mustermann", "beverage":"tea"}'

Afterward, execute the command below to order a hamburger. Please write down the orderId from the response.
curl -k -X POST https://food.cross-account-microservices.com/v1/orders \
-H "Content-Type: application/json" \
-d '{"fullName":"Max Mustermann", "food":"hamburger"}'

After having placed our orders, we will retrieve the order information of our food order by sending a GET-request to the orders/{orderId} endpoint. Execute the following command. Replace ORDERID with the ID from the POST-request response.
curl -k -X GET https://food.cross-account-microservices.com/v1/orders/ORDERID \
-H "Content-Type: application/json"

Congratulations, you just set up a serverless, cross-account microservice architecture on AWS.
Summary
As you can see, it is not complicated to implement and deploy a microservice architecture on AWS. The architecture that we just implemented is meant to serve as a starting point. There are multiple ways to make the solution more robust and efficient. Firstly, it is recommended to use CA-signed certificates and not self-signed certificates when setting up resources in production environments. Secondly, the microservices used are just basic templates and only offer limited functionality. Feel free to implement your own microservices or adjust the Terraform module to your liking.
I hope you had fun and learned something new while working through this example. I am looking forward to your feedback and questions. If you want to take a look at the complete example code please visit my Github.
— Hendrik