4 ways to connect to your EC2 instance
Connecting to an EC2 instance is basically a no-brainer. I am using an SSH client and starting a connection to the EC2 instance. In this Blog, I will show you four different ways of connecting. One of them is supposedly highly unknown to most people.
As said, there are currently four different ways of establishing a connection. Some of them are using the typical SSH protocol; another is using an additional package that needs to be installed on your system and an unknown way: utilizing an AWS Service and running everything only through a CLI command.
SSH direct connect
Let’s start with the most widespread way, the direct SSH connection.
The direct connection via SSH to an EC2 instance requires the Security Group to have TCP port 22 open. In addition to the port, the instance must have a Public IP or an Elastic IP address and is reachable from the Internet. Presuming you have the private SSH key for the EC2 instance available, we are running the ssh shell command. I am using my terminal for this. The invoked command ssh gets the parameter -i with the path to my private SSH key, followed by the username and IP address of the target.
ssh -i ~/.ssh/myprivatekey.pem ec2-user@52.219.170.50
You are connected now as the user ec2-user and can now work on your Linux.
It is the easiest way of establishing the connection but, at the same time, the most insecure way within AWS.
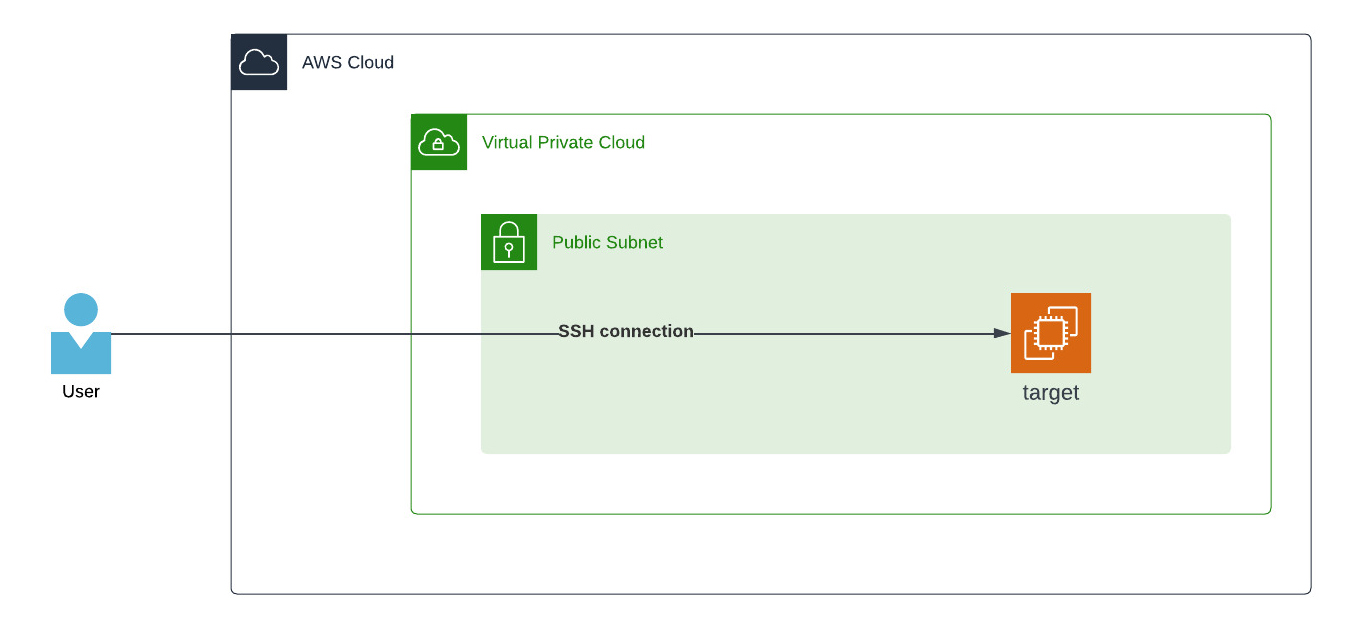
The main problem with this way is the public reachable IP address. The IP is available from every location worldwide, and when you are working from home, you might have to change the Security Group all the time with your current own public IP address your internet provider gives you. When there are multiple users for the same machine, this will be very time-consuming.
Opening the SSH port 22 up to the world with 0.0.0.0/0 allows direct attacks instead of having a second barrier/layer of protection.
This second barrier/layer leads me to the SSH connection through a Bastion Host.
SSH connect through a Bastion host
The SSH connection through a Bastion host allows a higher security measurement. The target system you want to connect to can only be reached when you are authenticated through a Bastion Host. To do so, we are again using the ssh command, adding the -A option that enables forwarding connections from an authentication agent like ssh-agent. The -J option brings up to connect to the first target (the Bastion Host with a public IP) and the second connection (the target private IP address).
ssh -A -J ec2-user@34.242.99.209 ec2-user@172.31.12.69 -i ~/.ssh/myprivatekey.pem
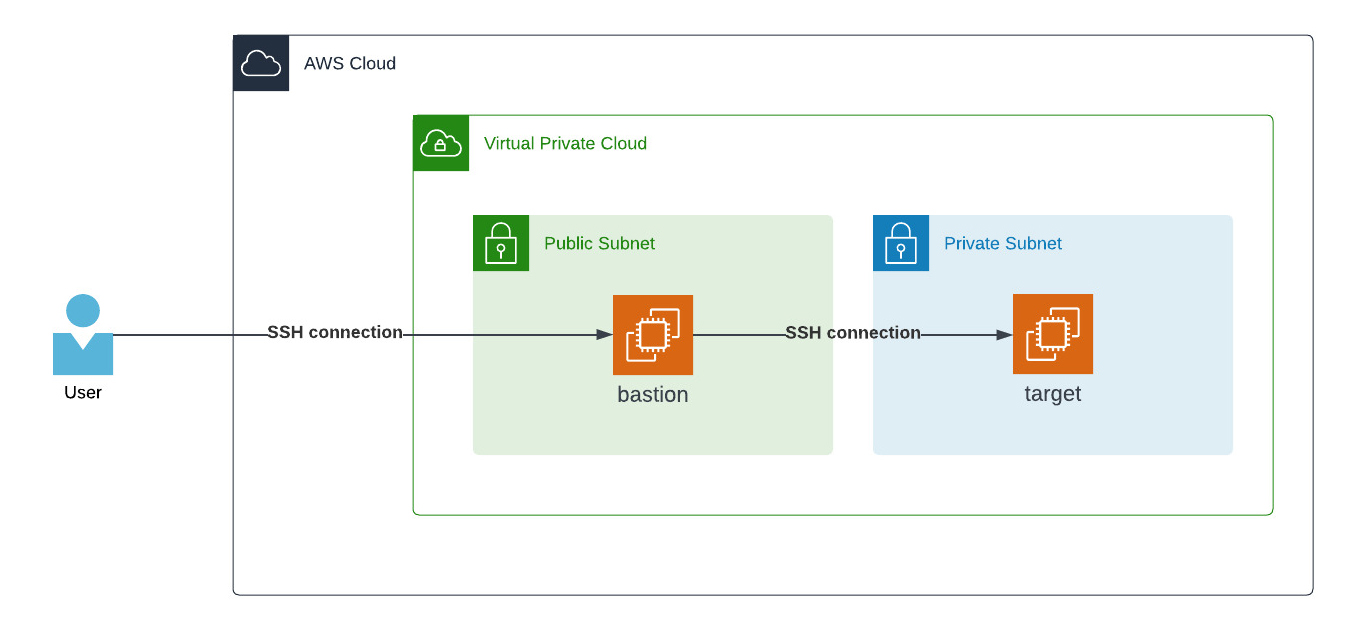
An advantage of this method is that the Bastion Host can be under attack, but the target host behind it still works without any interruption or notice of this attack. In this case, the Bastion Host could be shut down to save money on resources and prevent such an attack.
To remove this layer as well and make everything reachable without any resource like the Bastion Host, we can use the AWS Systems Manager Session Manager.
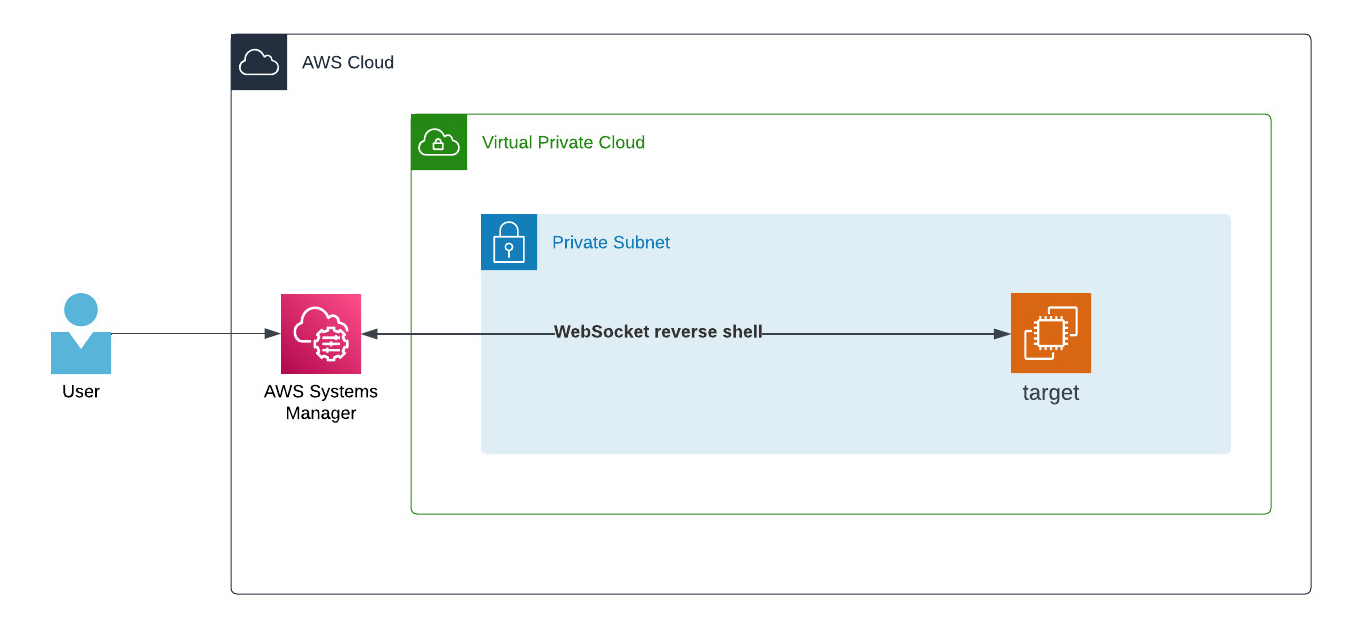
AWS Systems Manager Session Manager
Long name, short story: You only need to use the AWS Management Console. Choose the desired EC2 instance, click on connect, choose Session Manager, and establish the connection. It requires only the SSM Endpoint without having an Internet or NAT Gateway, and the SSM Agent installed with configured instance permissions for the EC2 instance.
When you don’t want to maintain those permissions within your policies or don’t want to think about configuration for each instance profile, you should take a look into the Default Host Management Configuration. Enabling this, requires no configuration of an instance profile as it enables the necessary permissions per default in your AWS Account and Region.
You can run the aws ssm start-session command if you prefer to connect via AWS CLI. It does the same as what you get through the AWS Management Console.
aws ssm start-session --target i-0b22a22eec53b9321
To make this more comfortable, you could create a simple function for your shell:
ssm-login () {
   bash -c "aws ssm start-session --target $1"
}
So you only have to run the command to have your connection established.
ssm-login i-0b22a22eec53b9321
Getting direct access through the AWS Management Console or the CLI is a great idea. With this method, the logging and access rights are managed entirely within AWS and no longer via SSH keys. So a user only needs an IAM policy, for example, the AWS-managed AmazonSSMManagedInstanceCore policy, to allow access to an EC2 instance. You don’t even have to create individual users on each system and add the public SSH keys to each.
EC2 Instance Connect (EIC) Endpoint
The last way is the most unknown way to connect to an EC2 instance: Using an EC2 Instance Connect (EIC) Endpoint. This endpoint is new. Brandnew. It was released on June 14 this year. So just some weeks ago.
To have it up and running, you must create the EC2 Instance Connect Endpoint once. A new network interface (ENI) is created within your chosen subnet during the creation process. It works as the endpoint in your VPC and is connected to the EIC Service in AWS on another layer.
When the endpoint is created, you must run the AWS CLI command now (yes, this one only works through the AWS CLI).
aws ec2-instance-connect ssh --instance-id i-0b22a22eec53b9321
You are connected to your EC2 instance right away. This also works with rdp connections to Windows. The only prerequisite is a pre-installed and configured EC2 Instance Connect.
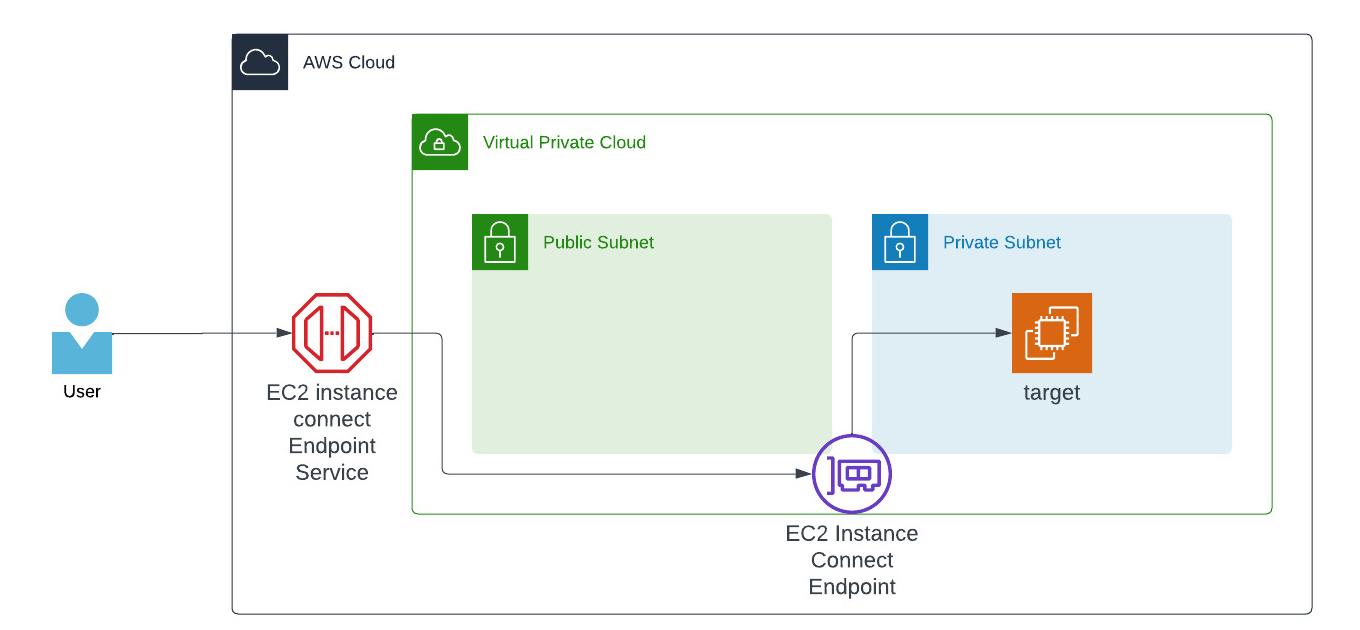
When you take a look into the infrastructure overview, it will show you where each component of the service relies and it feels like we have a managed Bastion Host.
For more info about EIC, please look into the docs.
Thanks for reading!
— Patrick