Simplifying SAP System Deployments with AWS Launch Wizard
Setting up enterprise applications can take a lot of work. Especially with software that has been on the market for a long time, a complete reinstallation and configuration can take quite a bit longer. Talking about complex installations, however, there is one final boss with three letters in its name: SAP.
Introduction
Since the ERP Suite was first published in the early 1970s, the software has steadily expanded in terms of its range of functions and complexity. And this is already noticeable in the installation process. Even an experienced SAP Basis administrator can need several days to install a new system. In reality, this effort is often avoided by simply cloning existing systems and then adjusting them to the project’s needs. However, technical debts of the old System are also inherited through this procedure.
Luckily, AWS has its own service helping with the installation of new enterprise software: AWS Launch Wizard. You can use it to deploy a variety of applications such as SQL Server, Active Directory and (you may have guessed it) SAP Systems! In the last weeks, we were able to gain some experience with the service. So today, I will walk you through the setup of a High-Availability SAP S4/HANA System while providing some additional info about SAP on AWS.
Target Architecture
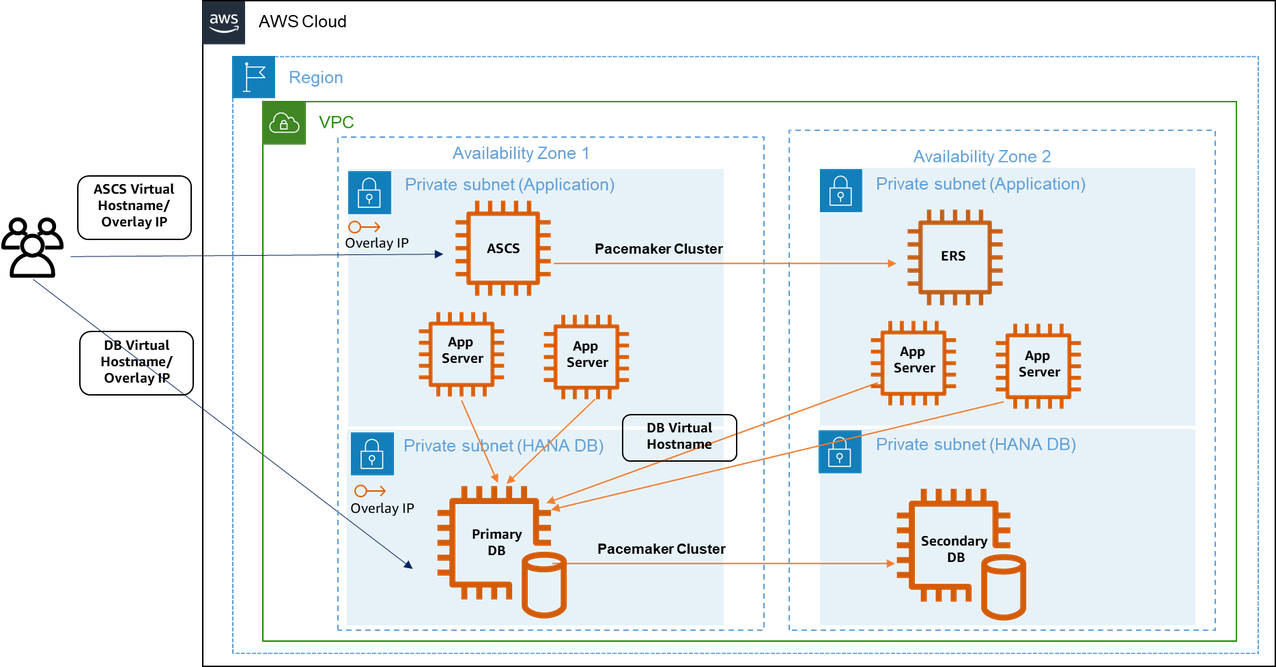
Let’s shortly discuss what we are building today. To make an SAP System highly available, we need at least six EC2 instances: At least two SAP HANA databases, one in each AZ. The primary HANA Database replicates its data to the secondary DB using HANA System Replication (HSR). Two application servers are responsible for processing the user input. The application servers should be distributed evenly over the Availability Zones to withstand hardware failures or AZ outages. When a user edits a database entry, a lock entry is created on the enque server running on the ASCS (ABAP SAP Central Services) instance to avoid data integrity conflicts. Those locks are constantly being replicated to the Enqueue Replication Server (ERS). In case of a failure of the ASCS instance, the ERS takes over its responsibilities. Routing to the different components is done via so-called Overlay IPs. It is quite a unique construct where you have dedicated entries in the route table for the HANA Database, the ASCS, and the ERS instance. If one of these components fails, the clustering software running on each server will change the route table entries to the network interface of the stand-by instance of the component.
Prerequisites
This guide assumes some basic knowledge of core AWS services such as Amazon EC2, VPC, and IAM. Deploying the system requires a VPC with at least two private subnets with outbound Internet access. Some basic knowledge about the deployment and architecture of SAP systems will also be helpful for troubleshooting, though optional. At one point, you will need to download SAP sources for which an SAP S-User is needed.
Starting the Launch Wizard
Let us set up our SAP HA System to see the described Architecture in action. We start the AWS Launch Wizard via the Console and create a new SAP deployment. Firstly, Launch Wizard informs us that it will create AWS resources on our behalf using its own IAM Role. Next, we need to give our deployment a name. It is not uncommon for your first deployment to fail, and since the name must be unique, we will call our deployment HADeployment01. You can enable Launch Wizard to delete all resources upon a failed deployment. We will not select this option since it makes debugging easier; however, make sure to delete all resources after each try to avoid unnecessary costs.
Deploying and maintaining SAP systems, particularly high-availability systems, can be costly due to the powerful infrastructure they require. After you have completed your tasks, consider cleaning up all AWS resources that were created during the process by deleting the created Cloudformation stack. If you need the system for a longer time period, you can save costs by stopping the EC2 instances when not needed. Please also set up a budget alarm to be notified if your costs exceed a certain threshold.
Infrastructure for SAP landscape
Give your configuration a name to make repeated deployment easier. We will create a non-production system and select an SSH key pair for our EC2 instance. Next, we need to choose a VPC and at least two subnets. I already created a VPC with two private subnets, a public subnet and a NAT instance for outbound internet access. Outbound internet access is crucial for the Launch Wizard so it asks you to verify connectivity again by ticking a box.
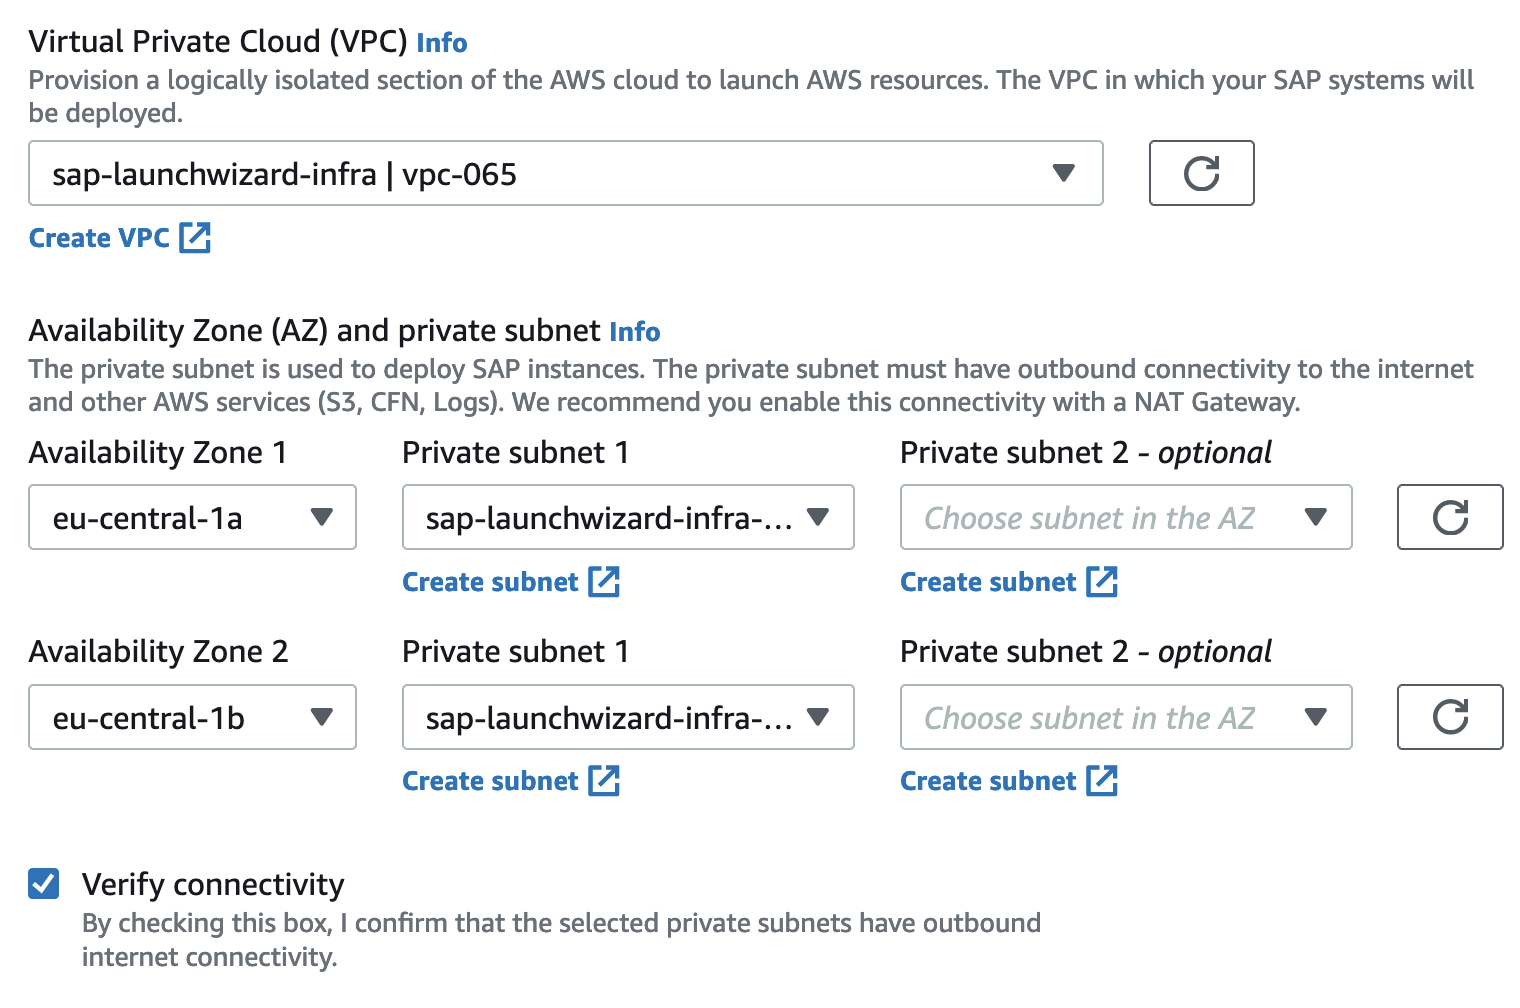
We can create new security groups or select existing for Application Servers and Database Servers. We will let Launch Wizard create the Security Groups and use our VPC CIDR range 10.10.0.0/16 as allowed sources. If you are setting up anything else than a sandbox system, we recommend restricting the security groups further after the deployment is finished. If needed, you can also use a proxy for outbound Internet access. We will go with the UTC time zone and with Amazon-managed EBS encryption.
Next, we can specify whether we want to use Route 53 for virtual hostname resolution. With this setting enabled, each EC2 instance will use DNS resolution to determine its own hostname. Doing so separates the physical hostname of the machine from the hostname used in network communication. If you would like to find out more about this mechanism, my colleague Fabian wrote a blog article about this topic. We will go with virtual hostnames as we have a domain name available and it requires no further configuration. However, if you do not have a domain registered in Route 53, leave this on the default setting.

We will leave everything else as default and go to the next page.
SAP specific configuration
We can now select the type of SAP application to install. You can select either an SAP NetWeaver System or a HANA-only System. Since we want to install a complete ERP system, we will choose NetWeaver. For the next settings, we use the following parameters.
Netweaver Settings
SID: ECD
SAP System Admin User ID: 5000
EBS Volume Type: GP3
Transport Domain Controller: Yes
Hana Settings
HANASID: HDB
HANA Instance number: 00
EBS Volumes Types: GP3
Next, we can configure our deployment model. We select a High Availability deployment here. As Operating System we will use the following SLES Version: SuSE-Linux-15-SP4-For-SAP-HVM. Select the option to use the same OS and version for all components of the deployment, and do not forget to subscribe to the AMI. Now we again have a bunch of settings. To make it easier, please refer to the following settings to configure the different SAP instance types.
ASCS Settings
Hostname: sapascs
Auto-assign IP address (default)
Instance Number: 10
Instance Type: c5.large
ERS Settings
Hostname: sapers
Auto-assign IP address (default)
Instance Number: 11
Instance Type: c5.2xlarge
DB Settings
SAP HANA primary host name: sappridb
Primary server site name: prisite
SAP HANA secondary host name: sapsecdb
Secondary server site name: secsite
Auto-assign IP address (default)
Overlay IP address: 192.168.1.10
Pacemaker tag name: sappacetag
Instance Type: m6i.2xlarge
PAS Settings
Hostname: sappas
Auto-assign IP address (default)
Instance Number: 12
Instance Type: c5.2xlarge
AAS Settings
Hostname: sapaas
Auto-assign IP address (default)
Instance Number: 13
Instance Type: c5.large
As you may have noticed, we already selected our first Overlay IP for the HANA DB (192.168.1.10). Launch Wizard will create an entry in our VPC route table that points to the ENI of the active HANA instance. Make sure you use a Class C IP address that does not belong to the CIDR Range of your VPC. Otherwise, your network traffic would always be routed into the same subnet, and failover would not work.
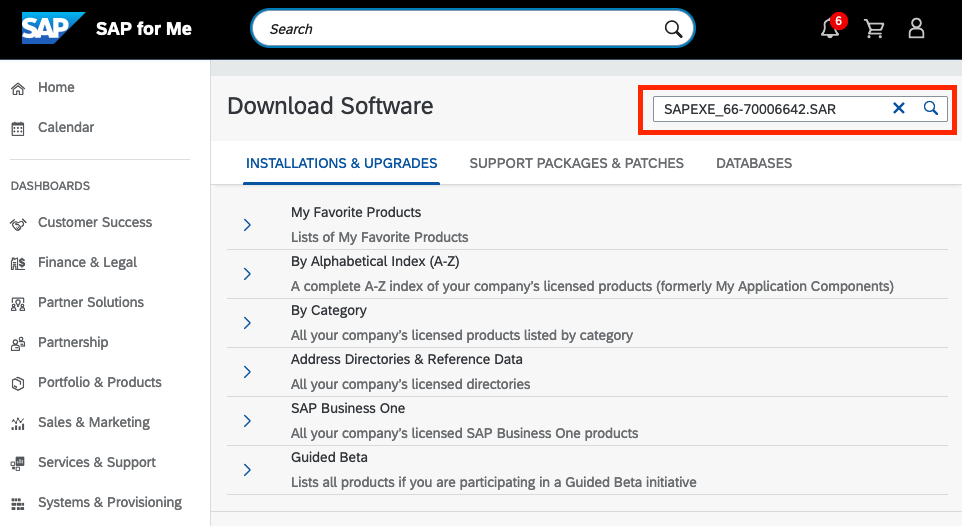
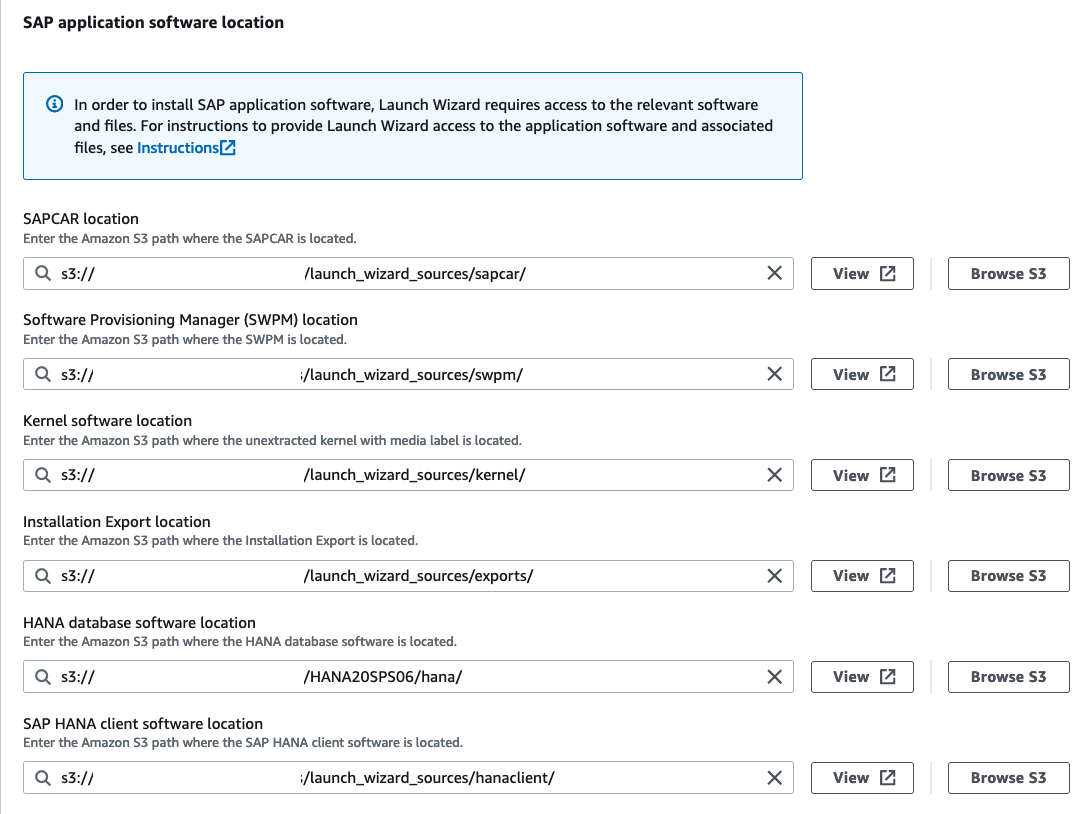
On the next page, we will configure the SAP application software that shall be installed. Launch Wizard does not have access to SAP sources, so we need to download everything we need from the SAP Software Center. Please refer to the AWS Launch Wizard Documentation to get the latest sources depending on the SAP product you want to install. The easiest way to download the sources you need is to copy paste the file name from the AWS documentation into the search bar of the SAP Software Center. Hint: To get SAPCAR, just search for “SAPCAR_1115-70006178.EXE “.
The sources then need to be uploaded to an S3 bucket. Make sure that each component of the sources (e.g., Kernel, SWPM, …) has its own prefix (aka Folder) in S3. When you provide the path to the sources in the Launch Wizard, you only point to the prefix, not to the actual file.
After that, we need to do a last round of configuration before we are ready to deploy our new System. We set a master password that is used for central users such as SIDADM or SAP*. We also give Overlay IPs to the ASCS and the ERS instance and set their virtual hostnames. You can use our parameters again as a reference.
PAS Instance Number: 12
ASCS Virtual Hostname: sapvascs
ASCS Overlay IP address: 192.168.1.11
ERS Virtual Hostname: sapvers
ERS Overlay IP address: 192.168.1.12
Database Virtual Hostname: sapvdb
Pacemaker tag name: sappacedb
Optionally, you can also install AWS Backint agent which supports storing native HANA backups in Amazon S3. Lastly, we need to attach a policy to the IAM role that Launch Wizard uses. This policy gives Launch Wizard access to the S3 bucket containing our SAP sources. Click on “Instructions”, copy the generated policy, and then create a new inline policy that is attached to the Launch Wizard role. Click on next to get an overview of the planned deployment. If everything looks correct, hit deploy. Launch Wizard will start to provision the specified AWS infrastructure and set up the SAP system and the pacemaker HA cluster. This process may take up to two hours, so grab a coffee and relax while Launch Wizard is doing the heavy lifting 🙂
Testing the High Availability System
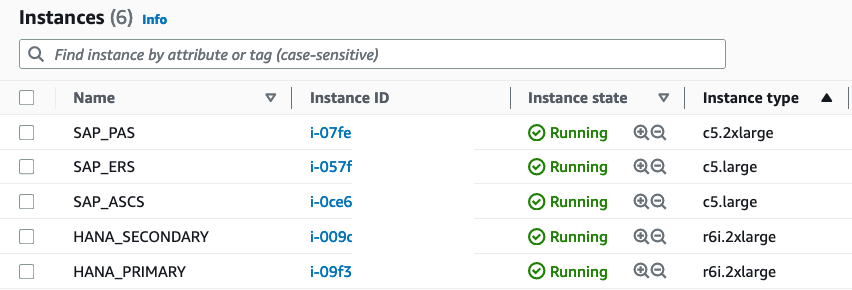
If everything goes well, the Application Deployment on the Launch Wizard Console will have the status “Completed,” and you will find five or six new EC2 instances (depending on your amount of application servers) in your EC2 console. I changed the respective name tag to make the different roles more transparent.
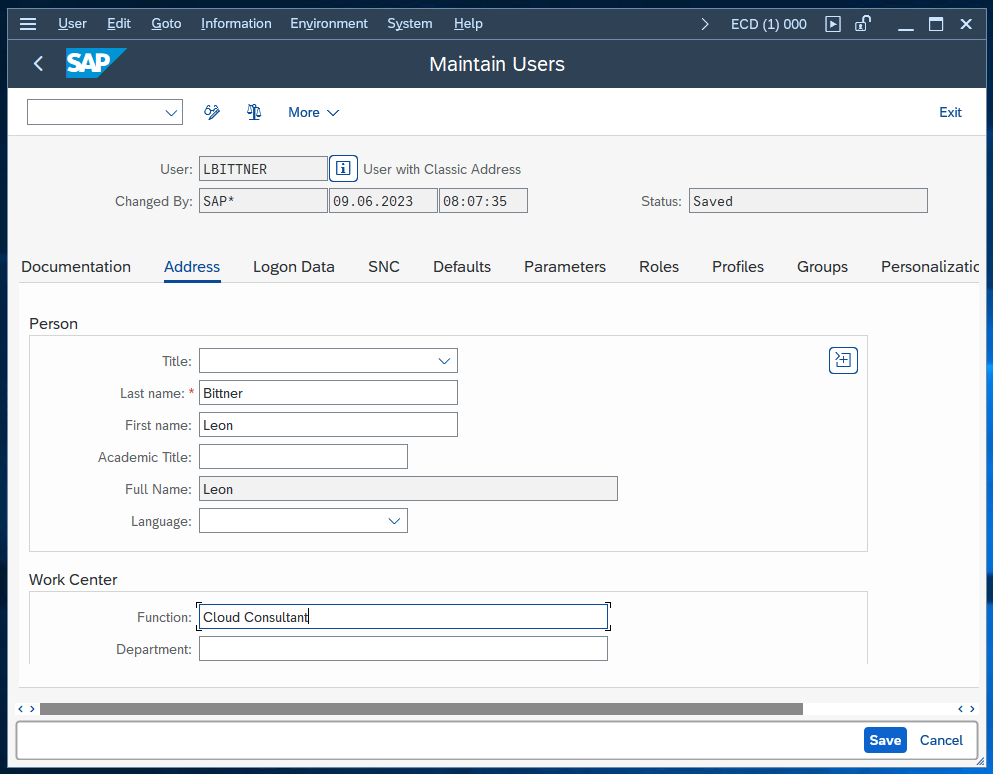
Now comes the fun part: Let’s make some trouble in our System to provoke a failover operation by the pacemaker cluster. My goal is to have the enqueue processes migrate from the ASCS instance to the ERS instance. To verify if the test was successful, we will open transaction SU01 and edit a user of our choice. This will set a lock on the enqueue server running on the ASCS instance.
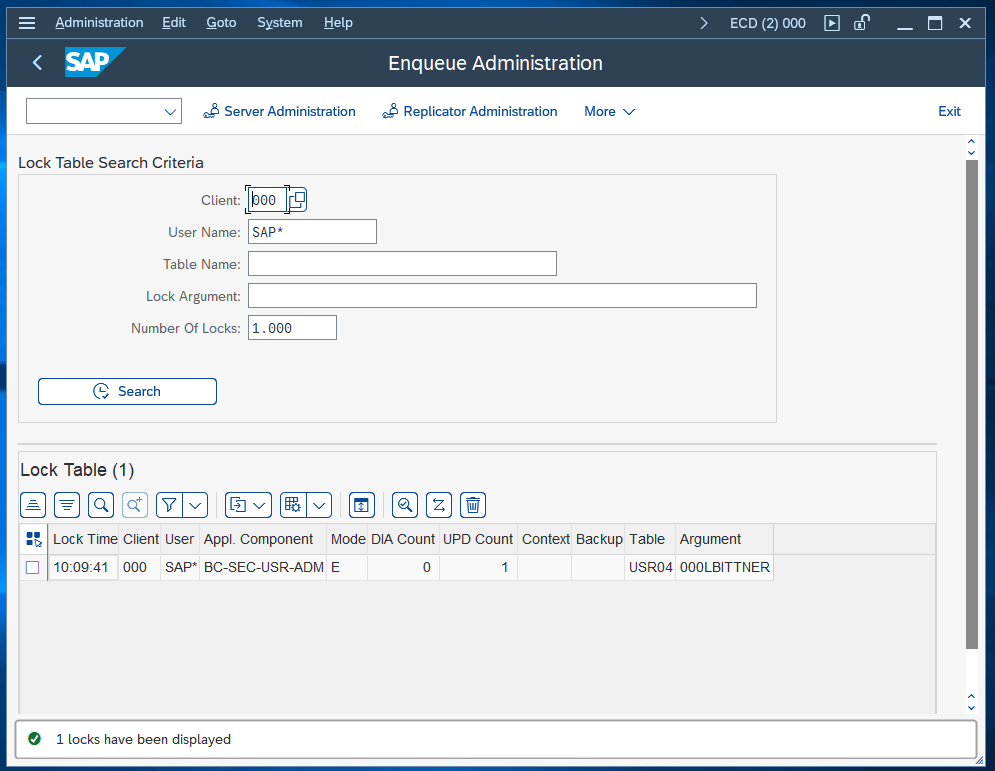
We verify that the lock has been created by opening the enqueue administration (/oSM12 and press F5).
To monitor the status of our pacemaker cluster, we log into both our ASCS and ERS instances via SSH. You can use the AWS Systems Manager or the key pair specified in the Launch Wizard configuration. Enter the command crm_mon -r as root to open the cluster monitor of pacemaker:
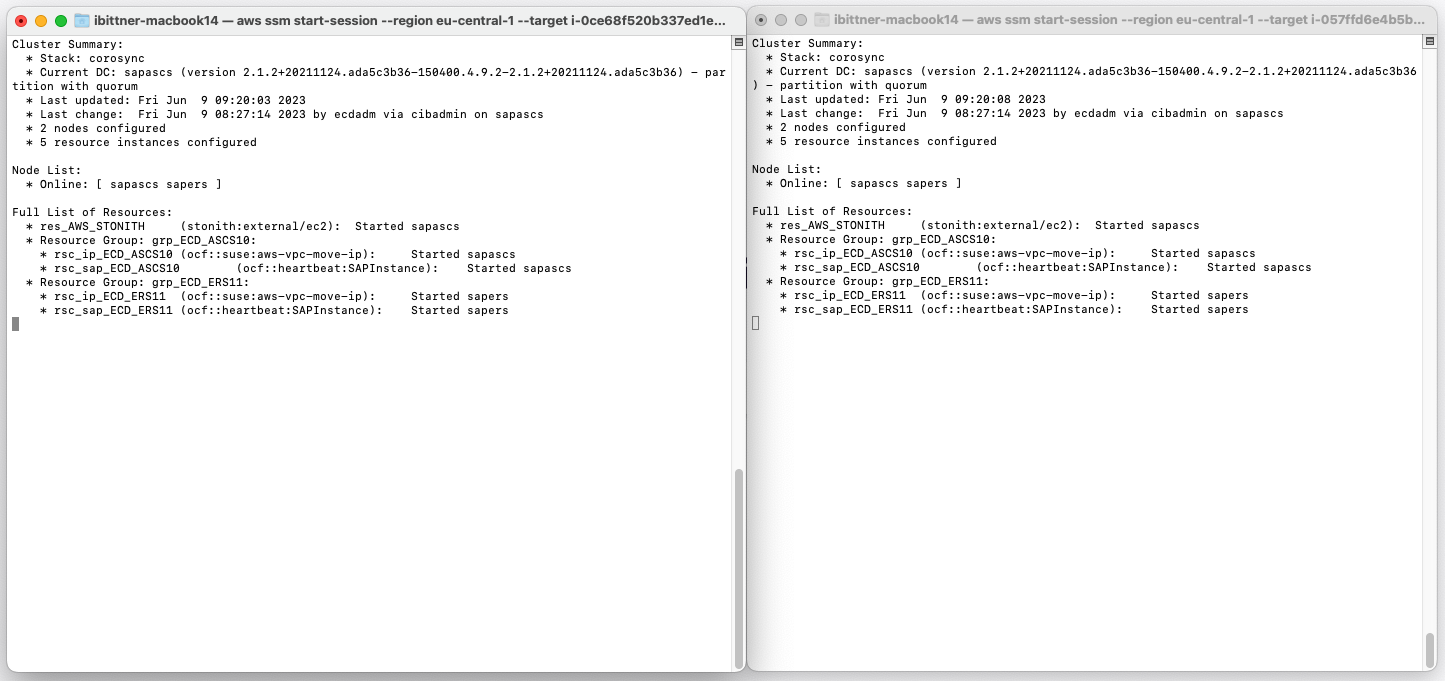
We can see that the cluster is up and running. Our current Designated Controller is the ASCS instance. The Designated Coordinator (DC) is responsible for maintaining the overall health and status of the cluster (for example coordinating failover operations).
Now we will do something we would never do in a production system: Crashing the ASCS instance! We simply stop the EC2 instance using the AWS console. Let’s take a look at our cluster monitor.
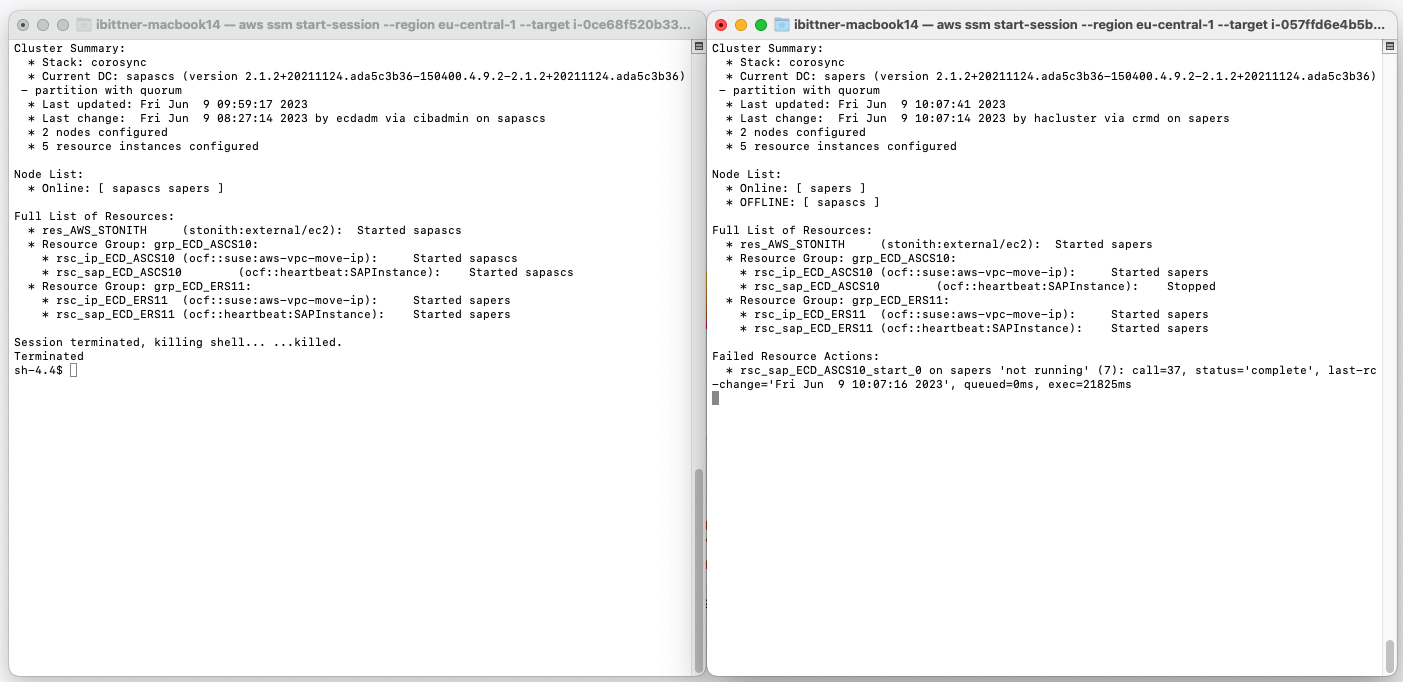
Our cluster recognizes the unavailability of the ASCS instance (sapascs), which is now marked as offline. As expected, it has automatically designated the ERS instance (sapers) as the new cluster controller (Current DC).
In addition to that, the Overlay IP address associated with the ASCS instance (rsc_ip_ECD_ASCS10) has shifted over to the ERS instance (sapers). This change indicates that a modification in the route table has occurred, with the Overlay IP now pointing to the network interface of the ERS instance. This means our expected failover process is taking place.
Lastly, let’s return to our SAP System and try to save our modified entry in SU01.
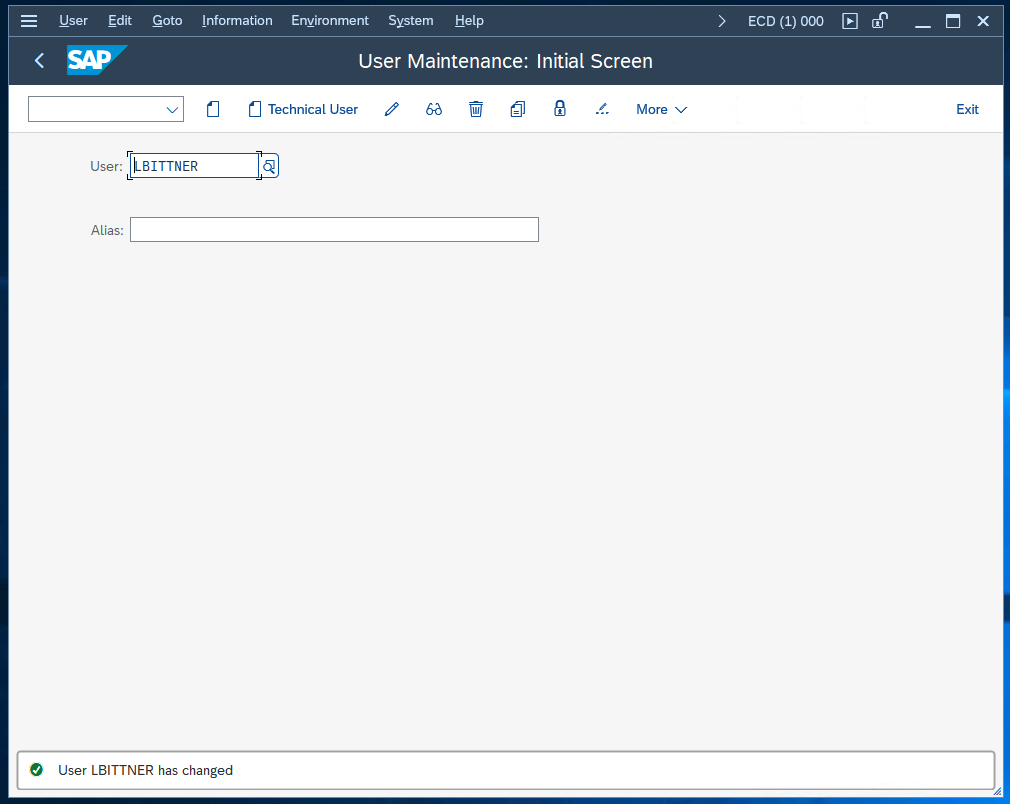
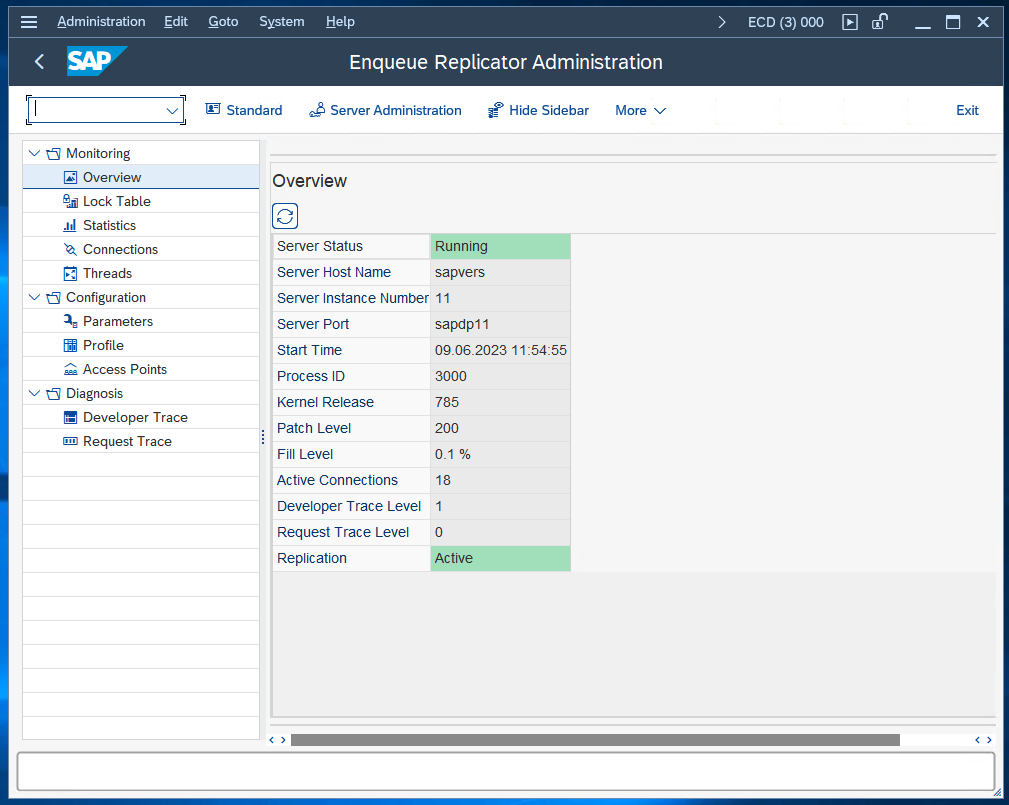
The entry was saved without an issue. We can also verify in SM12 that we are currently using the ERS as primary enqueue server by entering the Replicator Administration:
Conclusion
Setting up a high-availability SAP system can be a complex task, but with the help of AWS Launch Wizard it’s much easier. Today we’ve seen how to configure and deploy a SAP S4/HANA system and how to test its high-availability features.
We hope this guide helps you to deploy your own high-availability SAP system. Don’t forget to clean up the resources created during this guide to avoid unnecessary costs, and do not hesitate to contact us if you have questions or need support in deploying your own SAP System on AWS. Happy building!