Safe Storage - CloudHSM and FSx for NetApp ONTAP (Part 2)
In the first part of this blog, we looked into the complexities of provisioning and initializing CloudHSM clusters. To make our safe storage solution functional, we still need more steps: Activation and Connection.
Recap
Let us revisit our target infrastructure and our progress so far first.
To create storage that relies on our self-controlled HSMs, we provisioned a CloudHSM cluster. While this step is well-documented and readily available in various Infrastructure-as-Code blog posts, most How-Tos stop at the steps directly after this.
Establishing trust with our new cluster, we can verify its PKI certificate chain by checking both the vendor’s and AWS’ certificates for validity. Then, we confirm our trust by signing the certificate request of the cluster and initializing it.
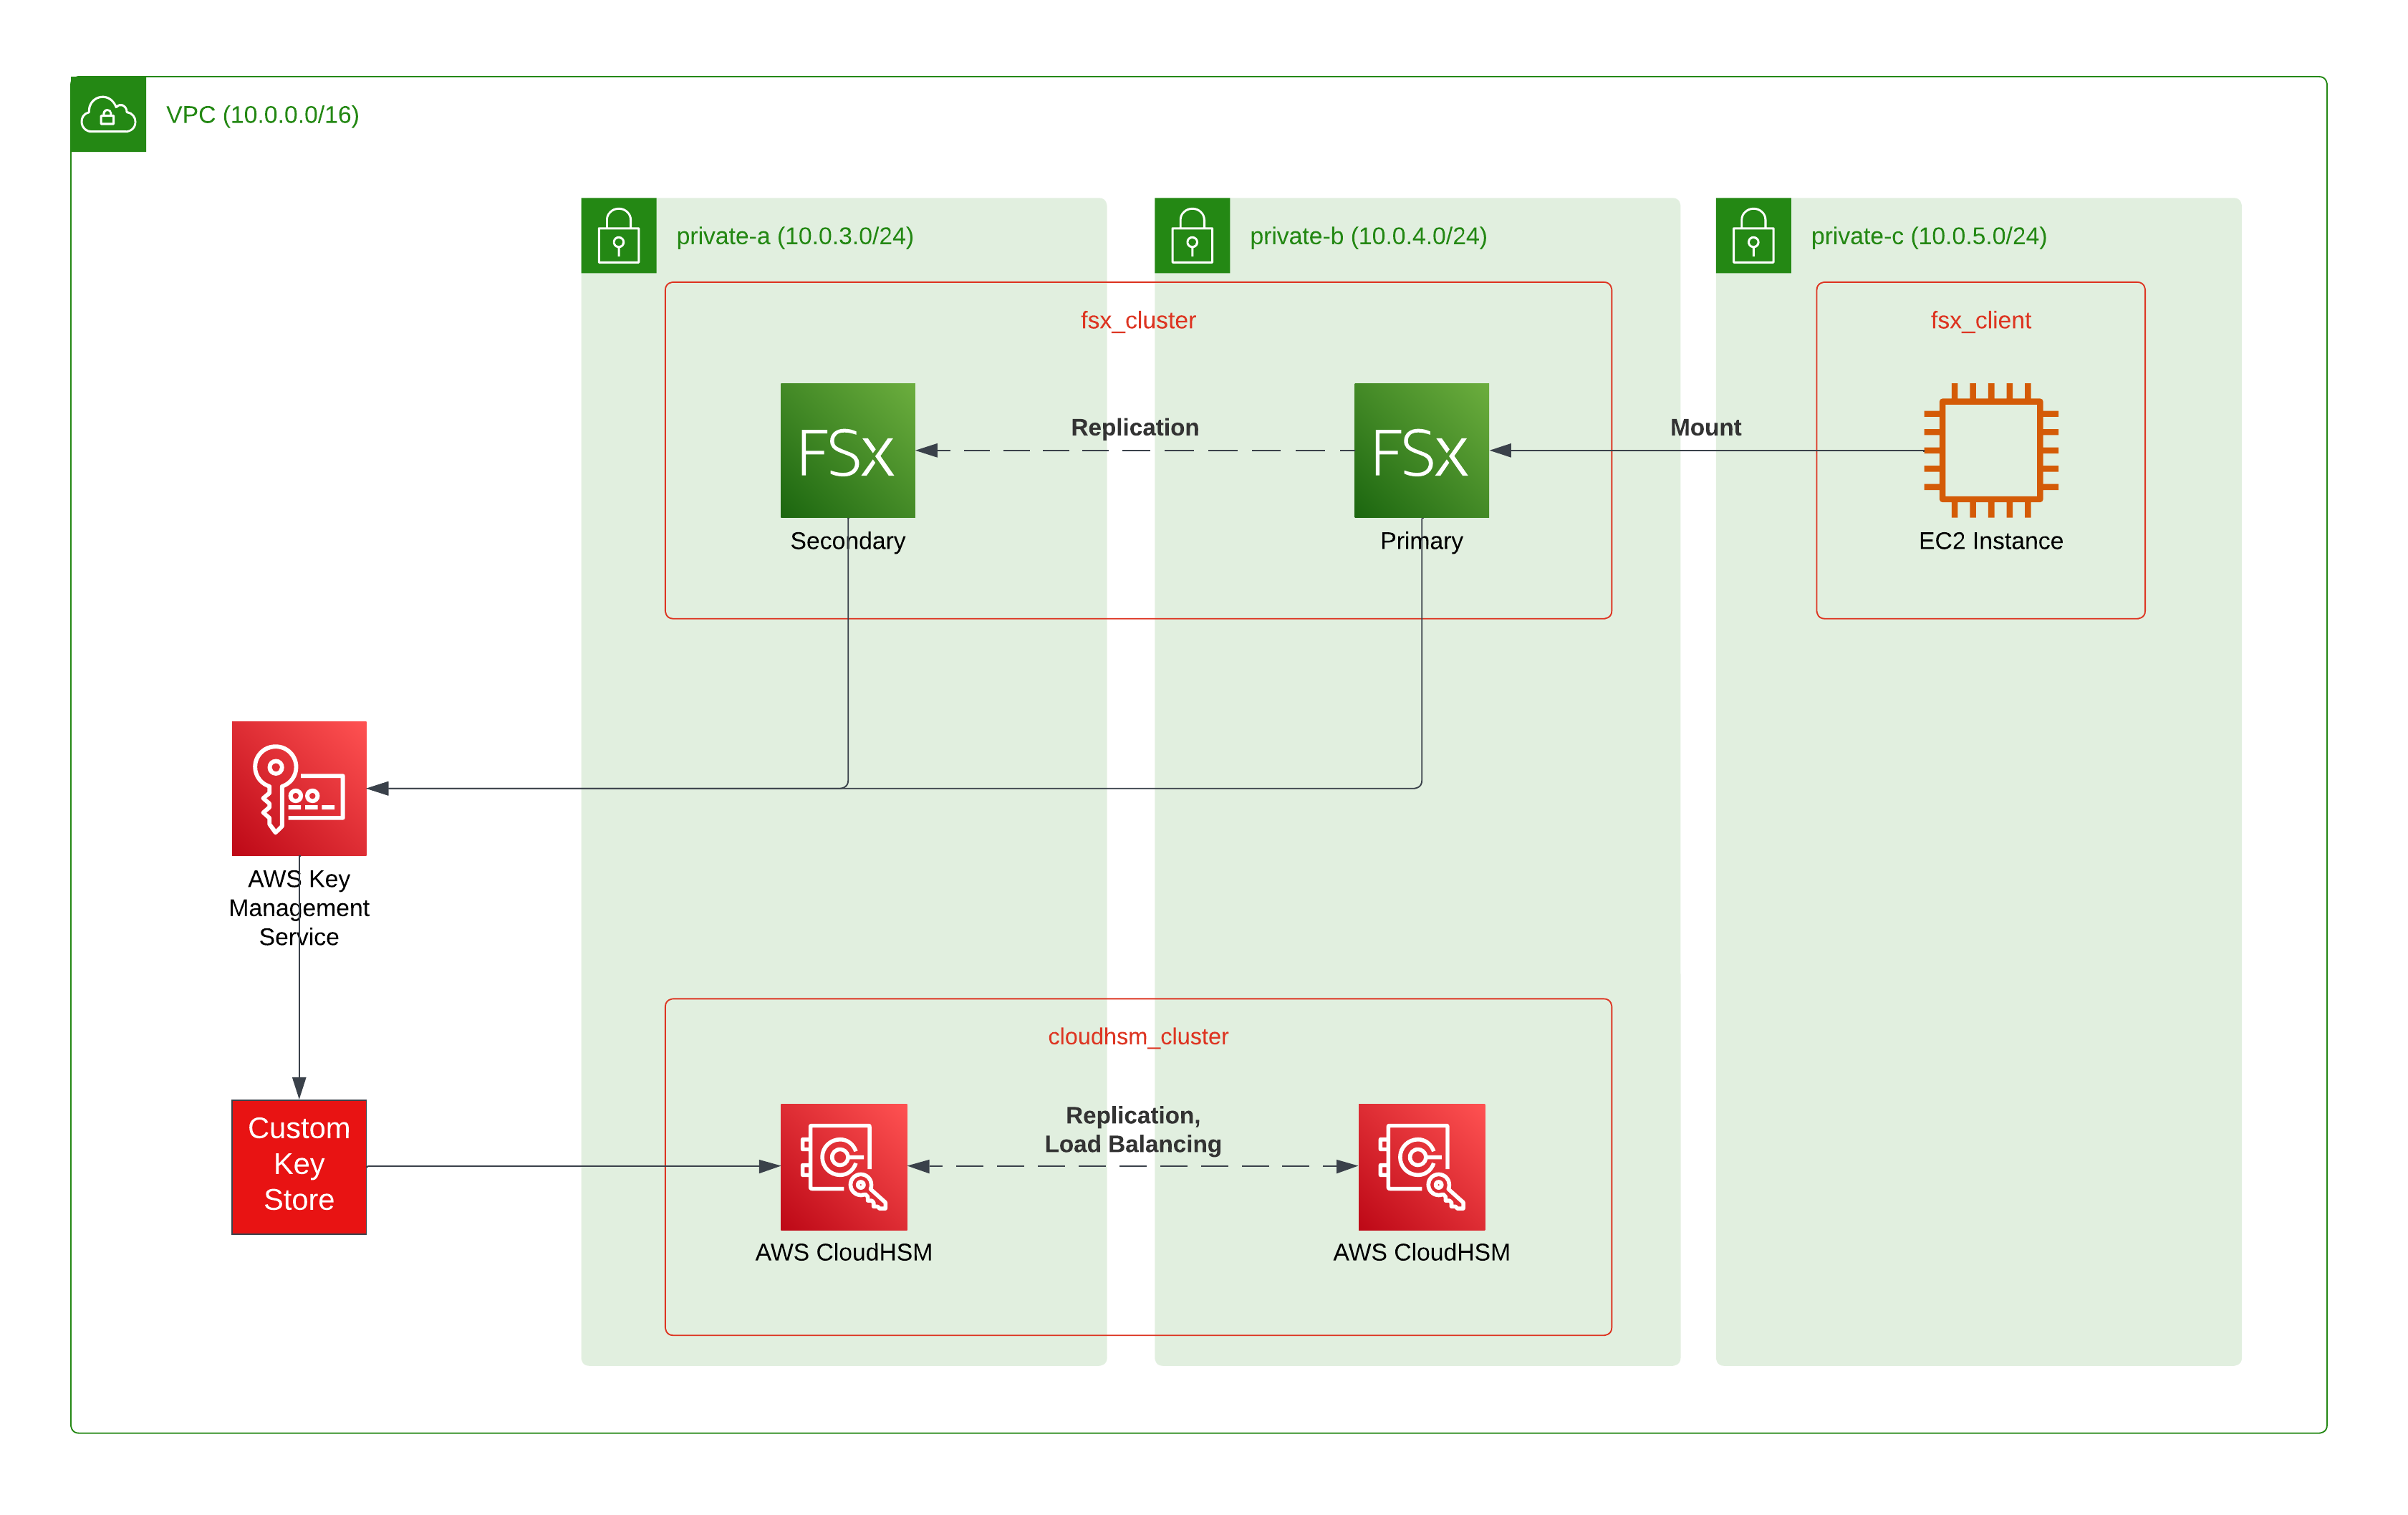
Now, we have to activate the cluster so it can be used. Then, we have to create a Custom Keystore and connect it to the CloudHSM cluster. Finally, we can provision our consuming service - Amazon FSx for NetApp ONTAP (FSxN) in this case.
Cluster Activation
The term “Activation” in this context mainly relates to setting a password for the preconfigured administrator on the device. HSMs have a strict separation of duties:
- Appliance Users: Can update and manage the device itself, but have no access to keys (AWS)
- Crypto Officers: Can manage users, but not create keys or use them
- Crypto Users: Can manage keys and use them
You can read about the exact details for these roles in the AWS CloudHSM documentation.
As you can see, AWS only can manage and update the hardware. By setting the password for the first Crypto Officers (strictly, it is a Precrypto officer before setting the password), only you as the customer have access to the higher management functions of the device.
This functionality requires installation of the CloudHSM CLI, placing your customerCA.crt in /opt/cloudhsm/etc/ and network connectivity to your CloudHSM, which is in private subnets.
CLI
/opt/cloudhsm/bin/configure-cli --cluster-id CLUSTER_ID
/opt/cloudhsm/bin/cloudhsm-cli cluster activate --password "NEW_PASSWORD"
Be careful not to commit passwords to your CLI history. You can either leave out the --password parameter to get prompted interactively (which does not help in automation).
Also, most Bash configurations will not persist a command if you prefix it with a space. Look for the HISTCONTROL=ignorespace setting before trying it on a shared machine.
While AWS documentation will advise you to use the -a parameter to configure your CLI, I would recommend the --cluster-id parameter. It will reach out to the CloudHSM API and request the IP for one of the HSM modules. This will need outbound HTTPS access (via IGW/NAT) or a CloudHSM VPC Endpoint.
Especially in automation, it can be tricky to retrieve the HSM IP as it is not easily exposed:
Terraform
data "aws_network_interface" "hsm_node0_eni" {
  id = aws_cloudhsm_v2_hsm.hsm_node[0].hsm_eni_id
}

# Now can access the IP via `data.aws_network_interface.hsm_node0_eni.private_ip` now
I currently use an EC2 instance in the target VPC to install the CLI and issue necessary commands - only to stop it afterwards. CloudHSM CLI usage seems to be a rather annoying obstacle to full automation.
**UPDATE **(May 31st, 2023)****
I published a blog post on how to execute CLI commands via a bash-based Custom Lambda Runtime. You can use this to create a VPC-enabled Lambda with the CloudHSM CLI installed in it. The Terraform code for this is available in a GitHub repository linked in the post.
Now, our CloudHSM cluster is finally operational.
Connecting a Custom Keystore
If you have provisioned your CloudHSM with only one HSM node, now is the time to add another one in a separate AZ. This is not only a good practice for robust deployments (in the end your whole data access relies upon it), but also a hard requirement for using Custom Keystores.
Terraform
resource "aws_kms_custom_key_store" "hsm" {
  cloud_hsm_cluster_id  = aws_cloudhsm_v2_cluster.cluster.cluster_id
  custom_key_store_name = "kms-custom-key-store"

  key_store_password       = var.kmsuser_password
  trust_anchor_certificate = trimspace(tls_self_signed_cert.user_cert.cert_pem)
}

resource "aws_kms_key" "storage" {
  description = "KMS key for FSxN storage"

  custom_key_store_id     = aws_kms_custom_key_store.hsm.id
  deletion_window_in_days = 30

  depends_on = [null_resource.wait_for_init]
}
Before connecting the two systems, you need to create a specific user on your CloudHSM cluster: kmsuser.
CLI
/opt/cloudhsm/bin/cloudhsm-cli user create --username kmsuser --role crypto-user --password "KSM_PASSWORD"
You cannot change the name of this user, as it is hard-wired inside the Custom Keystore service. The crypto-user role matches our definitions above and allows the creation and usage of keys inside CloudHSM.
Now, you can do the final step: Connecting the Custom Keystore. Again, this is a CLI-only action as Terraform does not have support for the related ad-hoc action.
CLI
aws kms connect-custom-key-store --custom-key-store-id KEYSTORE_ID

while [ "$(aws kms describe-custom-key-stores --custom-key-store-id KEYSTORE_ID | jq .CustomKeyStores[0].ConnectionState -r)" != "CONNECTED" ]; do
  sleep 15s
done
It can take up to 20 minutes(!) to create a successful connection. In most cases, failure to connect is related to the kmsuser missing or specifying the wrong password.
Using CloudHSM for FSx
The final steps are identical to what you are used to. You simply create an FSxN cluster and specify the key ID from the Custom Keystore. That’s it!
Terraform
resource "aws_fsx_ontap_file_system" "storage" {
  storage_capacity    = var.storage_capacity
  throughput_capacity = var.throughput_capacity

  subnet_ids          = random_shuffle.node_subnets.result
  preferred_subnet_id = element(random_shuffle.node_subnets.result, 0)

  security_group_ids = [aws_security_group.fsx_cluster.id]
  route_table_ids    = module.vpc.private_route_table_ids

  deployment_type = "MULTI_AZ_1"

  kms_key_id = aws_kms_key.storage.arn

  # This can need more than the default 60 minutes
  timeouts {
    create = "120m"
  }
}
As you can see, this is identical to specifying any KMS key - so you can use the same process for any KMS-supporting resource, not only FSxN.
Summary
I hope these blog posts help you when you require customer-controlled keys with AWS. So far, full automation has proven elusive mainly due to the CloudHSM CLI calls and different waiting times between the stages. As soon as I have a workable solution, I will put up a repository with the related Terraform code.