Safe Storage - CloudHSM and FSx for NetApp ONTAP (Part 1)
Sometimes, developing a fully-fledged Lambda is not feasible, is too much work, or is simply outside of the knowledge domain of the people involved. But what if we could run plain Bash scripts instead?
Motivation
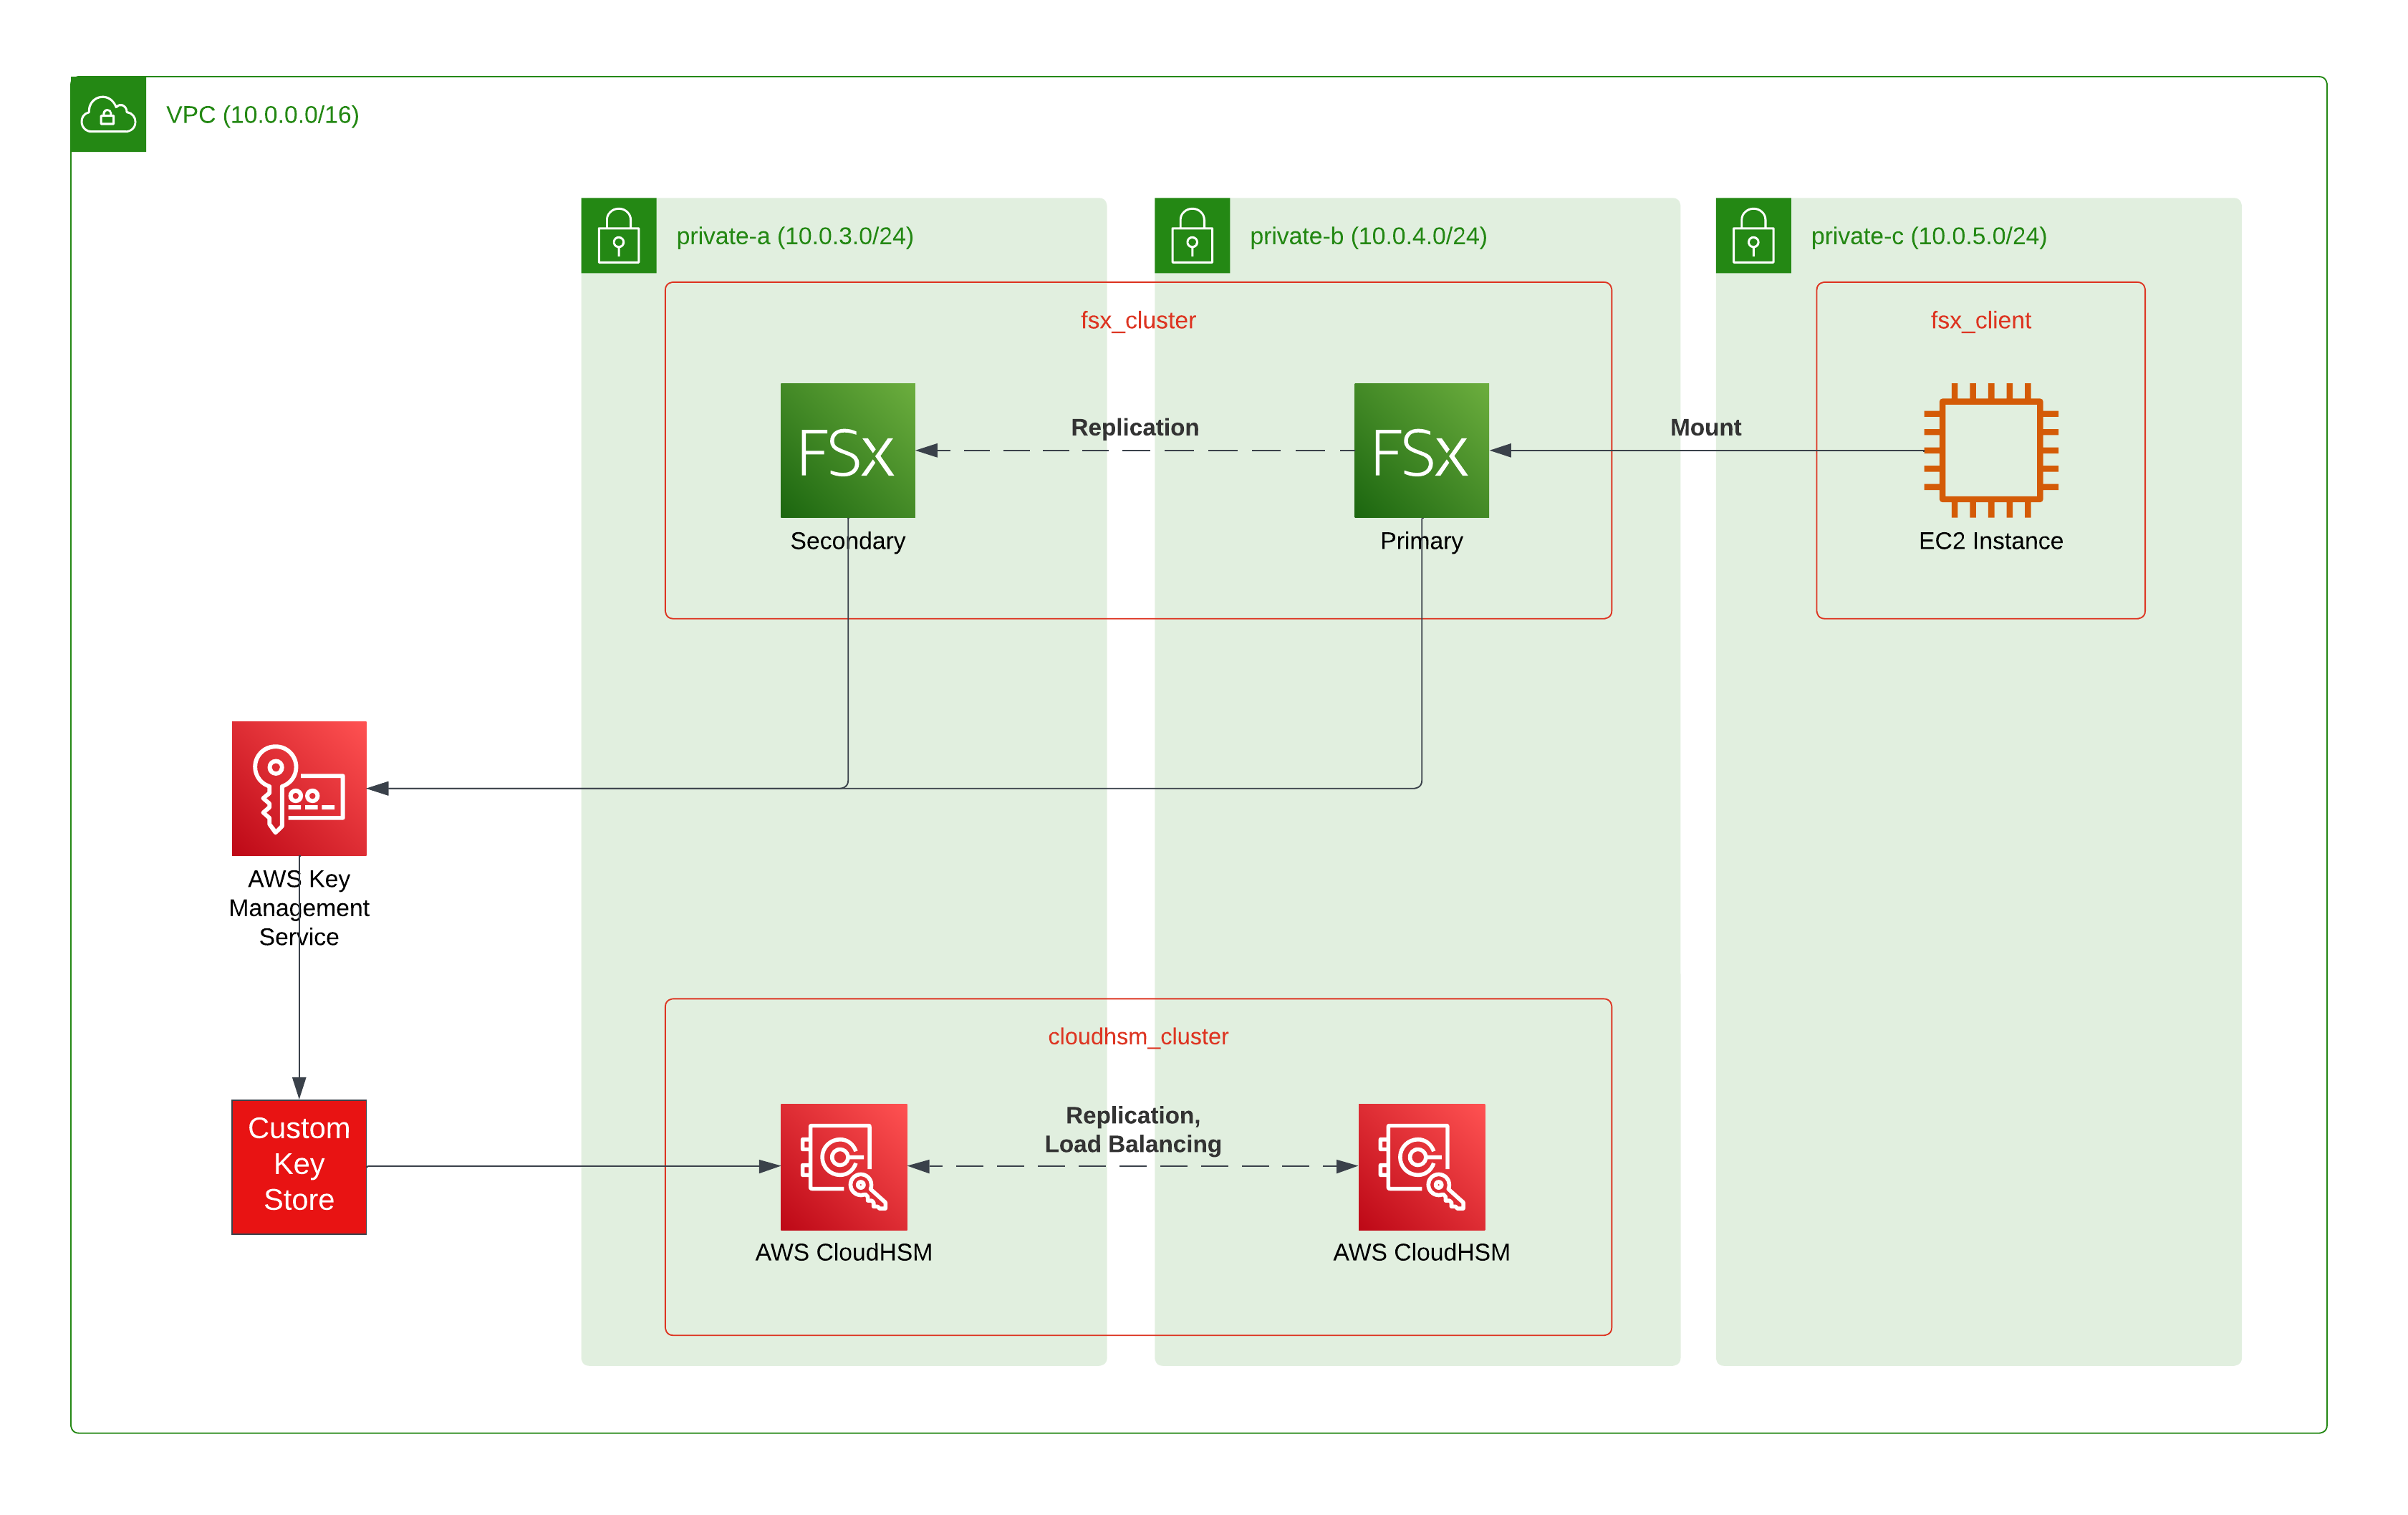
One concern of many customers wanting to migrate to the cloud is the topic of keeping their data private - in the sense of not even the cloud provider has access to it. Sometimes this is also called data sovereignty, although the use of the term can vary.
If you do not want your cloud provider to be able to access your data, you naturally have to encrypt it. But as most companies on AWS are relying on KMS, this could be mocked as “compliance encryption”. After all, the provider still has control over the encryption system and could (theoretically) access your data regardless.
To solve this scenario, AWS introduced CloudHSM back in 2013. First providing physical appliances called SafeNet Luna, they revamped the service in 2017 to use Cavium Nitrox III CNN35XX-NFBE cards. This made CloudHSM much more accessible and cheaper.
Still, access to CloudHSMs was a bit limited with basically just Redshift and custom clients being able to use it. To enable customers to connect arbitrary AWS services to CloudHSM, 2018 saw the introduction of Custom Keystores for KMS. Later, this was even extended to support on-premises HSMs.
One of these services is Amazon FSx for NetApp ONTAP (FSxN), which is using the long-proven storage platform from NetApp under the hoods. It offers CIFS- and NFS-shares as well as block-based storage via iSCSI - all mountable to your EC2 instances just like regular EFS/EBS.
In this blog post series, we will look into the different steps (and limitations) to set up the solution and try to automate it for easy consumption.
Provisioning the Cluster
Setting up CloudHSM seems pretty straightforward if you are used to the AWS way of things. But on closer inspection this, being an integration of third-party hardware, has some additional complexities.
Of course, first, you have to define a CloudHSM cluster and add some physical Hardware Security Module (HSM) nodes to it. You can start with two nodes for a production setup but can go up to 28 if you need lots of performance. As the default limit is set to 6 HSM nodes, you will need to raise a limit increase request and probably have to answer questions about the concrete use case in the resulting service ticket.
Terraform
  resource "aws_cloudhsm_v2_cluster" "cluster" {
    hsm_type   = "hsm1.medium"
    subnet_ids = local.subnet_ids

    lifecycle {
      ignore_changes = all
    }
  }

  resource "aws_cloudhsm_v2_hsm" "hsm_node" {
    count = 2

    subnet_id  = element(local.subnet_ids, count.index)
    cluster_id = aws_cloudhsm_v2_cluster.cluster.cluster_id
  }
CloudHSM so far does not support any form of automatic scaling, so you either have to scale manually or write your own scaling solution. It is important to note that CloudHSM CloudWatch metrics are limited and do not tell you about the current amount of operations in progress. This can be a particular problem when generating large amounts of long RSA keys - as this will result in CloudWatch logs messages noting another operation is in progress.
Even though auto-scaling is not implemented, CloudHSM does provide an internal load-balancing solution. While you can not access the cluster by any convenient auto-generated DNS endpoint, you can just direct your cryptographic requests to any HSM node. If it is busy, it will transparently forward the request to another HSM module and return the result to you.
You will notice that your cluster is not yet usable, as it still has two more steps to be completed: Initialization and activation.
Verification
HSMs exist due to one reason only: Trust. After all, you need to trust the infrastructure which secures your whole system ultimately.
This is, why you need to initialize a CloudHSM cluster. First by checking its integrity and then by attesting your trust in it. At that point, we have to delve into the scary realms of Public Key Infrastructure (PKI).
You can download different certificates via the AWS CLI:
- the HSM certificate which identifies the HSM itself
- the AWS certificate which states that this HSM was provisioned by AWS, and not anybody else
- the HSM vendor certificate which proves it is a genuine system
You can do this via commands from the AWS documentation which goes more into depth on this step. While it is called “optional”, it is advisable to do. Trust is important with this configuration, as previously mentioned.
Initialization
Now, you will have to do some certificate magic. CloudHSM provides a certificate signing request (CSR) for this, which you will sign and turn into a usable certificate. As such, we will be creating a self-signed Certificate Authority (CA).
While you can choose the file names freely, I would advise keeping them identical to those in the documentation. Otherwise, later steps will potentially become very confusing.
CLI
# Generate your private key
openssl genrsa -aes256 -out customerCA.key 4096
Terraform
resource "tls_private_key" "user_key" {
  algorithm = "RSA"
  rsa_bits  = 4096
}

resource "local_file" "user_key" {
  filename = "customerCA.key"
  content  = tls_private_key.user_key.private_key_pem
}
I decided to stick to a 4,096-bit key to increase security, and I generated a secure passphrase which I keep well-secured inside my password manager.
You will need a matching certificate to be able to identify to the CloudHSM cluster later. You will be prompted to enter some information during creation but it will not be vital to its later use. Still, some identifying information is good so colleagues can check who created this important piece.
CLI
openssl req -new -x509 -days 3652 -key customerCA.key -out customerCA.crt
Terraform
resource "tls_self_signed_cert" "user_cert" {
  private_key_pem   = tls_private_key.user_key.private_key_pem
  is_ca_certificate = true

  # replace by your own information
  subject {
    common_name  = "example.com"
    organization = "ACME Examples, Inc"
  }

  # 10 Years
  validity_period_hours = 87660

  allowed_uses = [
    "cert_signing",
    "crl_signing",
    "digital_signature"
  ]

  # Only run for create actions
  lifecycle {
    ignore_changes = all
  }
}

resource "local_file" "user_cert" {
  filename = "customerCA.crt"
  content  = tls_self_signed_cert.user_cert.cert_pem
}
Personally, I am okay with 10 years of validity in this situation. If you keep the certificate in a secure location, it should be fine. And you probably do not want to switch certificates on a central system yearly. But, as often stated in such tutorials: Your mileage may vary.
The final step is to sign the CloudHSM CSR with your certificate and key and then upload this to initialize the cluster
CLI
openssl x509 -req -days 3652 -in CLUSTER_ID_ClusterCsr.csr \
                             -CA customerCA.crt \
                             -CAkey customerCA.key \
                             -CAcreateserial \
                             -out CLUSTER_ID_CustomerHsmCertificate.crt

aws cloudhsmv2 initialize-cluster --cluster-id CLUSTER_ID \
                                  --signed-cert file://CLUSTER_ID_CustomerHsmCertificate.crt \
                                  --trust-anchor file://customerCA.crt
Terraform
# Step 2: Initialize (SSL certificates)
resource "local_file" "cluster_csr" {
  filename = "ClusterCsr.csr"

  # The CSR property will vanish as soon as the cluster is initialized, so we need a case distinction
  content  = length(aws_cloudhsm_v2_cluster.cluster.cluster_certificates) > 0 ? aws_cloudhsm_v2_cluster.cluster.cluster_certificates[0].cluster_csr : ""

  # Only run for create actions
  lifecycle {
    ignore_changes = all
  }
}

resource "tls_locally_signed_cert" "hsm_signed_cert" {
  cert_request_pem   = file(local_file.cluster_csr)
  ca_private_key_pem = tls_private_key.user_key.private_key_pem
  ca_cert_pem        = tls_self_signed_cert.user_cert.cert_pem

  # 10 Years
  validity_period_hours = 87660

  allowed_uses = [
    "client_auth",
    "digital_signature",
    "server_auth"
  ]

  # Only run for create actions
  lifecycle {
    ignore_changes = all
  }
}

resource "local_file" "hsm_signed_cert" {
  filename = "CustomerHsmCertificate.crt"
  content  = trimspace(tls_locally_signed_cert.hsm_signed_cert.cert_pem)

  # There is no Terraform resource for this ad-hoc action, so we revert to local CLI
  provisioner "local-exec" {
    command = <<CMD
      aws cloudhsmv2 initialize-cluster --cluster-id ${aws_cloudhsm_v2_cluster.cluster.cluster_id} \
                                        --signed-cert file://CustomerHsmCertificate.crt \
                                        --trust-anchor file://customerCA.crt
    CMD
  }
}
It is good practice to include the cluster ID in the file name so that there is no confusion later when you have multiple clusters. Remember: This is a per-cluster action, not per HSM node.
There might be a small waiting period between issuing the initialization command and the completion of the operation on the cluster, so you will need to wait after this step:
Terraform
  resource "null_resource" "wait_for_init" {
    provisioner "local-exec" {
      command = <<CMD
        echo "Waiting for ${aws_cloudhsm_v2_cluster.cluster.cluster_id} initialization (3-4 minutes)"
        while [ "$(aws cloudhsmv2 describe-clusters --filters 'clusterIds=${aws_cloudhsm_v2_cluster.cluster.cluster_id}' | jq .Clusters[0].State -r)" != "INITIALIZED"   ]; do
          sleep 15s
        done
      CMD
    }

    depends_on = [aws_cloudhsm_v2_hsm.hsm_node, local_file.hsm_signed_cert]
  }
Next Part
We are still not done! While the cluster is now initialized, it still is not active.
In the next post, we will go through the activation procedure, how to connect a Custom Keystore, and finally the FSxN storage.
See you there!