Managing volatile Terraform Deployments with AWS CodeBuild and Step Functions
I was searching for an AWS-native solution that would deploy resources via Terraform, allow them to do some work, and then destroy them properly without leaving any orphaned resources. Also, multiple of those Terraform deployments needed to be live at the same time.
The solution I found is a combination of AWS CodeBuild, AWS Step Functions, a Terraform State being managed in S3 and Terraform Workspaces.
Use Case
The solution can easily be applied to any problem, that requires some short term resources to be created and destroyed based on your own logic. It is similar to AWS Autoscaling, however in my particular use case Autoscaling wasn’t applicable as I needed more control over scaling events and wanted to add some more automation steps into the workflow (e.g. setup automation that doesn’t fit into instance user data). Additionally, Autoscaling doesn’t automate the creation of attached resources like DNS.
Additionally, I like the modularity of it. I am using the solution to build a SAP Application Server Autoscaling solution. The servers should be booted on demand and configured dynamically. However, the automation logic doesn’t really care about the actual resources that are deployed. You can port this solution to any other types of use cases.

Solution
I am using AWS Step Functions to orchestrate the deployment and destruction of the Terraform code. To allow multiple parallel deployments, a new Terraform Workspace is created for each workflow. The State is stored centrally in S3. Deployment is done with AWS CodeBuild which pulls the code from AWS CodeCommit.
Components
Step Functions
AWS Step Functions provides a simple no-code solution to orchestrating complex workflows that use AWS services as individual steps. All AWS APIs can be used as steps.
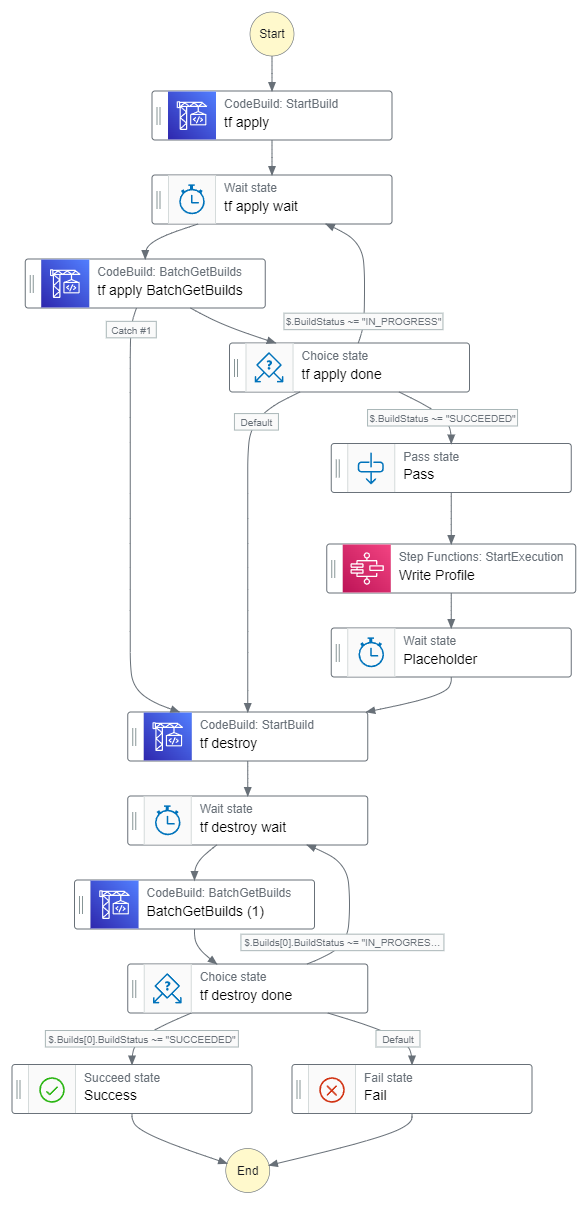
The following graph shows an example workflow that triggers a CodeBuild run and then waits for it to finish. If successful, it goes on to some additional configuration steps and would then start the actual job that it is build for. If deployment fails, it immediately triggers the destruction to ensure proper clean up. Later on, I want to build a logic that triggers the destruction after successful completion of the business function.
Step Functions have a maximum runtime of 1 year. Therefore, the solution is only applicable to resources with a lifetime shorted than a year. I like to use the term volatile to describe those.
Building the workflow isn’t always straight forward. As the graphic shows, some loops and decision points are necessary to wait for the CodeBuild Process to finish. In the same way, properly passing data between Steps requires a learning curve. However, it isn’t steep.
AWS CodeBuild and AWS CodeCommit
Most of the actual work happens in AWS CodeBuild. It provides a engine that boots up a container and then performs certain predefined tasks. Normally those would be used to build software artifacts from code as the name suggests. However, it is flexible enough to use it for the terraform apply and terraform destroy commands.
CodeBuild always does its work on a git repository and searches for a buildspec.yaml file. That file contains the instructions needed for either deployment and destruction. Those allow for flexible parameter passing using linux environment variables. Which file to use can be specified when starting the CodeBuild run.
Deployment
version: 0.2

env:
  variables:
    InstanceId: ""
  exported-variables:
    - terraform_output

phases:
  install:
    commands:
      - yum install -y yum-utils
      - yum-config-manager --add-repo https://rpm.releases.hashicorp.com/AmazonLinux/hashicorp.repo
      - yum -y install terraform

  pre_build:
    commands:
      - terraform init
      - terraform workspace select $WORKSPACE || terraform workspace new $WORKSPACE

  build:
    commands:
      - echo "using terraform workspace $WORKSPACE"
      - terraform apply -var-file="variables.tfvars" -auto-approve

  post_build:
    commands:
      - echo "terraform apply completed on workspace $WORKSPACE"
      - terraform_output=$(terraform output -json CodeBuildOutput)
Destruction
version: 0.2

phases:
  install:
    commands:
      - yum install -y yum-utils
      - yum-config-manager --add-repo https://rpm.releases.hashicorp.com/AmazonLinux/hashicorp.repo
      - yum -y install terraform

  pre_build:
    commands:
      - terraform init
      - terraform workspace select $WORKSPACE

  build:
    commands:
      - terraform destroy -var-file="variables.tfvars" -auto-approve

  post_build:
    commands:
      - terraform workspace select default
      - terraform workspace delete $WORKSPACE
Terraform Module
The Terraform module that you plan to deploy should first be build and test locally. Only, after you ensure that the logic is working properly, you should go into automating its deployment, as debugging is easier locally. However, there are some things to consider when build the module.
Resource Naming
As multiple instances of the same resources will be created, the module needs to be able to handle this. It needs to use flexible resource names wherever resources require a unique name. One option for this is to use a timestamp value.
Also, take care of resource dependencies. Certain mappings can only be done 1 to 1. For instance, an Elastic IP Address can only be assigned to one network interface / instance at a time. If not done right, such dependencies can lead to errors during deployment that are difficult to debug.
Terraform Workspaces
Terraform Workspaces allow individual deployments of the same module using the same Terraform State. It is identified via a simple string that can take any alphanumeric value. The Workspace ID can be accessed from within the code to allow dynamic naming and Workspace-specific logic.
The solution uses Workspaces to identify individual deployments. This is needed as the destruction Run wouldn’t know which State to destroy unless its given an identifier. As Workspace ID we are using the StartTime timestamp generated by AWS Step Functions as it is consistent throughout the workflow.
Conclusion
It was the first time that I used either of those features and it really was worth learning them. Especially Step Functions provide an immense potential for easy and straight forward automation. I will definitely use it to automated the dynamic start and stop of SAP application servers and will keep you posted with some blog posts about this endeavour.