MCP Authentication for Agent Connections in Amazon Bedrock AgentCore
MCP Authentication for Agent Connections in Amazon Bedrock AgentCore: A Complete Guide
Agents are currently the go-to topic in AI, with AWS heavily pushing Amazon Bedrock AgentCore as the next-generation platform for building intelligent, tool-enabled applications. However, while LLMs excel at language understanding and generation, they have fundamental limitations in performing complex calculations, data processing, and accessing external systems. While an LLM might have learned that 2+2 equals 4, it cannot perform integral calculations or access real-time data from external APIs.
This is where Model Context Protocol (MCP) servers become essential. MCP servers provide external tools and capabilities that LLMs can leverage through agents. While basic tools can be attached directly to agents, MCP servers offer a more scalable approach by providing reusable tools that can be shared across multiple agents and projects.
However, the AWS documentation primarily focuses on direct MCP testing using user-based authentication, which works for verifying MCP server availability but not for production agent-to-MCP communication. This guide addresses the gap between testing and production-ready implementations.
Note: All code examples in this guide are written in Python. Complete working examples and implementation code are available in the GitHub repository: https://github.com/tecracer/agentcore-mcp-authentication
Amazon Bedrock AgentCore Architecture Overview
Before diving into implementation details, let’s understand the high-level architecture of the Amazon Bedrock AgentCore ecosystem:
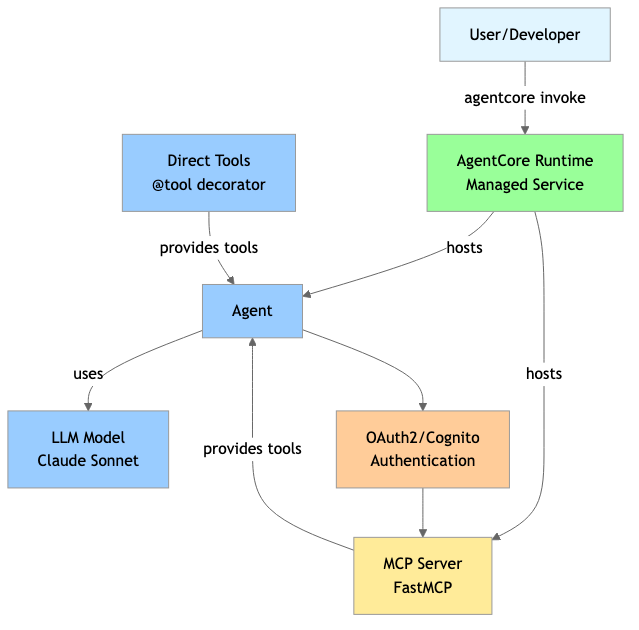
This diagram shows the complete Amazon Bedrock AgentCore ecosystem with two main approaches:
- Basic Agent: Uses direct tools attached with
@tooldecorator - MCP Agent: Connects to external MCP servers for external tool access
The Amazon Bedrock AgentCore Runtime hosts both agents and MCP servers, with authentication required only for MCP server connections.
Setting Up Basic Agents
Setting up agents is quite straightforward with the new AWS Starter toolkit available at https://github.com/aws/bedrock-agentcore-starter-toolkit. The commands agentcore configure, agentcore launch, agentcore invoke (along with agentcore monitor and agentcore destroy) make it incredibly easy to create and manage agents.
Here’s a basic agent implementation:
from strands import Agent, tool
from bedrock_agentcore.runtime import BedrockAgentCoreApp
from strands.models import BedrockModel

app = BedrockAgentCoreApp()

@tool
def your_tool(input: str) -> str:
    """Your calculator tool implementation"""
    return "result"

agent = Agent(
    model=BedrockModel(model_id="eu.anthropic.claude-3-7-sonnet-20250219-v1:0"),
    tools=[your_tool],
    system_prompt="You're a helpful assistant. You can do simple math calculations."
)

@app.entrypoint
def strands_agent_bedrock(payload):
    user_input = payload.get("input")
    response = agent(user_input)
    return response.message['content'][0]['text']

if __name__ == "__main__":
    app.run()
Deployment is straightforward:
# Configure the agent
agentcore configure -e single_strands_agent.py -n single_strands_agent

# Deploy to cloud
agentcore launch

# Test the deployed agent
agentcore invoke '{"input": "What is 2+2?"}'
And you’re done. This is all you need to implement and deploy basic Agents, yet without MCP-integration and a calculator as direct tool.
Setting Up MCP Servers
Similarly to Agents, MCP servers can be implemented following the official AWS documentation. The implementation uses FastMCP and follows the recommended structure:
from mcp.server.fastmcp import FastMCP
from starlette.responses import JSONResponse

mcp = FastMCP(host="0.0.0.0", stateless_http=True)

@mcp.tool()
def add_numbers(a: int, b: int) -> int:
   """Add two numbers together"""
   return a + b

@mcp.tool()
def multiply_numbers(a: int, b: int) -> int:
   """Multiply two numbers together"""
   return a * b

@mcp.tool()
def greet_user(name: str) -> str:
   """Greet a user by name"""
   return f"Hello, {name}! Nice to meet you."

if __name__ == "__main__":
   mcp.run(transport="streamable-http")
AWS Documentation Approach for MCP Configuration
The AWS documentation provides a straightforward approach for MCP configuration. It includes a complete script that:
- Creates an Amazon Cognito User Pool with a user account
- Generates the Discovery URL for OAuth2 configuration
- Provides the Client ID needed for MCP setup
Here’s the key part of their setup script:
#!/bin/bash

# Create User Pool and capture Pool ID directly
export POOL_ID=$(aws cognito-idp create-user-pool \
  --pool-name "MyUserPool" \
  --policies '{"PasswordPolicy":{"MinimumLength":8}}' \
  --region us-central-1 | jq -r '.UserPool.Id')

# Create App Client and capture Client ID directly
export CLIENT_ID=$(aws cognito-idp create-user-pool-client \
  --user-pool-id $POOL_ID \
  --client-name "MyClient" \
  --no-generate-secret \
  --explicit-auth-flows "ALLOW_USER_PASSWORD_AUTH" "ALLOW_REFRESH_TOKEN_AUTH" \
  --region us-east-1 | jq -r '.UserPoolClient.ClientId')

# Output the required values
echo "Discovery URL: https://cognito-idp.us-east-1.amazonaws.com/$POOL_ID/.well-known/openid-configuration"
echo "Client ID: $CLIENT_ID"
The deployment process uses these values with the agentcore configure command:
agentcore configure --name mcp_simple_calculator --protocol MCP --entrypoint mcp_server.py
During the guided setup, you provide:
- Discovery URL: From the setup script output
- Client ID: From the setup script output
Then deploy with:
agentcore launch
This approach works for direct MCP server access - you can connect to your deployed server using the three parameters client_id, username and password to create a bearer token within a simple script.
print("Getting Bearer token from Amazon Cognito using user credentials...")

# Get SSM parameters
client_id = ssm_client.get_parameter(Name='/app/blogpost/mcp/mcp_name/machine_client_id')['Parameter']['Value']
username = ssm_client.get_parameter(Name='/app/blogpost/mcp/mcp_name/username')['Parameter']['Value']
password = ssm_client.get_parameter(Name='/app/blogpost/mcp/mcp_name/password', WithDecryption=True)['Parameter']['Value']

# Get the bearer token using user authentication
response = cognito_client.initiate_auth(
   ClientId=client_id,
   AuthFlow='USER_PASSWORD_AUTH',
   AuthParameters={
   'USERNAME': username,
   'PASSWORD': password
   }
)
access_token = response['AuthenticationResult']['AccessToken']
This approach can be successfully tested locally to retrieve information about all available tools. A shortened example output from the local testing script:
$ python blogpost_invoke_mcp_tools_userCred.py --name blogpost_mcp_simple_calculator
Getting Bearer token from Amazon Cognito using user credentials...
Successfully obtained Bearer token using user authentication
MCP session initialized with Bearer token authentication

Available MCP Tools:
add_numbers - Add two numbers together
multiply_numbers - Multiply two numbers together
greet_user - Greet a user by name

Testing MCP Tools:
Testing add_numbers(5, 3)... Result: 8
Testing multiply_numbers(4, 7)... Result: 28
Testing greet_user('Alice')... Result: Hello, Alice! Nice to meet you.

All tools are working correctly!
The Authentication Challenge
While this user-based authentication works perfectly for direct MCP server testing, this approach has limitations for production agent-to-MCP communication. When creating an agent that connects to an MCP server, several critical issues become apparent with user-based authentication:
- Wrong authentication model: User authentication is designed for humans, not services
- User account dependency: Service depends on a user account that could be disabled or deleted
- Security concerns: Storing user credentials in for example Amazon SSM or as a secret is not ideal for service-to-service authentication
- Operational complexity: Requires managing user accounts for services, which is unnecessary overhead
Agent authentication and integration can be learned through the Amazon Bedrock AgentCore Gateway in this video. In this approach, an AWS Lambda is masked behind an Amazon Bedrock AgentCore Gateway to use it similar to a MCP server. This pattern should also work with normal MCP servers.
However, there were no real instructions on how to achieve this. By analyzing the implementation screenshots from the video and combining insights from this OpenSearch MCP Implementation, an agent can be developed that connects to an MCP calculator.
The Solution: Machine-to-Machine Authentication
For production use, Machine-to-Machine (M2M) authentication is the recommended approach. The solution can be found in this GitHub Repository - the actual code from the video, though in a more abstracted and extended way.
By examining the setup and configuration files that weren’t shown in the video, it becomes clear that they used AWS CloudFormation and a custom script to create a specific Amazon Cognito User Pool with a Machine-to-Machine (M2M) client.
While the official AWS documentation hints that MCP OAuth authentication can happen with Amazon Cognito, it was nowhere explained that Agent-to-MCP communication should use M2M authentication, not user-based authentication.
Why M2M Authentication is Superior:
- Purpose-Built for Services: M2M is specifically designed for application-to-application communication
- Better Security Model: Application-scoped credentials with appropriate permissions
- No User Management: No need to create, manage, or rotate user accounts
- More Reliable: No dependency on user accounts that could be disabled
- Easier to Scale: One set of credentials per service, not per user
- Industry Standard: This is how most production services authenticate
M2M Authentication Flow
The following diagram illustrates the complete Machine-to-Machine authentication flow:
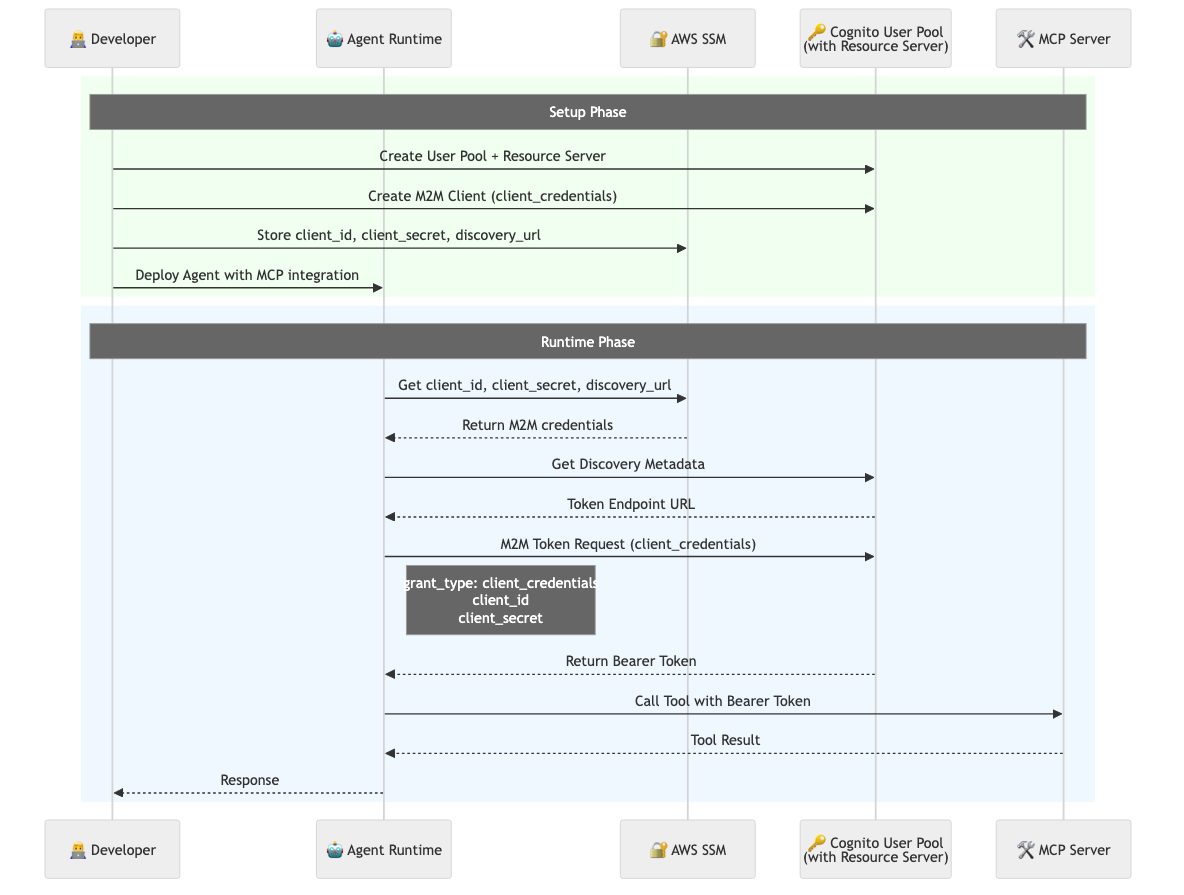
This sequence shows the two-phase process:
- Setup Phase (green): Developer creates M2M client and stores credentials
- Runtime Phase (blue): Agent authenticates using M2M credentials and executes tools
Implementation Steps
Now let’s walk through the detailed implementation:
1. Create an M2M Client in the User Pool and Store Required Information in Amazon SSM
Here’s the key part of the Amazon Cognito setup for M2M authentication:
def create_cognito_user_pool(mcp_name):
    """Create Amazon Cognito User Pool with M2M client for agent-to-MCP communication."""
    cognito_client = boto3.client('cognito-idp')

    # Create User Pool
    user_pool_response = cognito_client.create_user_pool(
        PoolName='MCPAgentPool',
        # ... basic pool configuration
    )

    # Create Resource Server (required for M2M client)
    resource_server_response = cognito_client.create_resource_server(
        UserPoolId=user_pool_id,
        Identifier='default-m2m-resource-server',
        Scopes=[{'ScopeName': 'read', 'ScopeDescription': 'M2M access scope'}]
    )

    # Create Machine-to-Machine App Client (the key difference!)
    machine_client_response = cognito_client.create_user_pool_client(
        UserPoolId=user_pool_id,
        ClientName=f'MCPAgentMachineClient-{mcp_name}',
        GenerateSecret=True,
        AllowedOAuthFlows=['client_credentials'],  # M2M flow, not user flow
        AllowedOAuthScopes=['default-m2m-resource-server/read'],
        AllowedOAuthFlowsUserPoolClient=True,
        # ... other M2M-specific settings
    )

    # Store M2M credentials in Amazon SSM for agent access
    ssm_client.put_parameter(
        Name=f'/app/mcp/{mcp_name}/machine_client_id',
        Value=machine_client_id,
        Type='String'
    )
    # ... store client secret and discovery URL
Key difference: This creates an M2M client with client_credentials flow, not a user client with USER_PASSWORD_AUTH.
2. Configure Your Agent Using the Correct Discovery ID and Client ID
# Set up Cognito first
python setup_M2M_cognito.py setup --mcp-name mcp_simple_calculator

# Configure agent with MCP protocol
agentcore configure --name mcp_simple_calculator --protocol MCP --entrypoint mcp_server.py
During configuration, you’ll need:
- Discovery URL:
https://cognito-idp.{region}.amazonaws.com/{user_pool_id}/.well-known/openid-configuration - Client ID: The Machine Client ID from step 1
Understanding Discovery URL and Client ID
Discovery URL: This is an OAuth2 standard endpoint that provides metadata about the authorization server. It contains information about available endpoints (like token endpoint), supported authentication methods, and other configuration details. The agent uses this URL to automatically discover how to authenticate with the Amazon Cognito User Pool.
Client ID: This is a unique identifier for the M2M application client created in the Amazon Cognito User Pool. It identifies which application is requesting access and determines what permissions and scopes are available. The Client ID, combined with the Client Secret, allows the agent to authenticate as a machine-to-machine client rather than a user.
3. Launch the MCP Server
agentcore launch
4. Write the Agent (Loading Correct Amazon SSM Parameters and Agent ARN)
Here’s the key part of the agent implementation that handles M2M authentication:
def get_bearer_token(discovery_url: str, client_id: str, client_secret: str) -> str:
    """Get OAuth2 bearer token using M2M client credentials flow."""
    # Get discovery data to find token endpoint
    response = requests.get(discovery_url)
    discovery_data = response.json()
    token_endpoint = discovery_data['token_endpoint']

    # M2M Client credentials flow (not user-based!)
    data = {
        'grant_type': 'client_credentials',  # Key difference from user auth
        'client_id': client_id,
        'client_secret': client_secret
    }

    headers = {
        'Content-Type': 'application/x-www-form-urlencoded'
    }

    response = requests.post(token_endpoint, data=data, headers=headers)
    return response.json()['access_token']

def create_agent() -> Agent:
    """Create agent with MCP tools using M2M authentication."""
    # Get M2M credentials from Amazon SSM (not user credentials)
    client_id = get_ssm_parameter("/app/blogpost/mcp/mcp_simple_calculator/machine_client_id")
    client_secret = get_ssm_parameter("/app/blogpost/mcp/mcp_simple_calculator/cognito_secret")
    discovery_url = get_ssm_parameter("/app/blogpost/mcp/mcp_simple_calculator/cognito_discovery_url")

    # Note: M2M authentication requires client_secret, which user-based auth does not

    # Get M2M bearer token
    bearer_token = get_bearer_token(discovery_url, client_id, client_secret)

    # Create MCP client with Bearer token authentication
    mcp_client = MCPClient(lambda: streamablehttp_client(mcp_url, {
        "authorization": f"Bearer {bearer_token}",  # M2M token, not user token
        "Content-Type": "application/json"
    }))

    # Rest of agent setup...
    return agent
The difference in this agent: This uses client_credentials grant type (M2M) instead of USER_PASSWORD_AUTH (user-based authentication).
5. Configure and launch the Agent (No Cognito Required, CLI Credentials Are Enough)
agentcore configure -e single_agent_mcp.py --protocol HTTP -n single_agent_mcp
agentcore launch
6. Invoke the Agent
# Test with authentication
agentcore invoke "What is 2+2?"
Expected output:
(.venv) leonvaness@MacBookPro 04_single_agent_mcp % agentcore invoke "What is 2+2?"
+----------------------------------- blogpost_single_agent_mcp -----------------------------------+
| Session: ca932e16-a0ab-442d-b53a-30dbbf782e28                                                    |
| Request ID: 0aba2764-abe0-4648-8b35-8a9371a2ece7                                                 |
| ARN:                                                                                             |
| arn:aws:bedrock-agentcore:eu-central-1:[ACCOUNT-ID]:runtime/blogpost_single_agent_mcp-PsKIjTAtVK |
| Logs: aws logs tail /aws/bedrock-agentcore/runtimes/blogpost_single_agent_mcp-PsKIjTAtVK-DEFAULT |
| --log-stream-name-prefix "2025/10/08/[runtime-logs]" --follow                                    |
|       aws logs tail /aws/bedrock-agentcore/runtimes/blogpost_single_agent_mcp-PsKIjTAtVK-DEFAULT |
| --log-stream-name-prefix "2025/10/08/[runtime-logs]" --since 1h                                  |
| GenAI Dashboard:                                                                                 |
| https://console.aws.amazon.com/cloudwatch/home?region=eu-central-1#gen-ai-observability/agent-co |
| re                                                                                               |
+--------------------------------------------------------------------------------------------------+

Response:
The sum of 2 + 2 = 4.
Runtime Authentication Flow
The following diagram illustrates the complete runtime authentication sequence that occurs when you invoke the agent:
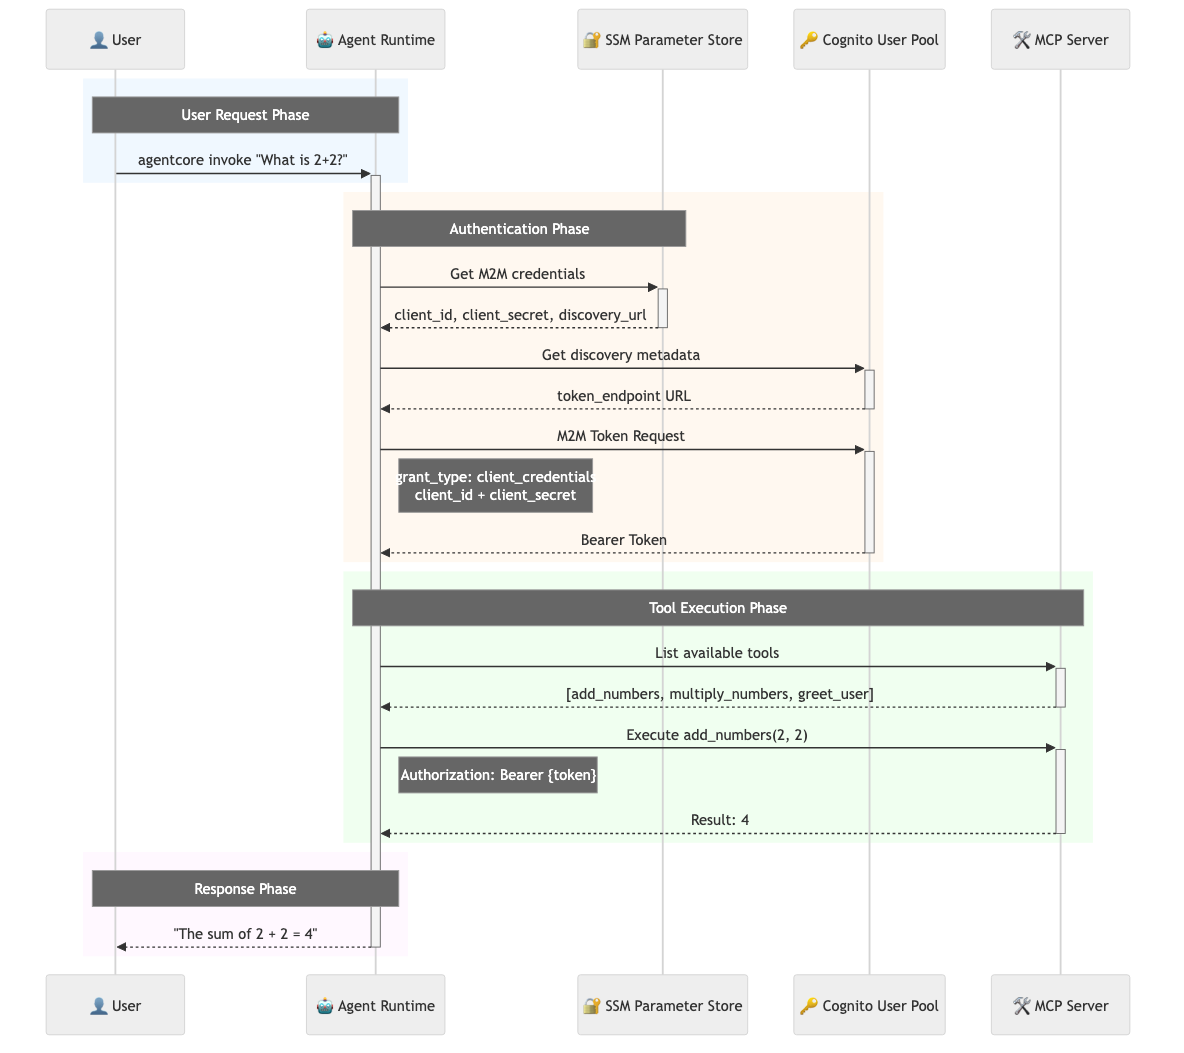
This sequence shows the two-phase process:
- Authentication Phase (orange): Agent retrieves M2M credentials and obtains a Bearer token
- Tool Execution Phase (green): Agent uses the token to authenticate with the MCP server and execute tools
Key Insights
The important takeaway is that Agent-to-MCP communication requires Machine-to-Machine (M2M) OAuth2 authentication, not user-based authentication. This involves:
- Amazon Cognito User Pool with a Resource Server
- M2M Client with
client_credentialsflow - OAuth2 Discovery for token endpoint resolution
- Bearer Token authentication for MCP server access
- Amazon SSM Parameter Store for secure credential management
The workflow ensures that your agent can securely connect to MCP servers deployed on Amazon Bedrock AgentCore Runtime, enabling the integration of proper authentication and authorization.
Summary and Recommendations
For Development/Testing:
- User-based authentication works for simple testing and development scenarios
- Can be implemented quickly for proof-of-concept work
- Suitable for local development and basic testing
For Production:
- Machine-to-Machine (M2M) authentication is the recommended approach
- Better security model with application-scoped credentials
- More reliable and scalable for production environments
- Follows industry best practices for service-to-service authentication
Key Takeaway:
While user-based authentication works for basic MCP server access, M2M authentication is the proper solution for production agent-to-MCP communication. The M2M approach provides better security, reliability, and scalability for your agent ecosystem.
Next Steps
This pattern can be extended to support multiple MCP servers, each with their own M2M client but sharing the same Amazon Cognito User Pool infrastructure. The modular design allows for easy scaling and maintenance of your agent ecosystem. Stay tuned for multiple MCPs, Agent Memory and Observability.