Adding Cognito Authentication to our Serverless Dash App
In a recent post, I‘ve shown you how to add HTTP Basic Authentication to the Serverless Dash app. That may be suitable for development or testing, but for production you typically want a more comprehensive solution. Within AWS this is usually where Cognito enters the scene. Cognito can manage users with its User Pool feature and, crucially, supports federated identities, i.e. Single Sign On via other identity providers such as Active Directory. In this post I‘m going to show you how to add this capability to your Serverless Dash App.
If you haven‘t followed the series, I recommend you at least read the first part, because I‘m going to skip some of the background information on the setup.
- Deploying a Serverless Dash App with AWS SAM and Lambda
- Adding Basic Authentication to the Serverless Dash App
- Build a Serverless S3 Explorer with Dash
In order to authenticate our users through Cognito, we‘re going to use the dash-cognito-auth package that Franck Spijkerman published a few years ago and to which I recently started contributing to keep it up to date.
pip install dash-cognito-auth
After installing the package, we need to integrate it in our app. Before we do that, let‘s talk a bit about how this works. The library wraps itself around your Dash app and checks each incoming request to see if the user is authenticated. If that‘s not the case, it redirects them to a local Cognito authorization endpoint. For unauthenticated users, this will then result in another redirect to the Cognito User Pool Sign-In UI. Here, the user authenticates themselves either trough username and password if they‘re native users in the User Pool or by being redirected to a third party identity provider.
Once Cognito has verified the identity, it creates an authentication code and redirects the user back to our apps‘ authorization endpoint. The endpoint makes a call using its own Cognito credentials to verify the authorization code and access user information. If everything goes well, the session is treated as authenticated, some information is added to it and the user is redirected to the app‘s home page.
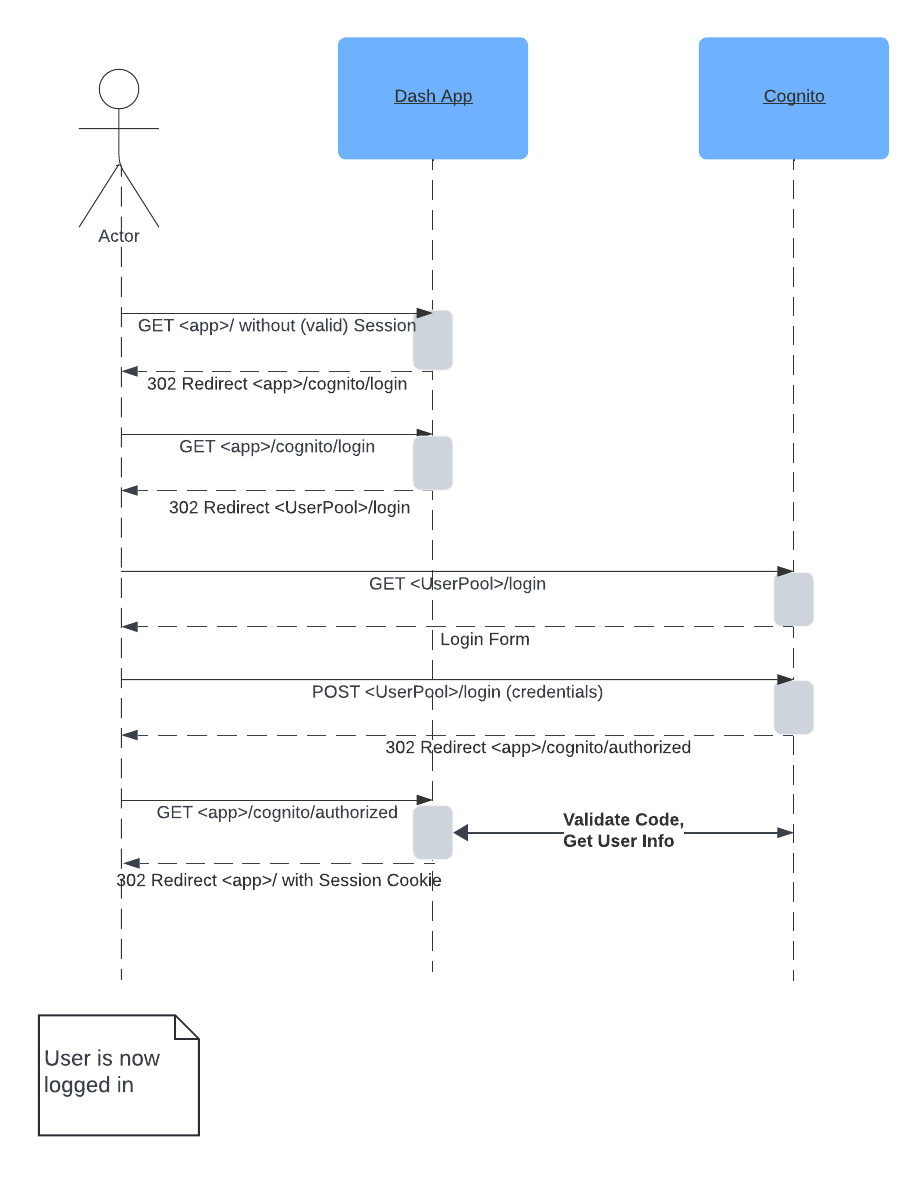
If this sounds like a lot of redirects to you, that‘s accurate. Fortunately, this is something the library handles through the integration of the flask-dance package. From your perspective, you just have to configure the Cognito information and the rest happens automatically. Should a user be already logged in to Cognito, the whole process happens transparently and is typically so fast they don‘t even notice it.
In case they‘re not authenticated in Cognito already, they will only be prompted for credentials there or through the third party identity provider. As a developer of the Dash app you can then assume that only authorized users can access the app and you‘re able to fetch information about the currently logged in user from the Flask session.
With this theory out of the way, let‘s see how we can implement it. I have once again created a repository with a SAM-based app. The app deploys the required Cognito user pool and app client for authentication and grants the Frontend Lambda permission to describe the User Pool and retrieve some secrets at runtime so that they don‘t have to be hardcoded. Almost all the rest happens in the Lambda function.
# template.yaml
UserPool:
Type: AWS::Cognito::UserPool
Properties:
  UsernameAttributes:
	- "email"
  UsernameConfiguration:
	CaseSensitive: false
  AdminCreateUserConfig:
	# Disable self-service signup
	AllowAdminCreateUserOnly: true
  Schema:
	- Mutable: true
	  Name: "email"
	  Required: true
	- Mutable: true
	  Name: "name"
	  Required: true
  AutoVerifiedAttributes:
	- "email"

UserPoolDomain:
Type: AWS::Cognito::UserPoolDomain
Properties:
  Domain:
	Ref: UserPoolDomainName
  UserPoolId:
	Ref: UserPool

UserPoolClient:
Type: AWS::Cognito::UserPoolClient
Properties:
  UserPoolId:
	Ref: UserPool
  AllowedOAuthFlows:
	- "implicit"
	- "code"
  AllowedOAuthFlowsUserPoolClient: true
  AllowedOAuthScopes:
	- "phone"
	- "email"
	- "openid"
	- "profile"
  CallbackURLs:
	# Add your custom domain here if you have one
	- !Sub "https://${ApiGatewayIdAfterDeployment}.execute-api.${AWS::Region}.amazonaws.com/${ApiGatewayStageName}/login/cognito/authorized"
	# For local development, the port varies sometimes
	- "http://localhost:5000/login/cognito/authorized"
	- "http://localhost:8000/login/cognito/authorized"
	- "http://localhost:8050/login/cognito/authorized"
	- "http://localhost:3000/login/cognito/authorized"
  GenerateSecret: true
  LogoutURLs:
	# Add your custom domain here if you have one
	- !Sub "https://${ApiGatewayIdAfterDeployment}.execute-api.${AWS::Region}.amazonaws.com/${ApiGatewayStageName}/"

	# For local development, the port varies sometimes
	- "http://localhost:3000/"
	- "http://localhost:5000/"
	- "http://localhost:8000/"
	- "http://localhost:8050/"
  SupportedIdentityProviders:
	# TODO: You can also replace this with your third
	#       party identity provider.
	- "COGNITO"
I’ve converted our previous Zip-based Lambda to a Docker based Lambda, which speeds up our deployment process and gives us a bit more flexibility. If you‘d like to learn more about that, check out this blog. As part of the function, I‘ve added frontend/auth.py, which is a helper module that makes it easy to add Cognito authentication to the Dash app.
Let‘s talk about the kind of information the dash-cognito-auth library needs. In order for it to work, it requires the domain name of the User Pool or whichever hosted UI is used for login. Additionally it requires the app client id and secret that connects Cognito with the application. Especially the secret is something that we don‘t want to keep in an environment variable, so we fetch this information using the AWS SDK, which you can see here.
For performance reasons, we cache the results as these credentials are unlikely to change frequently and we want to keep our response times low. Assuming that the environment variables COGNITO_CLIENT_ID, COGNITO_REGION and COGNITO_USER_POOL_ID are set appropriately, this is almost everything that we need to do here.
# frontend/auth.py
def add_cognito_auth_to(app: Dash) -> None:
    """
    Wrap a Dash app with Cognito authentication.
    """

    info = get_cognito_info()

    app.server.config["COGNITO_OAUTH_CLIENT_ID"] = info["client_id"]
    app.server.config["COGNITO_OAUTH_CLIENT_SECRET"] = info["client_secret"]

    dca.CognitoOAuth(
        app=app, domain=info["domain"], region=info["region"], logout_url="/logout"
    )
The next step happens in frontend/app.py - here we import our module and call add_cognito_authorization_to on our Dash app object. Additionally, we need to set the Flask secret which will be used to encrypt the cookie-content. This is a value that needs to be identical among your execution contexts, so we can‘t really generate it at runtime.
# frontend/app.py
from auth import add_cognito_auth_to

def build_app(dash_kwargs: dict = None) -> Dash:

    dash_kwargs = dash_kwargs or {}

    app = Dash(
        # ...
    )

    app.layout = html.Div(
        children=[
            render_nav(),
            dash.page_container,
        ],
    )

    app.server.secret_key = "CHANGE_ME"

    add_cognito_auth_to(app)

    return app
To keep my life simple, I‘ve just hardcoded it here - it would probably be better to store that value in the SSM Parameter store and read it from there at runtime.
Let‘s see our setup in action.
Deploying the app initially is a two-step process. We need to configure a bunch of URLs in the App client, which rely on the API Gateway Id. Unfortunately, there would be a circular reference if I tried to reference the value in the template. To work around that, I created a CloudFormation parameter with a dummy value. After the initial deployment, we need to overwrite this with the actual value, which is an output from the initial deployment.
# samconfig.toml
# TODO: Update this after the initial deployment
parameter_overrides = "UserPoolDomainName=\"update-me\" ApiGatewayStageName=\"Prod\" ApiGatewayIdAfterDeployment=\"update-me\""
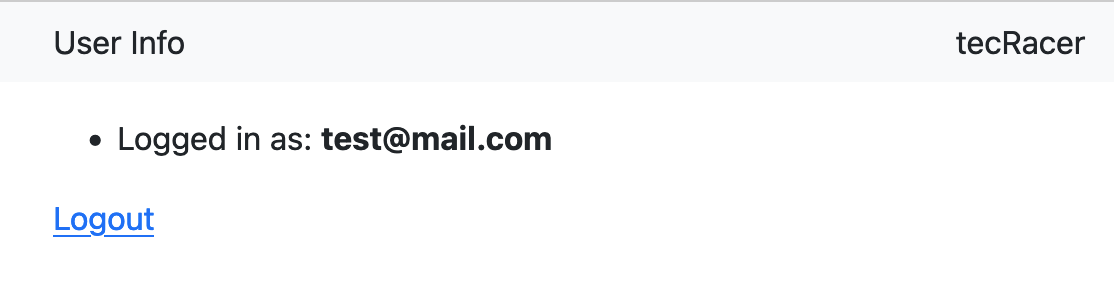
Having deployed the app, we can now access it in the browser. You‘ll notice that we get redirected to the Cognito hosted UI immediately. After logging in, we‘re redirected to our app, and it should look roughly like this.
For this example app I have disabled self-service-sign-up for the User Pool in the Cognito settings. This means we have to create a user through the Cognito Admin Console. You can change this behavior by updating the AllowAdminCreateUserOnly parameter to False in template.yaml and redeploying the solution. Beware though, that this is somewhat similar to making your app publicly accessible because everyone can just create an account - this should be intentional, not accidental.
If you want to authenticate your users through a 3rd party identity provider, configure that in the user pool and add the new IDP here in the template.yaml to the supported login methods. Once you do that, you could also remove the Cognito entry to allow only log in from the third party IDP.
Now that we‘re logged in, we may want to be able to log out as well. The library supports this workflow too (WIP). It will create an HTTP endpoint that an authenticated user can send a GET request to. This will then invalidate the session by expiring the cookie and additionally redirect them to the user pools logout path, which will log them out from Cognito. Otherwise they would be logged in again as soon as they refresh the page.
With the authentication setup completed, you should now have a decent template for developing your SAM based Serverless Dash app.
Go ahead and check it out on Github. Hopefully you learned something new in this post. Also check out the other posts in this series.
— Maurice
Other articles in this series: