Implementing SAML federation for Amazon OpenSearch Service with OneLogin.
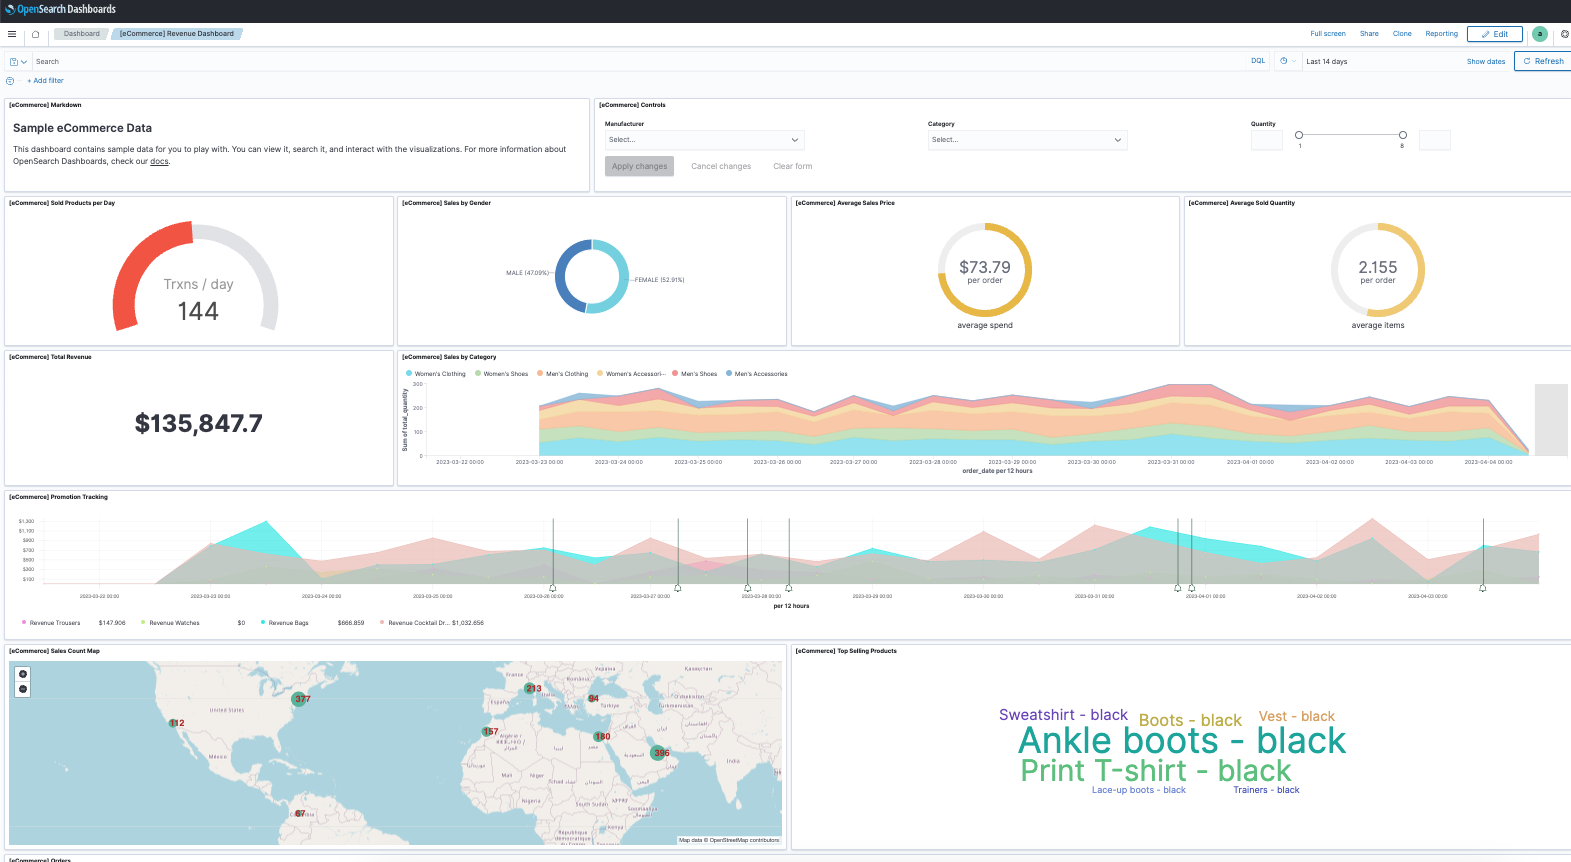
Amazon OpenSearch Service is a fully-managed solution for interactive log analytics, real-time application monitoring, website search, observability, and more. With a vast customer base, Amazon OpenSearch Service manages hundreds of thousands of clusters and processes trillions of requests monthly. The service provides seamless access for users through SAML-based federation for OpenSearch Dashboards, enabling single sign-on (SSO) on Amazon OpenSearch Service domains using existing identity providers (IdPs) like OneLogin. SAML simplifies the login process by allowing users to access multiple platforms with a single username and password, providing a safer and more convenient online experience.
This guide will walk you through integrating OneLogin with OpenSearch Dashboards for a seamless SSO experience, leveraging Amazon OpenSearch Service’s capabilities.
What is SAML?
SAML is a technology that helps computers communicate with each other to verify users’ identities when accessing different websites and apps. It simplifies the login process by allowing users to access multiple platforms with a single username and password, providing a safer and more convenient online experience.
Key Components of SAML:
- Service Provider (SP): This is the website or app you want to access (in this guide: Amazon OpenSearch Service). The SP provides the service you want to use and is responsible for integrating with the identity provider (IdP) to ensure secure authentication.
- Identity Provider (IdP): The IdP (in this guide: OneLogin) is the trusted party that verifies users’ identities. When a user tries to access an SP, the IdP checks their credentials (username and password) and sends an approval (SAML Assertion) to the SP if the user is authenticated.
- Assertion Consumer Service (ACS): The ACS is a crucial part of the SP that receives the SAML Assertion from the IdP and grants users access to the platform once their identity is confirmed.
- SAML Assertion Document: The digitally signed XML document containing the user’s identity and access rights upon successful authentication.
The SAML Service Provider Initiated Authentication Process:
The overall Authentication Process between OneLogin and OpenSearch can be seen on next Figure and is described next.
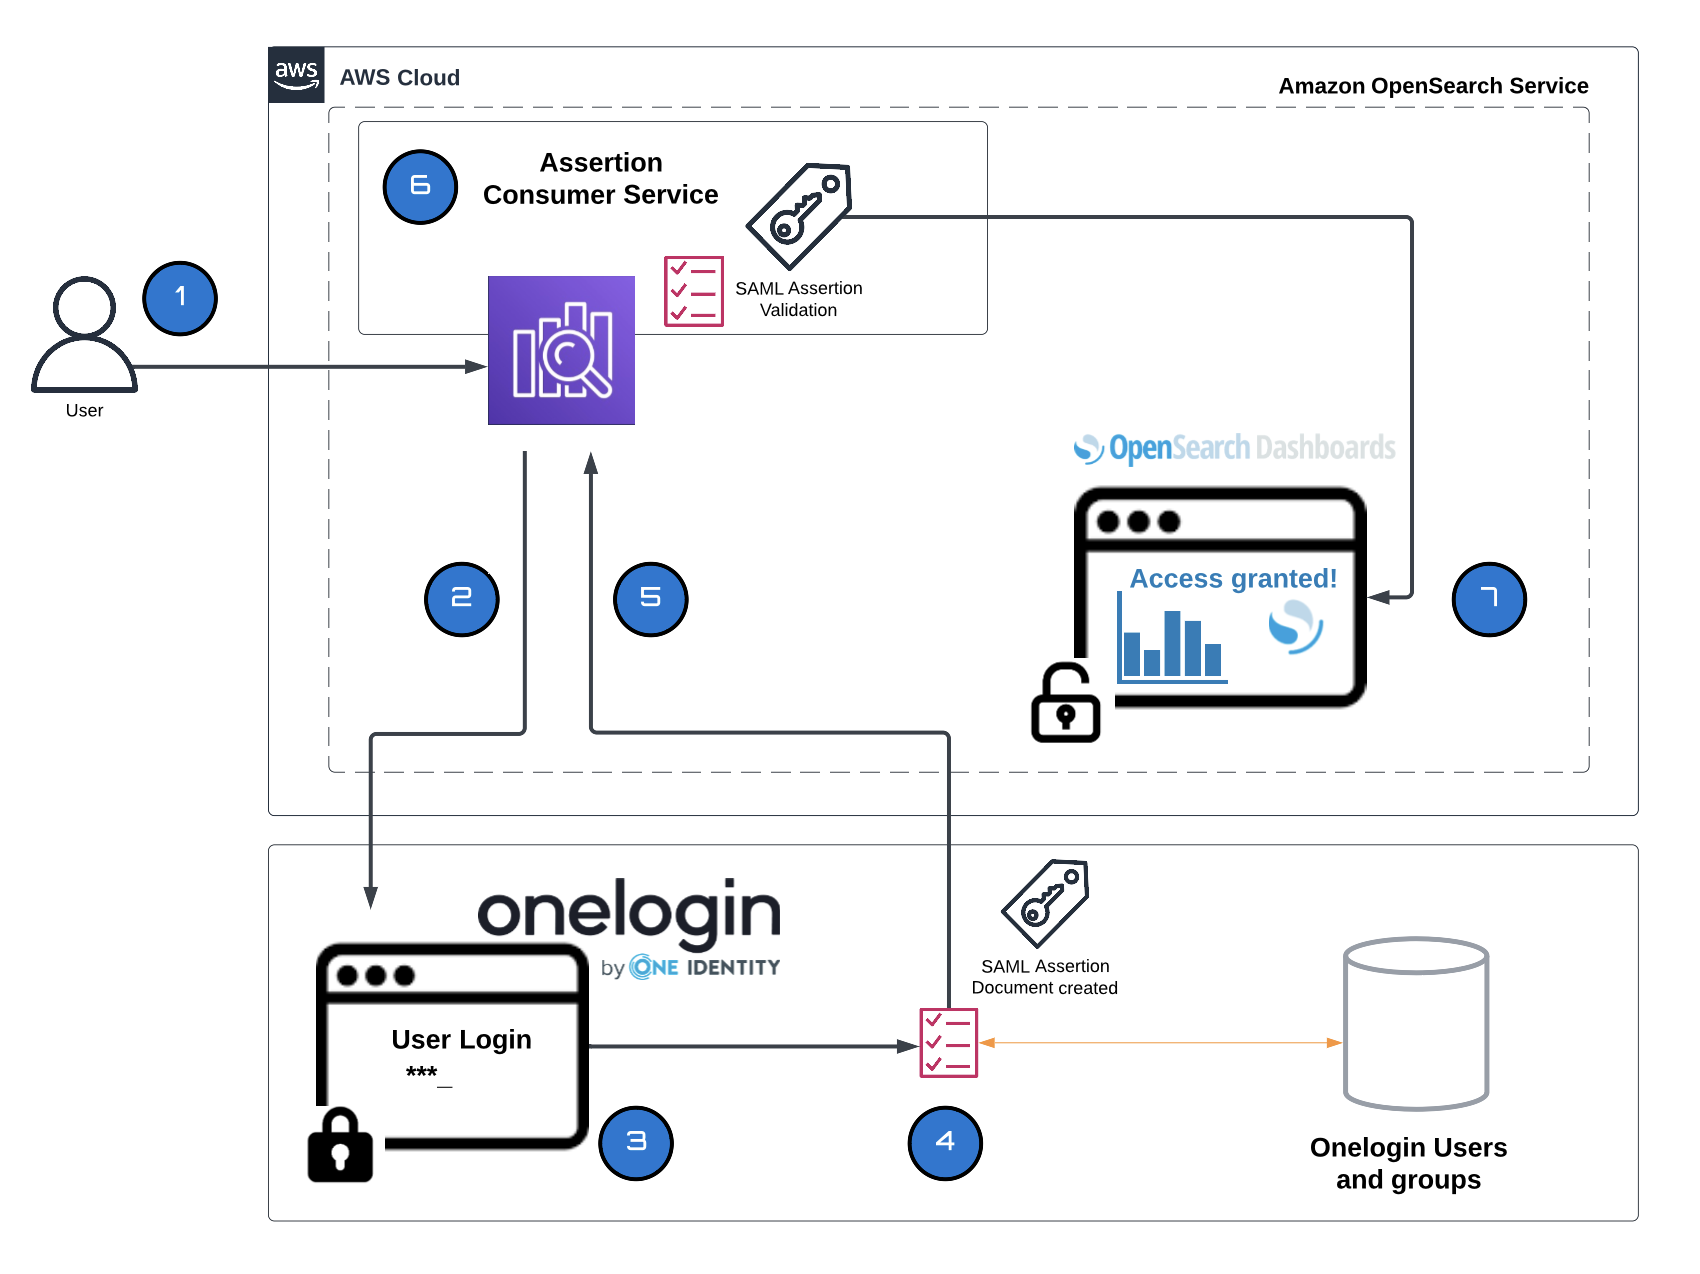
- Access OpenSearch Dashboards: The user visits the OpenSearch Dashboards (SP) and requests access.
- Redirect to OneLogin: If the user is not authenticated, OpenSearch Dashboards (SP) redirects them to the OneLogin (idP) SSO login page.
- User Authentication: The user enters their OneLogin credentials on the SSO login page.
- SAML Assertion: The OneLogin (IdP) verifies the user’s credentials and creates a SAML Assertion, which is a secure message that confirms the user’s identity.
- Send SAML Assertion: OneLogin sends the SAML assertion to the OpenSearch Dashboards SP using an HTTP POST request.
- SP Validation: The OpenSearch Dashboards ACS validates the SAML assertion, ensuring its authenticity and integrity.
- Grant Access: OpenSearch Dashboards grants the user access based on the information and access rights specified in the assertion.
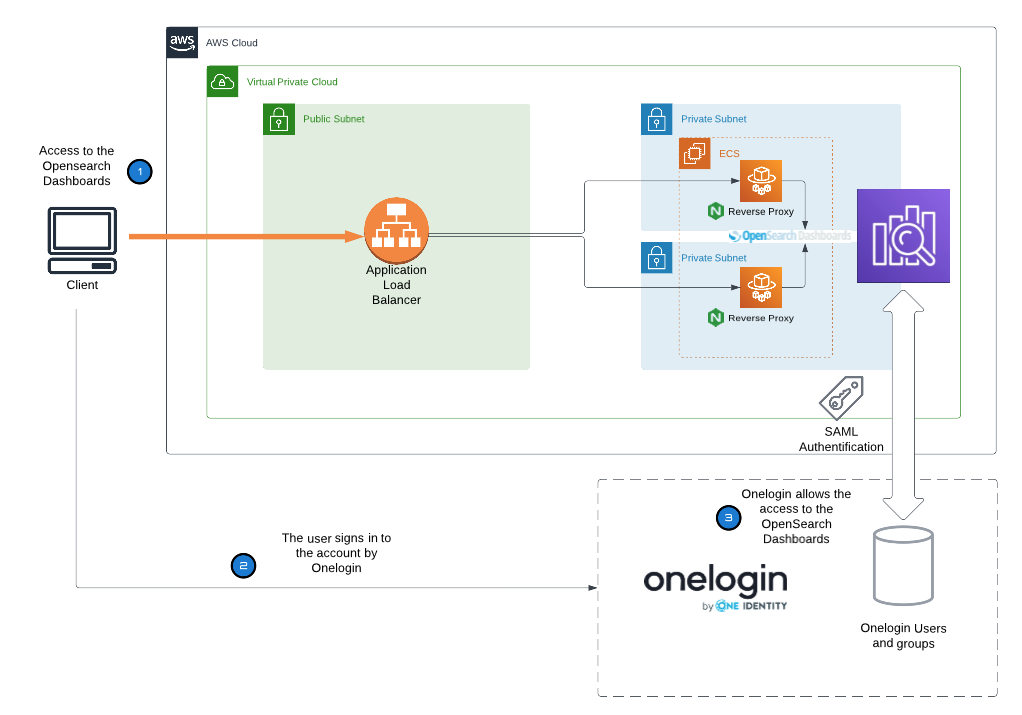
Remember that if your OpenSearch domain is hosted within a private VPC, you can still use SAML authentication. This is because SAML does not require direct communication between identity providers and service providers. Instead, your browser can act as an intermediary.
Identity Provider (IdP)-initiated and Service Provider (SP)-initiated Authentication
Identity Provider (IdP)-initiated and Service Provider (SP)-initiated Authentication are two different SAML authentication flows:
- IdP-initiated Authentication: In this flow, the user first logs in to the Identity Provider (IdP) directly, without visiting the Service Provider (SP) first. After successful authentication, the IdP sends a SAML Assertion to the SP, granting the user access to the requested service. This flow is initiated by the IdP (OneLogin).
- SP-initiated Authentication: In this flow, the user first visits the Service Provider (SP) and requests access to a specific service. The SP then redirects the user to the Identity Provider (IdP) for authentication. Once the user is authenticated, the IdP sends a SAML Assertion to the SP, granting the user access. This flow is initiated by the SP (Service Provider).
Amazon OpenSearch Service supports both flows, but on OneLogin page you need to choose which one to use. In our scenario, OneLogin serves as the IdP, while Amazon OpenSearch Dashboards acts as the SP. Our focus in this post is on the SP-initiated method, but we will briefly mention enabling the IdP-initiated option.
Prerequisites
- An OneLogin account with admin rights.
- An AWS account with admin rights for Amazon OpenSearch Service.
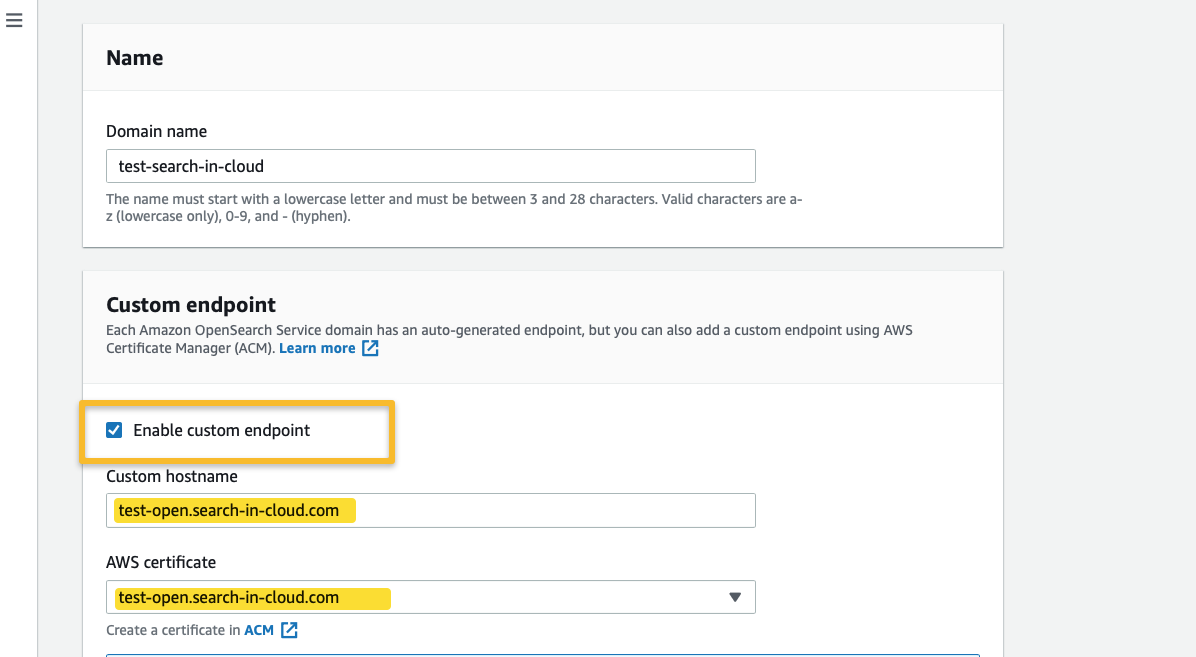
- A registered domain name to use with the Amazon OpenSearch domain. For this post we assume that the domain is registered using Amazon Route 53
- Access to the Amazon Route 53 hosted zone for the domain from the AWS account. The custom endpoint used in this tutorial is https://test-open.search-in-cloud.com. This should be replaced with the appropriate endpoint if you follow this post.
Set up of the OneLogin
First, you will set up an AWS Single Sign-On Application in OneLogin, configure it, save the SAML metadata file, and configure users and roles. The steps that you need to follow are detailed next:
-
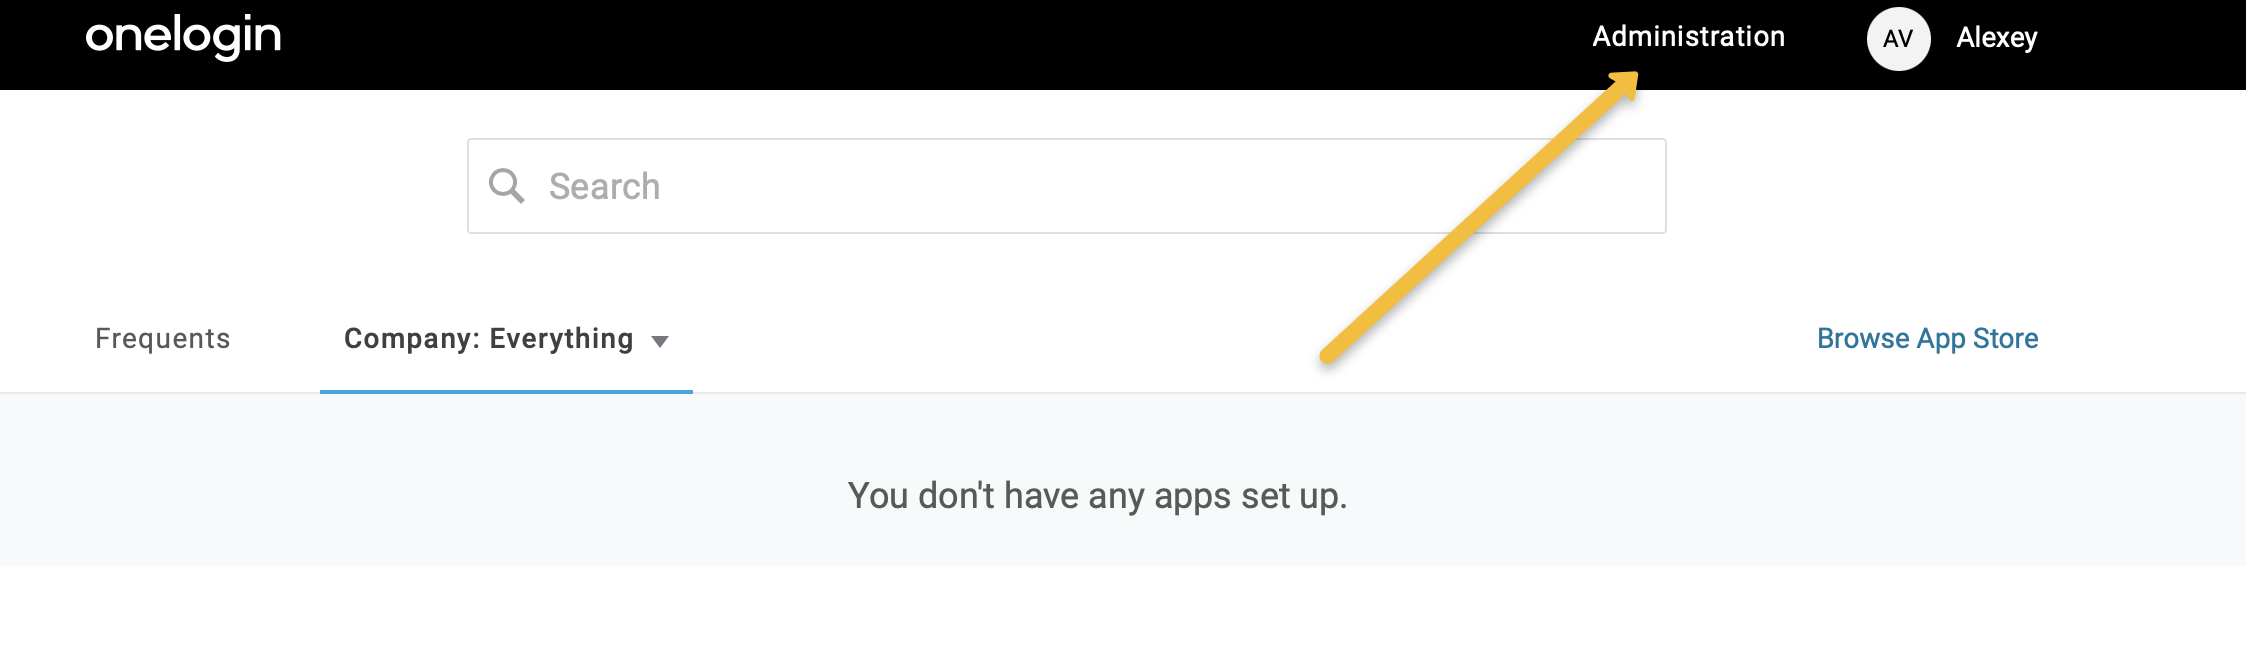
Login to your OneLogin account and navigate to the Administration section
-
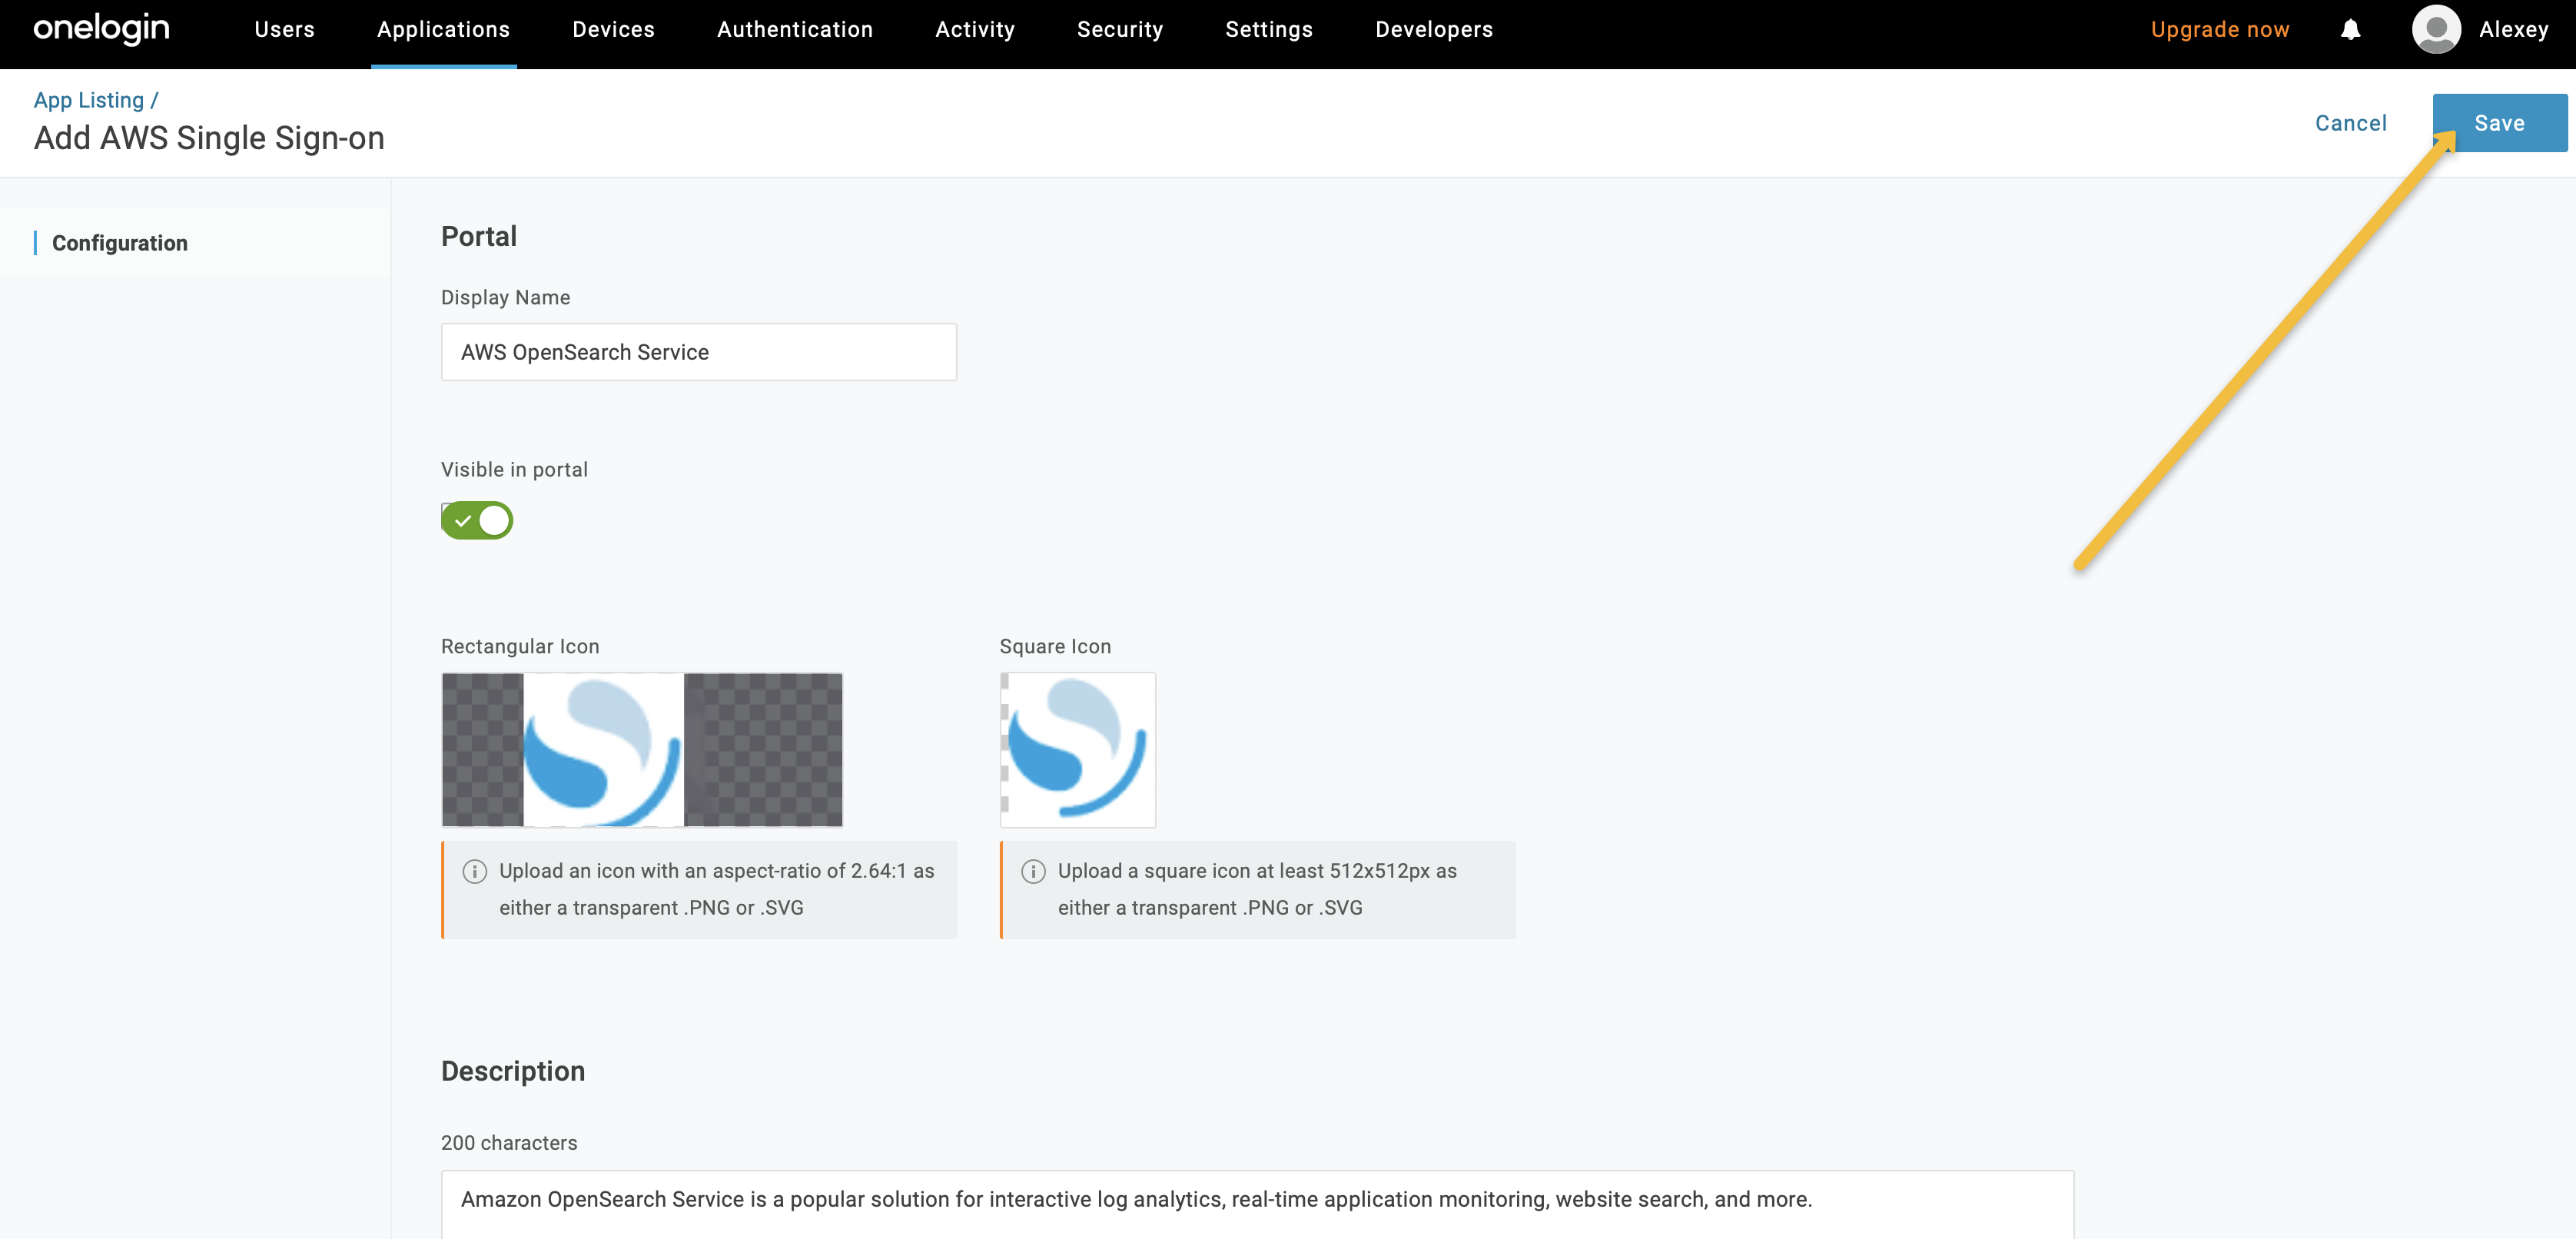
In the Applications page, search for “AWS Single Sign-on” and create a new OneLogin application of this kind. This application will be used for authentication to Amazon OpenSearch Service.

-
Configure the application by adding a Display Name, icons, description, and visibility settings, and then save it.
-
After saving the application, open the Configuration section and add the AWS SSO Issuer URL and AWS SSO ACS URL for the application.
AWS SSO Issuer URL: https://EXAMPLE.COM
AWS SSO ACS URL: https://EXAMPLE.COM/_dashboards/_opendistro/_security/saml/acs
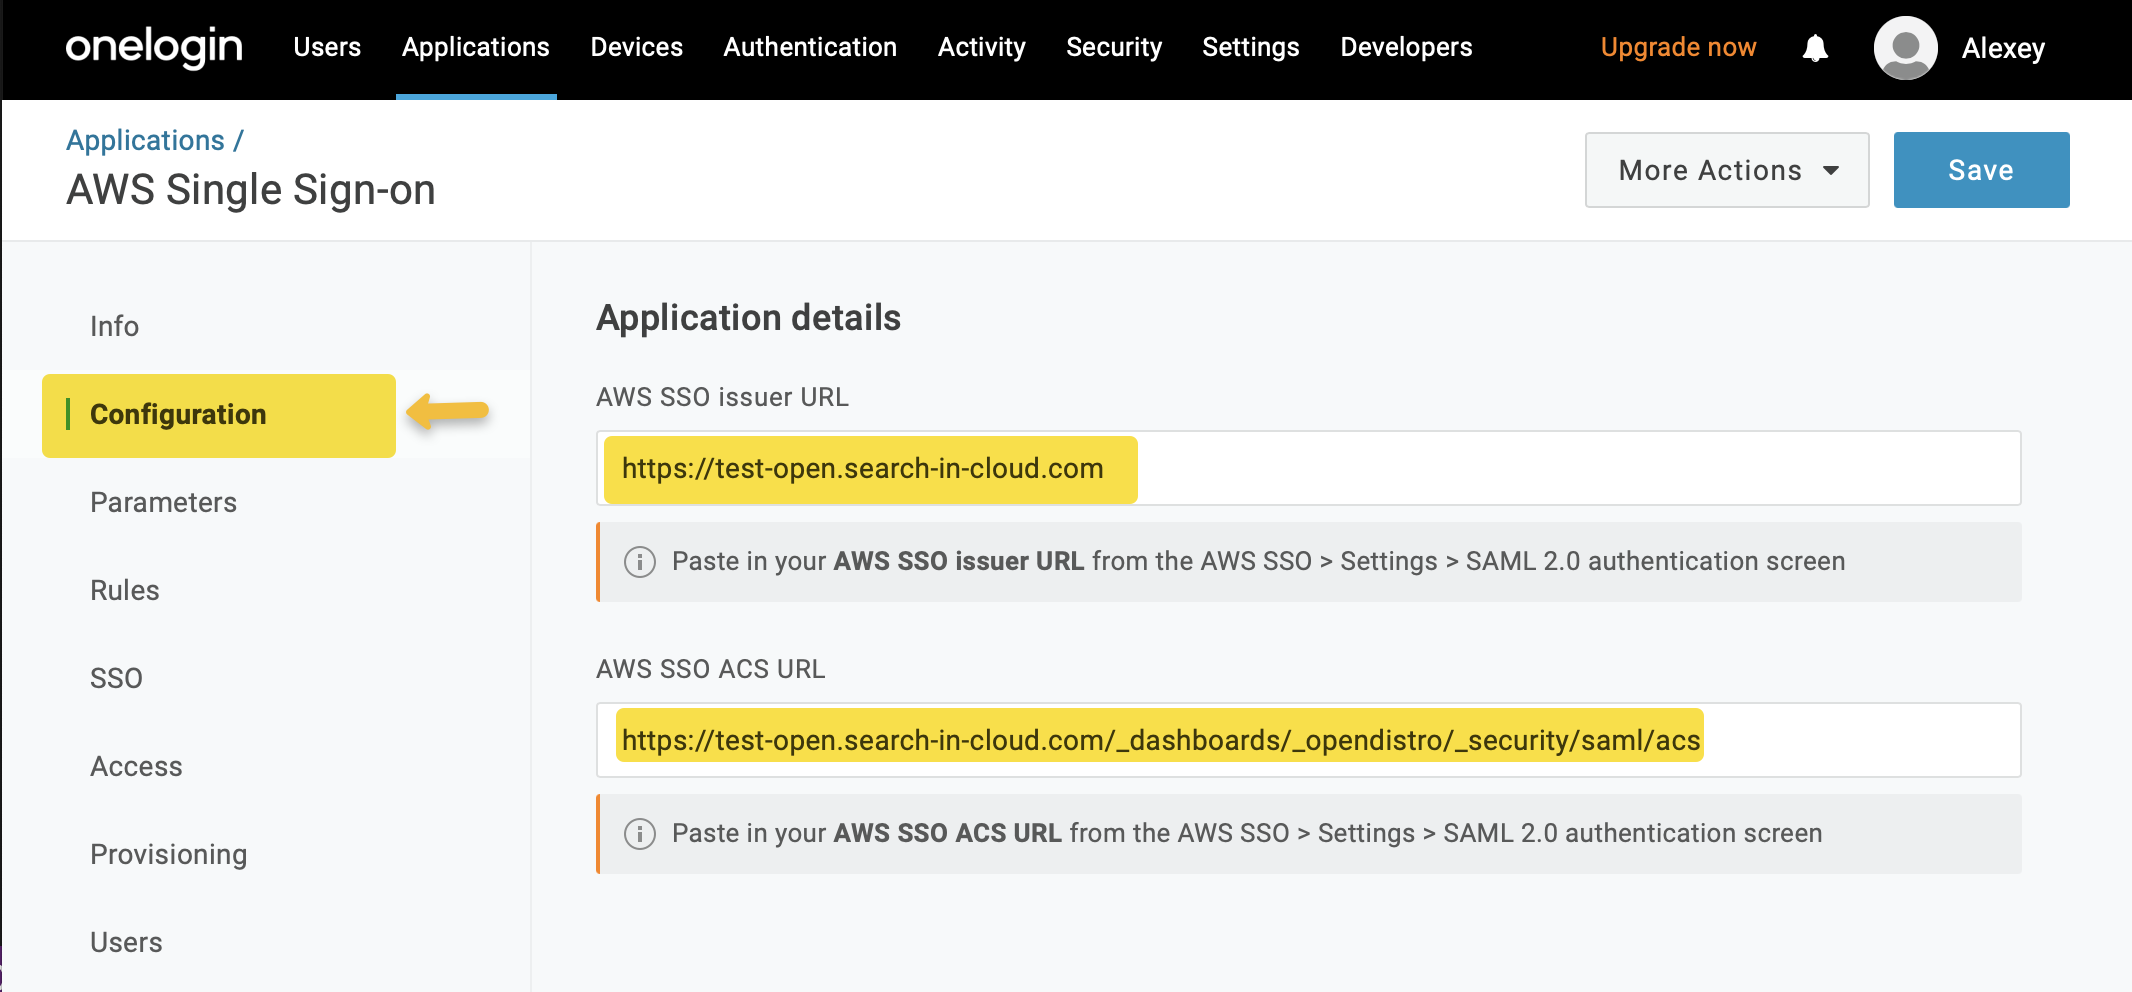
IdP-initiated Authentification Notice: The only change needed is to use the following link for AWS SSO ACS URL: https://EXAMPLE.COM/dashboards/opendistro/_security/saml/acs/idpinitiated
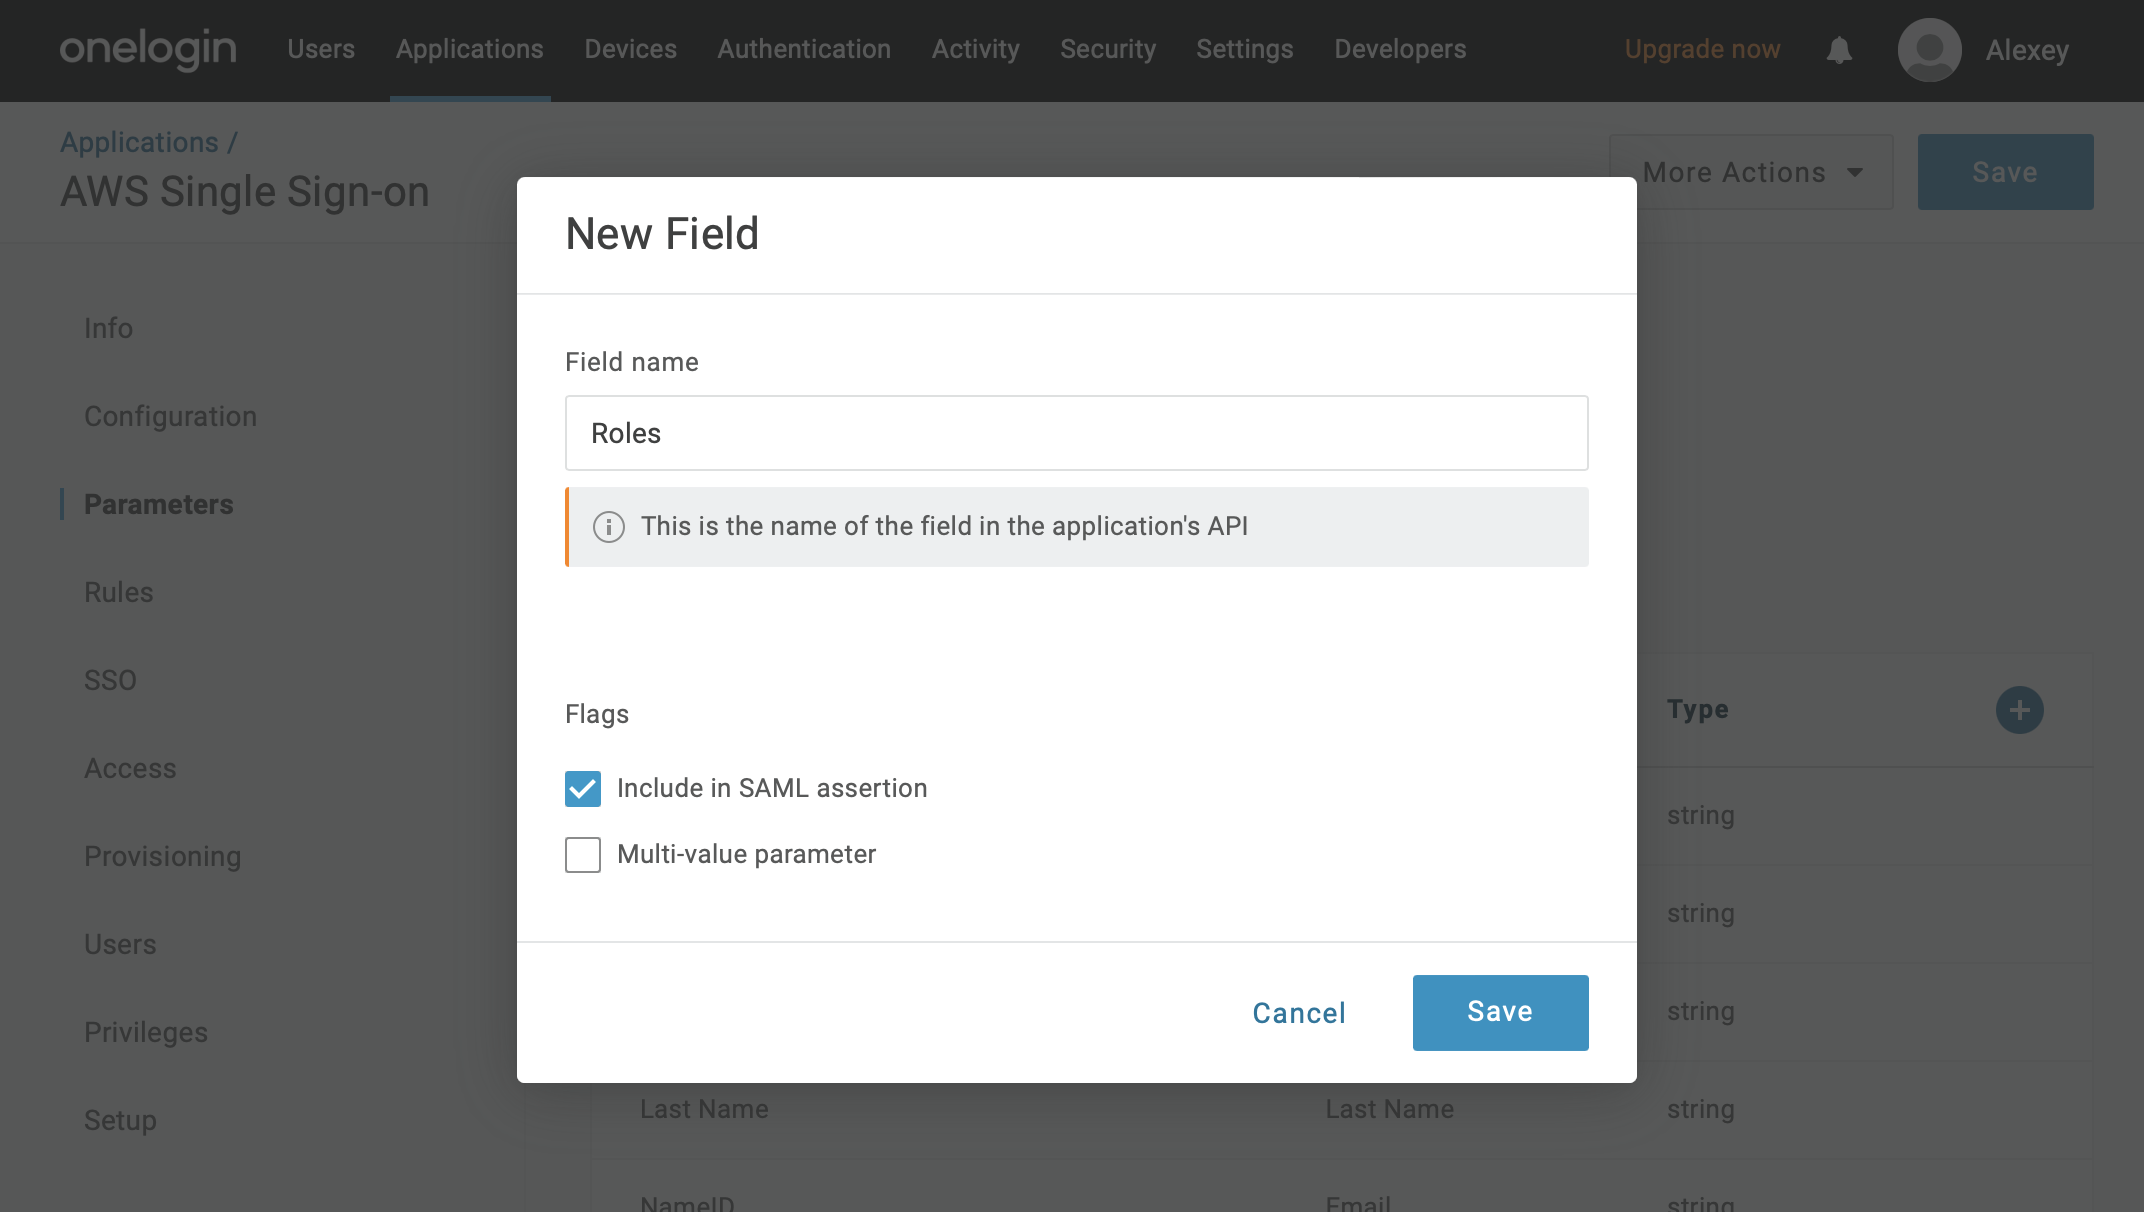
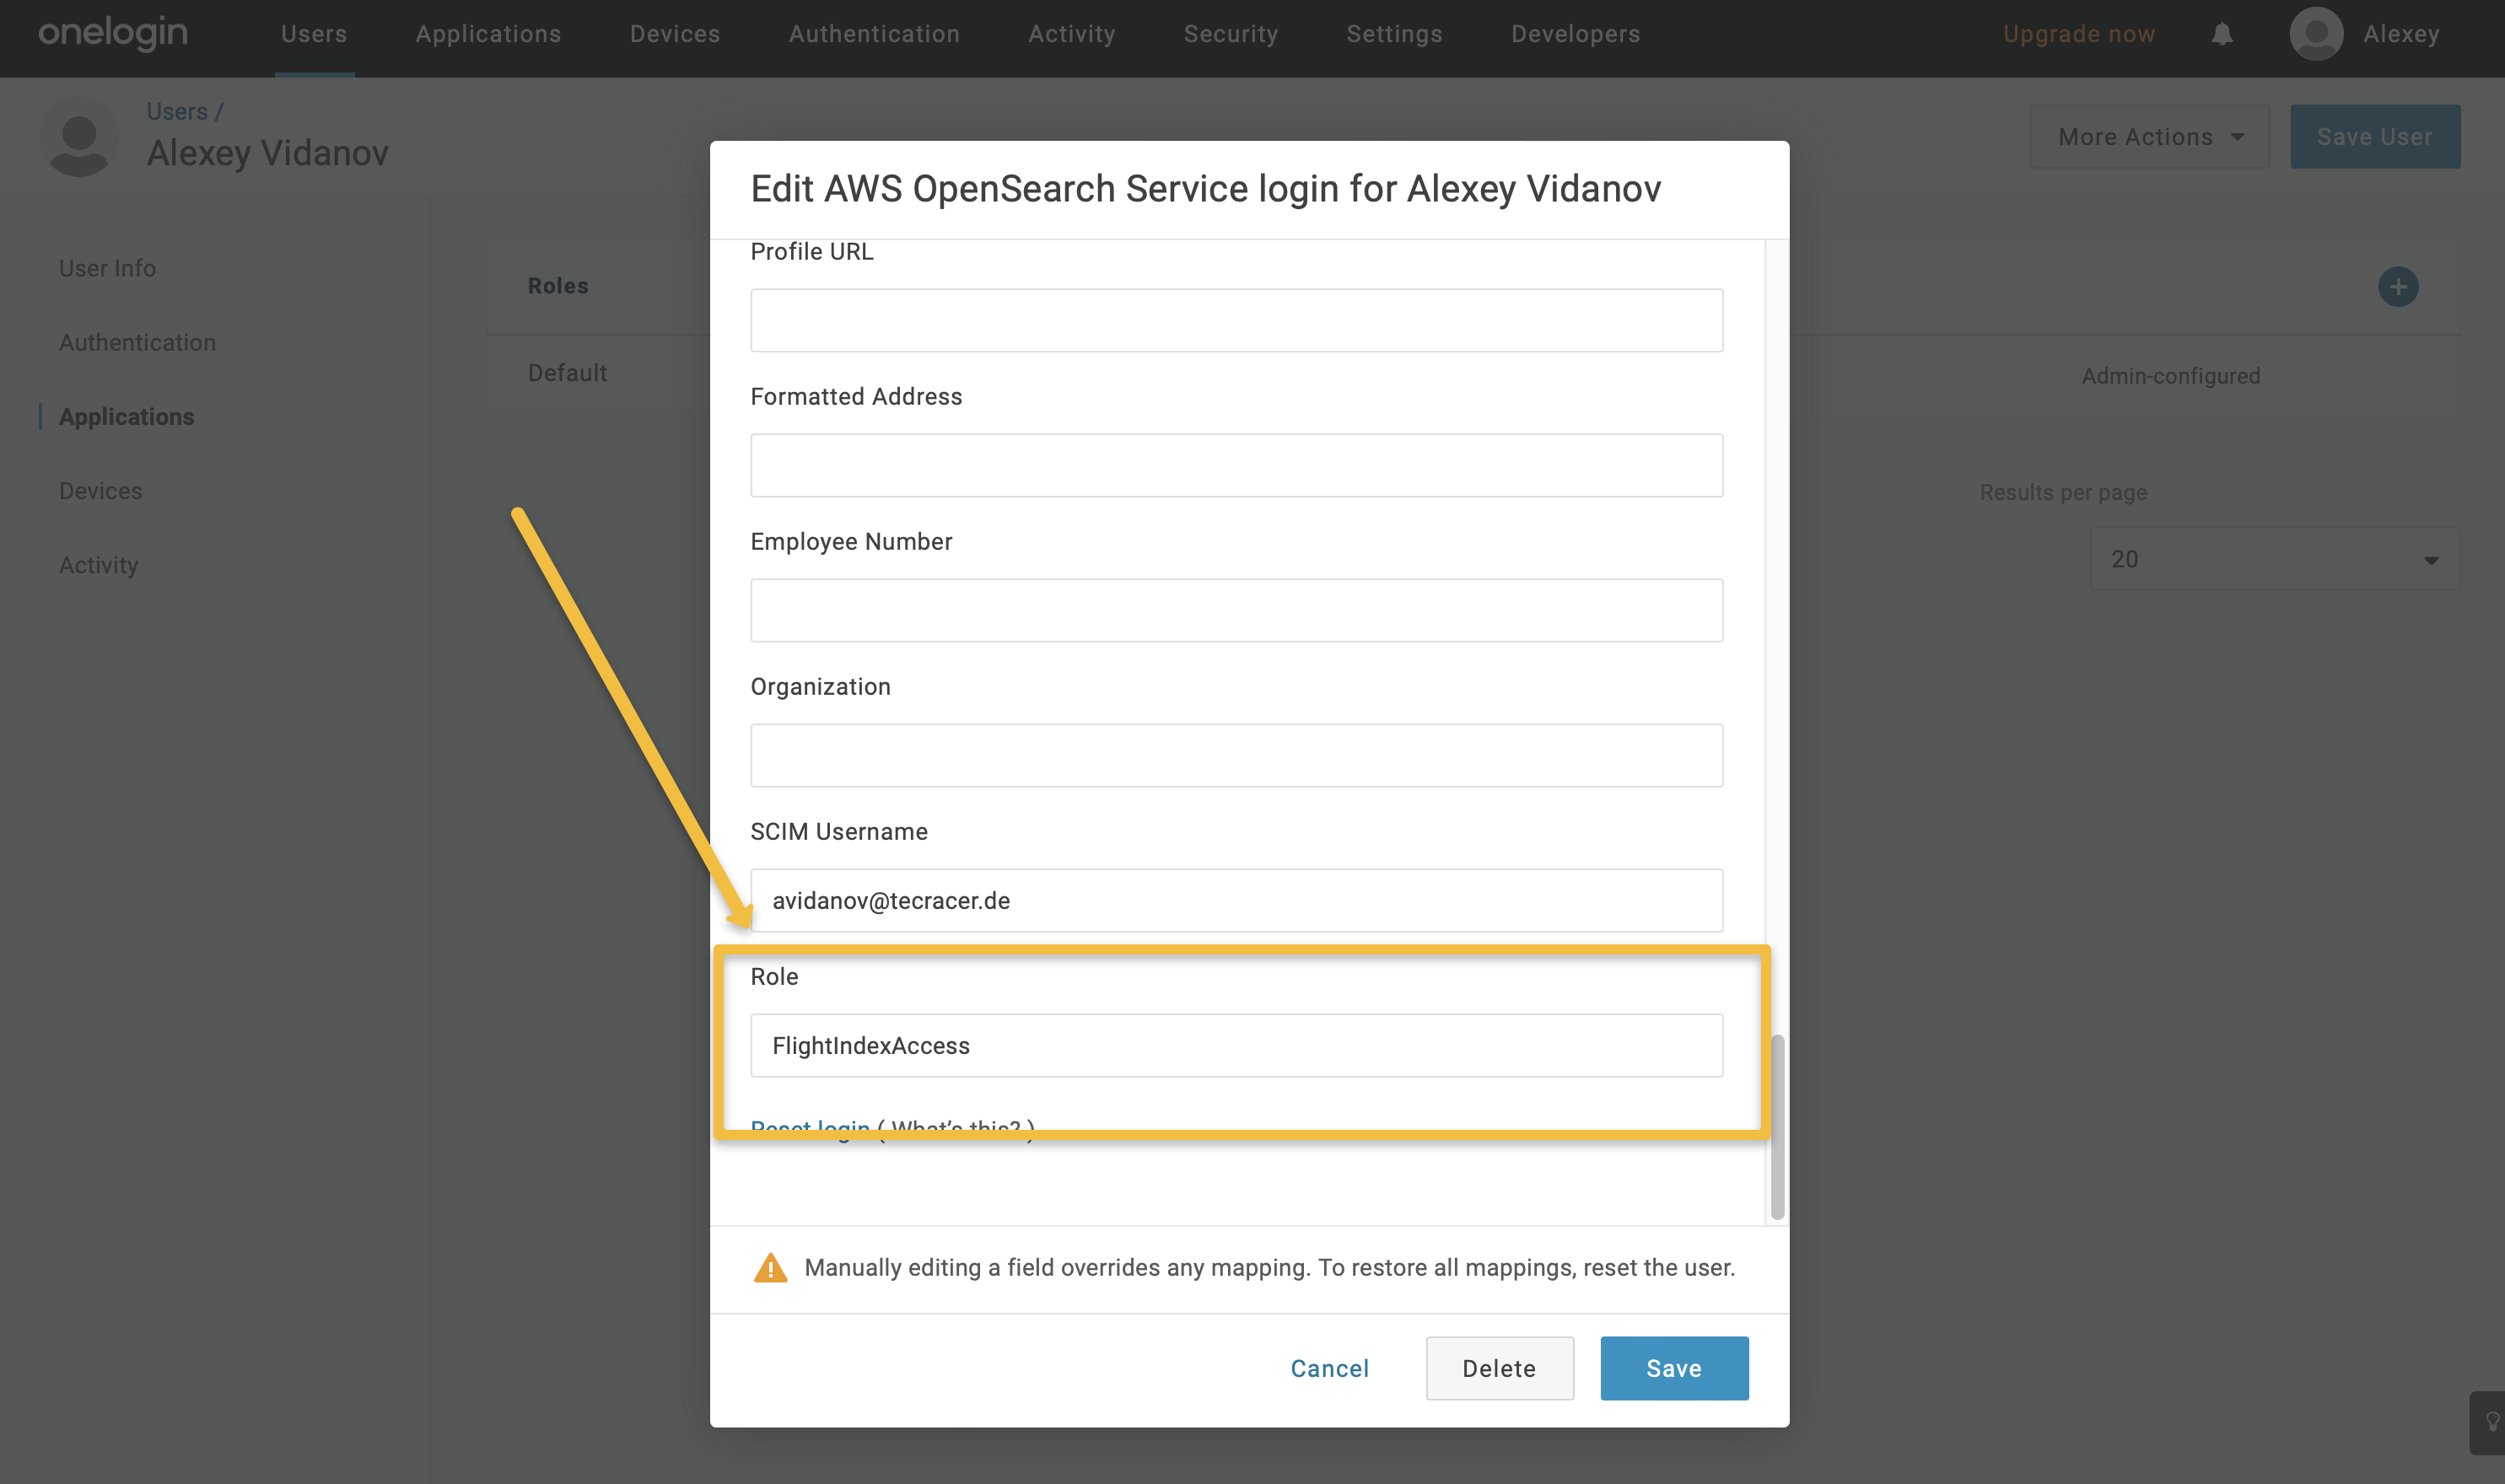
Then, create a new parameter called “Roles” using the “+” button in the Parameters section. This parameter should be included in the SAML assertion and mapped to field that will be used as the backend role. Note that “Roles” will be entered in the OpenSearch Service later and mapped to roles in the OpenSearch Dashboards during login.
You can use any field for the role definition. The field should contain a unique value. We use the Role field for the presentation.
-
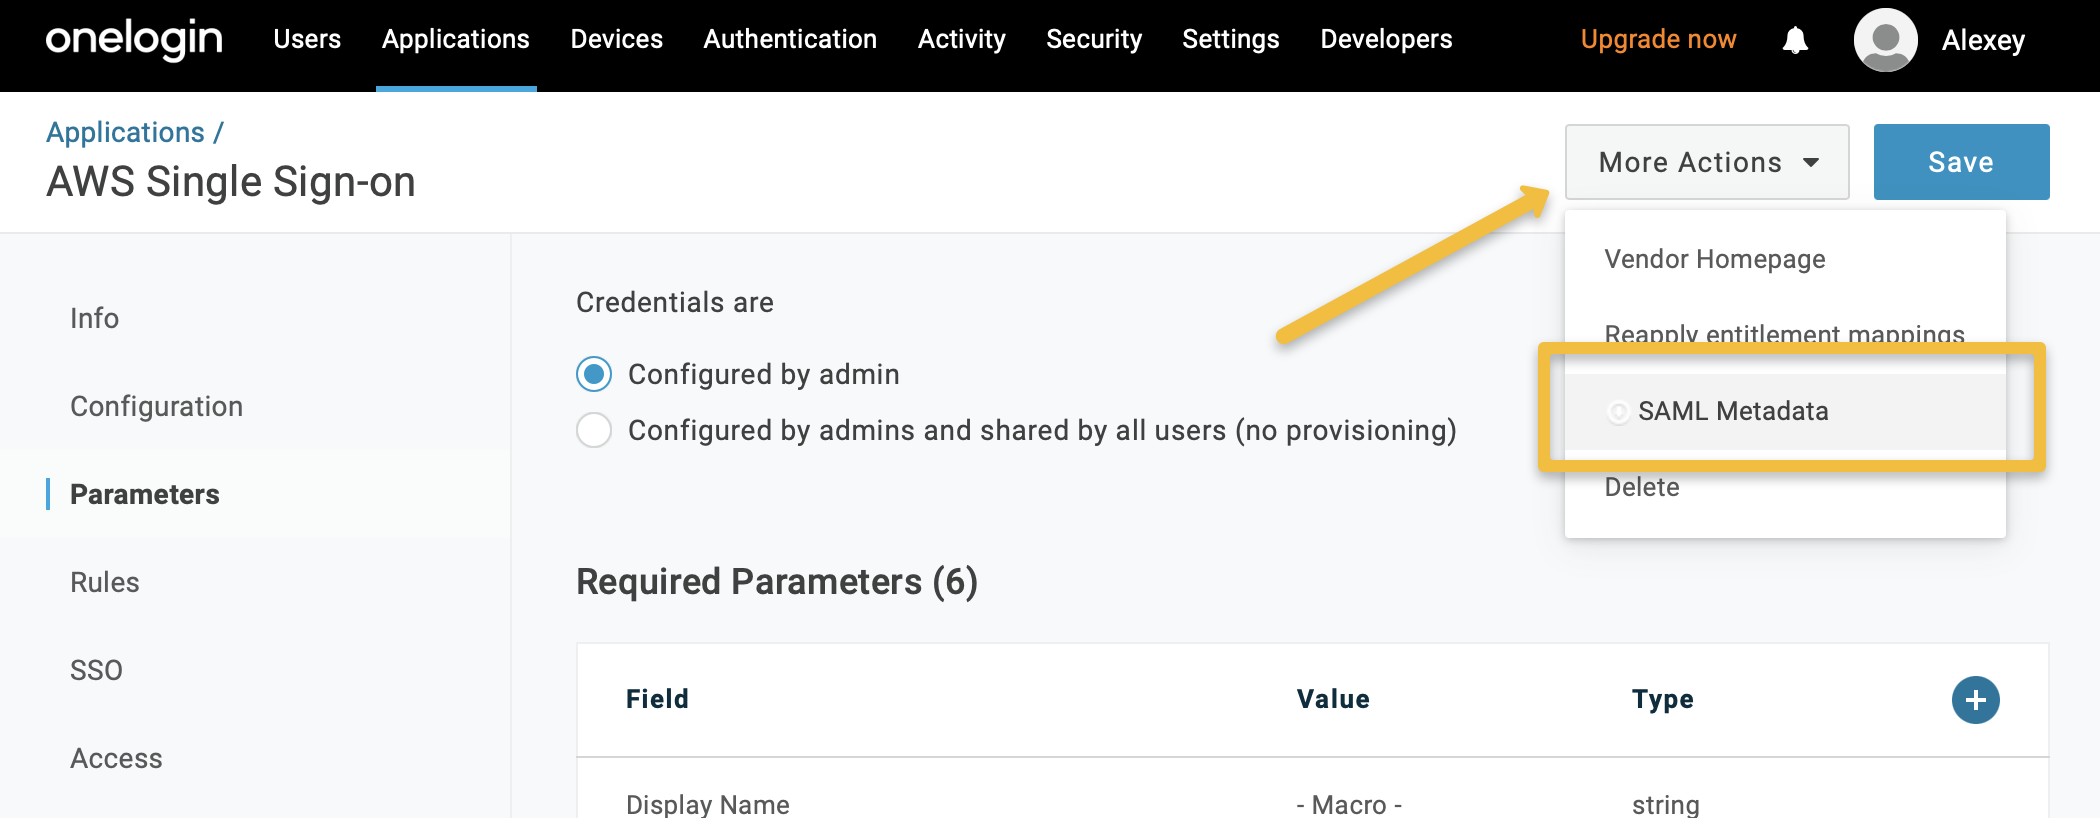
Save the SAML Metadata file, which contains the necessary information for the further configuration. The contents of this file must be entered in the OpenSearch Service SAML settings.
-
Assign users to the application you created.
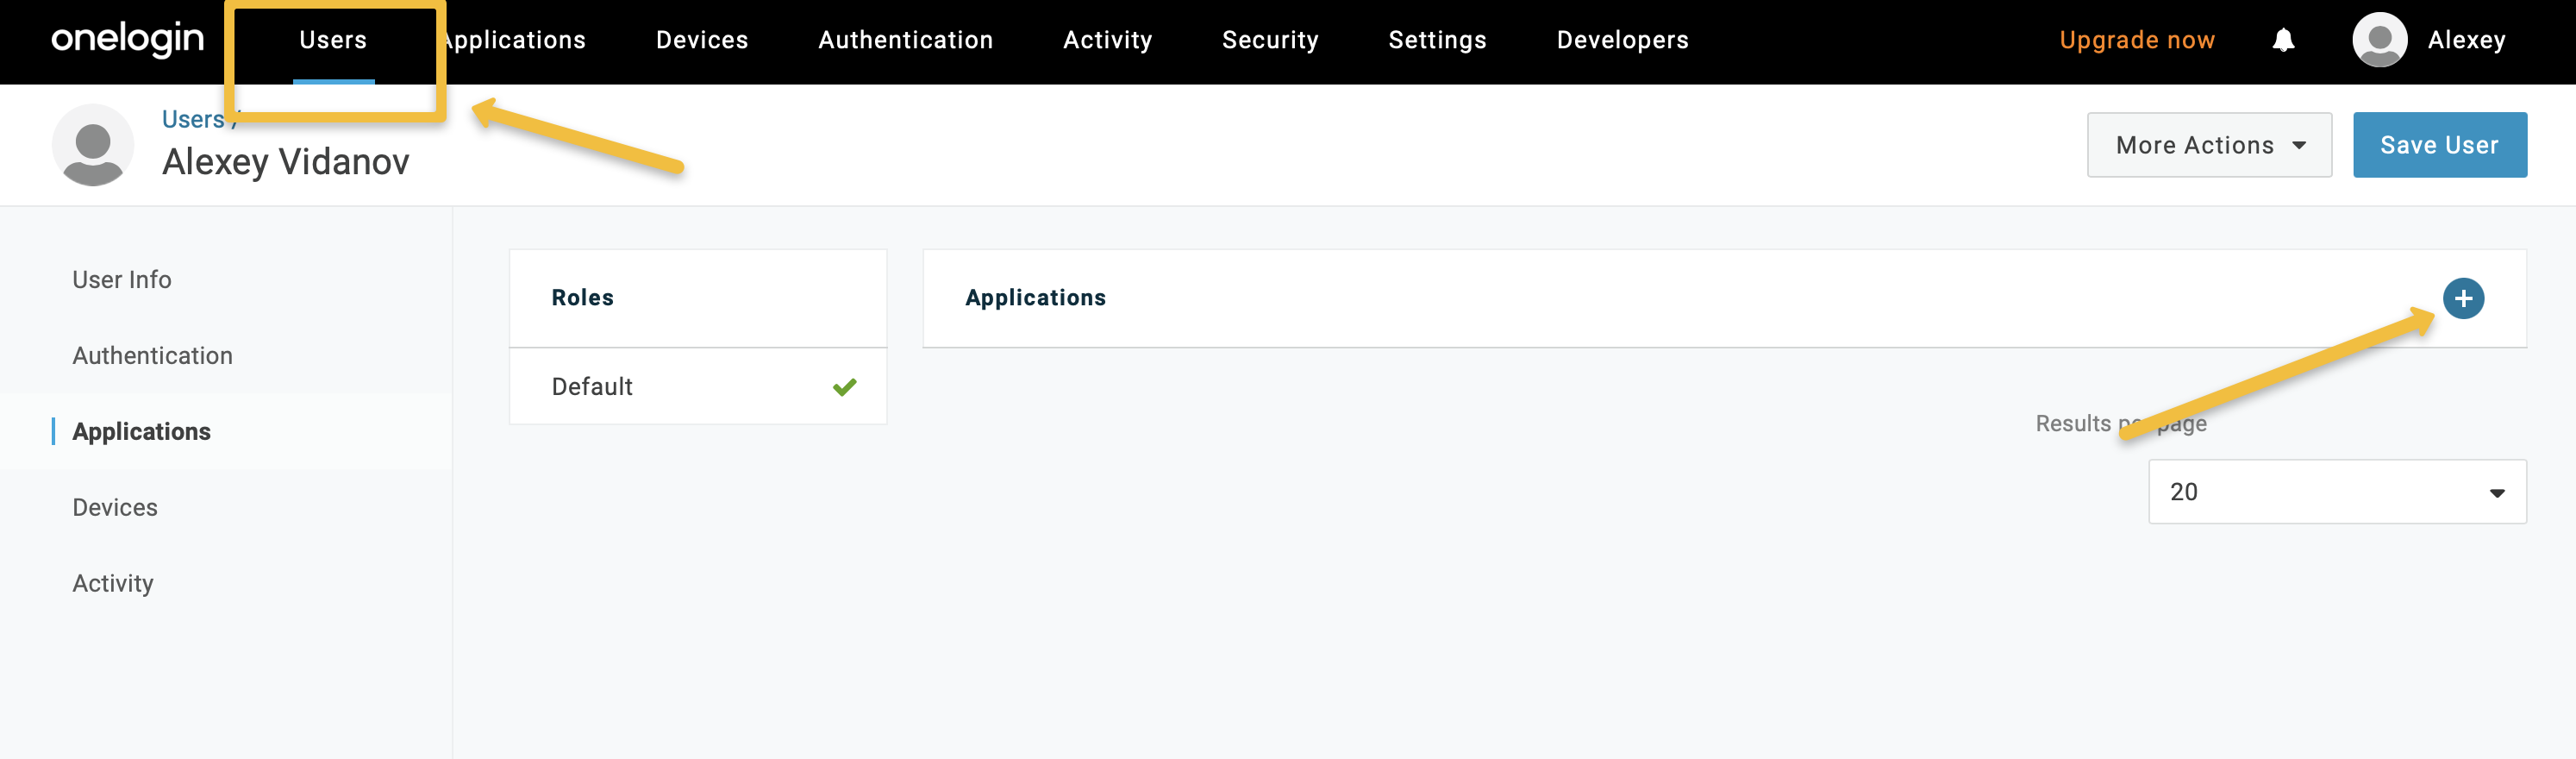
You can define the role of the user by adding a value to the “Role” field. The value here you can map to the specific role in the OpenSearch Dashboards. For the admin access you can use something like “all_access” and then input this value in the SAML configuration of the OpenSearch Dashboards. I recommend to use two different users in OneLogin. One with Admin rights for the Dashboard and one to test the access rights to the specific index/tenant.
Setup OpenSearch Service Domain for SAML authentification
In this part of the guide, you will set up the custom endpoint for your domain in the OpenSearch Service, enable fine-grained access control, and set up SAML authentication.
- Enable the custom endpoint for your domain in OpenSearch Service by using the edit configuration button on your existing OpenSearch Domain or by entering the necessary information when creating a new OpenSearch Service Domain.
-
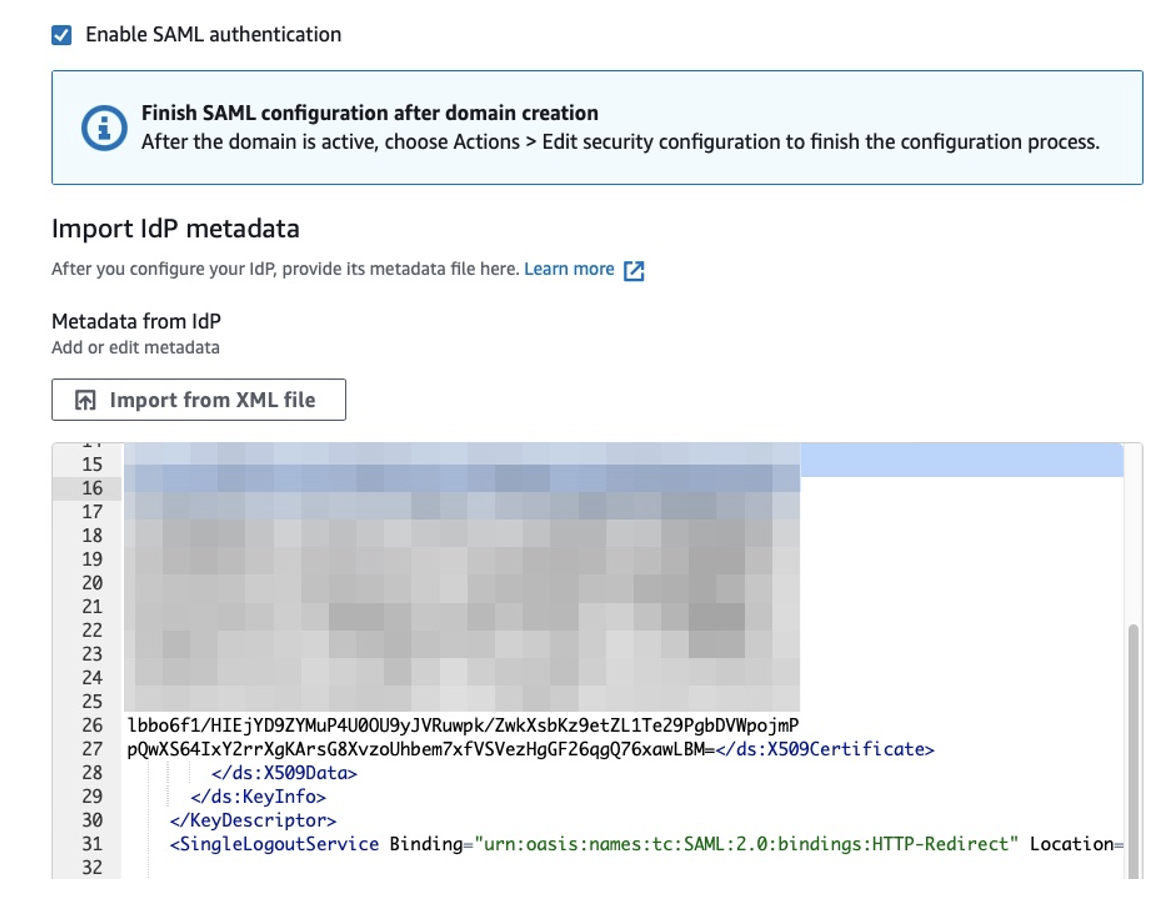
In the Amazon OpenSearch Service console on the AWS page, enable “Fine Grained Access Control” in the security configuration and activate SAML authentication.
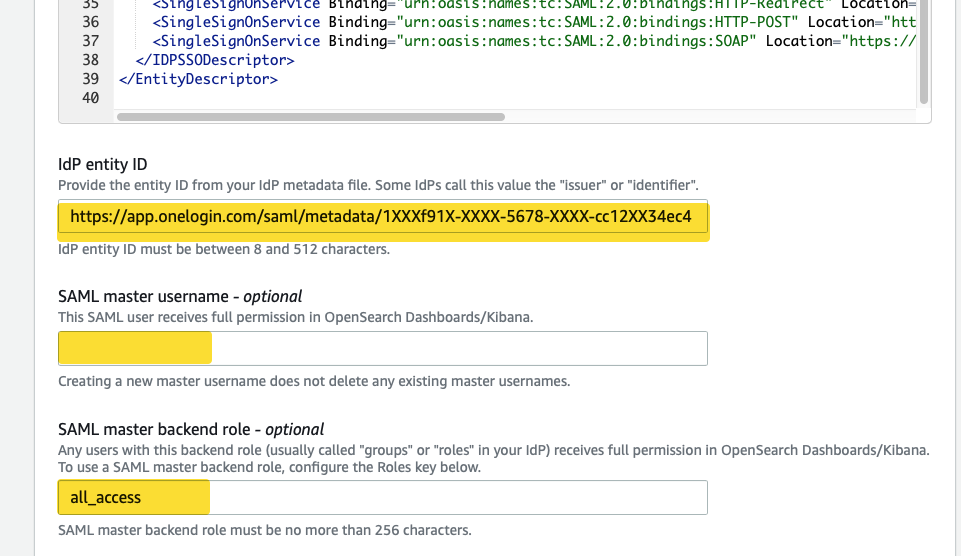
To configure SAML settings, copy and paste the contents of the SAML metadata file (see step 5 in the OneLogin setup instructions above) in the security configuration for SAML.
-
Enter your username from OneLogin in the SAML primary username field or use the admin role value “all_access” you input in the Role field in the OneLogin. The fiedl idP entity ID will be filled out automatically using the information from the SAML metadata file.
-
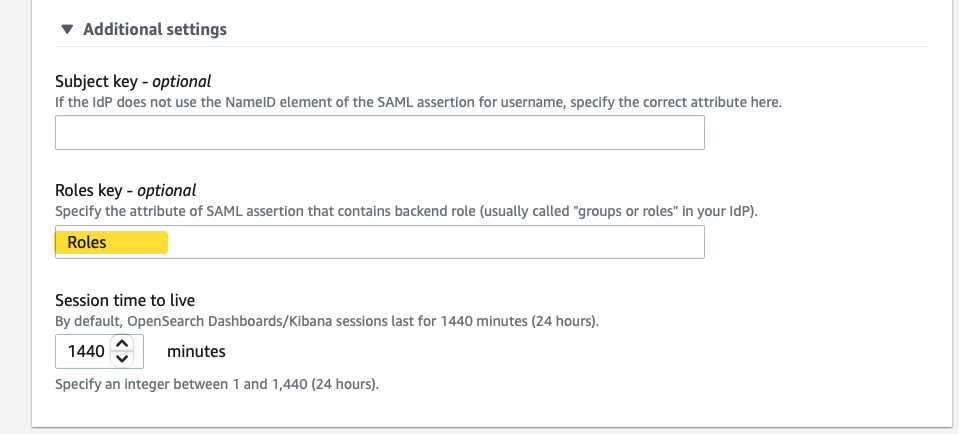
Expand the Additional settings and enter “Roles” in the Role key:
-
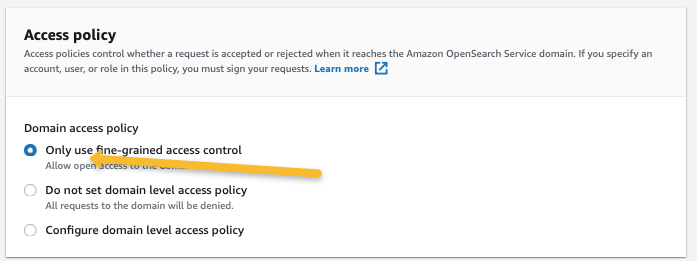
For the Access Policy use “Only use fine-grained access control”
-
To map your custom domain to the Amazon OpenSearch Service Domain, you need to create a CNAME record in an Amazon Route 53 Hosted Zone that points to the autogenerated Domain endpoint of the Amazon OpenSearch Service Domain. This will allow you to access your OpenSearch Service using your custom domain name.
Set up the OpenSearch Dashboards
In this part of the guide, you access the OpenSearch Dashboards using OneLogin SAML and set up the roles mapping:
-
Now it is possible to test the SAML federation by logging in to the Amazon OpenSearch cluster with the OneLogin account https://test-open.search-in-cloud.com/_dashboards
-
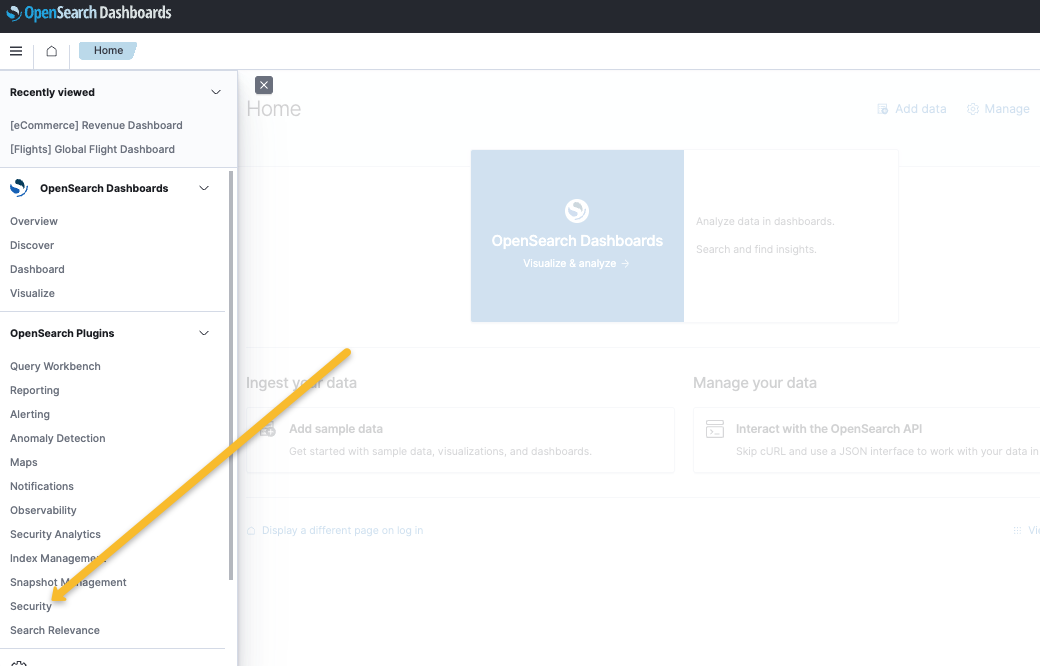
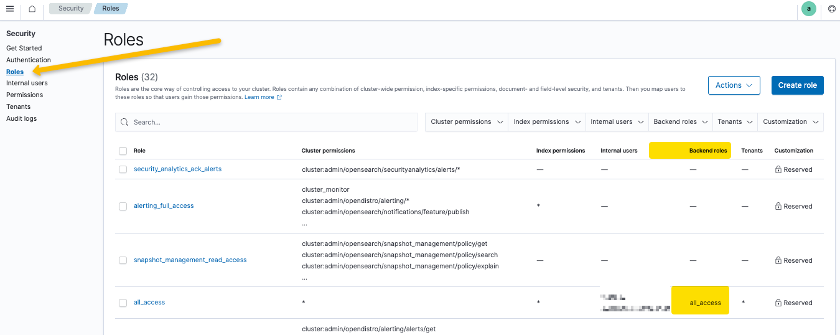
With the help of the Security plugin in the OpenSearch Dashboards, you can configure additional role mapping. Open the security plugin to map the backend roles. The backend role value comes from OneLogin from the ‘Roles’ field that you previously defined and mapped in the OneLogin dashboard.
-
Map the backend roles. The backend role value comes from OneLogin from the ‘Roles’ field that you previously defined and mapped in the OneLogin dashboard.
-
You can use the Developer Tools for the setup too. Check the Step 7: Map SAML users to roles on the AWS documentation[1].
[1] https://docs.aws.amazon.com/opensearch-service/latest/developerguide/saml.html
For SAML troubleshooting, we used the Chrome extension ‘SAML Tracer’. An alternative is the built-in browser development tools. (see How to view a SAML response in your browser for troubleshooting - AWS Identity and Access Management)

Final thoughts
Congratulations! You have successfully integrated OneLogin with Amazon OpenSearch Service, enabling SSO for your OpenSearch Dashboards. With this integration, your users can now easily access their dashboards with a single set of credentials, improving their productivity and overall user experience. You can also extend this integration to other AWS services and applications to create a unified SSO experience across your entire organization. We hope this guide has been helpful, and feel free to reach out to us if you have any further questions or feedback.
In real-life projects, implementing SAML federation for Amazon OpenSearch Service with OneLogin can be automated using Infrastructure as Code (IaC) tools like Terraform, AWS CloudFormation, and AWS CDK. These tools can help you automate the creation, configuration, and updates of your OpenSearch Service resources, reducing human errors, accelerating and simplifying your deployment process.
Implementing Single Sign-On (SSO) is an essential step, but it is also crucial to consider several best practices to ensure a secure, efficient, and cost-effective Amazon OpenSearch Service domain setup. Key areas of focus include security, high availability, performance monitoring, and cost optimization. Remember that you can contact tecRacer to help on all these areas.
Our team of experts can help you design, deploy, and manage your OpenSearch Service infrastructure, ensuring high availability, security, and scalability.
Contact us today to schedule a consultation and take the first step towards a successful and efficient Amazon OpenSearch Service deployment tailored to your organization’s needs.
– Alexey