Cross Account Kafka Streaming: Part 2
When discussing high performant real-time event streaming, Apache Kafka is a tool that immediately comes to mind. Optimized for ingesting and transforming real-time streaming data in a reliable and scalable manner, a great number of companies today rely on Apache Kafka to power their mission-critical applications and data analytics pipelines.
In this blog series, I would like to show you how you can leverage Amazon MSK and Terraform to set up a fully managed, cross-account Apache Kafka streaming pipeline on AWS. In the first part, we already set up the MSK Kafka cluster and producers. The second part will show you how you can set up distributed Kafka clients in different AWS accounts and communicate with the MSK cluster via AWS VPC Endpoints.
Introduction
This is the second post of a two-post series.
In the first post Cross Account Kafka Streaming Part 1, we set up a fully managed Kafka cluster on AWS using Amazon MSK and Terraform.
In the second post, we will expand the setup by adding a Kafka consumer in different VPCs and AWS accounts and connecting to the cluster via VPC Endpoints.
Please be aware that this blog post won’t go into much detail regarding Kafka functionality and configuration itself. To fully grasp this post it is recommended to have a basic understanding of Apache Kafka. For more detailed information regarding Kafka itself, please visit the official Kafka website.
Architecture Review
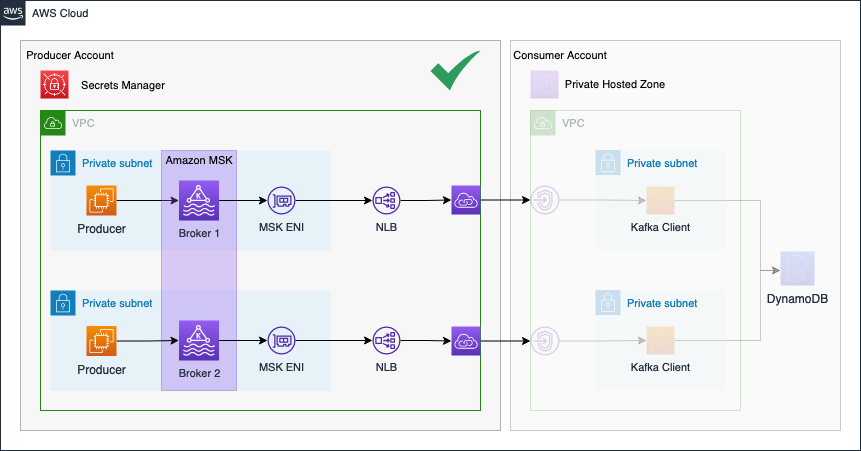
Before we start the second part of this series, I would like to revisit part one and take a look at what we already build. The diagram below shows the components that were already deployed in part one.
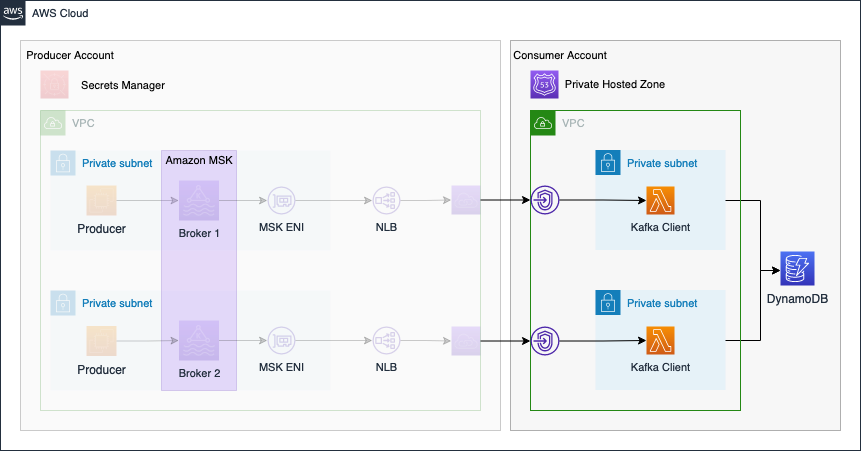
In the second part of the series, we will continue the Kafka setup by implementing the Consumer Account.
The connectivity pattern used for this example was highly inspired by the official AWS Big Data Blog Post Secure connectivity patterns to access Amazon MSK across AWS Regions. Please visit the original post to get a better understanding of the pattern employed and possible alternatives.
Project Structure
Before we start setting up our Terraform configuration, I would like you to create the project structure. Notice that we will focus on setting up the MSK Kafka cluster and Kafka producers. Please create the following files.
├── consumer
  ├── src
  │   ├── index.py
  ├── dynamodb.tf
  ├── endpoints.tf
  ├── lambda.tf
  ├── route53.tf
  ├── locals.tf
  ├── data.tf
  ├── terraform.tfvars
  ├── variables.tf
  └── vpc.tf
As this example will be quite extensive, we will split up our Terraform configuration into separate files. The name of each file corresponds to the AWS service which configuration is contained within.
Network Deployment
We will start by deploying the network infrastructure. The VPC and all included components will be the basis for the Kafka clients and VPC Endpoints. The Terraform configuration for the vpc.tf can be found here.
Before we are able to deploy our network, we have to define a few variables for our vpc and subnets. Please copy the following snippet into the variables.tf. Besides the variables for the VPC and subnet cidr blocks, we already included a variable for the application_name. It will be used later when setting up the Kafka Clients.
variable "vpc_cidr_block" {
  description = "CIDR of vpc"
  type        = string
}

variable "public_subnets" {
  description = "Map of public subnets that should be created"
  type = map(object({
    cidr_block        = string
    availability_zone = string
  }))
}

variable "private_subnets" {
  description = "Map of private subnets that should be created"
  type = map(object({
    cidr_block        = string
    availability_zone = string
  }))
}

variable "application_name" {
  description = "Name of the application"
  type        = string
}
To manage the values of our defined variables, we will create a terraform.tfvars file. This will help us to keep our Terraform configuration clean and readable. Please define the following values for our variables in the terraform.tfvars file.
vpc_cidr_block = "10.0.0.0/16"

public_subnets = {
  subnet_1 = {
    cidr_block        = "10.0.0.0/24"
    availability_zone = "eu-central-1a"
  }
  subnet_2 = {
    cidr_block        = "10.0.1.0/24"
    availability_zone = "eu-central-1b"
  }
}

private_subnets = {
  subnet_1 = {
    cidr_block        = "10.0.2.0/24"
    availability_zone = "eu-central-1a"
  }
  subnet_2 = {
    cidr_block        = "10.0.3.0/24"
    availability_zone = "eu-central-1b"
  }
}

application_name = "cross-account-msk-data-streaming"
Let’s run terraform init to initialize Terraform and terraform apply to deploy the network infrastructure. Once Terraform has deployed the configuration, you should see a new network setup in the AWS console.
Depending on the setting in part one of this series, you can set up the Kafka consumer in the same AWS account or a different AWS account. When setting up the consumers in the same AWS account, make sure that the CIDR ranges of the producer and consumer VPC do not overlap. You will not be able to create the consumer VPC if it uses the same CIDR block as the producer account.
Connect VPC Endpoints
Before we are able to connect the Kafka consumers to our MSK cluster, we have to set up the connection via VPC Endpoints. The VPC Endpoints will connect to the VPC Endpoint Service we set up in the Producer Account and will enable secure communication over the AWS internal network. To be able to set up the connection, we need to access the information stored in the shared Secrets Manager secret. The secret does contain the Kafka broker urls, and broker ports as well as the VPC Endpoint Service service names. We will need the service names when creating the VPC Endpoint in the Consumer Account.
To access the secret, we will use Terraform data resources. Copy the following snippet into the data.tf.
data "aws_secretsmanager_secret" "this" {
  name = var.application_name
}

data "aws_secretsmanager_secret_version" "this" {
  secret_id = data.aws_secretsmanager_secret.this.id
}

data "aws_region" "current" {}
The data resource will retrieve the shared secret. In order to access the individual values, we will decode the JSON that is returned using local variables. Copy the Terraform configuration into the locals.tf.
locals {
  private_subnet_ids   = [for k, v in aws_subnet.private : v.id]
  private_subnet_cidrs = [for k, v in aws_subnet.private : v.cidr_block]

  kafka_cluster_map     = nonsensitive(jsondecode(data.aws_secretsmanager_secret_version.this.secret_string))
  broker_ports          = toset([for k, v in local.kafka_cluster_map : v.broker_port])
  bootstrap_brokers_tls = join(",", [for k, v in local.kafka_cluster_map : "${v.endpoint_url}:${v.broker_port}"])

}
Using local variables, we decoded and recreated the kafka_cluster_map from part one of the series. We also extracted the broker ports and rebuild the broker urls. Both will later be used by the consumers to connect to the MSK cluster. We will also use the information in the next step to set up a Route53 Private Hosted Zone to map the broker urls to VPC Endpoints via alias records. We start by creating the VPC Endpoints. Copy the following snippet into the endpoints.tf.
################################################################################
# VPC Endpoint
################################################################################

resource "aws_vpc_endpoint" "this" {
  for_each = local.kafka_cluster_map

  service_name      = each.value.service_name
  vpc_endpoint_type = "Interface"

  vpc_id             = aws_vpc.this.id
  security_group_ids = [aws_security_group.this.id]
  subnet_ids         = local.private_subnet_ids
}

################################################################################
# Endpoint Security Group
################################################################################

resource "aws_security_group" "this" {
  name   = var.application_name
  vpc_id = aws_vpc.this.id
}

resource "aws_security_group_rule" "ingress" {
  for_each = local.broker_ports

  security_group_id = aws_security_group.this.id

  type        = "ingress"
  from_port   = each.value
  to_port     = each.value
  protocol    = "tcp"
  cidr_blocks = local.private_subnet_cidrs
}

resource "aws_security_group_rule" "egress" {
  security_group_id = aws_security_group.this.id

  type        = "egress"
  from_port   = 0
  to_port     = 0
  protocol    = -1
  cidr_blocks = ["0.0.0.0/0"]
}
After having set up the VPC Endpoints, we will create a Route53 Private Hosted Zone. The hosted zone will be used to map the Kafka broker domains to the VPC Endpoints via alias records. This step is necessary to allow consumers to connect to the MSK cluster by using the native broker domains. Copy the following Terraform configuration into router53.tf.
################################################################################
# Route53 hosted zone
################################################################################

resource "aws_route53_zone" "this" {
  name = "kafka.${data.aws_region.current.name}.amazonaws.com"

  vpc {
    vpc_id     = aws_vpc.this.id
    vpc_region = data.aws_region.current.name
  }
}


################################################################################
# Route53 records
################################################################################

resource "aws_route53_record" "this" {
  for_each = aws_vpc_endpoint.this

  zone_id = aws_route53_zone.this.id
  name    = local.kafka_cluster_map[each.key].endpoint_url
  type    = "A"

  alias {
    evaluate_target_health = true
    name                   = each.value.dns_entry[0].dns_name
    zone_id                = each.value.dns_entry[0].hosted_zone_id
  }
}
Deploy the new Terraform configuration by executing terraform apply. Once the infrastructure has been deployed successfully, we will find the VPC Endpoints in the AWS VPC console.

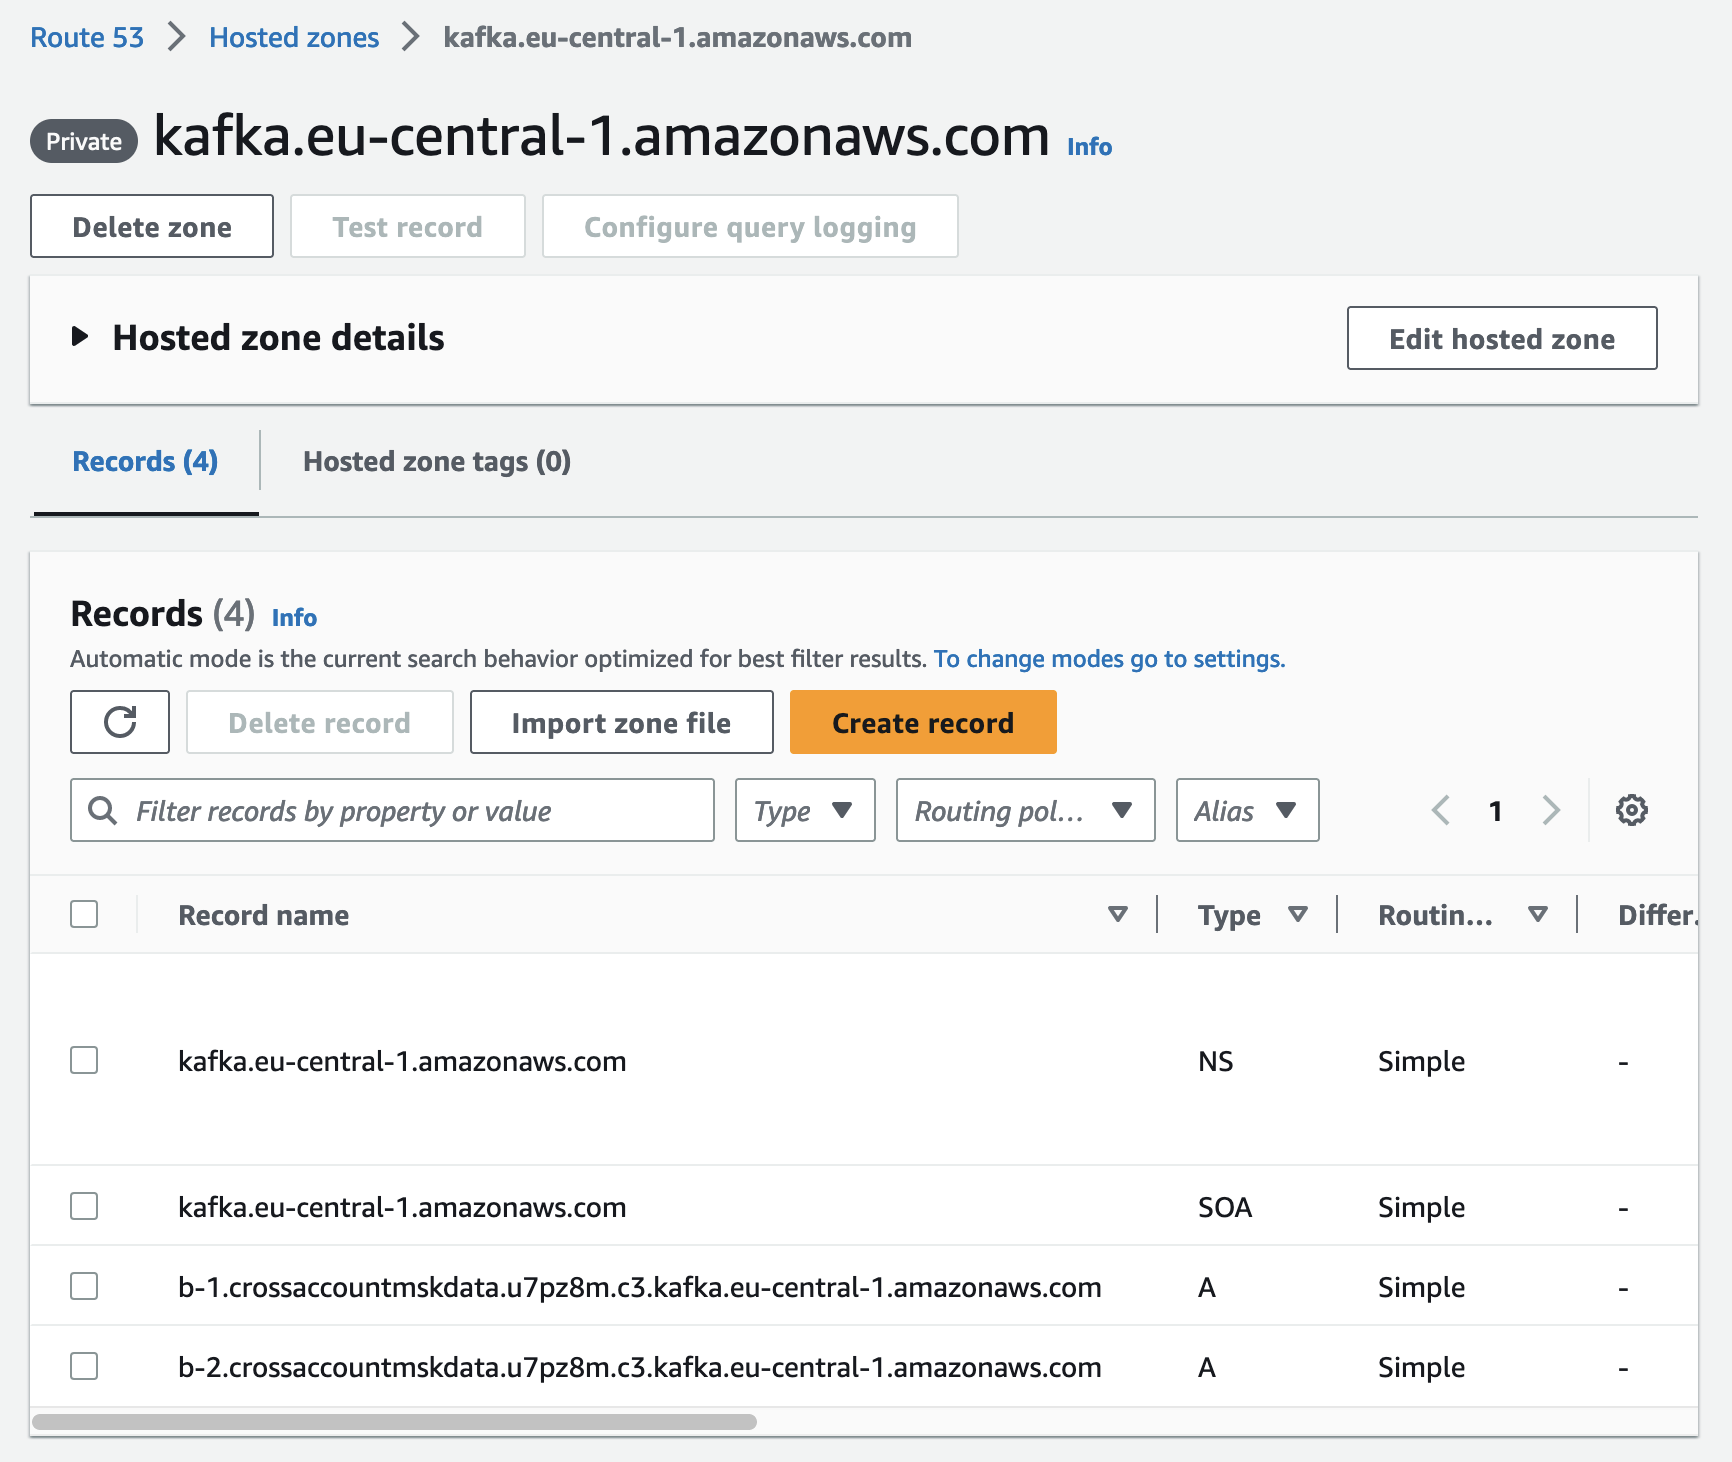
You will also find the Route53 Private Hosted Zone in the AWS Route53 console.
Lambda Kafka Consumer
Once the VPC Endpoints have been deployed, we have set up a fully functional Kafka streaming pipeline consisting of producer and consumer. The next step consists of creating a sample consumer that will consume and analyze our sensor data. To keep this example as simple as possible, we will use a Lambda function in combination with an event-source mapping for self-managed Kafka clusters.
Let’s start by exploring the Python function itself before we implement the Terraform configuration. Copy the following Python script into src/index.py.
import json
import base64
import os
import boto3

from decimal import Decimal
from itertools import groupby
from operator import attrgetter

KAFKA_TOPIC = os.environ.get("KAFKA_TOPIC")
DYNAMODB_TABLE_NAME = os.environ.get("DYNAMODB_TABLE_NAME")

dynamodb_resource = boto3.resource("dynamodb")
table = dynamodb_resource.Table(DYNAMODB_TABLE_NAME)

def lambda_handler(event, context):
    payloads = []

    record_list = event['records'][KAFKA_TOPIC]
    for record in record_list:

        value_decoded = base64.b64decode(record['value'])
        payload = json.loads(value_decoded)

        device_id = payload['device_id']
        timestamp = payload['timestamp']
        temperature = payload['temperature']

        payloads.append(Payload(device_id, timestamp, temperature))

    attribute = attrgetter('device_id')
    ordered_payloads = {k:list(v) for k,v in groupby(sorted(payloads, key=attribute), attribute)}

    for device in ordered_payloads:
        avg_temperature = round(sum(payload.temperature for payload in ordered_payloads[device]) / len(ordered_payloads[device]))
        min_timestamp   = min(payload.timestamp for payload in ordered_payloads[device])
        max_timestamp   = max(payload.timestamp for payload in ordered_payloads[device])

        response = table.put_item(
            Item={
                'device_id': device,
                'window_start': min_timestamp,
                'window_stop': max_timestamp,
                'avg_temp': Decimal(avg_temperature)
            }
        )

class Payload:
 def __init__(self,device_id, timestamp, temperature):
        self.device_id = device_id
        self.timestamp = timestamp
        self.temperature = temperature
The Lambda function will consume the Kafka event, calculate a moving average of the temperature for each device and store the results in a DynamoDB table. To create the Lambda functions via Terraform copy the following snippet into lambda.tf.
################################################################################
# Lambda Kafka Consumer
################################################################################

resource "aws_lambda_function" "this" {
  function_name = var.application_name
  role          = aws_iam_role.this.arn

  filename         = data.archive_file.this.output_path
  handler          = "index.lambda_handler"
  runtime          = "python3.9"
  source_code_hash = data.archive_file.this.output_base64sha256

  environment {
    variables = {
      KAFKA_TOPIC         = "${var.application_name}-0"
      DYNAMODB_TABLE_NAME = aws_dynamodb_table.this.name
    }
  }

  vpc_config {
    security_group_ids = [aws_security_group.this.id]
    subnet_ids         = local.private_subnet_ids
  }

  timeout     = 10
  memory_size = 512
}

data "archive_file" "this" {
  type        = "zip"
  source_file = "${path.module}/src/index.py"
  output_path = "${path.module}/src/python.zip"
}


################################################################################
# Cloudwatch Log Group
################################################################################

resource "aws_cloudwatch_log_group" "this" {
  name              = "/aws/lambda/${var.application_name}"
  retention_in_days = 30
}


################################################################################
# Lambda Role
################################################################################

resource "aws_iam_role" "this" {
  name = "${var.application_name}-lambda"

  assume_role_policy = jsonencode({
    Version = "2012-10-17"
    Statement = [
      {
        Action = "sts:AssumeRole"
        Effect = "Allow"
        Principal = {
          Service = "lambda.amazonaws.com"
        }
      },
    ]
  })
}


data "aws_iam_policy_document" "log_access" {
  statement {

    actions = [
      "logs:CreateLogStream",
      "logs:PutLogEvents"
    ]

    resources = [
      "${aws_cloudwatch_log_group.this.arn}:*"
    ]
  }
}

resource "aws_iam_policy" "log_access" {
  name   = "log-access"
  policy = data.aws_iam_policy_document.log_access.json
}

resource "aws_iam_role_policy_attachment" "log_access" {
  role       = aws_iam_role.this.name
  policy_arn = aws_iam_policy.log_access.arn
}


data "aws_iam_policy_document" "ec2_access" {
  statement {
    actions = [
      "ec2:CreateNetworkInterface",
      "ec2:DescribeNetworkInterfaces",
      "ec2:DescribeVpcs",
      "ec2:DeleteNetworkInterface",
      "ec2:DescribeSubnets",
      "ec2:DescribeSecurityGroups"
    ]
    resources = [
      "*"
    ]
  }
}

resource "aws_iam_policy" "ec2_access" {
  name   = "ec2-access"
  policy = data.aws_iam_policy_document.ec2_access.json
}

resource "aws_iam_role_policy_attachment" "ec2_access" {
  role       = aws_iam_role.this.name
  policy_arn = aws_iam_policy.ec2_access.arn
}


data "aws_iam_policy_document" "dynamodb_access" {
  statement {
    actions = [
      "dynamodb:BatchWriteItem",
      "dynamodb:PutItem",
      "dynamodb:UpdateItem"
    ]
    resources = [
      aws_dynamodb_table.this.arn
    ]
  }
}

resource "aws_iam_policy" "dynamodb_access" {
  name   = "dynamodb-access"
  policy = data.aws_iam_policy_document.dynamodb_access.json
}

resource "aws_iam_role_policy_attachment" "dynamodb_access" {
  role       = aws_iam_role.this.name
  policy_arn = aws_iam_policy.dynamodb_access.arn
}


################################################################################
# Lambda Event Source Mapping
################################################################################

resource "aws_lambda_event_source_mapping" "this" {

  function_name = aws_lambda_function.this.function_name

  topics            = [var.application_name]
  starting_position = "LATEST"


  self_managed_event_source {
    endpoints = {
      KAFKA_BOOTSTRAP_SERVERS = local.bootstrap_brokers_tls
    }
  }

  dynamic "source_access_configuration" {
    for_each = concat(local.event_source_mapping_subnet_list, local.event_source_mapping_security_group_list)

    content {
      type = source_access_configuration.value.type
      uri  = source_access_configuration.value.uri
    }
  }

  batch_size = 10
}
Before we can deploy the Lambda function, we have to implement a few additional components. First, we need to implement a DynamoDB table where Lambda can store the analysis results. Copy the following snippet into dynamodb.tf.
################################################################################
# DynamoDB Table (IOT Data)
################################################################################

resource "aws_dynamodb_table" "this" {
  name = var.application_name

  billing_mode = "PAY_PER_REQUEST"
  hash_key     = "device_id"
  range_key    = "window_start"

  table_class = "STANDARD"

  attribute {
    name = "device_id"
    type = "N"
  }

  attribute {
    name = "window_start"
    type = "S"
  }
}
Secondly, we are in need of two additional local variables to simplify the setup of the Lambda event-source mapping. Expand the locals.tf by copying the following two locals into the locals.tf.
  event_source_mapping_subnet_list = [for v in local.private_subnet_ids : {
    "type" : "VPC_SUBNET",
    "uri" : "subnet:${v}"
    }
  ]

  event_source_mapping_security_group_list = [{
    "type" : "VPC_SECURITY_GROUP",
    "uri" : "security_group:${aws_security_group.this.id}"
    }
  ]
Deploy the Kafka consumer by executing terraform apply. Once the deployment has been finished, you should find the Lambda and DynamoDB table in the AWS console.
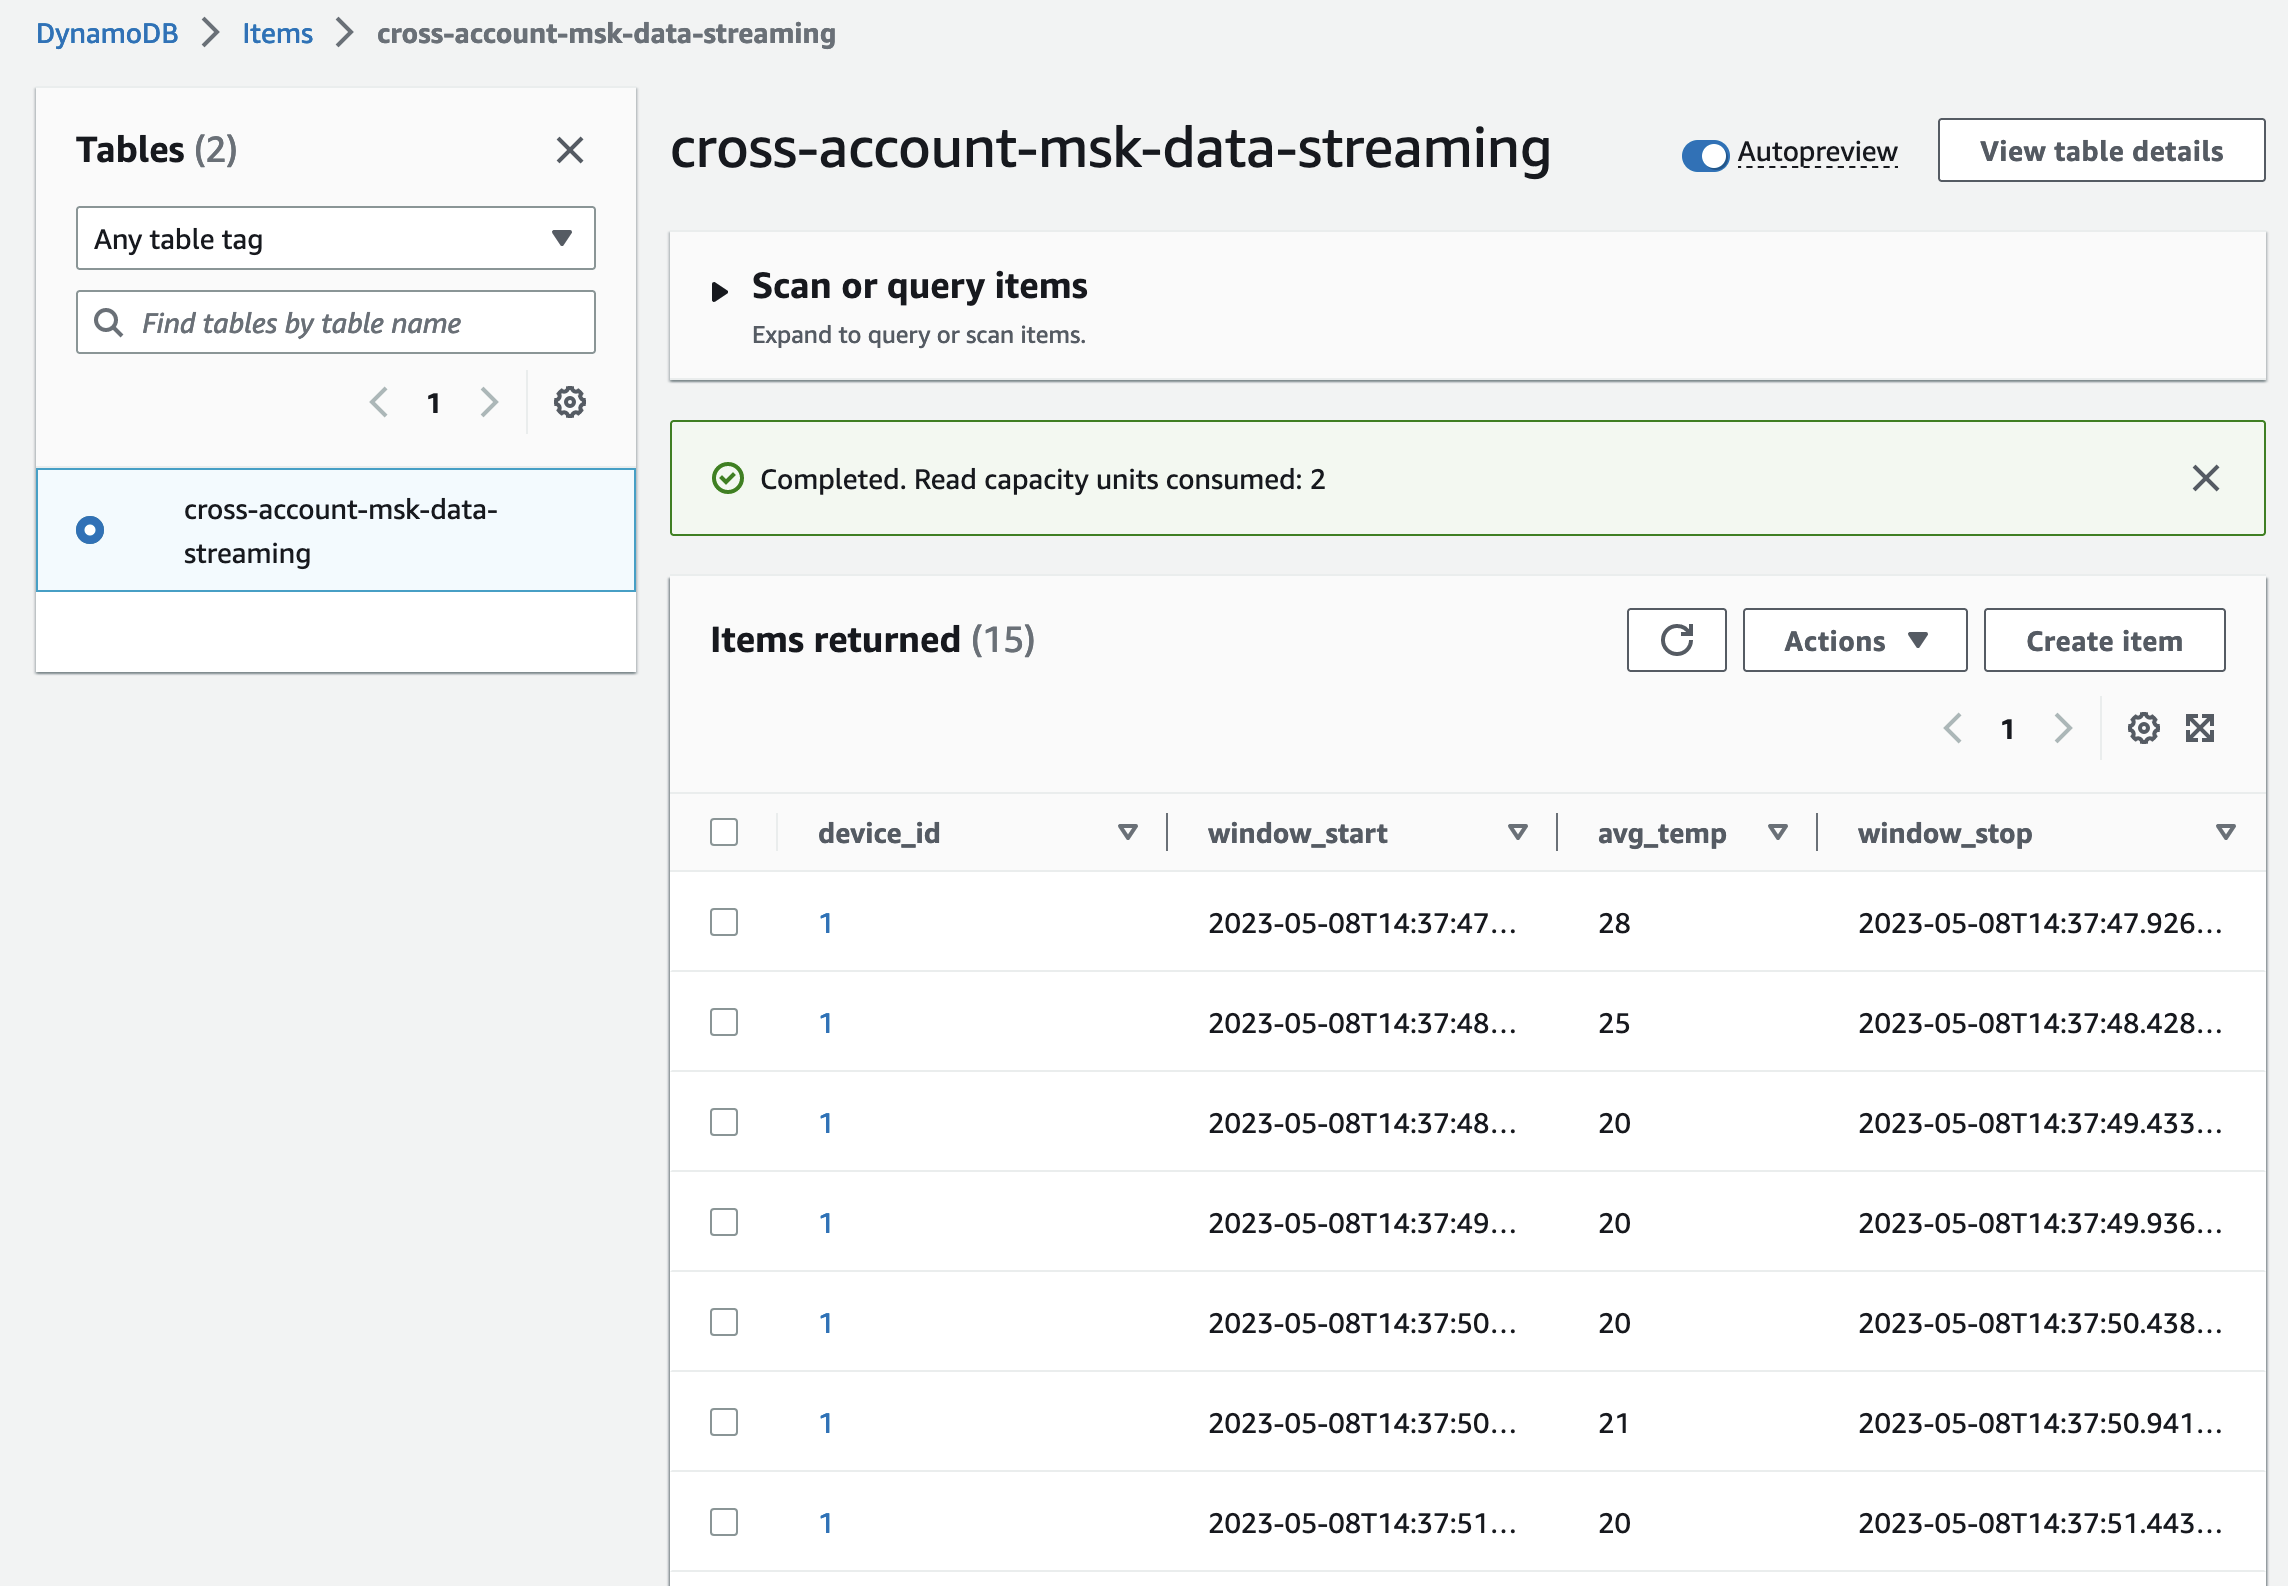
Check the DynamoDB table items. You will see that Lambda is successfully consuming and aggregating the Kafka records.
Congratulations! You just successfully implemented a real-time data analytics pipeline using Amazon MSK and Terraform.
Please be aware that the current producer and consumer infrastructure will cause costs. Make sure to remove the infrastructure at the end of this example by running terraform destroy.
Summary
As you can see, it is not complicated to implement a simple Kafka consumer using Terraform and AWS Lambda. Using this architecture you are able to set up the Kafka client and connect it to the MSK cluster in the Producer Account. By using AWS-managed services like Amazon MSK and AWS Lambda, you will be able to quickly set up production-ready workloads while reducing the operational overhead of managing a Kafka cluster and Kafka clients.
The architecture that we just implemented is meant to serve as a starting point and an example. Feel free to expand the example and add your own producer and consumer logic.
I hope you had fun and learned something new while working through this short example. I am looking forward to your feedback and questions. If you want to take a look at the complete example code please visit my Github.
— Hendrik