Cross Account Kafka Streaming: Part 1
When discussing high performant real-time event streaming, Apache Kafka is a tool that immediately comes to mind. Optimized for ingesting and transforming real-time streaming data in a reliable and scalable manner, a great number of companies today rely on Apache Kafka to power their mission-critical applications and data analytics pipelines.
In this blog series, I would like to show you how you can leverage Amazon MSK and Terraform to set up a fully managed, cross-account Apache Kafka streaming pipeline on AWS. In this first part, we will set up the MSK Kafka cluster and producers. The second part will show you how you can set up distributed Kafka clients in different AWS accounts and communicate with the MSK cluster via AWS VPC Endpoints.
Introduction
The world and our industry have become more and more data-driven. Be it the Internet of Things or the upcoming AI and Machine Learning trend, data is captured, stored, and processed at a greater rate than ever before. By doing so, companies are able to extract well-grounded business insights and make smart decisions more reliably. Especially the analysis of information in real-time promises to drive more accurate and faster decision-making. According to a report by IDC, 25 percent of all data will be real-time by 2025.
While most technical and business experts agree on the benefits of real-time data processing and analytics, implementing a high-performant streaming pipeline poses its unique challenges. With ever-increasing volumes of data being generated, tools and solutions need to be highly specialized in order to keep up the pace. One tool that has emerged as the de facto standard for real-time data streaming in recent years is Apache Kafka.
Apache Kafka is a distributed event streaming solution optimized for ingesting and processing data in real-time. Due to its cluster architecture, it is not only highly scalable and reliable but also offers fault-tolerant and durable storage. The large ecosystem provides built-in stream processing, out-of-the-box interfaces to connect to pretty much anything, a rich set of client libraries, and much more. Today it is used by thousands of organizations worldwide to power mission-critical, real-time streaming data pipelines and applications.
While being a powerful tool, setting up, maintaining, and managing a Kafka cluster can be a challenge. When combining Kafka, an already large and complex system, with producer and client systems, the complexity can become overwhelming quickly. Especially for smaller companies that lack the personnel or necessary technical know-how, implementing a Kafka cluster might be a steep mountain to climb.
One solution to this problem comes in the form of a fully managed Kafka Service offered by AWS called Amazon MSK. Amazon MSK lets you deploy a fully managed Apache Kafka cluster on AWS to run your real-time streaming workloads. It eliminates the operational overhead of provisioning and maintaining your cluster and allows you to scale your capacity automatically on demand. Amazon MSK is also fully integrated into the AWS ecosystem and enables you to easily integrate services like AWS Lambda or Kinesis into your Kafka workflow.
In this blog series, I would like to show you how you can set up your own fully managed Apache Kafka real-time streaming pipeline on AWS, using Amazon MSK and Terraform.
This is the first post of a two-post series.
In the first post, we set up a fully managed Kafka cluster on AWS using Amazon MSK and Terraform.
In the second post Cross Account Kafka Streaming Part 2, we will expand the setup by adding a Kafka consumer in different VPCs and AWS accounts and connecting to the cluster via VPC Endpoints.
Please be aware that this blog post won’t go into much detail regarding Kafka functionality and configuration itself. To fully grasp this post it is recommended to have a basic understanding of Apache Kafka. For more detailed information regarding Kafka itself, please visit the official Kafka website.
Architecture
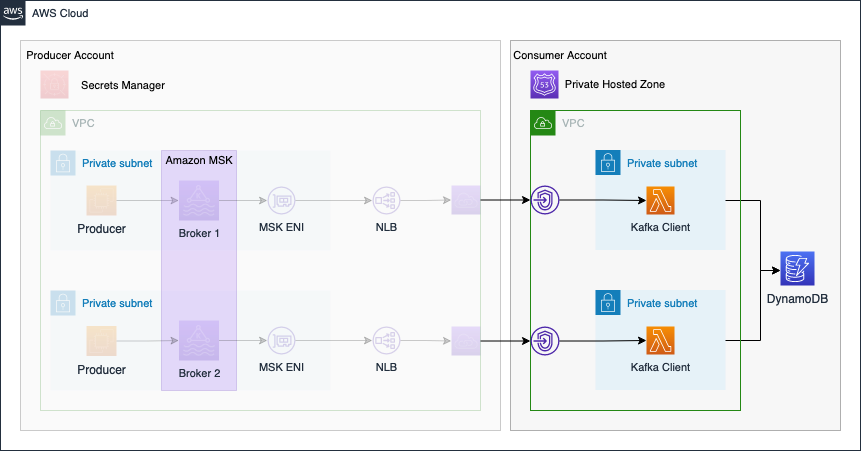
As an introduction, I would like to guide you through the infrastructure that we will set up as part of this blog post. The diagram below displays the target architecture that we will build and deploy.
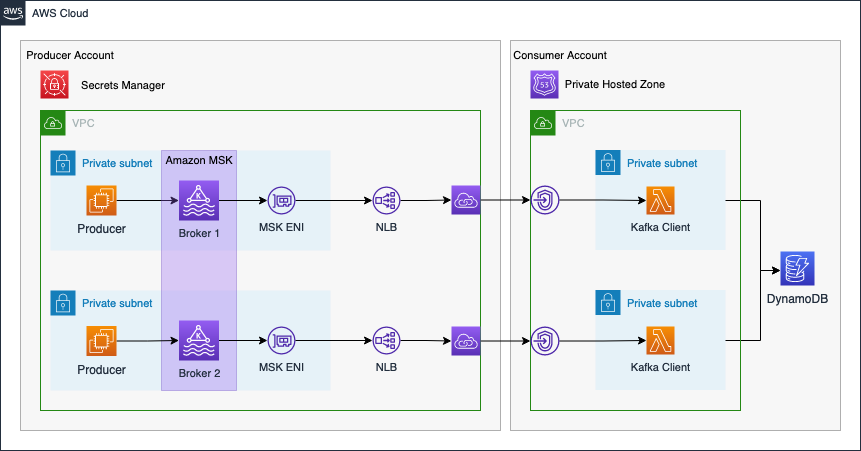
We will set up a cross-account streaming pipeline using Amazon MSK and AWS Lambda. We will use two distinct AWS accounts. The first account will be the Producer Account and the second account will be the Consumer Account.
The Producer Account will contain the Amazon MSK Kafka Cluster as well as the Kafka producer hosted on EC2 instances. To make Kafka available to the Consumer Account, we will set up a VPC Endpoint Service using Network Load Balancers and AWS Private Link. By using Private Link we will be able to expose our Kafka cluster as a service via the internal AWS network. We will also create a secret in AWS Secrets Manager in order to store connection information of the Kafka cluster and Private Link service. This secret will be shared with the Consumer Account. To simulate a real-time analytics workflow, event streaming data will be produced by EC2 instances in the Producer Account and written to a Kafka topic. We will simulate temperature sensors in our example.
Once the Producer Account has been set up, we will continue with the Consumer Account. The Consumer Account will connect to the VPC Endpoint Service of the Producer Account via VPC Endpoints. This will allow the Kafka client in the Consumer Account to reach the Kafka Cluster securely. To be able to resolve the Kafka broker domains, we will also create a Private Hosted Zone with records that will map the Kafka broker domains to the VPC Endpoint IPs. Afterward, we will set up AWS Lambda functions as Kafka consumers. The Lambda Event Source Mapping for self-managed Kafka can be used to reliably trigger our Lambda functions each time an event is written to the Kafka cluster. To simulate a real-time analytics workflow, the Lambda functions will consume the Kafka topic, aggregate the data and store the results in a DynamoDB table.
The connectivity pattern used for this example was highly inspired by the official AWS Big Data Blog Post Secure connectivity patterns to access Amazon MSK across AWS Regions. Please visit the original post to get a better understanding of the pattern employed and possible alternatives.
Project Structure
Before we start setting up our Terraform configuration, I would like you to create the project structure. Notice that we will focus on setting up the MSK Kafka cluster and Kafka producers. Please create the following files and folders.
├── producer
  ├── src
  │   └── kafka-init.sh
  ├── modules
  │   └── vpc-endpoint-service
  │       ├── main.tf
  │       ├── outputs.tf
  │       └── variables.tf
  ├── msk.tf
  ├── secrets.tf
  ├── vpc.tf
  ├── ec2.tf
  ├── endpoint_service.tf
  ├── locals.tf
  ├── terraform.tfvars
  └── variables.tf
As this example will be quite extensive, we will split up our Terraform configuration into separate files. The name of each file corresponds to the AWS service which configuration is contained within. We will also create a separate module to implement the VPC Endpoint Service.
Please be aware that deploying an MSK cluster in AWS can take up to 40min. Make sure to allocate enough time before starting this example.
Network Deployment
We will start by deploying the network infrastructure. The VPC and all included components will be the basis for the MSK Kafka cluster and the EC2 instances. The Terraform configuration for the vpc.tf can be found here.
Before we are able to deploy our network, we have to define a few variables for our vpc and subnets. Please copy the following snippet into the variables.tf. Besides the variables for the VPC and subnet cidr blocks, we already included a variable for the application_name and for allowed_service_principal_arns. These will be used later when setting up the MSK cluster and the VPC Endpoint Services.
variable "vpc_cidr_block" {
  description = "CIDR of vpc."
  type        = string
}

variable "public_subnets" {
  description = "Map of public subnets that should be created"
  type = map(object({
    cidr_block        = string
    availability_zone = string
  }))
}

variable "private_subnets" {
  description = "Map of private subnets that should be created."
  type = map(object({
    cidr_block        = string
    availability_zone = string
  }))
}

variable "application_name" {
  description = "Name of the application."
  type        = string
}

variable "allowed_service_principal_arns" {
  description = "List of the consumer ARNs allowed to connect to the VPC Endpoint Service and access the secret."
  type        = list(string)
}
To manage the values of our defined variables, we will create a terraform.tfvars file. This will help us to keep our Terraform configuration clean and readable. Please define the following values for our variables in the terraform.tfvars file. For allowed_service_principal_arns please add the account id of the AWS account which will be used for the Consumer Account.
If you do not have access to a second AWS account, you can also deploy the Consumer Account setup into the same account as the Producer Account. In this case, please add the account id of the Producer Account for allowed_service_principal_arns.
vpc_cidr_block = "192.168.0.0/16"

public_subnets = {
  subnet_1 = {
    cidr_block        = "192.168.0.0/24"
    availability_zone = "eu-central-1a"
  }
  subnet_2 = {
    cidr_block        = "192.168.1.0/24"
    availability_zone = "eu-central-1b"
  }
}

private_subnets = {
  subnet_1 = {
    cidr_block        = "192.168.2.0/24"
    availability_zone = "eu-central-1a"
  }
  subnet_2 = {
    cidr_block        = "192.168.3.0/24"
    availability_zone = "eu-central-1b"
  }
}

application_name               = "cross-account-msk-data-streaming"
allowed_service_principal_arns = ["arn:aws:iam::XXXXXXXXXX:root"]
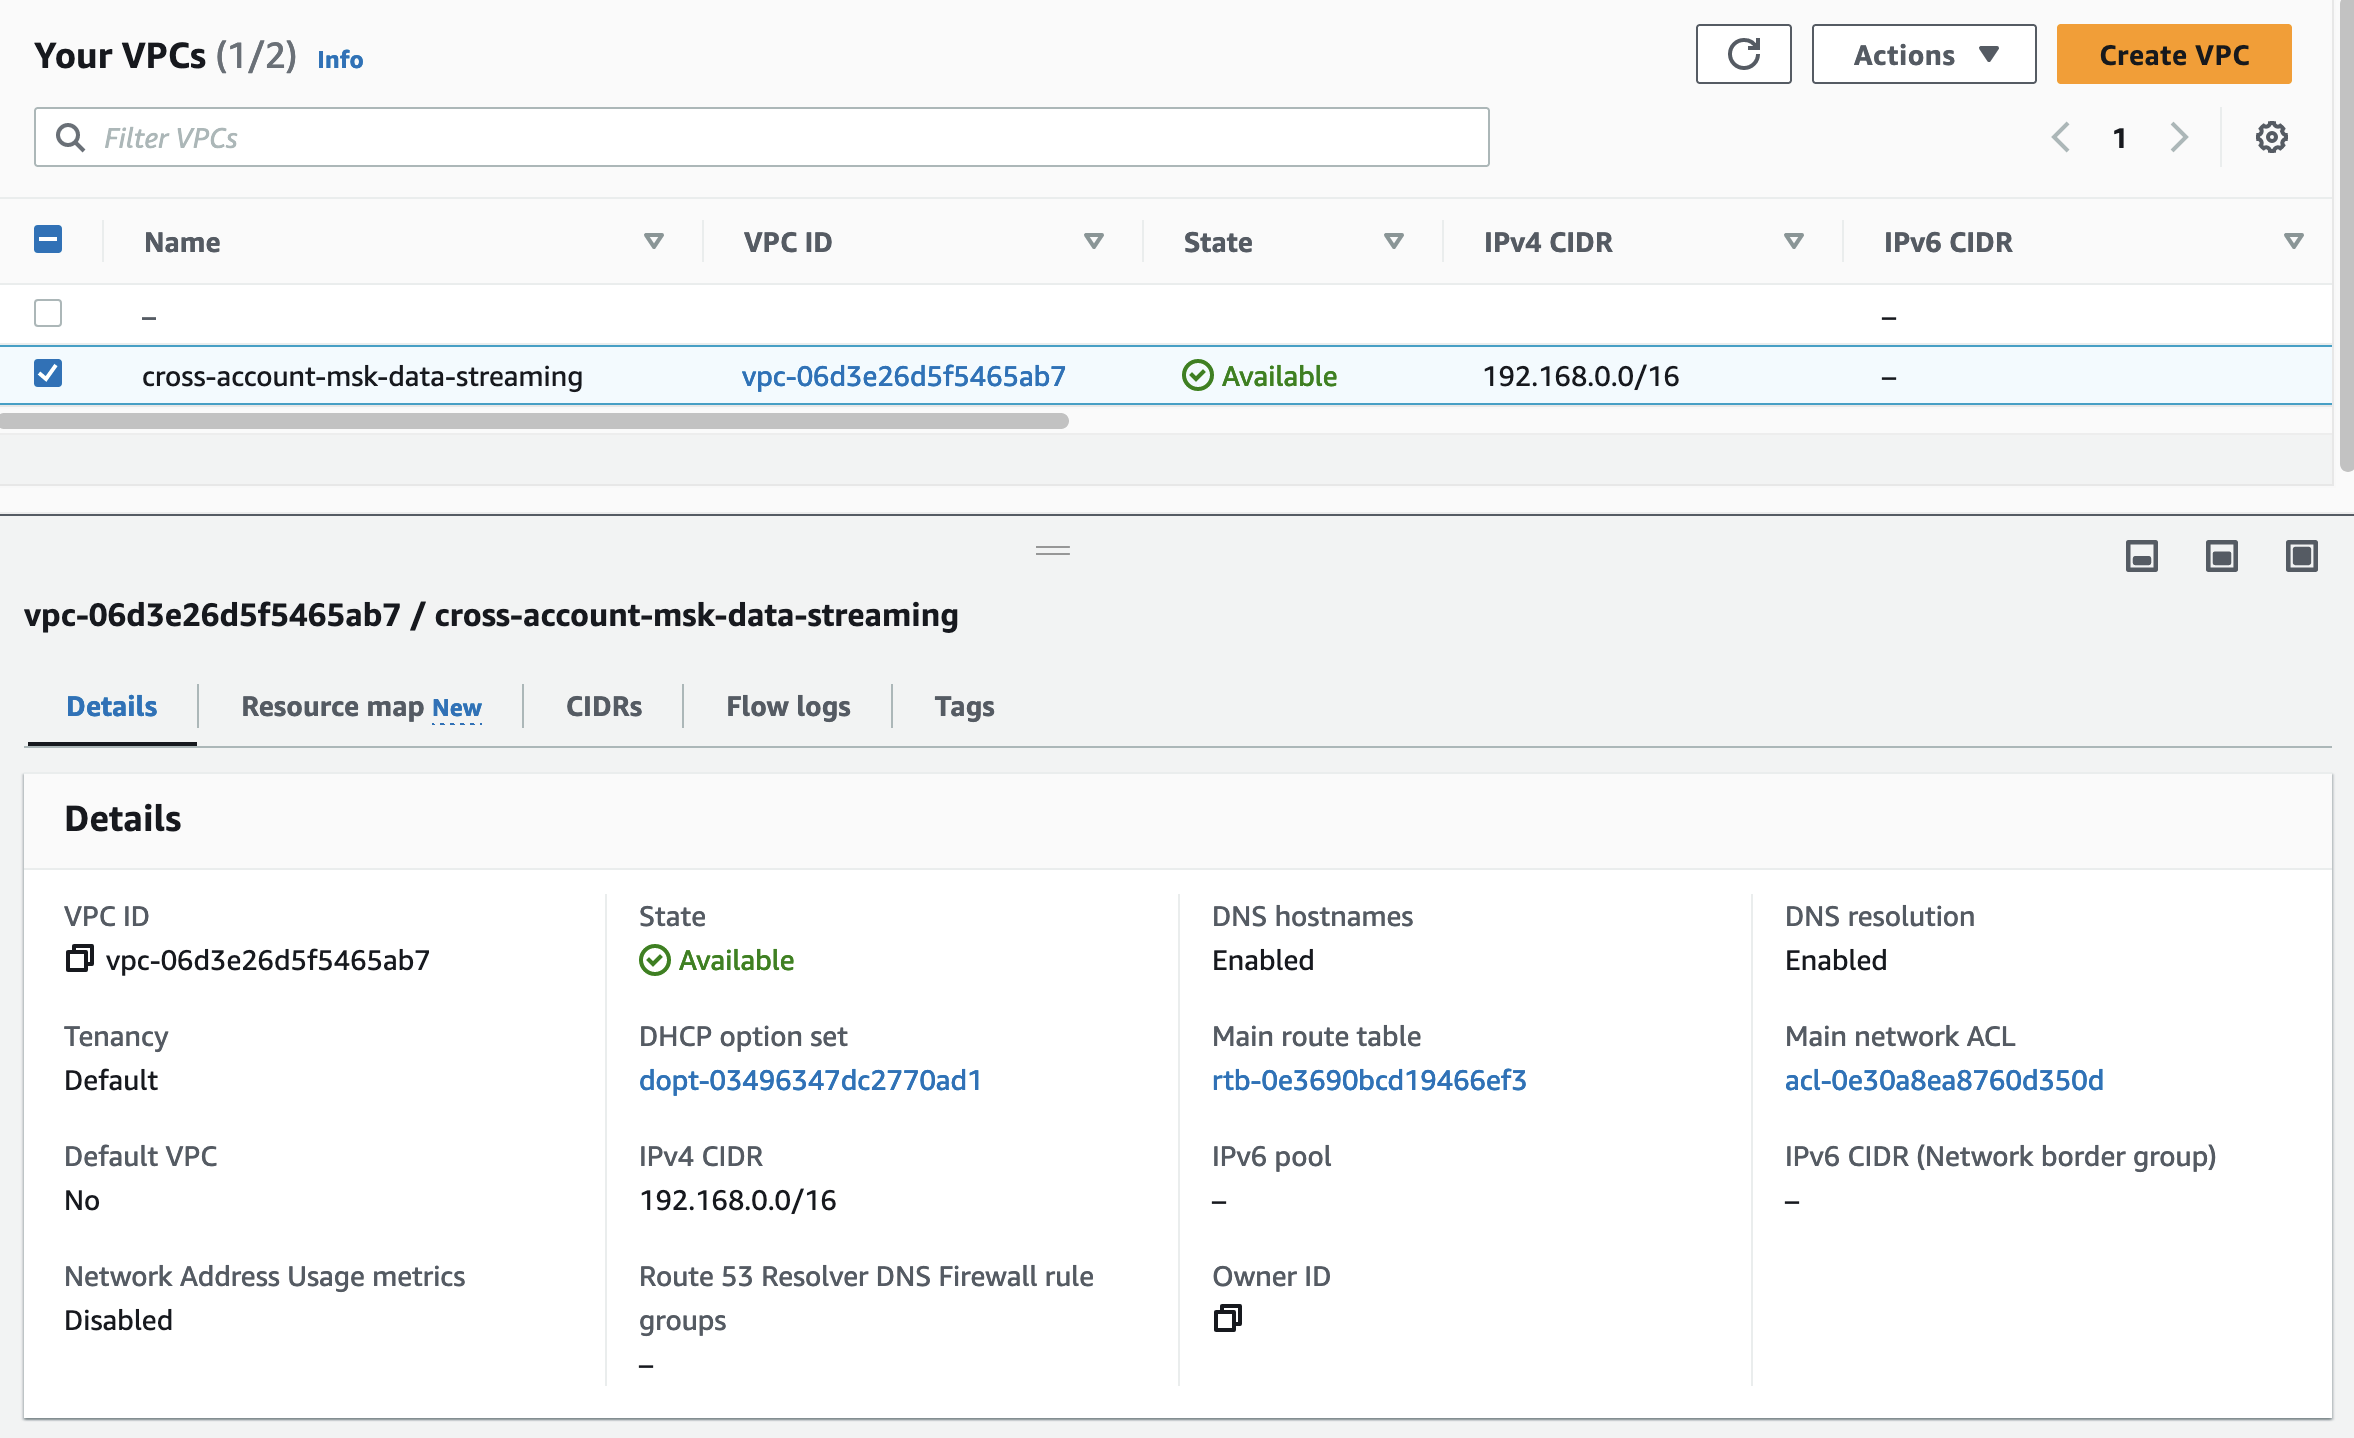
Let’s run terraform init to initialize Terraform and terraform apply to deploy the network infrastructure. Once Terraform has deployed the configuration, you should see a new network setup in the AWS console.
MSK Kafka
Once the network has been deployed, it is time to implement our managed Kafka cluster. As Amazon MSK is a fully managed service offered by AWS, there is not much we have to define. We pick the Kafka version of our cluster, the number of nodes as well as the instance size and storage of each node. The rest is handled by AWS. Please copy the following code into the msk.tf.
################################################################################
# MSK Cluster Broker Info
################################################################################

data "aws_msk_broker_nodes" "this" {
  cluster_arn = aws_msk_cluster.this.arn
}


################################################################################
# MSK Cluster
################################################################################

resource "aws_msk_cluster" "this" {

  cluster_name           = var.application_name
  kafka_version          = "2.8.1"
  number_of_broker_nodes = local.number_of_broker_nodes

  broker_node_group_info {
    client_subnets  = local.private_subnet_ids
    instance_type   = "kafka.t3.small"
    security_groups = [aws_security_group.this.id]

    storage_info {
      ebs_storage_info {
        volume_size = 8
      }
    }
  }

  encryption_info {
    encryption_in_transit {
      client_broker = "TLS"
      in_cluster    = true
    }
  }

  logging_info {
    broker_logs {
      cloudwatch_logs {
        enabled   = true
        log_group = aws_cloudwatch_log_group.this.name
      }
    }
  }
}

################################################################################
# MSK Cloudwatch Log Group
################################################################################

resource "aws_cloudwatch_log_group" "this" {
  name              = "/aws/msk/${var.application_name}"
  retention_in_days = 30
}

################################################################################
# MSK Security Group
################################################################################

resource "aws_security_group" "this" {
  name   = var.application_name
  vpc_id = aws_vpc.this.id
}
As you can see, besides the MSK cluster itself we have defined a CloudWatch Group for monitoring as well as a Security Group to manage in- and outbound traffic. We will define the Security Group rules once the cluster has been set up. There are also a few local variables that we have defined in the Terraform code that we have to add before we can run terraform apply. Add the following local variables to the locals.tf
locals {
  private_subnet_ids   = [for k, v in aws_subnet.private : v.id]
  private_subnet_cidrs = [for key, v in aws_subnet.private : v.cidr_block]

  number_of_broker_nodes = length(local.private_subnet_ids)
}
Please be aware that deploying an MSK cluster in AWS can take up to 40min. Continue with the example once the cluster has been deployed.
To deploy the infrastructure run terraform apply.
VPC Endpoint Service Module
Now that the MSK cluster has been deployed, it is time to configure our VPC Endpoint Service. The VPC Endpoint Service is powered by AWS PrivateLink and will allow us to set up a secure connection between our Producer and Consumer Account via the internal AWS network. In order to set up a VPC Endpoint Service we need to deploy a Network Load Balancer, attach the Load Balancer to a VPC Endpoint Service, and add the Elastic Network Interfaces of our MSK nodes to the Load Balancers Target Group. Afterward, the Consumer Account will be able to connect to the Endpoint Service via a VPC Endpoint. The traffic between the Kafka client and the MSK cluster will go through the Network Load Balancer. For more information regarding AWS PrivateLink visit the official documentation.
To make our setup more resilient, we will deploy a VPC Endpoint Service from each Kafka broker. This also allows us to keep the native broker port settings in place. For more information please visit the official AWS blog post.
In our example, we deployed two Kafka nodes. If we are to scale our Kafka cluster in the future and are to add more nodes, we will have to implement the Endpoint Services in a way that is efficient and scalable. For that reason, we will introduce a new Terraform module called vpc-endpoint-service. By implementing this module, we are able to encapsulate the Endpoint Service logic and create multiple, identical Services via Terraform for_each statements. Please copy the following logic into the the main.tf of vpc-endpoint-service.
################################################################################
# LB
################################################################################

resource "aws_lb" "this" {
  name                             = var.name
  load_balancer_type               = "network"
  internal                         = true
  subnets                          = var.subnets
  ip_address_type                  = "ipv4"
  enable_cross_zone_load_balancing = true
}

################################################################################
# LB HTTP TCP listener
################################################################################

resource "aws_lb_listener" "this" {
  load_balancer_arn = aws_lb.this.arn
  protocol          = "TCP"

  port = var.port

  default_action {
    type             = "forward"
    target_group_arn = aws_lb_target_group.this.arn
  }
}

################################################################################
# LB target groups
################################################################################

resource "aws_lb_target_group" "this" {
  name        = var.name
  port        = var.port
  protocol    = "TCP"
  target_type = "ip"
  vpc_id      = var.vpc_id

  health_check {
    enabled  = true
    protocol = "TCP"
  }
}

################################################################################
# LB Target Group Attachment
################################################################################

resource "aws_lb_target_group_attachment" "this" {
  target_group_arn = aws_lb_target_group.this.arn
  target_id        = var.target_id
  port             = var.port
}

################################################################################
# VPC Endpoint Service
################################################################################

resource "aws_vpc_endpoint_service" "this" {
  acceptance_required        = false
  network_load_balancer_arns = [aws_lb.this.arn]
}


################################################################################
# VPC Endpoint Service allowed principals
################################################################################

resource "aws_vpc_endpoint_service_allowed_principal" "this" {
  for_each = toset(var.allowed_service_principal_arns)

  vpc_endpoint_service_id = aws_vpc_endpoint_service.this.id
  principal_arn           = each.value
}
The module will create a Network Load Balancer, Listener, Target Group as well as Endpoint Service. The resources can be configured dynamically using variables. Add the following variables to the variables.tf of vpc-endpoint-service.
variable "name" {
  description = "Name of the Load Balancer and related resources."
  type        = string
}

variable "subnets" {
  description = "List of Subnet to deploy Load Balancer into."
  type        = list(string)
}

variable "vpc_id" {
  description = "ID of Target Group VPC."
  type        = string
}

variable "port" {
  description = "Port to listen and forward traffic to."
  type        = number
}

variable "target_id" {
  description = "ID of target to attach to Target Group"
  type        = string
}

variable "allowed_service_principal_arns" {
  description = "List of principal ARNs that are allowed to accees the vpc endpoint service."
  type        = list(string)
}
To connect the module to the rest of our Terraform configuration, a few outputs are necessary. Add the following outputs to the outputs.tf of vpc-endpoint-service.
################################################################################
# LB outputs
################################################################################

output "lb_arn" {
  description = "The ARN of the load balancer"
  value       = aws_lb.this.arn
}

output "lb_id" {
  description = "The ARN of the load balancer"
  value       = aws_lb.this.id
}

output "lb_dns_name" {
  description = "The DNS name of the load balancer."
  value       = aws_lb.this.dns_name
}

output "lb_zone_id" {
  description = "The canonical hosted zone ID of the load balancer (to be used in a Route 53 Alias record)."
  value       = aws_lb.this.zone_id
}


################################################################################
# LB target group outputs
################################################################################

output "target_group_arn" {
  description = "ARN of the Target Group (matches id)."
  value       = aws_lb_target_group.this.arn
}

output "target_group_id" {
  description = "ARN of the Target Group (matches arn)."
  value       = aws_lb_target_group.this.id
}

output "target_group_name" {
  description = "Name of the Target Group."
  value       = aws_lb_target_group.this.name
}


################################################################################
# VPC Endpoint Service ouputs
################################################################################

output "service_id" {
  description = "The ID of the VPC endpoint service."
  value       = aws_vpc_endpoint_service.this.id
}

output "service_availability_zones" {
  description = "The Availability Zones in which the service is available."
  value       = aws_vpc_endpoint_service.this.availability_zones
}

output "service_arn" {
  description = "The Amazon Resource Name (ARN) of the VPC endpoint service."
  value       = aws_vpc_endpoint_service.this.arn
}

output "service_base_endpoint_dns_names" {
  description = "The DNS names for the service."
  value       = aws_vpc_endpoint_service.this.base_endpoint_dns_names
}

output "service_manages_vpc_endpoints" {
  description = "Whether or not the service manages its VPC endpoints - true or false."
  value       = aws_vpc_endpoint_service.this.manages_vpc_endpoints
}

output "service_name" {
  description = "The service name."
  value       = aws_vpc_endpoint_service.this.service_name
}

output "service_type" {
  description = "The service type, Gateway or Interface."
  value       = aws_vpc_endpoint_service.this.service_type
}
Deploy VPC Endpoint Services
After having created the Terraform module, it is time to deploy our Endpoint Services. Before we can actually implement our Terraform configuration for the Endpoint Services, we have to create a few local variables. These locals are necessary to combine all the necessary values from the different resources into a few maps. Add the following locals to the locals.tf.
  broker_port_map = { for v in split(",", aws_msk_cluster.this.bootstrap_brokers_tls) : split(".", v)[0] => split(":", v)[1] }

  broker_port     = distinct(values(local.broker_port_map))[0]

  broker_info_map = {
    for v in data.aws_msk_broker_nodes.this.node_info_list : "b-${v.broker_id}" => {
      eni_ip       = v.client_vpc_ip_address,
      endpoint_url = tolist(v.endpoints)[0]
      port         = local.broker_port_map["b-${v.broker_id}"]
    }
  }

  endpoint_service_key_map = { for n in range(1, local.number_of_broker_nodes + 1) : "b-${n}" => true }

  kafka_cluster_map = {
    for k, v in local.broker_info_map : k => {
      endpoint_url = v.endpoint_url,
      broker_port  = v.port,
      service_name = module.vpc_endpoint_service[k].service_name
    }
  }
The output bootstrap_brokers_tls is a SINGLE string containing the DNS names (or IP addresses) and TLS port pairs of the MSK brokers. Each broker domain starts with ‘b-X.’ where X is the number of brokers in the cluster. The bootstrap_brokers_tls string is split into a map in the format { b-X: PORT}.
broker_port_map = { for v in split(",", aws_msk_cluster.this.bootstrap_brokers_tls) : split(".", v)[0] => split(":", v)[1] }
As we are not using custom ports for the brokers, the port will always be the same (9094). Therefore, we can extract the port by using the first map element.
broker_port = distinct(values(local.broker_port_map))[0]
The broker_info_map contains the information needed for the VPC Endpoint Services. As the values in data.aws_msk_broker_nodes.this.node_info_list cannot be determined until the Terraform configuration has been applied, we CAN NOT use this map as the input for the module vpc_endpoint_service.
To be able to dynamically create our VPC Endpoint Services, we will create a second map endpoint_service_key_map with a known number of map entries. The keys of the map will be equal to the key of the map broker_info_map and will serve as the input for the module vpc_endpoint_service.
  broker_info_map = {
    for v in data.aws_msk_broker_nodes.this.node_info_list : "b-${v.broker_id}" => {
      eni_ip       = v.client_vpc_ip_address,
      endpoint_url = tolist(v.endpoints)[0]
      port         = local.broker_port_map["b-${v.broker_id}"]
    }
  }

  endpoint_service_key_map = { for n in range(1, local.number_of_broker_nodes + 1) : "b-${n}" => true }
The Kafka Consumer Account will need information regarding the cluster. The map kafka_cluster_map contains all the necessary information and will be shared via a Secrets Manager secret.
  kafka_cluster_map = {
    for k, v in local.broker_info_map : k => {
      endpoint_url = v.endpoint_url,
      broker_port  = v.port,
      service_name = module.vpc_endpoint_service[k].service_name
    }
  }
After all locals have been set up, we can finally implement the VPC Endpoint Services. We will use the previously created module as a base and the locals as input. Copy the following snippet into the endpoint_service.tf.
################################################################################
# VPC Endpoint Service
################################################################################

module "vpc_endpoint_service" {
  for_each = local.endpoint_service_key_map

  source = "./modules/vpc-endpoint-service"

  name                           = each.key
  subnets                        = local.private_subnet_ids
  vpc_id                         = aws_vpc.this.id
  port                           = local.broker_info_map[each.key].port
  target_id                      = local.broker_info_map[each.key].eni_ip
  allowed_service_principal_arns = var.allowed_service_principal_arns
}
Before we will apply the new Terraform configuration, we will add the MSK Security Group rules. As you might remember, we set up the Security Group without any rules. In order to allow communication to and from the MSK cluster via the Network Load Balancers, we will add two rules - one for ingress and one for egress. Expand the msk.tf by adding the following rules.
resource "aws_security_group_rule" "ingress" {
  security_group_id = aws_security_group.this.id

  type        = "ingress"
  from_port   = local.broker_port
  to_port     = local.broker_port
  protocol    = "tcp"
  cidr_blocks = local.private_subnet_cidrs
}

resource "aws_security_group_rule" "egress" {
  security_group_id = aws_security_group.this.id

  type        = "egress"
  from_port   = 0
  to_port     = 0
  protocol    = -1
  cidr_blocks = ["0.0.0.0/0"]
}
Please be aware that the Security Group rules are extremely permissive. This is intentional to simplify this example. Please use more restrictive rules when setting up production workloads.
Once you have implemented the rules, you can deploy the new Terraform configuration via terraform apply. You should see the new VPC Endpoint Services in the AWS console after a successful deployment.

Share MSK Cluster Information
To allow the Consumer Account to connect to the MSK cluster via the VPC Endpoints, the consumer needs the VPC Endpoint Service service name, the MSK broker endpoint urls and port the brokers are reachable on. To make the setup more flexible and to allow potential, additional consumers to easily access the information, we will create and share a Secrets Manager secret. The secret will contain the local variable kafka_cluster_map we created earlier. Copy the following snippet into the secrets.tf.
################################################################################
# Secrets Manager Secret
################################################################################

resource "aws_secretsmanager_secret" "this" {
  name = var.application_name
}

resource "aws_secretsmanager_secret_version" "this" {
  secret_id     = aws_secretsmanager_secret.this.id
  secret_string = jsonencode(local.kafka_cluster_map)
}


################################################################################
# Secret Policy
################################################################################

resource "aws_secretsmanager_secret_policy" "example" {
  secret_arn = aws_secretsmanager_secret.this.arn
  policy     = data.aws_iam_policy_document.this.json
}

data "aws_iam_policy_document" "this" {
  statement {
    effect = "Allow"

    principals {
      type        = "AWS"
      identifiers = var.allowed_service_principal_arns
    }

    actions   = ["secretsmanager:GetSecretValue"]
    resources = [aws_secretsmanager_secret.this.arn]
  }
}
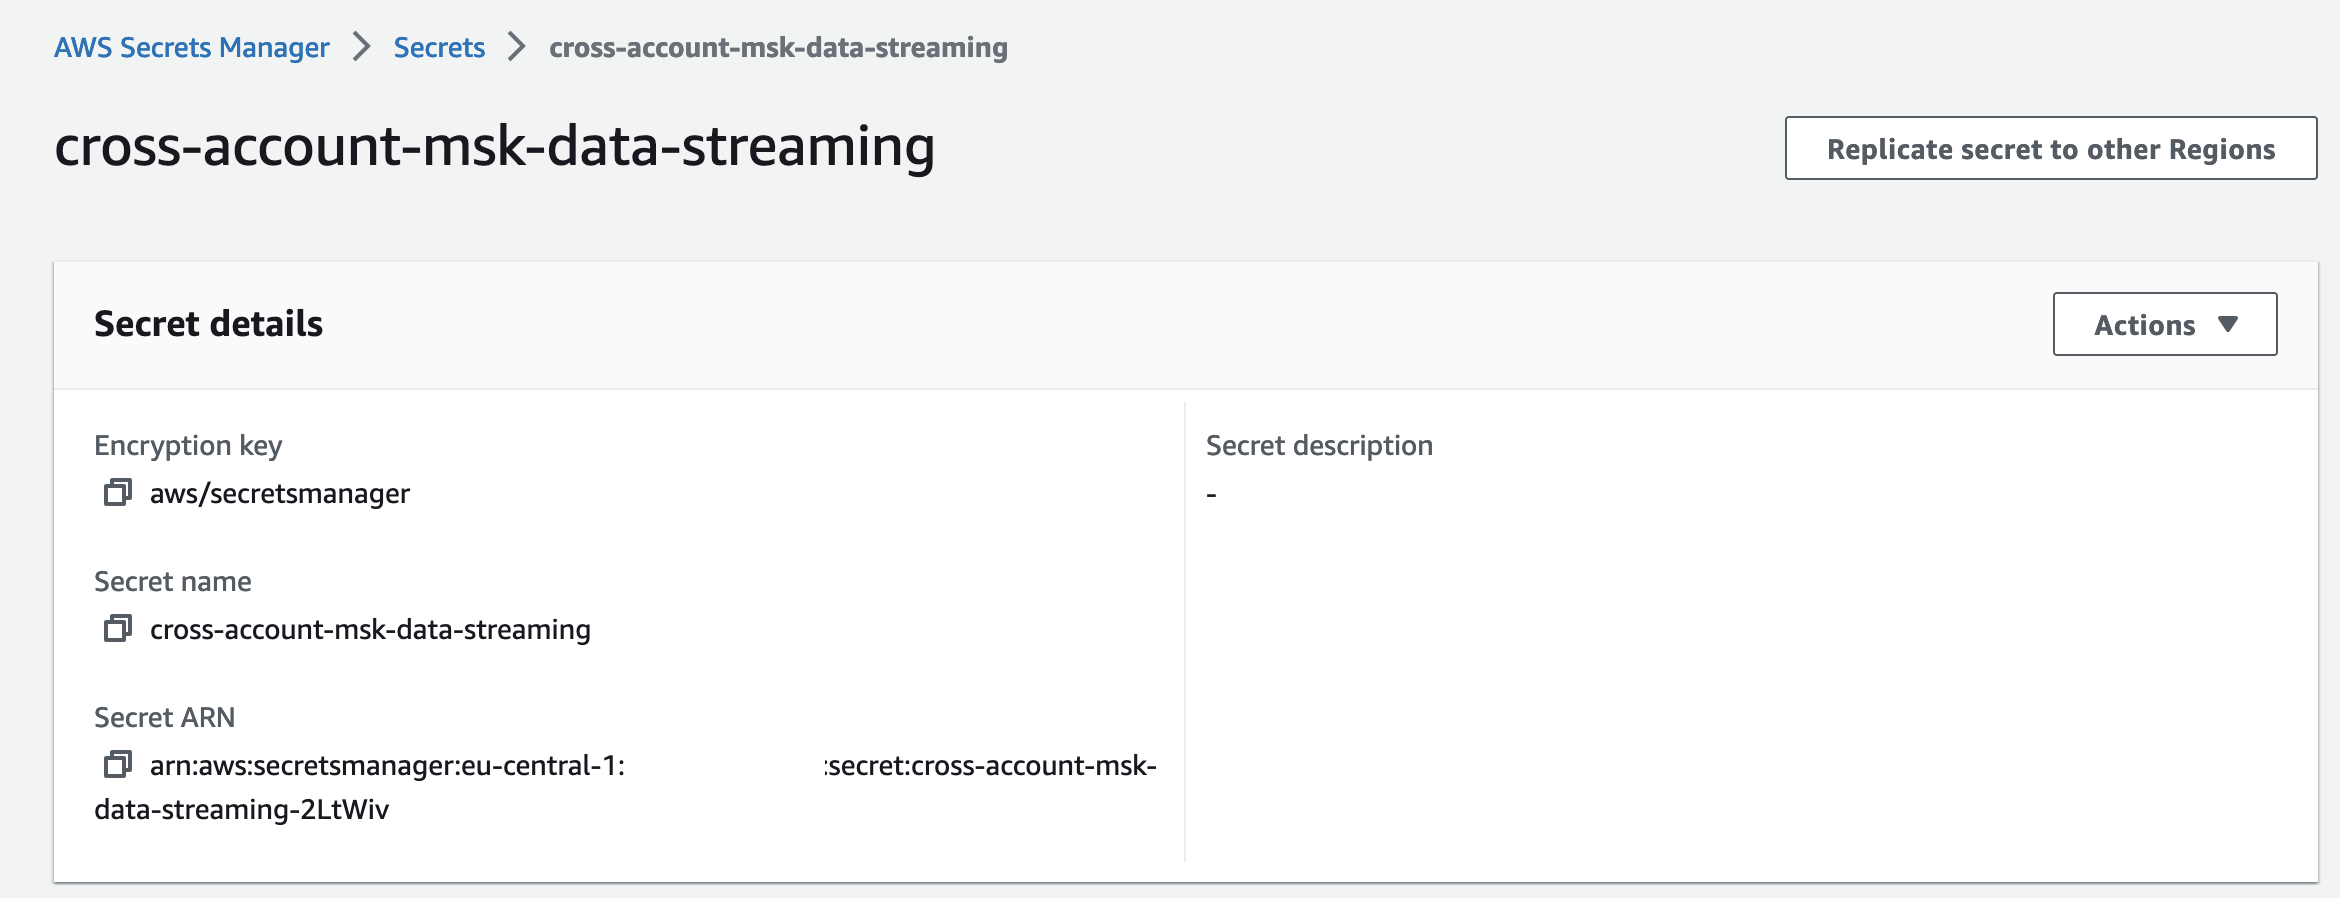
The policy we added to the secret allows the AWS principals that already have access to connect to the VPC Endpoint Services to also perform GetSecretValue API calls to retrieve the secret. Deploy the secret by executing terraform apply. You will find the newly created secret in the AWS Secrets Manager console.
Produce Sample Data
The MSK cluster that we have set up so far is ready to be used. The only thing missing are producers that create sample data. We will use this sample data to get a better feeling of how data producers and consumers work in combination with Amazon MSK. In our case, we will deploy a small EC2 instance that will write sample data to an MSK topic every 100ms. The EC2 instance will simulate temperature sensor data with the following payload. This sample temperature data will then be consumed and analyzed by the Consumer Account.
{"device_id": 1, "timestamp":timestamp , "temperature":temperature}
Let us start by setting up the EC2 instance. Copy the following Terraform configuration into the ec2.tf.
################################################################################
# EC2 MSK Producer
################################################################################

resource "aws_instance" "this" {
  instance_type          = "t2.micro"
  ami                    = data.aws_ami.amazon_2.id
  subnet_id              = local.private_subnet_ids[0]
  iam_instance_profile   = aws_iam_instance_profile.this.name
  vpc_security_group_ids = [aws_security_group.this.id]

  root_block_device {
    volume_size           = 8
    volume_type           = "gp2"
    encrypted             = true
    delete_on_termination = true
  }

  user_data_base64 = base64encode(templatefile("${path.module}/src/kafka-init.sh", {
    bootstrap_servers = aws_msk_cluster.this.bootstrap_brokers_tls,
    kafka_topic       = var.application_name
    device_id         = 1
    }
    )
  )
}


################################################################################
# Get newest Linux 2 AMI
################################################################################

data "aws_ami" "amazon_2" {
  most_recent = true

  filter {
    name   = "name"
    values = ["amzn2-ami-hvm-*-x86_64-ebs"]
  }
  owners = ["amazon"]
}


################################################################################
# EC2 Instance Profile
################################################################################

resource "aws_iam_role" "this" {
  name = var.application_name

  assume_role_policy = jsonencode({
    Version = "2012-10-17"
    Statement = [
      {
        Action = "sts:AssumeRole"
        Effect = "Allow"
        Principal = {
          Service = "ec2.amazonaws.com"
        }
      },
    ]
  })
}

resource "aws_iam_instance_profile" "this" {
  name = "${aws_iam_role.this.name}-ip"
  role = aws_iam_role.this.name
}

resource "aws_iam_role_policy_attachment" "this" {
  role       = aws_iam_role.this.name
  policy_arn = "arn:aws:iam::aws:policy/AmazonMSKFullAccess"
}
For simplicities sake, we gave the EC2 instance AmazonMSKFullAccess and placed it in a shared Security Group with the MSK cluster. Please define more restrictive and isolated Security Groups as well as IAM permissions for production workloads.
Before we can deploy the EC2 instance, we have to define the user_data script. We will use the user_data script to bootstrap our instance, initialize the MSK Kafka cluster and start a simple sensor data-creating Python script. Copy the following script into the kafka-init.sh. I will go through the script step by step and highlight the most important bits.
#!/bin/bash

sudo yum update -y
sudo yum -y install java-1.8.0-openjdk

cd /home/ec2-user

wget https://archive.apache.org/dist/kafka/2.8.1/kafka_2.13-2.8.1.tgz
tar -xzf kafka_2.13-2.8.1.tgz
rm kafka_2.13-2.8.1.tgz

cd kafka_2.13-2.8.1/bin/

sudo bash -c 'echo "security.protocol=SSL" > client.properties'

sudo ./kafka-topics.sh --create --bootstrap-server ${bootstrap_servers} --command-config client.properties --topic ${kafka_topic} --if-not-exists

cd -

sudo python3 -m pip install kafka-python

mkdir kafka-python-producer
cd kafka-python-producer

cat > producer.py << EOF
#!/usr/bin/env python3
from kafka import KafkaProducer
import json
import datetime
import random
import time
import sys
# Messages will be serialized as JSON
def serializer(message):
    return json.dumps(message).encode('utf-8')
# Kafka Producer
producer = KafkaProducer(
    security_protocol="SSL",
    bootstrap_servers=list(sys.argv[1].split(',')),
    value_serializer=serializer
)
if __name__ == '__main__':
    # Infinite loop - runs until you kill the program
   temperature = random.randint(25,35)

   while True:
        # Generate a message
        timestamp = datetime.datetime.now().isoformat()
        temperature = temperature + random.randint(-1,1)
        message = {"device_id": int(sys.argv[3]), "timestamp":timestamp , "temperature":temperature}
        # Send it to the kafka topic
        producer.send(sys.argv[2], message)
        # Sleep for 100ms
        time.sleep(0.1)
EOF

sudo chmod +x producer.py
sudo ./producer.py ${bootstrap_servers} ${kafka_topic} ${device_id}
The first step will consist of updating our EC2 instance and downloading and installing the appropriate version of Kafka. After having installed Kafka, we will create a client.properties file with the property security.protocol=SSL to ensure encryption in flight between the producer and the MSK cluster. Afterward, we will create a sample Kafka topic on the MSK cluster. The flag --if-not-exists ensures that the topic creation is only attempted when the topic does not already exist.
#!/bin/bash

sudo yum update -y
sudo yum -y install java-1.8.0-openjdk

cd /home/ec2-user

wget https://archive.apache.org/dist/kafka/2.8.1/kafka_2.13-2.8.1.tgz
tar -xzf kafka_2.13-2.8.1.tgz
rm kafka_2.13-2.8.1.tgz

cd kafka_2.13-2.8.1/bin/

sudo bash -c 'echo "security.protocol=SSL" > client.properties'

sudo ./kafka-topics.sh --create --bootstrap-server ${bootstrap_servers} --command-config client.properties --topic ${kafka_topic} --if-not-exists
Next, we will create a simple Python script that will generate the sample sensor data for us. To make the interaction between Python and Kafka more comfortable, we will use the Kafka client library kafka-python. The Python script itself will connect to the Kafka topic and will generate sensor data in an infinite loop every 100ms. The temperature is randomly generated and then incremented or decremented in the loop. The script expects three input arguments during execution - the Kafka broker urls, the name of the Kafka topic, and the ID of the sensor.
sudo python3 -m pip install kafka-python

mkdir kafka-python-producer
cd kafka-python-producer

cat > producer.py << EOF
#!/usr/bin/env python3
from kafka import KafkaProducer
import json
import datetime
import random
import time
import sys
# Messages will be serialized as JSON
def serializer(message):
    return json.dumps(message).encode('utf-8')
# Kafka Producer
producer = KafkaProducer(
    security_protocol="SSL",
    bootstrap_servers=list(sys.argv[1].split(',')),
    value_serializer=serializer
)
if __name__ == '__main__':
    # Infinite loop - runs until you kill the program
   temperature = random.randint(25,35)

   while True:
        # Generate a message
        timestamp = datetime.datetime.now().isoformat()
        temperature = temperature + random.randint(-1,1)
        message = {"device_id": int(sys.argv[3]), "timestamp":timestamp , "temperature":temperature}
        # Send it to the kafka topic
        producer.send(sys.argv[2], message)
        # Sleep for 100ms
        time.sleep(0.1)
EOF

sudo chmod +x producer.py
sudo ./producer.py ${bootstrap_servers} ${kafka_topic} ${device_id}
After having implemented the kafka-init.sh, we will deploy the Kafka producer by running terraform apply. Once the deployment has been finished, the producer will start generating sample sensor data.
Review
Before finishing the first part of this series, I would like to quickly review what we build already as part of this blog post and what we will implement in the second part. The following diagram gives you a quick overview of what we created already.
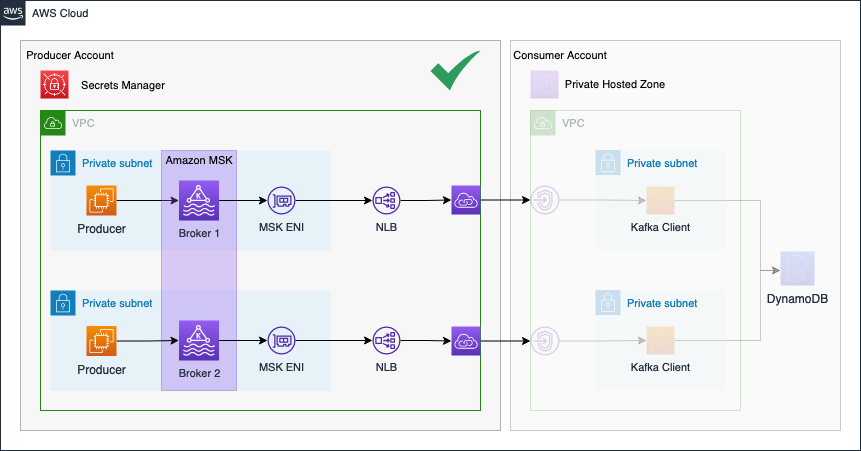
In the second part of the series, we will continue the Kafka setup by implementing the Consumer Account.
Please be aware that AWS NAT Gateways, Amazon MSK, Network Load Balancers, and EC2 will incur costs. If you wish to continue the second part of this series at a later time, make sure to remove the infrastructure by running terraform destroy.
Summary
As you can see, it is not complicated to implement a simple Kafka cluster using Terraform and Amazon MSK. Using this architecture you are able to set up the producer side of a Kafka-based real-time event streaming pipeline. By using AWS-managed services like Amazon MSK, you will be able to quickly set up production-ready workloads while reducing the operational overhead of managing a Kafka cluster.
The architecture that we just implemented is meant to serve as a starting point and an example. There are multiple ways to make the solution more robust and efficient. One possibility would be to replace our sample EC2 producer with proper workloads. Adjusting the Security Groups and IAM Roles to make them more restrictive and explicit is also something that should be done for production workloads. I will show you how to use set up Kafka consumers in the second part of this series.
I hope you had fun and learned something new while working through this short example. I am looking forward to your feedback and questions. If you want to take a look at the complete example code please visit my Github.
— Hendrik