Version Control your Database on AWS using Flyway
Proper version control is an essential part of a fast-paced, agile development approach and the foundation of CI/CD. Even though databases are an important aspect of nearly every application, database migrations, and schema evolutions are often not versioned and not integrated into the automation process.
In this blog post, I would like to show you how you can leverage Flyway on AWS to version control your schema changes and automate your database migrations.
Introduction
Version control has become nearly ubiquitous and a must-have skill for every IT or Cloud professional. Be it software applications or IaC configurations, versioning files, and tracking changes are essential when working in such a fast-paced, and agile environment. It not only simplifies collaboration but also protects against unintended human mistakes and consequences.
Besides its many advantages, version control is the basis of CI/CD. By leveraging CI/CD, we are able to remove as much human intervention as possible from the integration and deployment process. The results are faster and more reliable deployments as well as minimized downtimes.
Even though the advantages and the necessity for version control in combination with CI/CD is widely known and accepted, database migrations and schema evolutions are often left out of this workflow. As a result, applications and infrastructures are evolving rapidly while database changes are slow to implement and propagate. As databases are often a major component of many applications, this disconnect can lead to an overall deceleration of the development and deployment process.
One solution to this problem is to introduce a tool like Flyway. Flyway is a tool that lets you version control your database and automate your database migrations. It uses plain old SQL, requires zero dependencies, and offers a wide range of database and cloud support.
In this blog post, I would like to show you how you can set up your own database version control and migration automation on AWS by using Flyway and Terraform.
Please be aware that this blog won’t go into much detail regarding Flyway. If you are looking for deeper insides into Flyway please visit the official documentation
Architecture
As an introduction, I would like to guide you through the infrastructure that we will set up. As seen in the architecture diagram below, we will create a simple pipeline consisting of S3 Buckets, Lambda, SSM, EC2, and an Aurora Serverless cluster.

We will start by setting up a couple of S3 Buckets. We will create an S3 Bucket for each Database that should be managed by Flyway. In our example, we will manage two databases in our Aurora Serverless cluster, Users and Products, and will therefore create two corresponding Buckets. Each S3 Bucket will contain the versioned Flyway migration files for its database. Every time a file is uploaded to one of the S3 Buckets, a Lambda function will be triggered. The Lambda function works as the Flyway Trigger and will execute an SSM Run Command on the Flyway Host. The Flyway Host is an EC2 Instance that has Flyway installed and is able to connect to the Aurora cluster. The SSM Run Command will execute Flyway on the Flyway Host and perform the database migration.
Project Structure
Before we start setting up our Terraform configuration, I would like you to create the project structure. Please create the following files and folders.
├── migrations
│   ├── V1__create_table_persons.sql
│   ├── V2__alter_table_persons.sql
├── src
│   ├── flyway-host
│   │   └── setup.sh
│   └── flyway-trigger
│       └── index.py
├── data.tf
├── ec2.tf
├── lambda.tf
├── rds.tf
├── s3.tf
├── variables.tf
As this example will be quite extensive, we will split up our Terraform configuration into separate files. The name of each file corresponds to the AWS service which configuration is contained within. The source code of our Lambda Flyway Trigger function will be contained in /src/flyway-trigger/index.py. The user data to bootstrap our EC2 instance will be contained in /src/flyway-host/setup.sh. /migrations/ contains two Flyway migration files that we will use to create and alter a table.
Deploy an Aurora Cluster.
We will start by deploying our Aurora Serverless cluster. This deployment usually takes a couple of minutes. Please copy the Terraform configuration below into your rds.tf.
################################################################################
# Aurora Serverless
################################################################################

resource "aws_rds_cluster" "aurora_mysql" {
  cluster_identifier      = "aurora-mysql"
  engine                  = "aurora-mysql"
  engine_mode             = "serverless"
  database_name           = "test"
  backup_retention_period = 30

  master_password = var.master_password
  master_username = var.master_username

  scaling_configuration {
    auto_pause     = false
    max_capacity   = 2
    min_capacity   = 1
    timeout_action = "RollbackCapacityChange"
  }

  vpc_security_group_ids = [aws_security_group.aurora_mysql.id]

  storage_encrypted = true
  enable_http_endpoint = true
  skip_final_snapshot = true
}

################################################################################
# RDS Subnet Group
################################################################################

resource "aws_db_subnet_group" "aurora_mysql" {
  name       = "aurora_mysql"
  subnet_ids = data.aws_subnets.default.ids
}

################################################################################
# Security Group
################################################################################

resource "aws_security_group" "aurora_mysql" {
  name   = "aurora-mysql"
  vpc_id = data.aws_vpc.default.id
}

resource "aws_security_group_rule" "ingress" {
  security_group_id = aws_security_group.aurora_mysql.id

  type      = "ingress"
  from_port = 3306
  to_port   = 3306
  protocol  = "tcp"
  self      = true
}

resource "aws_security_group_rule" "egress" {
  security_group_id = aws_security_group.aurora_mysql.id

  type             = "egress"
  from_port        = 0
  to_port          = 0
  protocol         = "-1"
  cidr_blocks      = ["0.0.0.0/0"]
}
The Terraform configuration will create an Aurora Serverless MySQL cluster, a Subnet Group, and a Security Group for the cluster. Notice that we enabled the http_endpoint for our Aurora V1 Cluster. This enables the Data API for the cluster and allows us to use the Query Editor later on. The Security Group allows inbound traffic on MySQL port 3306 from itself. We will reuse this Security Group for our Flyway Host to simplify the communication between the Database and EC2 instance. There are no restrictions regarding outbound traffic.
To create the Subnet Group and the Security Group, we need a VPC and a Subnets. To keep this example simple, we will use the Default VPC. To retrieve information about our AWS network, use Terraform data resources. Please copy the configuration below into the data.tf.
################################################################################
# Get default VPC
################################################################################

data "aws_vpc" "default" {
  default = true
}

################################################################################
# Get List of private Subnet IDs
################################################################################

data "aws_subnets" "default" {
  filter {
    name   = "vpc-id"
    values = [data.aws_vpc.default.id]
  }
}

################################################################################
# Get Current region
################################################################################

data "aws_region" "current" {}

################################################################################
# Get current AWS Account ID
################################################################################

data "aws_caller_identity" "this" {}
The resources aws_region and aws_caller_identity are needed later for our Flyway Trigger. Before we deploy our infrastructure, we will have to implement a few variables. As you can see in the aws_rds_cluster resource above, we have parameterized the database master password and username. Please copy the snippet below into the variables.tf to create both variables.
variable "master_password" {
  type        = string
  description = "Password for the RDS database"
  sensitive = true
  default     = "supersecretpassword"
}

variable "master_username" {
  type        = string
  description = "Username for the RDS database"
  sensitive = true
  default     = "admin"
}
As this is only an example, Terraform variables and default values are used for the database username and password. This is NOT best practice. A better approach when working in production environments would be to use AWS Secrets and retrieve the values via Terraform data resources.
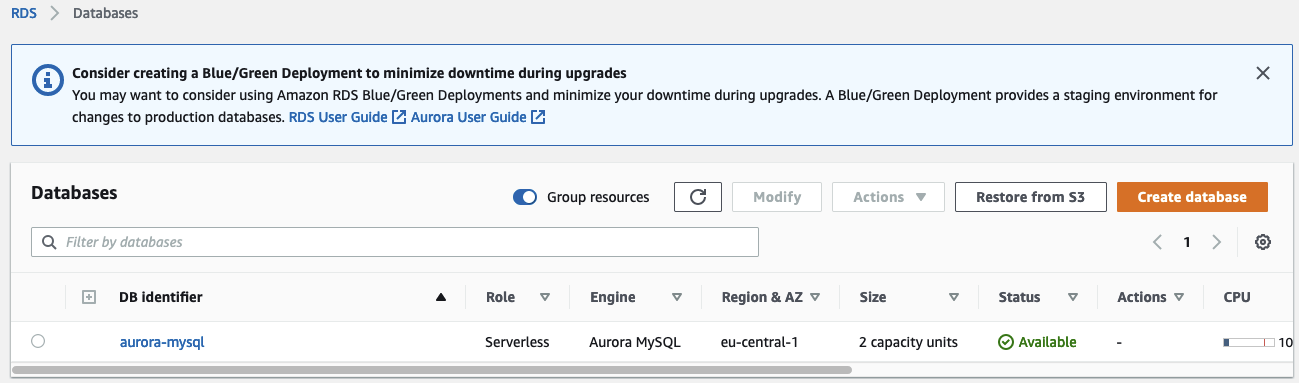
Let’s run terraform init to initialize the Terraform providers and terraform apply to deploy the infrastructure. Once Terraform has deployed the configuration, you should see a new Aurora Serverless cluster in the AWS console.
Set up S3
After having created the Aurora Serverless cluster, it is time to create our S3 Buckets. Each S3 Bucket will contain the Flyway migration files in its assigned database. Copy the Terraform configuration below into the s3.tf.
################################################################################
# S3 Buckets for each managed database
################################################################################

resource "aws_s3_bucket" "this" {
  for_each = toset(var.flyway_managed_databases)

  bucket_prefix = lower(each.value)
  force_destroy = true
}
To keep our configuration dynamic and to allow the creation and management of additional databases in our Aurora cluster, we create the S3 Buckets via a for_each loop. The managed databases are defined by the variable flyway_managed_databases. Add the variables to the variables.tf.
variable "flyway_managed_databases" {
  type        = list(string)
  description = "List of databases that should be managed by Flyway"
  default     = ["Users", "Products"]
}
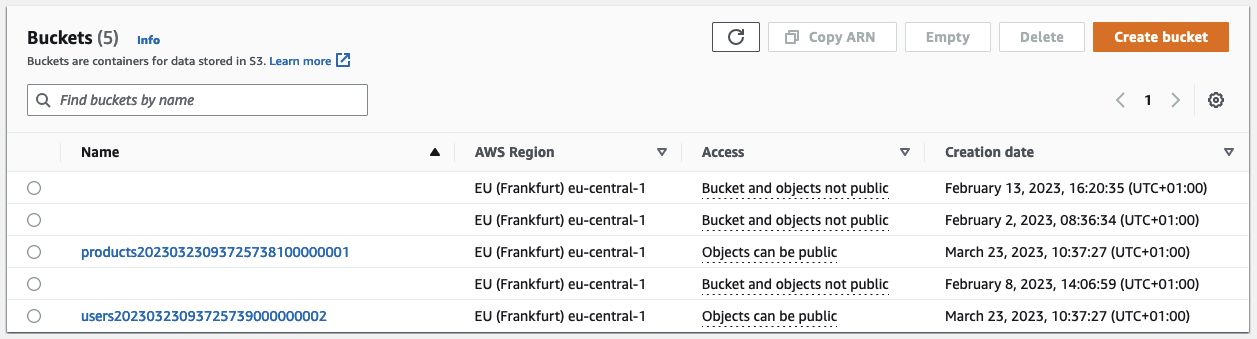
Run terraform apply to deploy the configuration. You should see two new S3 Buckets in your AWS Console.
Create Flyway Host
After the creation of our S3 Buckets, we will continue by deploying the Flyway Host EC2 instance. This EC2 instance will have Flyway installed and will run our migration commands against the Aurora cluster. Before we can set up the instance itself, we have to define the user data script. The user data script will install and set up Flyway on the instance. Copy the script below into setup.sh.
#!/usr/bin/env bash

yum update -y
wget -qO- https://repo1.maven.org/maven2/org/flywaydb/flyway-commandline/${flyway_version}/flyway-commandline-${flyway_version}-linux-x64.tar.gz | tar xvz && sudo ln -s `pwd`/flyway-${flyway_version}/flyway /usr/local/bin

cat >/flyway-${flyway_version}/conf/${flyway_conf} <<EOL
flyway.url=${flyway_url}
flyway.user=${flyway_db_user}
flyway.password=${flyway_db_pw}
flyway.baselineOnMigrate=true
EOL
This script will update the instance and download Flyway. The version can be set dynamically. After having installed Flyway, we will create a Flyway Config. In our case, the configuration file is used to set the URL and credentials of the cluster. By using configuration files, you are able to perform migrations to different clusters and databases using the same Flyway Host. All you have to do is to define a different config file when executing the database migration commands.
Continue by implementing the Flyway Host. Copy the Terraform configuration below into ec2.tf.
################################################################################
# Flyway EC2 Instance
################################################################################

resource "aws_instance" "flyway_host" {

  instance_type          = "t3.micro"
  ami                    = data.aws_ami.flyway_host_ami.id
  iam_instance_profile   = aws_iam_instance_profile.flyway_host.name
  subnet_id              = data.aws_subnets.default.ids[0]
  vpc_security_group_ids = [aws_security_group.aurora_mysql.id]

  user_data_base64 = base64encode(templatefile("${path.module}/src/flyway-host/setup.sh", {
    flyway_version = var.flyway_version
    flyway_conf    = var.flyway_conf
    flyway_url     = "jdbc:mysql://${aws_rds_cluster.aurora_mysql.endpoint}:${aws_rds_cluster.aurora_mysql.port}"
    flyway_db_user = var.master_username
    flyway_db_pw   = var.master_password
  }))
}

resource "aws_cloudwatch_log_group" "flyway_host" {
  name              = "/ssm/runcommand/flyway-host"
  retention_in_days = 30
}

################################################################################
# Get Latest Amazon Linux (with SSM Agent)
################################################################################

data "aws_ami" "flyway_host_ami" {
  most_recent = true
  owners      = ["amazon"]

  filter {
    name   = "name"
    values = ["amzn2-ami-hvm-*-x86_64-ebs"]
  }
  filter {
    name   = "architecture"
    values = ["x86_64"]
  }
  filter {
    name   = "root-device-type"
    values = ["ebs"]
  }
  filter {
    name   = "virtualization-type"
    values = ["hvm"]
  }
}
To make our EC2 instance accessible via SSM, write into our EC2 Cloudwatch log group, and grant access to our S3 Buckets, we will also create an IAM instance profile with the necessary permissions. Copy the configuration below into ec2.tf as well.
################################################################################
# IAM instance profile for Flyway host
################################################################################

resource "aws_iam_role" "flyway_host" {
  name = "flyway-host"

  assume_role_policy = jsonencode({
    Version = "2012-10-17"
    Statement = [
      {
        Action = "sts:AssumeRole"
        Effect = "Allow"
        Principal = {
          Service = "ec2.amazonaws.com"
        }
      },
    ]
  })
}

resource "aws_iam_instance_profile" "flyway_host" {
  name = "flyway-host"
  role = aws_iam_role.flyway_host.name
}

data "aws_iam_policy_document" "cloudwatch_access" {
  statement {
    actions = [
      "logs:DescribeLogGroups"
    ]

    resources = ["*"]
  }

  statement {

    actions = [
      "logs:CreateLogStream",
      "logs:DescribeLogStreams",
      "logs:PutLogEvents"
    ]

    resources = [
      aws_cloudwatch_log_group.flyway_host.arn,
      "${aws_cloudwatch_log_group.flyway_host.arn}:*"
    ]
  }
}

resource "aws_iam_policy" "cloudwatch_access" {
  name   = "cloudwatch-access"
  policy = data.aws_iam_policy_document.cloudwatch_access.json
}

resource "aws_iam_role_policy_attachment" "cloudwatch_access" {
  role       = aws_iam_role.flyway_host.name
  policy_arn = aws_iam_policy.cloudwatch_access.arn
}

data "aws_iam_policy_document" "s3_access" {
  dynamic "statement" {
    for_each = aws_s3_bucket.this
    content {
      actions = [
        "s3:ListBucket",
        "s3:GetObject"
      ]
      resources = [
        statement.value.arn,
        "${statement.value.arn}/*"
      ]
    }

  }
}

resource "aws_iam_policy" "s3_access" {
  name   = "s3-access"
  policy = data.aws_iam_policy_document.s3_access.json
}

resource "aws_iam_role_policy_attachment" "s3_access" {
  role       = aws_iam_role.flyway_host.name
  policy_arn = aws_iam_policy.s3_access.arn
}

resource "aws_iam_role_policy_attachment" "ssm_managed_instance_core" {
  role       = aws_iam_role.flyway_host.name
  policy_arn = "arn:aws:iam::aws:policy/AmazonSSMManagedInstanceCore"
}
Before we can deploy our infrastructure additions, we have to add two variables to our variables.tf. flyway_version and flyway_conf. Those variables will allow you to dynamically adjust the Flyway version and the name of the Flyway Config name. Add the following snippet to variables.tf.
variable "flyway_version" {
  type        = string
  description = "Flyway version to use"
  default     = "7.15.0"
}

variable "flyway_conf" {
  type        = string
  description = "Name of the Flyway config file"
  default     = "test_flyway.conf"
}
Deploy the changes by running terraform apply. Once Terraform has successfully applied the changes, you should see the EC2 instance in the AWS Console.

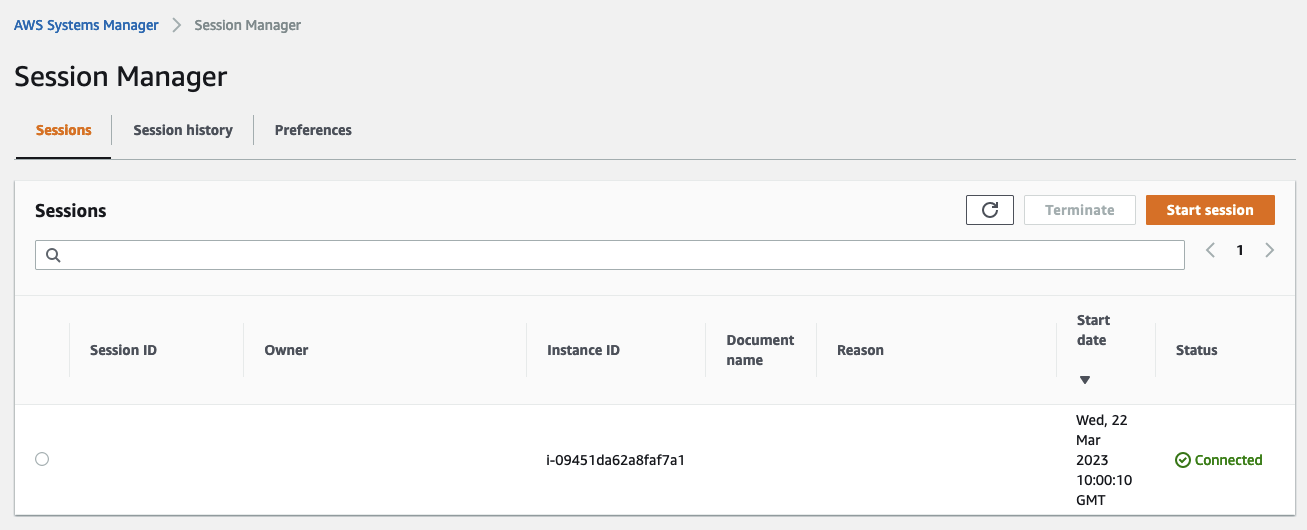
You should also be able to connect to the instance via SSM.
Implement Flyway Trigger
Now that the EC2 instance is up and running, we can start with the implementation of the Flyway Trigger Lambda function. Let’s start by exploring the logic of the function. Copy the following Python code into the index.py.
import boto3
import os
import json

awsRegion = os.environ.get("AWS_REGION")
instanceId = os.environ.get("INSTANCE_ID")
cloudwatchLogGroupName = os.environ.get("CLOUDWATCH_LOG_GROUP_NAME")

def lambda_handler(event, context):

    bucketName = event['Records'][0]['s3']['bucket']['name']

    client = boto3.client('ssm')

    parameters = json.loads(client.get_parameter(
            Name="/flyway/s3-mapping/"+bucketName
        )["Parameter"]["Value"])

    schema = parameters["schema"]
    flywayVersion = parameters["flywayVersion"]
    flywayConf = parameters["flywayConf"]

    response = client.send_command(
        InstanceIds=[instanceId],
        DocumentName='AWS-RunShellScript',
        Parameters={
            'executionTimeout':["36000"],
            'commands': [
                f'aws s3 --region {awsRegion} sync s3://{bucketName} /flyway-{flywayVersion}/sql/{bucketName}/',
                f'cd /flyway-{flywayVersion}/',
                f'./flyway -configFiles=/flyway-{flywayVersion}/conf/{flywayConf} -schemas={schema} -locations="filesystem:/flyway-{flywayVersion}/sql/{bucketName}/" migrate'
            ]
        },
        MaxConcurrency='1',
        CloudWatchOutputConfig={
            'CloudWatchLogGroupName': cloudwatchLogGroupName,
            'CloudWatchOutputEnabled': True
        }
    )
Let’s go through the code step by step. We first import all necessary libraries and set a few environment variables. The only environment variables that we need are the AWS region, the instance id of the Flyway Host, and the Cloudwatch Log Group name.
import boto3
import os
import json

awsRegion = os.environ.get("AWS_REGION")
instanceId = os.environ.get("INSTANCE_ID")
cloudwatchLogGroupName = os.environ.get("CLOUDWATCH_LOG_GROUP_NAME")
As we want to be able to reuse the Flyway Trigger as well as the Flyway Host for multiple clusters, databases, and stages, we have to set the Flyway Version, Flyway Config, and Schema dynamically based on the S3 Bucket that triggers our function. Each Bucket is tied to a specific cluster and database. One solution is to create a mapping between the S3 Bucket and the cluster/database and store the mapping as a parameter in the SSM Parameter store. When the Lambda gets triggered by an S3 Notification, we can extract the necessary information for the parameter belonging to the S3 Bucket. In our example, we will later create a parameter for each S3 Bucket in the SSM Parameter Store. As you can see below, we will extract the Flyway Version, Flyway Config, and Schema from the parameter based on the S3 Bucket name.
def lambda_handler(event, context):

    bucketName = event['Records'][0]['s3']['bucket']['name']

    client = boto3.client('ssm')

    parameters = json.loads(client.get_parameter(
            Name="/flyway/s3-mapping/"+bucketName
        )["Parameter"]["Value"])

    schema = parameters["schema"]
    flywayVersion = parameters["flywayVersion"]
    flywayConf = parameters["flywayConf"]
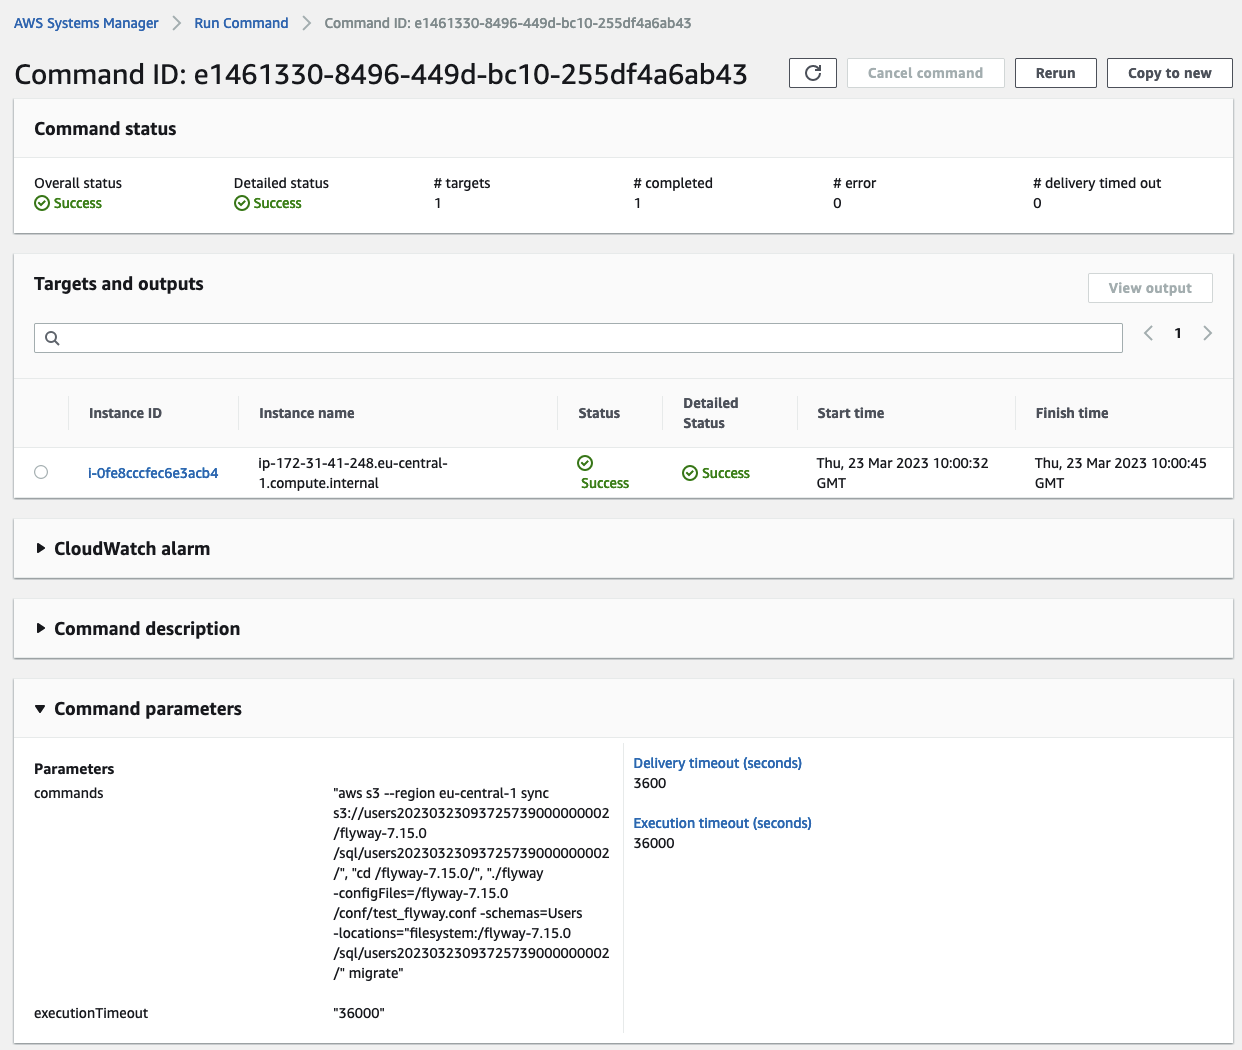
Once we have retrieved all necessary parameters, we will execute an SSM Run Command on the Flyway Host. The document will be a simple AWS-RunShellScript. As database migrations can take quite some time depending on the size of the table that is modified, we will set the executionTimeout to 36000 seconds (10 hours). The command can be split up into two steps. The first step synchronizes the S3 Bucket with a local directory on the instance. The sync command will recursively copy new and updated files from the source directory to the destination.
Flyway is also able to directly interact with an S3 Bucket. To use S3 as a location, the AWS SDK dependencies have to be manually added to Flyway. To keep this example as simple as possible, a different approach was chosen. If you are looking for a challenge, feel free to implement the direct S3 interaction.
After the S3 files were copied to the EC2 Instance, we will execute the Flyway migrate command. We pass three flags to the command - the Flyway Conf, the Schema, and the Location of the migration files. The logs will be stored in the Cloudwatch Log Group we set up for the EC2 instance.
    response = client.send_command(
        InstanceIds=[instanceId],
        DocumentName='AWS-RunShellScript',
        Parameters={
            'executionTimeout':["36000"],
            'commands': [
                f'aws s3 --region {awsRegion} sync s3://{bucketName} /flyway-{flywayVersion}/sql/{bucketName}/',
                f'cd /flyway-{flywayVersion}/',
                f'./flyway -configFiles=/flyway-{flywayVersion}/conf/{flywayConf} -schemas={schema} -locations="filesystem:/flyway-{flywayVersion}/sql/{bucketName}/" migrate'
            ]
        },
        MaxConcurrency='1',
        CloudWatchOutputConfig={
            'CloudWatchLogGroupName': cloudwatchLogGroupName,
            'CloudWatchOutputEnabled': True
        }
    )
Now that we have a better overview of the Lambda logic, it is time to implement our Terraform configuration. We will start with the creation of the SSM Parameters. We have to create one parameter per S3 Bucket. Copy the following code into the s3.tf.
################################################################################
# ParameterStore variables for S3 Bucket mapping
################################################################################
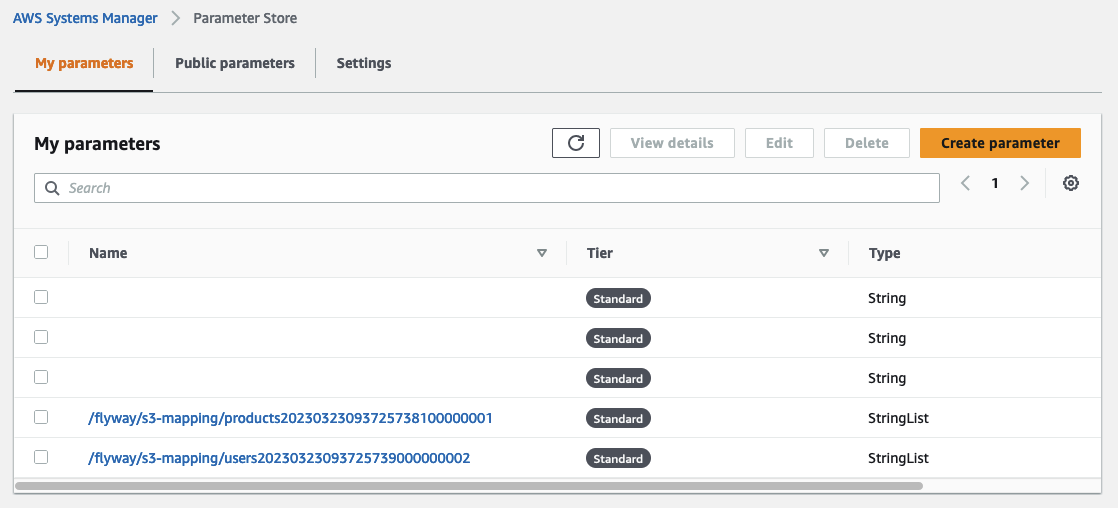
resource "aws_ssm_parameter" "s3_mapping" {
for_each = aws_s3_bucket.this
name = "/flyway/s3-mapping/${each.value.id}"
type = "StringList"
value = jsonencode(
{
schema = each.key
flywayVersion = var.flyway_version
flywayConf = var.flyway_conf
}
)
}
To keep things simple, the same Flyway Version and Flyway Conf file is used for both S3 Buckets. Next, we will create the Lambda function itself. Copy the following code in the lambda.tf.
################################################################################
# Lambda Flyway Trigger
################################################################################

resource "aws_lambda_function" "flyway_trigger" {
  function_name = "flyway-trigger"
  role          = aws_iam_role.flyway_trigger.arn

  filename         = data.archive_file.flyway_trigger.output_path
  handler          = "index.lambda_handler"
  source_code_hash = data.archive_file.flyway_trigger.output_base64sha256

  environment {
    variables = {
      INSTANCE_ID               = aws_instance.flyway_host.id
      CLOUDWATCH_LOG_GROUP_NAME = aws_cloudwatch_log_group.flyway_host.name
    }
  }

  runtime = "python3.9"

  timeout     = 15
  memory_size = 128

}


data "archive_file" "flyway_trigger" {
  type        = "zip"
  source_file = "${path.module}/src/flyway-trigger/index.py"
  output_path = "${path.module}/src/flyway-trigger/python.zip"
}
To be able to retrieve the SSM Parameters and execute an SSM Run Command on the Flyway Host, our Lambda function needs to have an IAM role with the proper permissions. Add the following code to the lambda.tf.
################################################################################
# IAM role for Lambda Flyway Trigger
################################################################################

resource "aws_iam_role" "flyway_trigger" {
  name = "flyway-trigger"

  assume_role_policy = jsonencode({
    Version = "2012-10-17"
    Statement = [
      {
        Action = "sts:AssumeRole"
        Effect = "Allow"
        Principal = {
          Service = "lambda.amazonaws.com"
        }
      },
    ]
  })
}

data "aws_iam_policy_document" "ssm_access" {
  statement {

    actions = [
      "ssm:GetParameter",
      "ssm:GetParametersByPath"
    ]

    resources = [
      for k, v in aws_ssm_parameter.s3_mapping : v.arn
    ]
  }
  statement {

    actions = [
      "ssm:SendCommand"
    ]

    resources = [
      "arn:aws:ssm:${data.aws_region.current.name}::document/AWS-RunShellScript",
      aws_instance.flyway_host.arn
    ]
  }

  statement {

    actions = [
      "ssm:GetCommandInvocation"
    ]

    resources = [
      "arn:aws:ssm:${data.aws_region.current.name}:${data.aws_caller_identity.this.account_id}:*"
    ]
  }
}

resource "aws_iam_policy" "ssm_access" {
  name   = "ssm-access"
  policy = data.aws_iam_policy_document.ssm_access.json
}

resource "aws_iam_role_policy_attachment" "ssm_access" {
  role       = aws_iam_role.flyway_trigger.name
  policy_arn = aws_iam_policy.ssm_access.arn
}

resource "aws_iam_role_policy_attachment" "basic_execution_role" {
  role       = aws_iam_role.flyway_trigger.name
  policy_arn = "arn:aws:iam::aws:policy/service-role/AWSLambdaBasicExecutionRole"
}
We are nearly finished. The only steps that are left to do are to set up an S3 notification and a Lambda permission for S3. This will ensure that our S3 Buckets are allowed to trigger the Flyway Trigger via S3 notifications each time a new migration file is uploaded to the S3 Bucket. Copy the following code into the lambda.tf.
resource "aws_lambda_permission" "flyway_trigger" {
  for_each = aws_s3_bucket.this

  statement_id   = "allow-execute-from-${each.value.id}"
  action         = "lambda:InvokeFunction"
  function_name  = aws_lambda_function.flyway_trigger.function_name
  principal      = "s3.amazonaws.com"
  source_arn     = each.value.arn
  source_account = data.aws_caller_identity.this.account_id
}
Afterward, adjust the s3.tf and add the snippet below.
################################################################################
# S3 notification trigger
################################################################################

resource "aws_s3_bucket_notification" "this" {
  for_each = aws_s3_bucket.this

  bucket = each.value.id
  lambda_function {
    events              = ["s3:ObjectCreated:*"]
    lambda_function_arn = aws_lambda_function.flyway_trigger.arn
    filter_suffix       = ".sql"
  }
  depends_on = [
    aws_lambda_permission.flyway_trigger
  ]
}
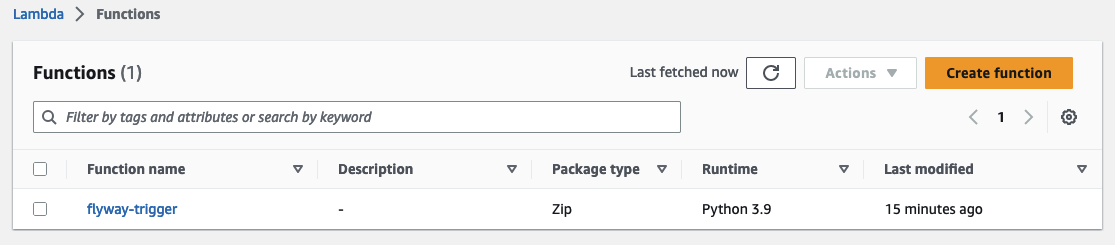
Run terraform init and terraform apply to deploy the new Flyway Trigger function. You should see a new Lambda function in the AWS Console.
You should also find two new parameters in the SSM Parameter store.
Perform Database Migrations
Now that our database migration pipeline is up and running, it is time to put it to a test. We will use the files V1__create_table_persons.sql and V2__alter_table_persons.sql we created early to create a new table in the database Users and alter it afterward. Add the following SQL script to V1__create_table_persons.sql…
CREATE TABLE Persons (
    PersonID int,
    LastName varchar(255),
    FirstName varchar(255),
    Address varchar(255),
    City varchar(255)
);
and V2__alter_table_persons.sql.
ALTER TABLE Persons
ADD Email varchar(255);
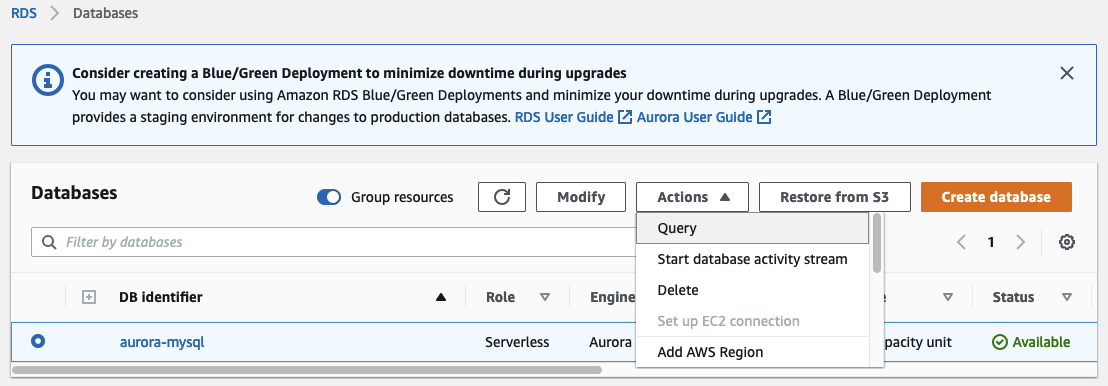
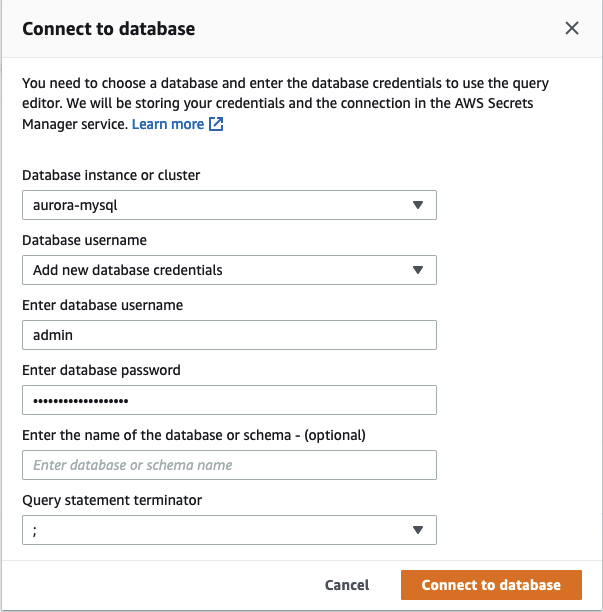
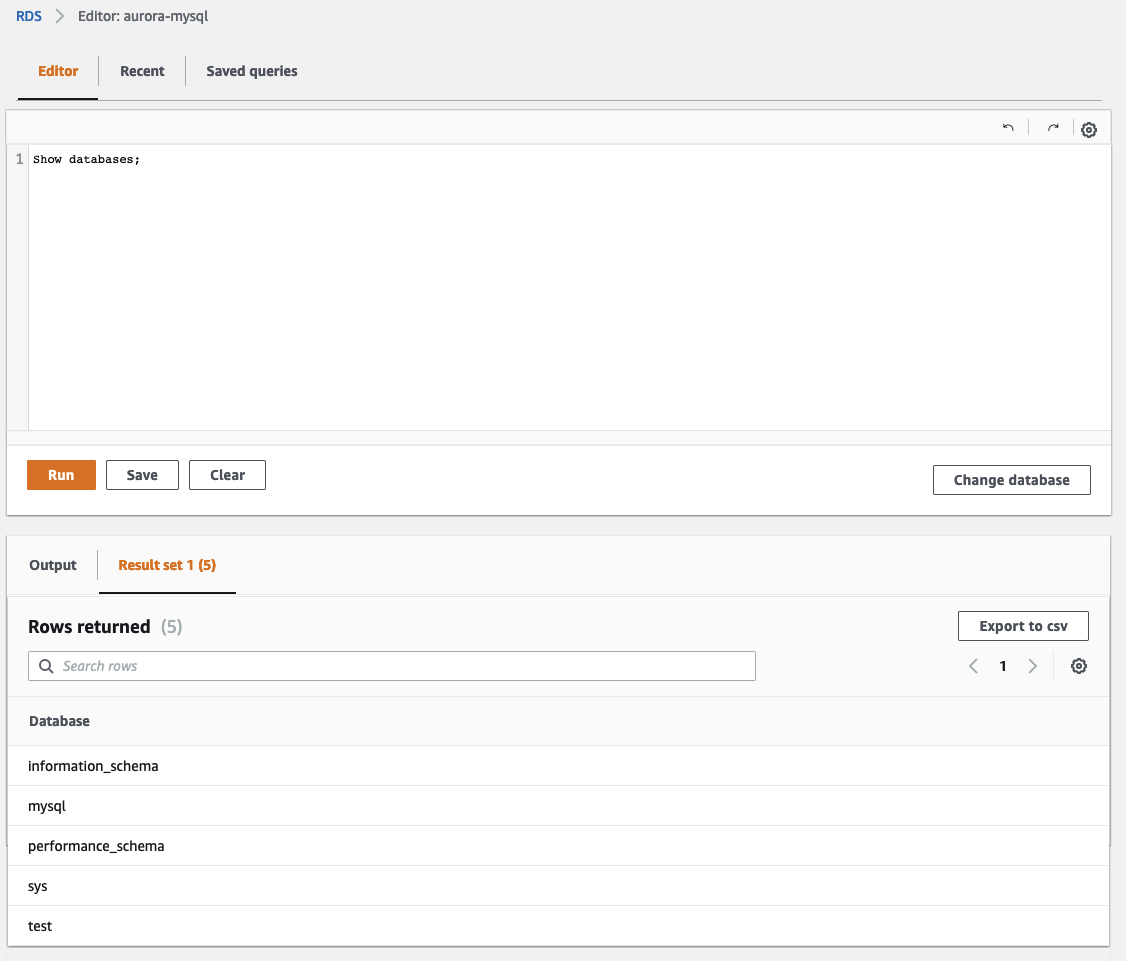
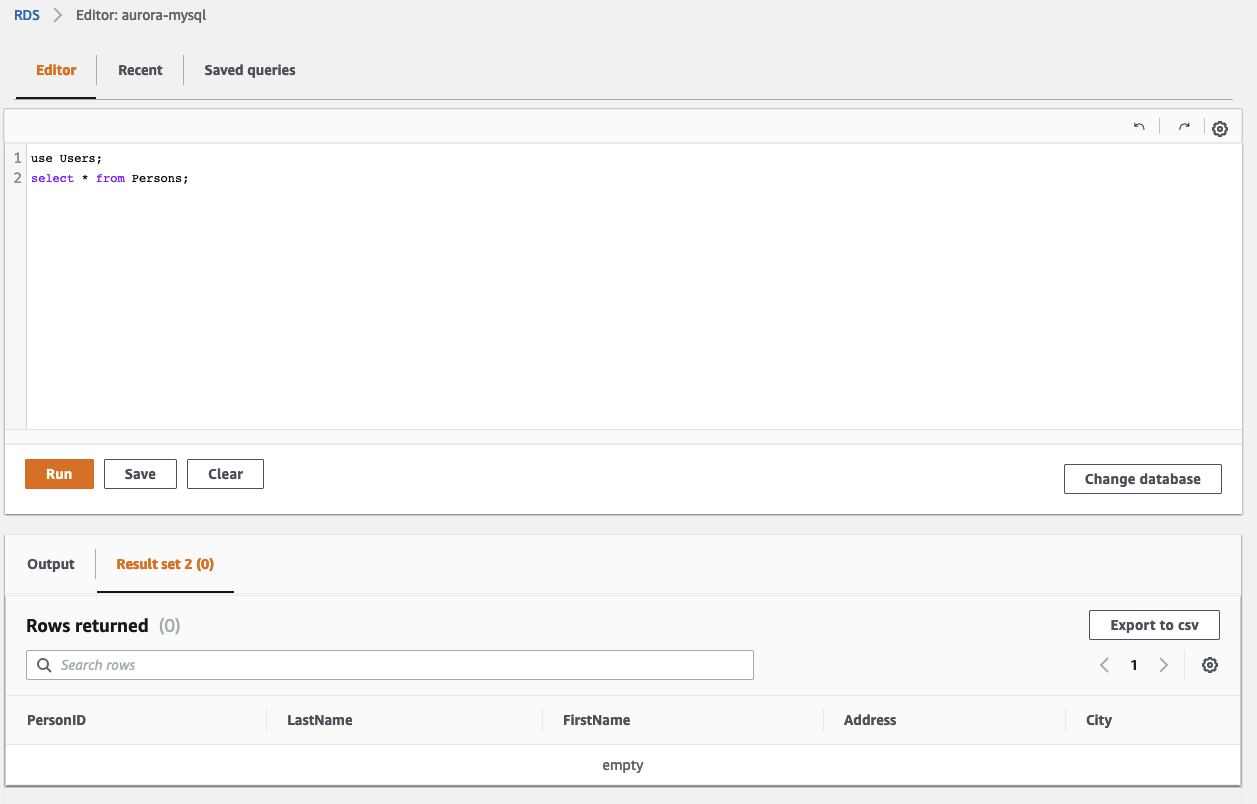
Before uploading both files one after the other, let’s open the RDS query editor and login into our Aurora Serverless cluster.
Next, we will check the databases that are currently present. Execute the SQL command show databases;. As you can see we have neither the database Products nor Users.
In order to create the databases and perform the database migrations, start by uploading the file V1__create_table_persons.sql to the S3 Bucket that starts with users. When working with Flyway, migrations files need to be prefixed with VX__. The number defines the version of the migration. When Flyway is executed, it will iterate over the files from the lowest version to the highest version number and will perform the migration.
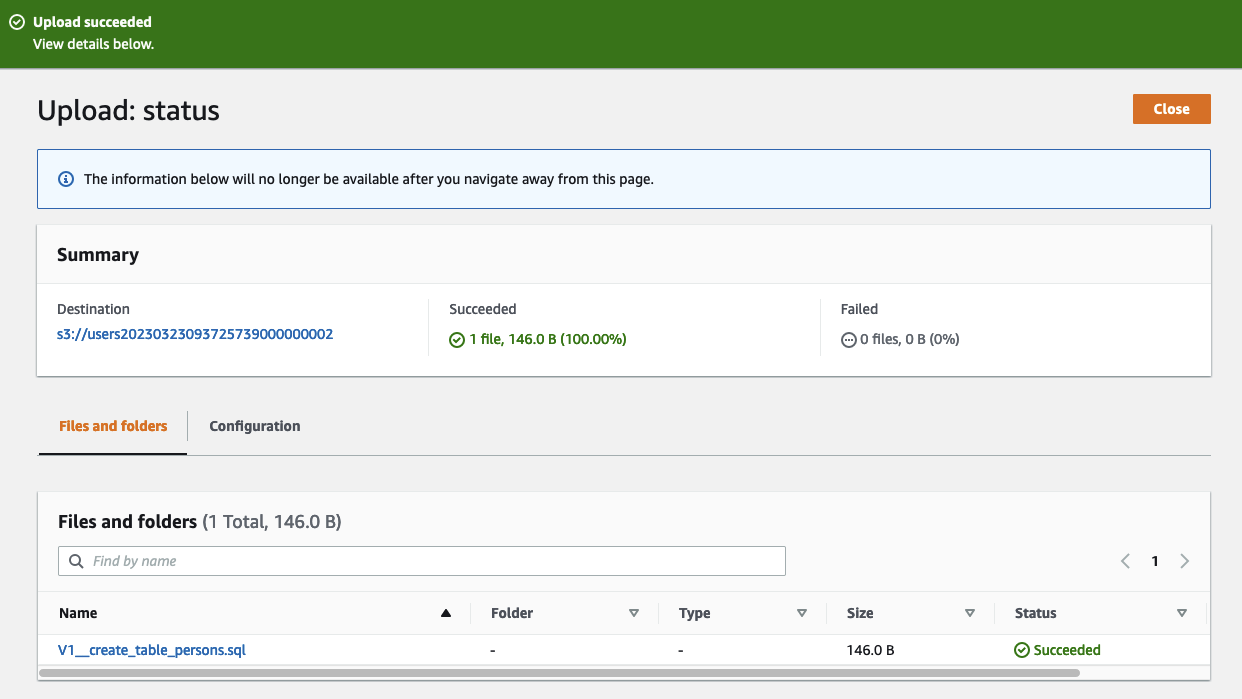
Once the file has been uploaded you should see that the Lambda function has been triggered and that an SSM Run Command was executed on the Flyway Host.
Check the Aurora cluster again and you should see, that a new database named Users with a new table named Persons has been created.
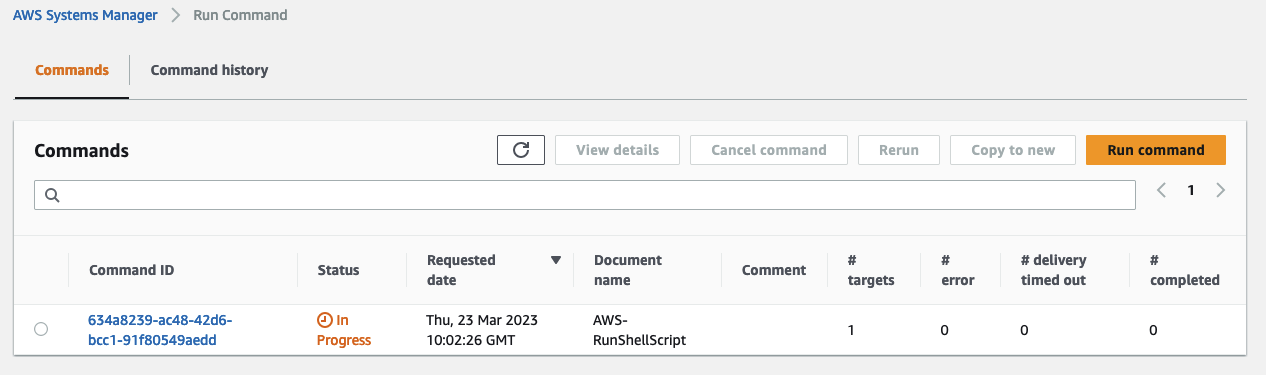
Upload the file V2__alter_table_persons.sql to perform a second migration and alter the new table Persons. We will add a new field called Email to the table. The Lambda function will trigger another SSM Run Command once the upload has been completed.
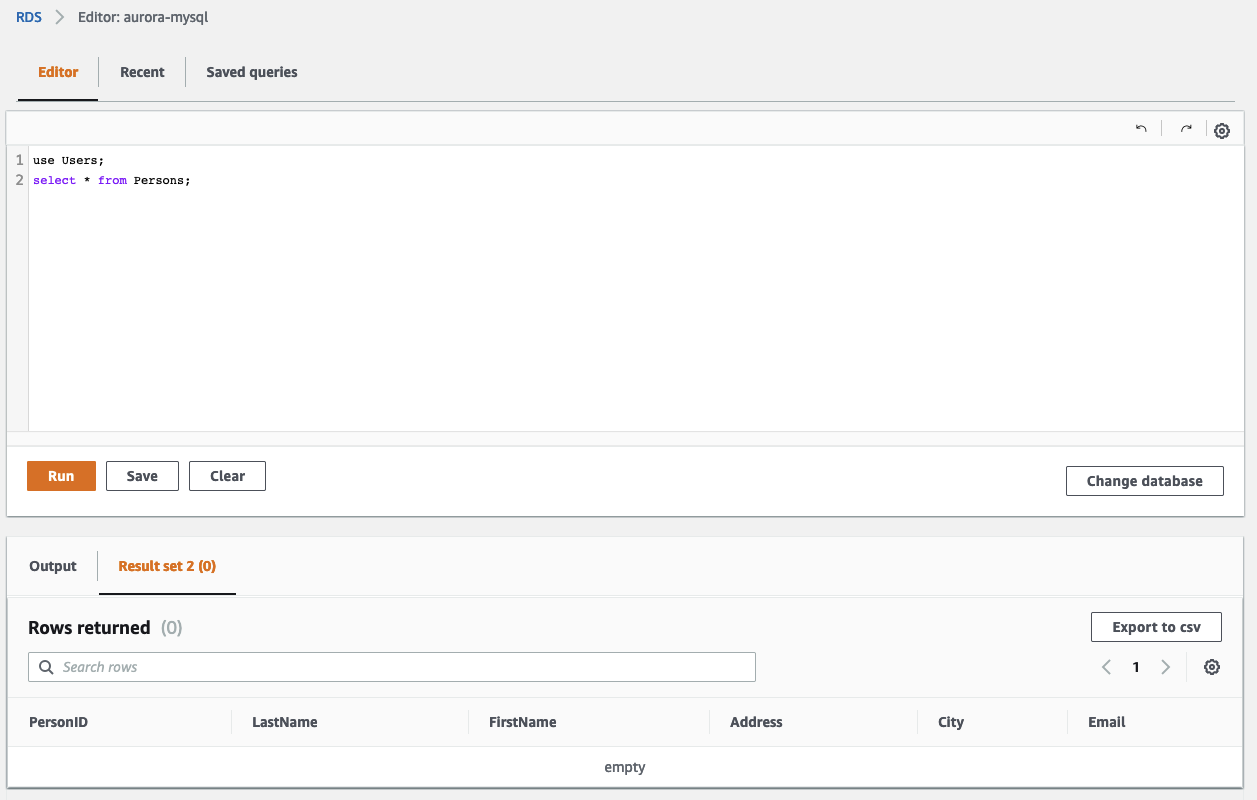
Go back to the RDS Query editor and verify the table Persons. You should see, that the field Email was added successfully to our table.
This concludes our short example. Feel free to create more Flyway migration files on your own and upload them to the S3 Buckets.
Summary
As you can see, it is not complicated to implement version control for your database with Flyway on AWS. Using this architecture you are able to automate your database migrations across different clusters, databases, and stages. This will not only make database deployments more reliable but will also speed up the overall development process of your team.
The architecture that we just implemented is meant to serve as a starting point and an example. There are multiple ways to make the solution more robust and efficient. One possibility would be to automate the S3 Bucket upload via GitHub Actions. If you feel comfortable enough you can also add the AWS SDK dependencies to Flyway and use the inbuild S3 support instead of using the aws s3 sync command.
I hope you had fun and learned something new while working through this short example. I am looking forward to your feedback and questions. If you want to take a look at the complete example code please visit my Github.
— Hendrik