Open Policy Agent for AWS and Terraform
While traditional Infrastructure as Code tools offer a multitude of benefits, they usually fail to meet the security and compliance requirements of modern security-focused organizations when managing infrastructure at scale.
This post will show you how you can leverage Open Policy Agent and Policy as Code to automate security and compliance procedures as well as enforce custom policies across an organization at scale.
Introduction
Everything as Code, also called EaC, is an emerging practice that aims to treat and implement every component of an IT system as code. The main focus is to switch from error-prone manual operations to codifying components while employing best practices used for software development regarding versioning, scaling, and testing.
When deploying infrastructure to the cloud, Infrastructure as Code has become the de facto standard. Be it CloudFormation, AWS CDK, or cloud-agnostic open-source tools like Terraform, there are a wide variety of options to choose from when provisioning, upgrading, and managing cloud infrastructure. Using IaC offers several benefits in terms of flexibility, speed, and consistency of development and deployment. While the advantages of IaC are clearly visible, traditional IaC tools alone fail to meet the security and compliance requirements of modern security-focused organizations when managing infrastructure at scale.
One solution to this problem is the addition of Policy as Code. Policy as Code tools like Open Policy Agent allows automated and unified policy enforcement as well as security and compliance validation across a company’s technology stack. By expressing policies and guardrails as code, testing, sharing, and enforcement becomes possible at nearly any scale. Reduction of human error and a higher level of overall security and compliance are the end result.
In this blog, I would like to show you how you can leverage Terraform (IaC) in combination with Open Policy Agent (PoC) to ensure secure and compliant infrastructure deployments.
Workflow
Before I guide you through the example, I would like to start by giving you a general overview of the workflow when using Terraform and Open Policy Agent (OPA) to deploy infrastructure. The figure below highlights the main steps and will function as a blueprint later on.
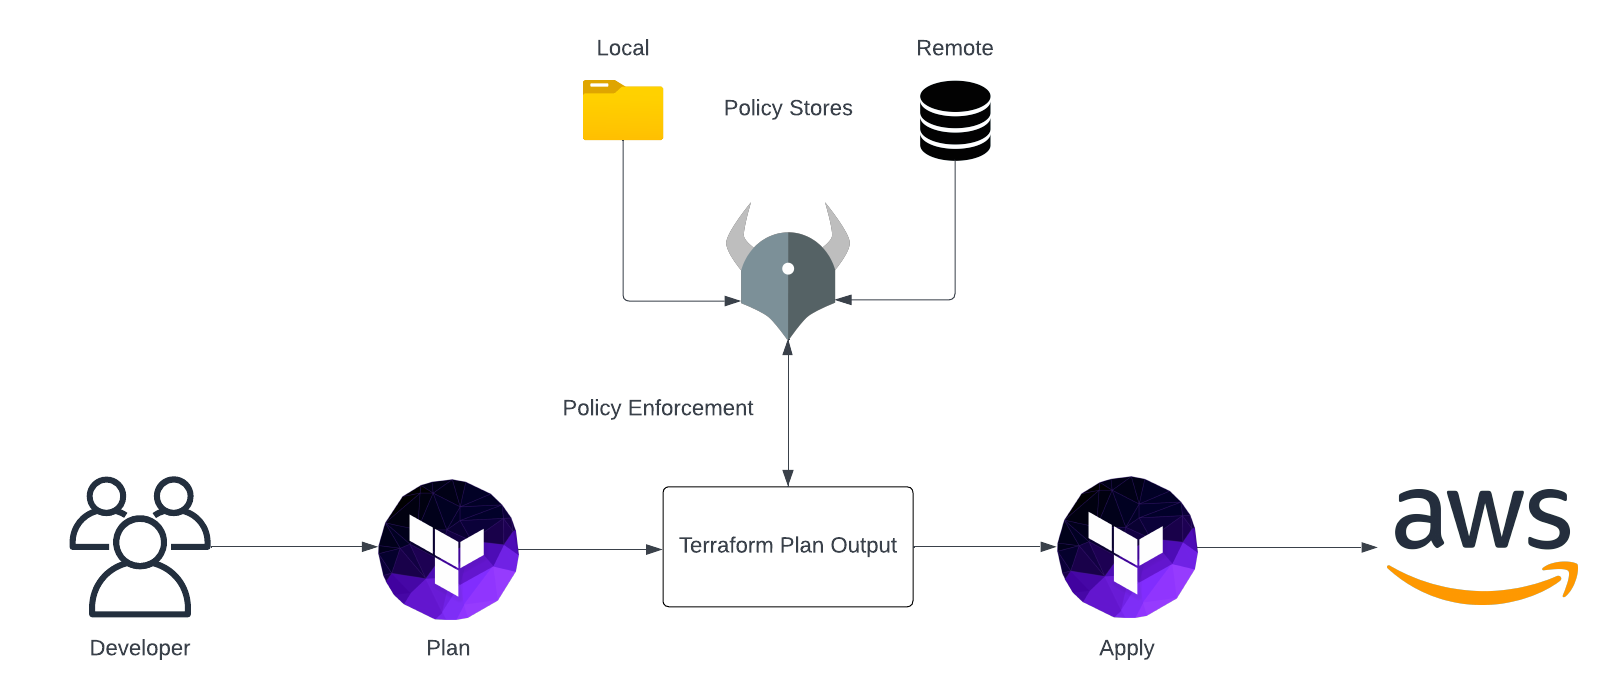
The first step of the process starts with the developer and the development of Terraform Code itself. Without Terraform code there is nothing we could evaluate our OPA policies against. After having implemented the desired infrastructure configuration, we generate a Terraform plan output by using terraform plan -out tfplan. Terraform plan lets us create an execution plan and preview the changes Terraform intends to perform. Afterward, OPA will analyze resource creations, updates, and deletions and will compare these planned changes to permitted actions defined in custom policy documents. Policy documents can be stored either on the local machine or in a remote location like a database. In case the intended changes comply with the guardrails defined in the policies, the evaluation is marked as successful. A successful evaluation by OPA leads to terraform apply being executed to deploy the infrastructure to AWS.
Setup Project Structure
Before we start implementing our OPA policies and Terraform configuration, I would like you to create the project structure. Please create the following files and folders.
├── policy/
│   └── policy.rego
├── main.tf
As you can see, we don’t need much to demonstrate the usage of OPA in combination with Terraform. The file main.tf will contain our Terraform code. The folder policy will contain a single policy file policy.rego that we will use to evaluate our Terraform plan output.
Generate Terraform Plan Output
As already described above, the whole OPA evaluation process starts with the Terraform code itself. For that reason, we will create an example configuration containing a few resources. The actual infrastructure is not the main focus of this discussion and has been kept simple on purpose. If you are looking for a challenge, feel free to experiment and use your own Terraform configuration. The example below creates four resources, an S3 Bucket, two EC2 Instances, and an IAM Role. Please copy the code into your main.tf. (You can also download the code straight from Github)
################################################################################
# S3
################################################################################

resource "aws_s3_bucket" "this" {
}


################################################################################
# EC2
################################################################################

resource "aws_instance" "instance_A" {
  instance_type = "t2.large"
  ami = data.aws_ami.ubuntu.id
}

resource "aws_instance" "instance_B" {
  instance_type = "t2.large"
  ami = data.aws_ami.ubuntu.id
}

data "aws_ami" "ubuntu" {
  most_recent = true

  filter {
    name   = "name"
    values = ["ubuntu/images/hvm-ssd/ubuntu-focal-20.04-amd64-server-*"]
  }

  filter {
    name   = "virtualization-type"
    values = ["hvm"]
  }
}


################################################################################
# IAM
################################################################################

resource "aws_iam_role" "this" {
  name = "example-role"

  assume_role_policy = jsonencode({
    Version = "2012-10-17"
    Statement = [
      {
        Action = "sts:AssumeRole"
        Effect  = "Allow"
        Sid    = ""
        Principal = {
          Service = "ec2.amazonaws.com"
        }
      },
    ]
  })
}
Once you have copied the code into your main.tf, initialize Terraform by running terraform init and generate a Terraform plan output by using the command terraform plan -out tfplan. This command will perform a terraform plan and store the plan output as a binary into the file tfplan. Before we can proceed we have to convert the binary file into JSON so that it can be read by OPA. Run the command terraform show -json tfplan > tfplan.json to create a JSON version of the Terraform plan output.
Implement OPA Policy
Now that we have converted our plan to JSON, we can start implementing our OPA policy. OPA policies are written in Rego. Rego is a declarative, general-purpose policy language. Given that OPA is Policy as Code, you can implement any policy you want as long as the attributes and values you are evaluating are part of the Terraform plan JSON file.
In this example, we will make a couple of basic checks to ensure that only approved AWS resources can be created, deleted, or changed. The example should only be used as a foundation and starting point for your own policies. Please start by copying the policy below into the policy.rego file we created earlier. I will go over the policy step by step and explain the major components in detail later on.
##########################################
# Imports
##########################################

package terraform.analysis

import input as tfplan
import future.keywords.in


##########################################
# Parameters
##########################################

blast_radius := 30

weights := {
    "aws_instance":{"delete":100, "create": 6, "modify": 1},
    "aws_s3_bucket":{"delete":100, "create": 20, "modify": 1}
}


##########################################
# Changed & Created Resources
##########################################

res_changes[resource_type] := all {
    some resource_type
    weights[resource_type]
    all := [name |
        name:= tfplan.resource_changes[_]
        name.type == resource_type
    ]
}

res_creations[resource_type] := num {
    some resource_type
    res_changes[resource_type]
    all := res_changes[resource_type]
    creates := [res |  res:= all[_]; res.change.actions[_] == "create"]
    num := count(creates)
}


##########################################
# Policies
##########################################

score := s {
    all := [ x |
            some resource_type
            crud := weights[resource_type];
            new := crud["create"] * res_creations[resource_type];
            x := new
    ]
    s := sum(all)
}

deny_iam_changes {
    some resource in tfplan.resource_changes
    violations := [address |
        address := resource.address
        contains(resource.type, "iam")
    ]
    count(violations) > 0
}

check_instance_type {
    some resource in tfplan.resource_changes
    violations := [address |
        address := resource.address
        resource.type == "aws_instance"
        not resource.change.after.instance_type == "t2.micro"
        ]

    count(violations) > 0
}

default authz := false
authz {
    score < blast_radius
    not deny_iam_changes
    not check_instance_type
}
The first section of the policy loads the OPA Terraform package terraform.analysis, the Keyword in, and imports the evaluation input as tfplan. When we run our OPA evaluation later on, tfplan.json will be our input. By declaring import input as tfplan, we are able to use the keyword tfplan when referencing our attributes and values from the plan file instead of having to use input. Even though this step is not necessary, it makes referencing easier.
##########################################
# Imports
##########################################

package terraform.analysis

import input as tfplan
import future.keywords.in
After having declared the imports, we will define two additional parameters - blast_radius and weights. Our OPA policy will analyze the total amount of created, destroyed, and modified resources and will make sure that the combined changes don’t go above a pre-defined threshold. Each resource that we want to include in this evaluation receives an entry in the weights object as well as a numeric value for delete, create, and modify. The numeric values represent a score that is assigned to each resource type and Terraform action. Creating an S3 Bucket and an EC2 Instance for example would result in a score of 6 + 20 = 26. The blast_radius represents the upper boundary for the score of combined resource changes and cannot be exceeded. Creating two S3 Buckets would not be possible, as a score of 20 +20 = 40 would result in a greater score than the blast_radius of 30.
##########################################
# Parameters
##########################################

blast_radius := 30

weights := {
    "aws_instance":{"delete":100, "create": 6, "modify": 10},
    "aws_s3_bucket":{"delete":100, "create": 20, "modify": 10}
}
Next, we will create two objects - res_changes and res_creations. The first object res_changes is a collection of all resources that will be changed by Terraform (create, delete, modify) and are included in the weights object. The resources are grouped by resource type. In the case of our example the object res_changes will include all aws_instance and aws_s3_bucket resources that are either created, deleted, or modified. We use this object to create the object res_creation. res_creation is a subset of res_changes and includes the number of resources per resource type that will be created by Terraform. If we create two S3 Buckets for example, res_creation will contain the value entry 2 for the object key aws_s3_bucket. Both objects are later used to determine the total blast_radius.
To keep this example as understandable as possible, only resource creations are considered. Feel free to challenge yourself and implement a separate object for resource deletion and modification on your own.
##########################################
# Changed & Created Resources
##########################################

res_changes[resource_type] := all {
    some resource_type
    weights[resource_type]
    all := [name |
        name:= tfplan.resource_changes[_]
        name.type == resource_type
    ]
}

res_creations[resource_type] := num {
    some resource_type
    res_changes[resource_type]
    all := res_changes[resource_type]
    creates := [res |  res:= all[_]; res.change.actions[_] == "create"]
    num := count(creates)
}
The next section deals with the implementation of the actual policies. In the case of our example we will implement three rules that will be evaluated together - score, deny_iam_changes, and check_instance_type. score calculates the total blast_radius by multiplying the create weights of each resource type with the number of distinct resources that will be created of said type. deny_iam_changes will count all planned changes to resources that contain the word iam. We will use this rule to disallow any changes to IAM resources. check_instance_type will check if the instance type of EC2 Instances is set to t2.micro.
##########################################
# Policies
##########################################

score := s {
    all := [ x |
            some resource_type
            crud := weights[resource_type];
            new := crud["create"] * res_creations[resource_type];
            x := new
    ]
    s := sum(all)
}

deny_iam_changes {
    some resource in tfplan.resource_changes
    violations := [address |
        address := resource.address
        contains(resource.type, "iam")
    ]
    count(violations) > 0
}

check_instance_type {
    some resource in tfplan.resource_changes
    violations := [address |
        address := resource.address
        resource.type == "aws_instance"
        not resource.change.after.instance_type == "t2.micro"
        ]

    count(violations) > 0
}
After having defined all rules, we combine all three into a single rule authz. By default authz is set to false which means that the policy will be non-compliant by default. Only if the calculated score is lower than the pre-defined blast_radius, no changes have been made to IAM resources, and the instance type of EC2 Instances is set to t2.micro will the policy evaluation be shown as compliant.
default authz := false
authz {
    score < blast_radius
    not deny_iam_changes
    not check_instance_type
}
Evaluate Policy
Now that we have implemented our Terraform configuration as well as our policy, it is time for the evaluation. To evaluate our policy we will run the following command.
opa exec --decision terraform/analysis/authz -b policy/ tfplan.json
opa exec will execute OPA against one or more input files. The --decision flag is used to set the rule we want to evaluate. In our case --decision will be pointed at authz. The -b flag lets us define the directory of our policy files. tfplan.json is the evaluation input file. When running the command, you should receive the following output.

As you can see the rule authz evaluates to false. That means that our Terraform configuration is not compliant with our policy. Let’s dig a little deeper. As discussed in the section earlier, Terraform configurations that make any changes to IAM resources will be non-compliant. To check to the status of our rule deny_iam_changes, we can point the opa exec command to a different rule via the --decision flag.
opa exec --decision terraform/analysis/deny_iam_changes -b policy/ tfplan.json
As shown by the command output, the rule is evaluated as true. That means that our Terraform plan includes changes to IAM resources. To make our configuration compliant we would have to remove the resource aws_iam_role from our Terraform configuration.

Let’s also verify the status of the other two rules score and check_instance_type by adjusting the --decision flag. Run the two following commands.
opa exec --decision terraform/analysis/score -b policy/ tfplan.json
opa exec --decision terraform/analysis/check_instance_type -b policy/ tfplan.json
For the evaluation of the score rule you should receive a result of 32. By combining the pre-defined creation weights of our resources aws_instance and aws_s3_bucket we receive a score of 6 + 6 + 20 = 32. This means that our current Terraform configuration has a blast_radius high than 30. In order to be compliant with our policy we will have to remove either the S3 Bucket or one of the EC2 Instances.

The rule check_instance_type also evaluates to true which is not compliant with our policy. To make our configuration compliant, we will have to change the instance type of our EC2 Instances from t2.large to t2.micro.

Adjust Terraform Configuration
After having evaluated all the rules of our policy, we will make the necessary Terraform adjustments. Please replace the content of your main.tf with the following snippet.
################################################################################
# S3
################################################################################

resource "aws_s3_bucket" "this" {
}


################################################################################
# EC2
################################################################################

resource "aws_instance" "instance_A" {
  instance_type = "t2.micro"
  ami = data.aws_ami.ubuntu.id
}

data "aws_ami" "ubuntu" {
  most_recent = true

  filter {
    name   = "name"
    values = ["ubuntu/images/hvm-ssd/ubuntu-focal-20.04-amd64-server-*"]
  }

  filter {
    name   = "virtualization-type"
    values = ["hvm"]
  }
}
As you can see, we removed the aws_iam_role resource, one aws_instance, and changed the instance type of the remaining instance to t2.micro. To evaluate our adjusted configuration, we have to regenerate our tfplan.json. Start by deleting the old tfplan and tfplan.json files. Once deleted, rerun the commands terraform plan -out tfplan and terraform show -json tfplan > tfplan.json. Afterward, reevaluate the OPA policy by executing opa exec --decision terraform/analysis/authz -b policy/ tfplan.json. As you can see that authz evaluates to true. That means, that our new Terraform configuration is compliant and could be deployed. Feel free to rerun the evaluation for the other rules to get a better feeling of how our adjustments affected the outcome.

Summary
As you can see it is not that complicated to create basic guardrails with OPA for your IaC deployments. By leveraging Policy as Code we were able to make our Terraform deployment more secure and compliant with pre-defined standards. Even though the configuration itself as well as the policy used as part of this example were simple in nature, I hope the power and potential of using IaC and PaC together have been made clear.
Besides OPA, static code analysis tools with pre-defined rules like KICS or Checkov can also be used to handle the most common misconfigurations and security threats. A sensible approach could be to use Checkov to make a first basic scan and OPA to enforce highly customized policies afterward.
I hope you had fun and learned something new while working through this short example. I am looking forward to your feedback and questions. If you want to take a look at the complete example code please visit my Github.
— Hendrik