Introduction to MQTT and AWS IoT Core
This content is more than 4 years old and the cloud moves fast so some information may be slightly out of date.
I’m going to introduce MQTT and AWS IoT core in this article. MQTT or Message Queuing Telemetry Transport is an Open Source protocol that was developed in the 90s by Andy Stanford-Clark and Arlen Nipper. Fundamentally, it implements the publisher/subscriber pattern in an elegant way that requires few resources and little overhead. It’s simple and lightweight, making it a widespread choice for IoT applications. I consider it an interesting solution for non-IoT use cases as well, so bear with me, even if you’re not into IoT.
We need a message broker to use MQTT as a central entity that facilitates data exchange. There are many options for this, for example, VerneMQ, Eclipse Mosquitto, or AWS IoT Core. We’ll use AWS IoT Core later. First, we will consider MQTT, what it does, and how it works.
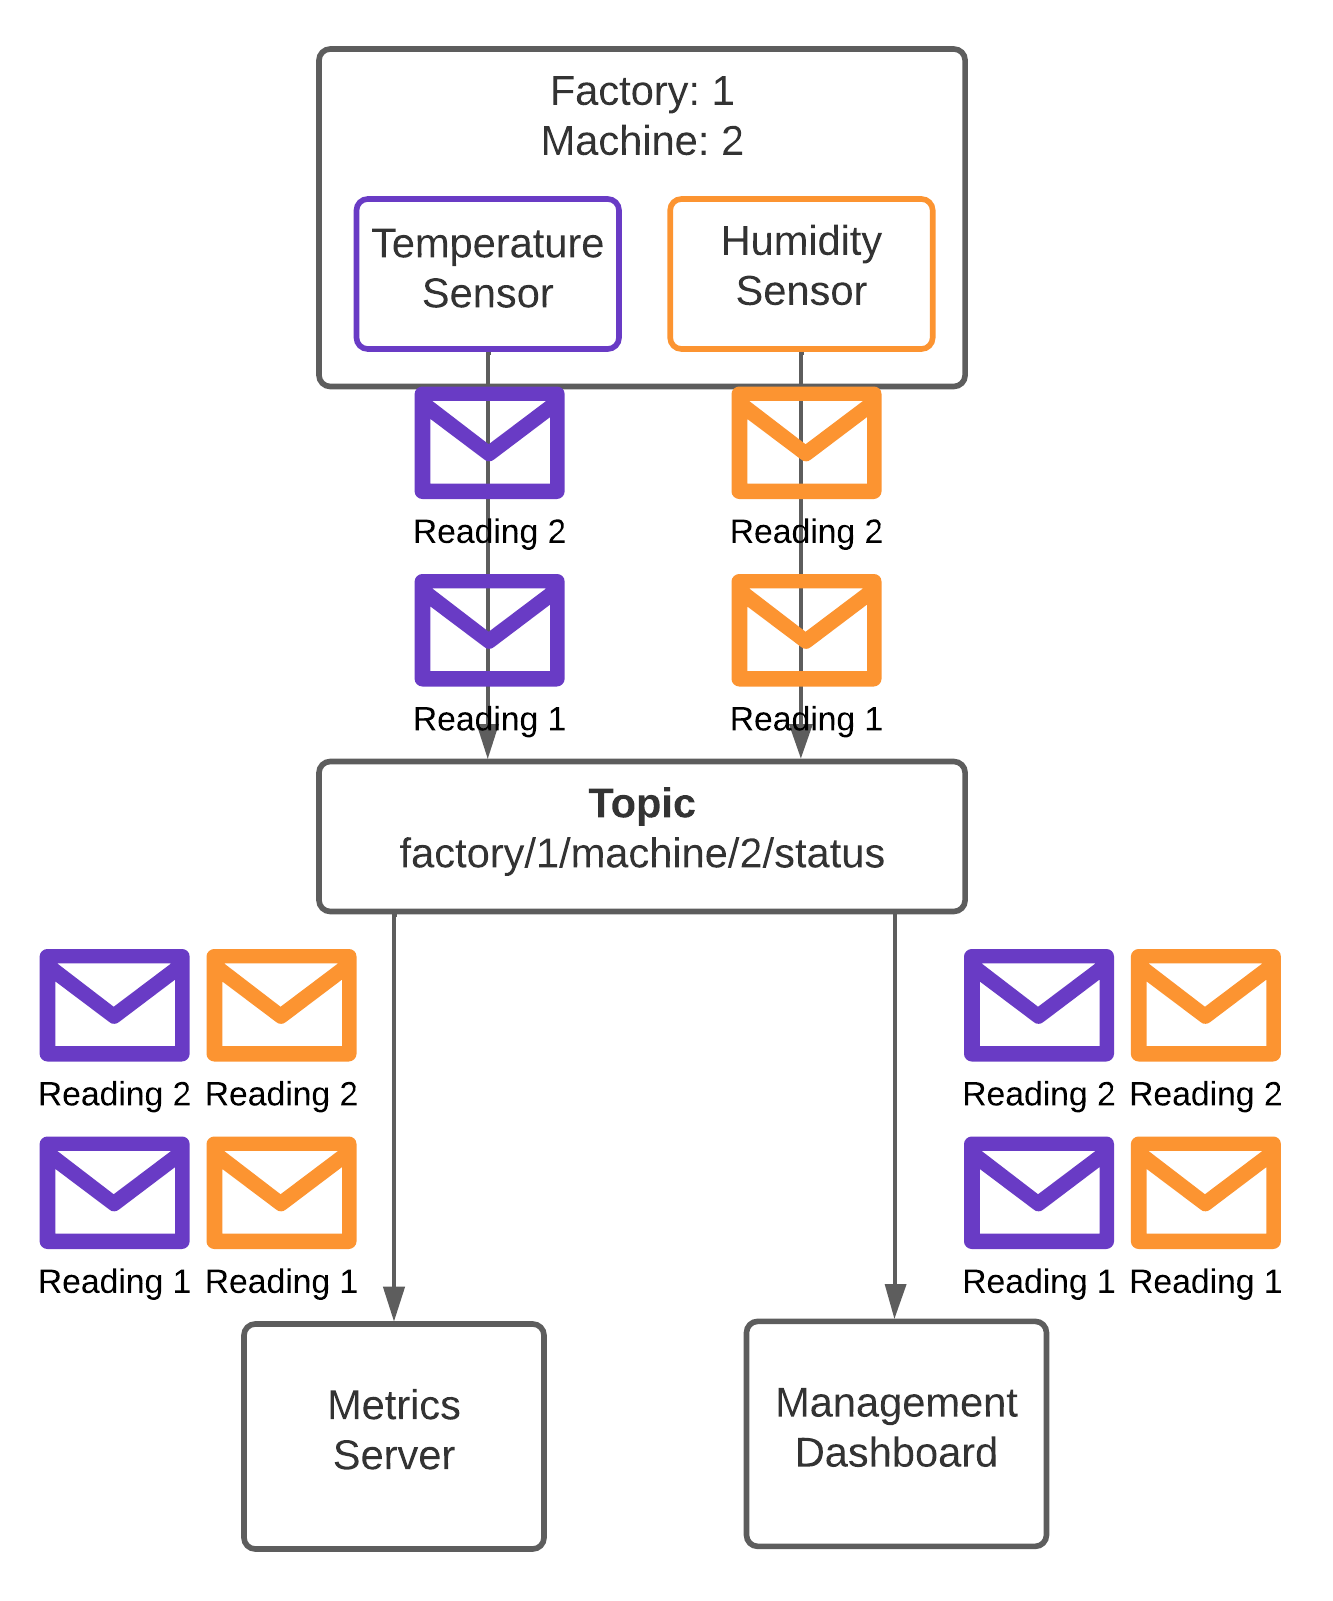
I already mentioned that it implements the publisher-subscriber pattern. It means that one or more publishers send messages to a topic, and any number of subscribers will each receive a copy of messages sent to this topic. Topics are at the core of this flow and enable building loosely coupled and scalable architectures. That is because subscribers don’t need to know about individual publishers and vice versa. Also, as long as the server can handle the number of clients, the system can grow enormously (This is what IoT Core is good at).
Clients, in this case, can both send and receive messages from the broker. Depending on what they do, they may act as publishers or subscribers. First, we’ll take a closer look at publishers. Publishers send messages to a topic, and each message gets sent to exactly one topic. The publisher can set a few attributes of the message that enable specific behaviors. Retained messages are one of these. A retained message “sticks” to a topic and any newly connecting subscriber will receive it. There can only be one retained message per topic. Retained messages often keep track of the current state of a resource, for example, if a lamp is currently turned on or off or an initial configuration. Sending a new retained message will overwrite existing ones, and sending an empty retained message to the topic clears them.
Messages get sent to topics, which are dynamically generated on MQTT servers whenever they receive a message. There is no need to create them in advance, simplifying communication flows. Topics are organized in a tree-like hierarchy. If you’re familiar with folder structures, this is similar to how topics work. A topic name can be something like “factory/1/machine/2/status”. Each “/” creates a new level in the hierarchy, just as we’re familiar with from working with directory trees. You can use almost any UTF-8 character in a topic name, except for “#” and “+” because they have a special meaning, which we’ll cover in a bit. You shouldn’t create topics starting with “$SYS/” because the message broker uses them for internal operations.
Now that we’ve covered some of the basics of sending messages let’s move over to receiving them. Subscribers receive messages that get sent to topics to which they subscribe. Each subscriber on a topic will get a copy of the messages sent to that topic. Our subscriber would create a subscription to “factory/1/machine/2/status” to get the status messages for machine 2 in factory 1 from the example above. This would be a subscription to a specific topic. We need to use wildcards if we’re interested in all messages in factory 1 or machine 2.
Wildcards are placeholders in the topic name for a subscription. There are two kinds of wildcards in the MQTT protocol. One of them is the “#.” The “#” wildcard matches any string following it. There can only be exactly one of these in a subscription, and it needs to be at the end of the filter. Let’s consider the following topic names:
- factory/1/machine/1/status
- factory/1/machine/32/status
- factory/2/machine/7/status
- office/7/machine/23/status
- office/8/sensor/42/measurements
In our example, the filter “factory/1/machine/# “matches the topics 1) and 2) and the filter “factory/# “would match the topics 1-3. The plain “#” filter would match all topics, and “office/# “would match only the last two topics. This filter is very broad and matches a lot of topics. You should use it sparsely because you may get more messages than you asked for. If we later add another topic with the name “factory/1/machine/1/measurements”, the filter “factory/1/machine/#” may suddenly return more (and different) messages than expected.
The other option is the “+” wildcard. It can be used multiple times within a subscription and matches exactly one level in the topic hierarchy. You can also combine it with the “#” wildcard if you feel like it. Let’s consider another set of topic names:
- factory/1/machine/1/status
- factory/1/machine/1/alerts
- factory/2/machine/3/status
- factory/1/vehicle/1/alerts
- office/1/machine/23/status
- office/2/machine/16/status
- office/2/machine/16/alerts
Here, a filter “factory/+/machine/+/status” would get all messages from topics 1 and 3. The filter “+/+/machine/+/alerts” would receive messages from topics 2 and 7. As mentioned, we can also combine the wildcards, and “factory/+/machine/#” would produce the messages from topics 1 to 3. Wildcards are a powerful way to filter which messages you’re interested in.
There are also persistent and clean sessions for subscribers. The difference between the two is what happens when the subscriber is disconnected. For a clean session, the broker will forget about the subscriber as soon as it disconnects, and the subscriber will start receiving any new messages when it connects again. A persistent connection works differently. The broker has an internal queue that buffers the subscribers’ messages until they reconnect and then delivers any missed messages.
Now that we’ve talked about the basics of publishing and subscribing, it’s time to talk about consistency and reliability. Both are concepts that we may or may not need for our applications. If you have a sensor that does 120 measurements per second, it’s probably okay if some of them get lost during transmission. Building a system that needs to respond to alerts as soon as possible doesn’t have these tolerances. The discussion we’re going to have is about Quality of Service.
Quality of Service (QoS) is a feature of the MQTT protocol that lets publishes and subscribers independently decide what kind of service level they require. There is three in total:
- QoS 0: Fire and forget: Publishers send messages, and they may or may not arrive at the broker. The broker sends the message to all subscribers but doesn’t keep track if it was successful
- QoS 1: At least once delivery: Messages from a publisher arrive at least once at the broker, but there may be retransmissions in case some acknowledgments get lost. The same is true for subscribers - the broker will ensure that messages are received at least once, but it may sometimes send duplicates.
- QoS 2: Exactly once delivery: The perfect system. Messages from the publisher are processed by the broker exactly once. Also, each subscriber gets each message exactly once. (AWS IoT Core doesn’t support this.)
Why would you choose any level other than 2? Well, as usual, perfect systems come with a price attached, so we often settle for good enough. In this case, the broker needs to do a lot of work, which doesn’t scale very well. I want to emphasize again that QoS levels between publisher and broker and subscriber and broker are independent. It’s possible that the publisher does fire and forget (0), and the subscriber subscribes as exactly-once delivery (2). In that case, there is no guarantee the subscriber will receive all the messages, only the ones that make it to the broker. In general, you’ll want to pick the least (compute) expensive option that is feasible for your use case. However, your selection may be limited because not all brokers support all of these QoS levels. AWS IoT Core, for example, only supports QoS levels 0 and 1.
Speaking of AWS IoT Core, we’ve covered the essentials about MQTT. Let’s move on to seeing how this works in the real world. IoT Core is an MQTT broker that comes with your AWS account and is generally priced based on the number of messages it has to process and the number and duration of connections to it. We would use code to connect to it and send and receive messages in practice. That includes a fair bit of complexity and would be too much for this introductory post. Fortunately, the AWS console has a test client that we can use to publish and subscribe to topics.
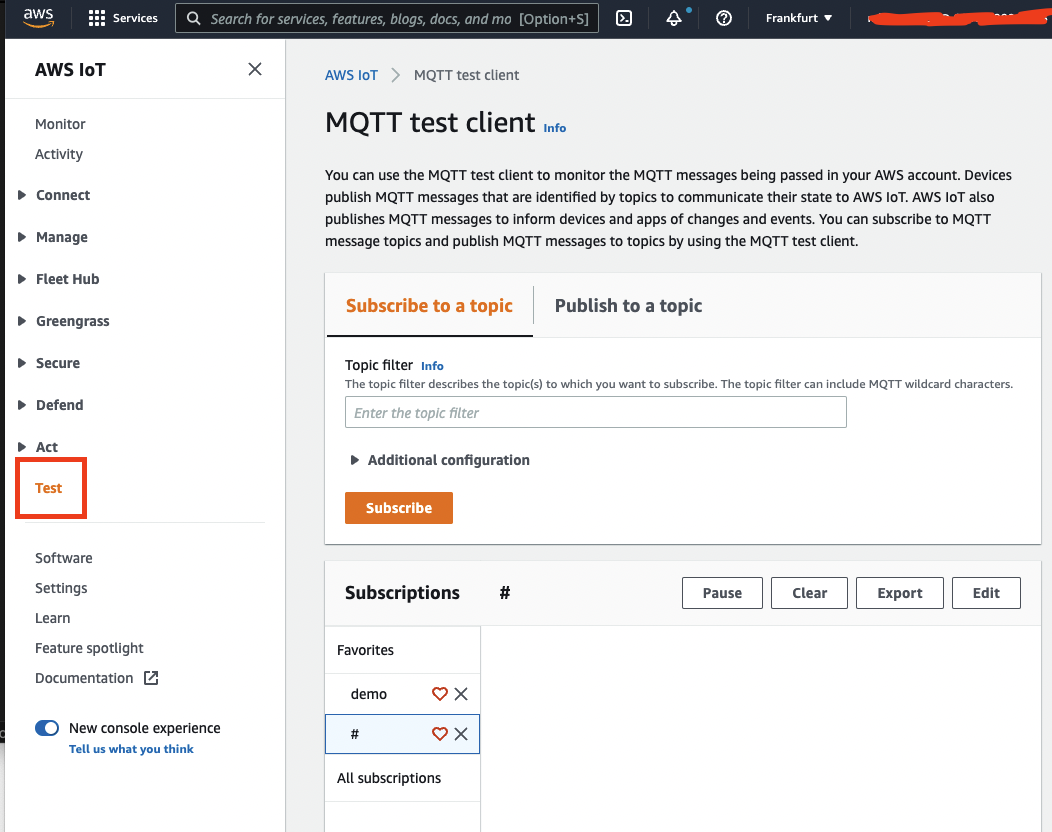
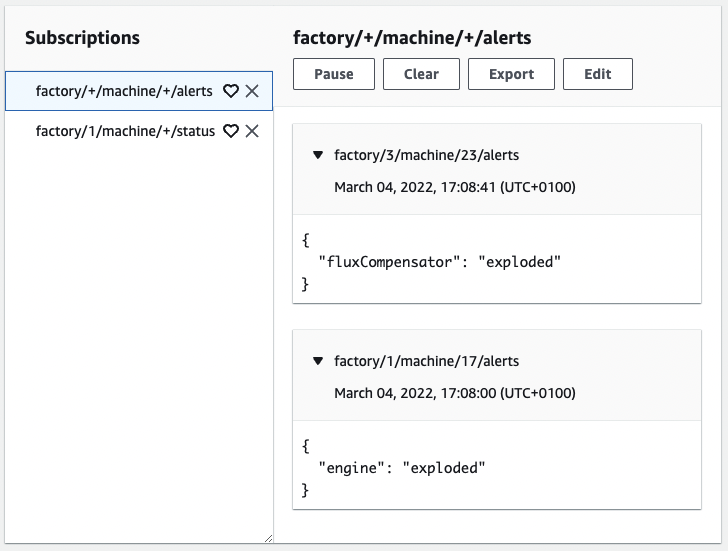
We can easily set up a few subscriptions here, which will allow us to see published messages later. In my case, I’m sticking close to some of the examples I’ve shown above. I subscribed to both “factory/+/machine/+/alerts” - alerts for all machines in all factories- and “factory/1/machine/+/status” - status messages for all devices in factory 1. After we send messages, we’ll be able to observe them here.

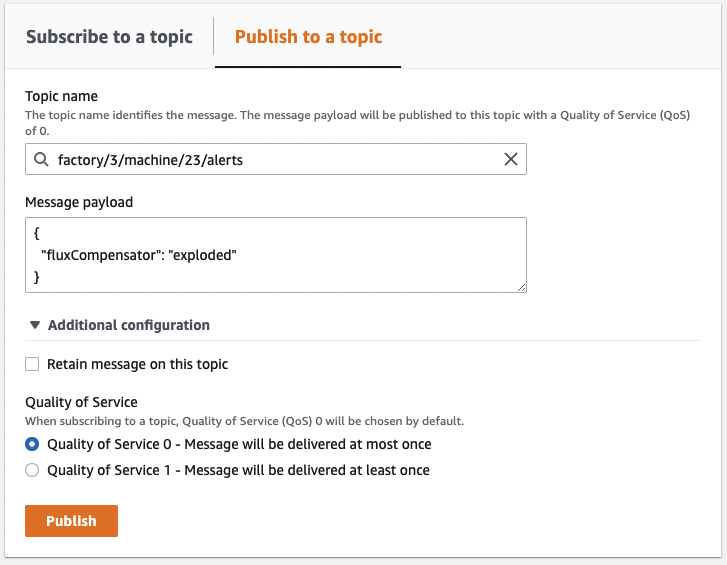
Next, I will send some messages to topics by clicking on additional configuration. I’m able to set attributes such as the QoS or retained messages. IoT Core stores retained messages for up to 3 years, then they expire. So they would have to be refreshed at some point.
Having published a few messages, we’re now able to see the results in the console. JSON doesn’t have to be the transport format for messages sent over IoT Core. Binary content is possible as well. For later processing in AWS, it’s advisable to stick to JSON, though. That will allow you to use the full breadth of the filtering and aggregation logic of AWS IoT.
Summary
In this post, we’ve first taken a look at MQTT and how it implements the publisher-subscriber-pattern. We talked about the hierarchically structured topics. We also covered Quality of Service, retained messages, and clean/persistent sessions. Last, we briefly explored using the AWS console to interact with the MQTT broker built into AWS IoT Core.
I’ve written a post about ingesting IoT data into data lakes, which allows you to see one application of the tools discussed here.
Thank you for reading this far. For feedback, questions, suggestions, and concerns, feel free to reach out via the channels listed in my bio.
— Maurice