Restrict AWS Marketplace offerings with private Marketplace
People are constantly stumbling over the AWS Marketplace and their more than 30,000 public offerings. Restricting such a massive amount of products is mainly done with the necessary internal AWS Marketplace policy that you find in a document in document management systems like AWS WorkDocs. What would you say about better restricting the public AWS Marketplace with a private Marketplace?
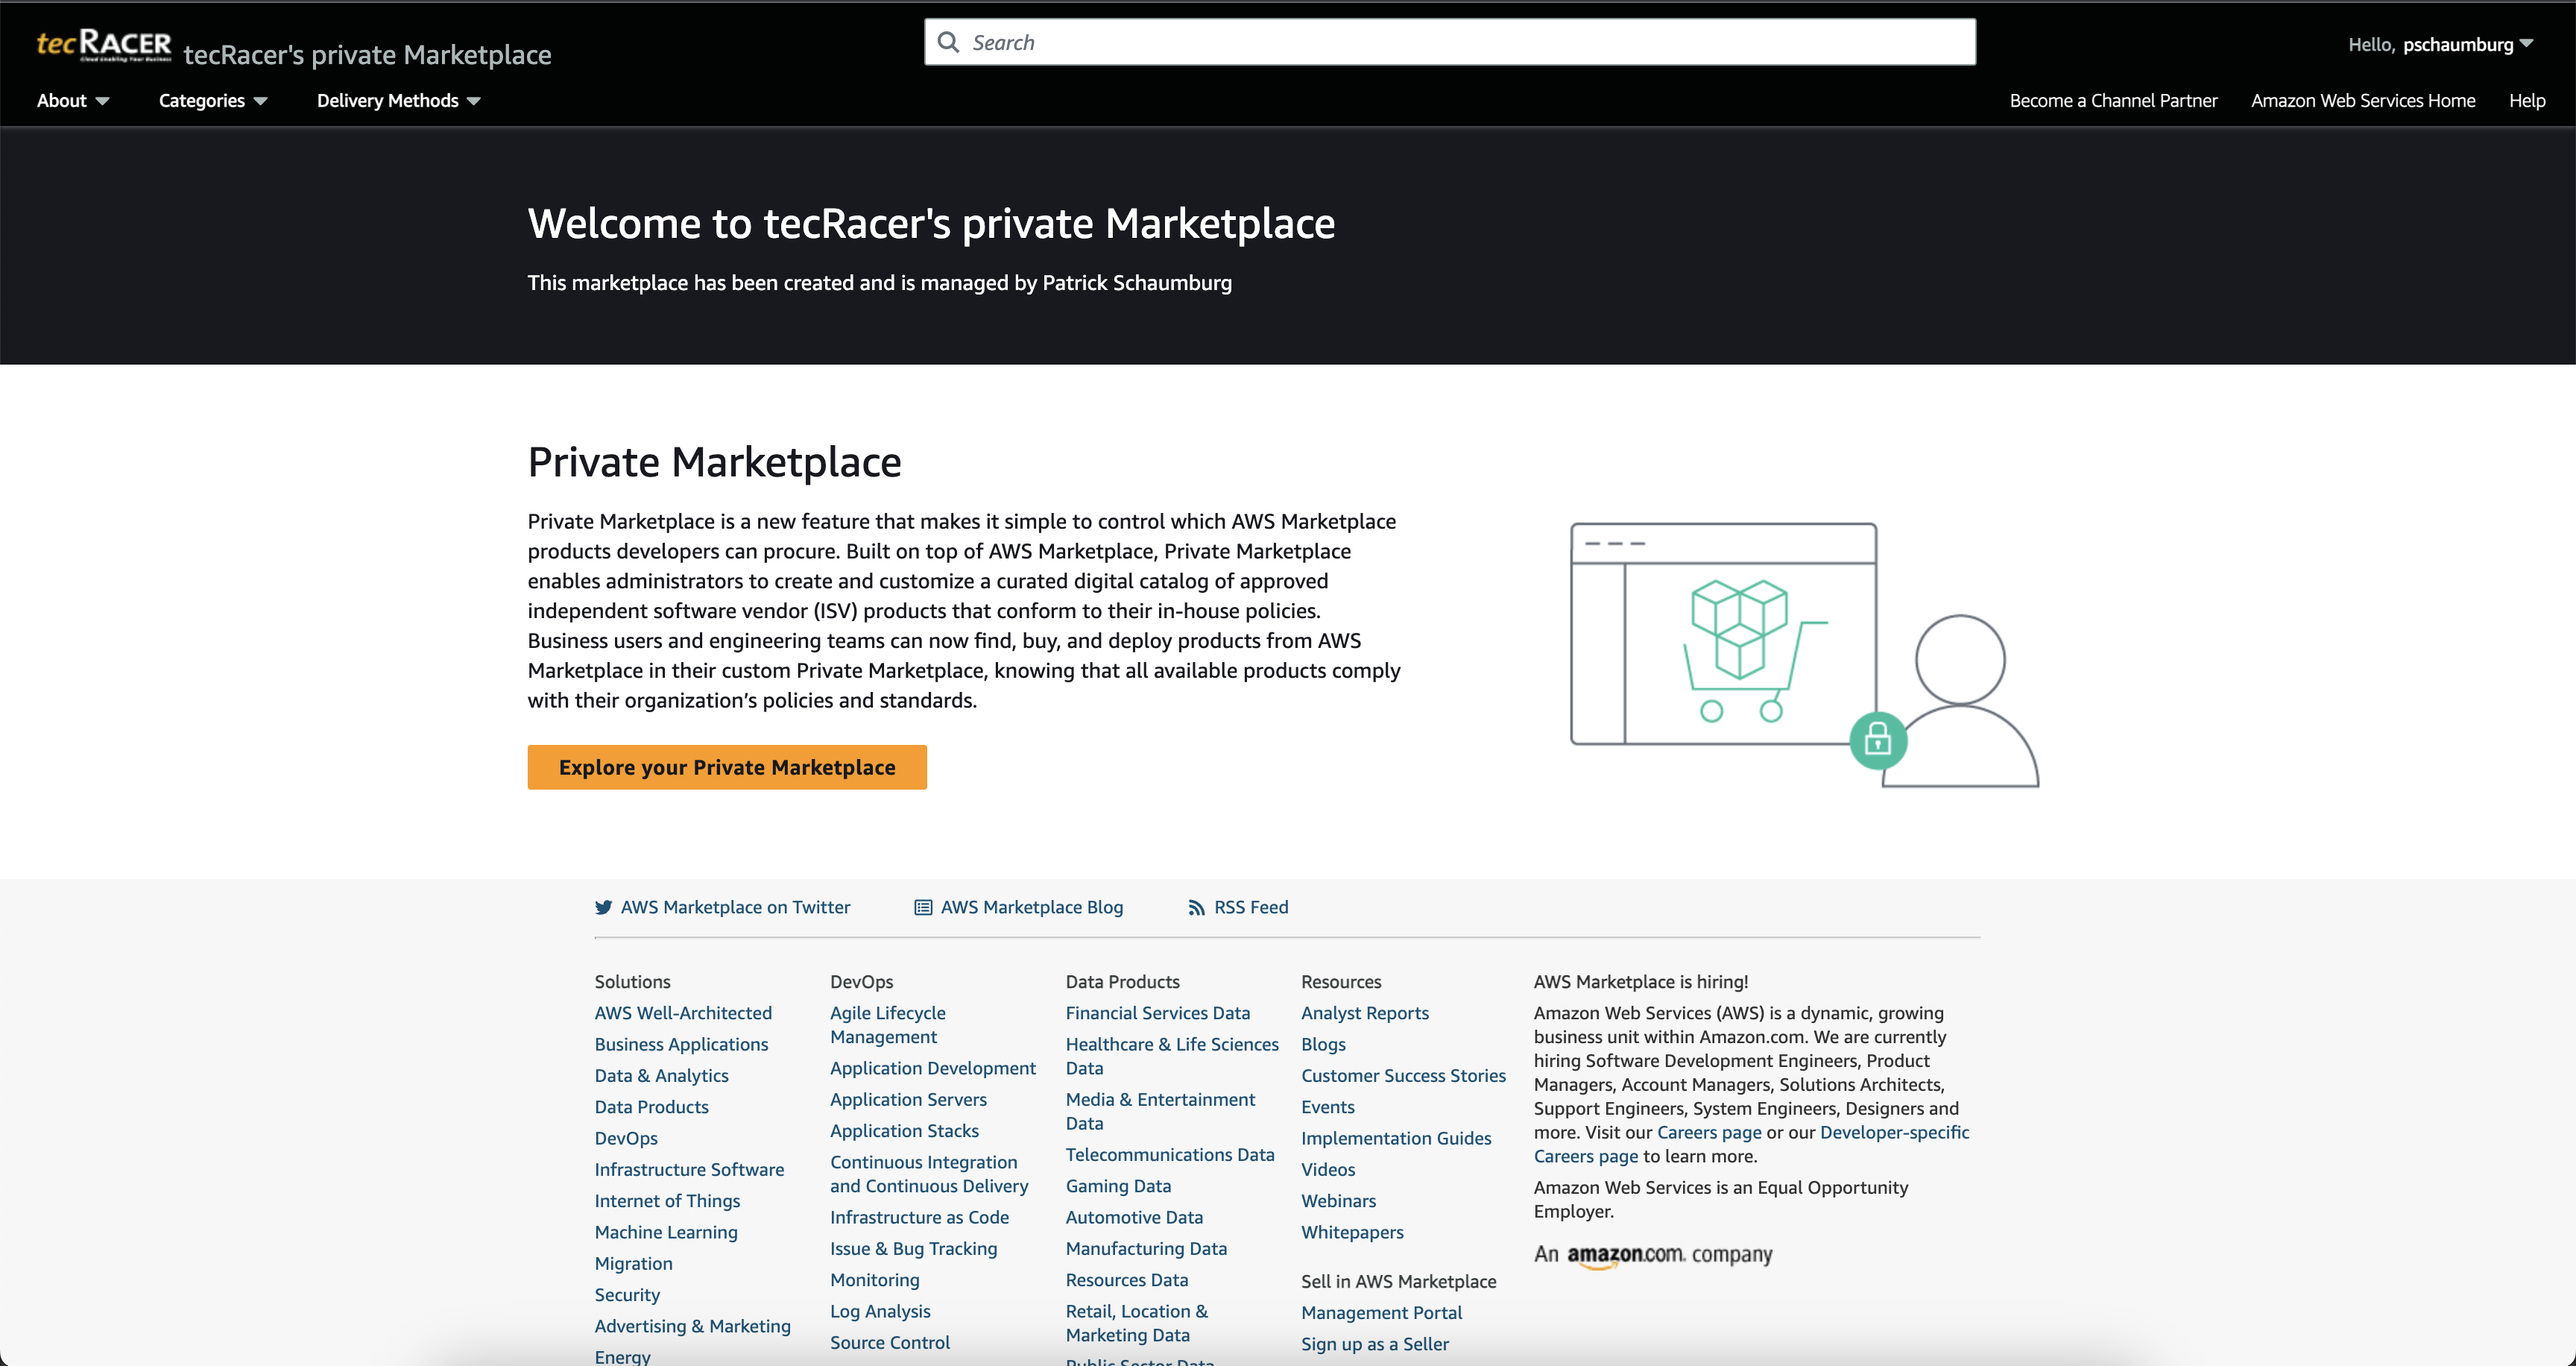
The private Marketplace is an excellent possibility for every company that wants to restrict access to new AWS Marketplace purchases, even when those are at no cost. When enabled, it redirects every logged-in user to the private Marketplace when opening the regular AWS Marketplace. It can also be adjusted in minor ways, like giving the Marketplace its name and adding a description and a logo. Look what I did in 10 minutes of playing around with it.
Before going into details, let’s see how we get access to it.
How to access?
The first idea was to search for “Marketplace” in the search bar at the top of the AWS Management Console.
The options offered never mentioned anything about a private Marketplace. So let’s first look into AWS Marketplace Subscriptions-service.
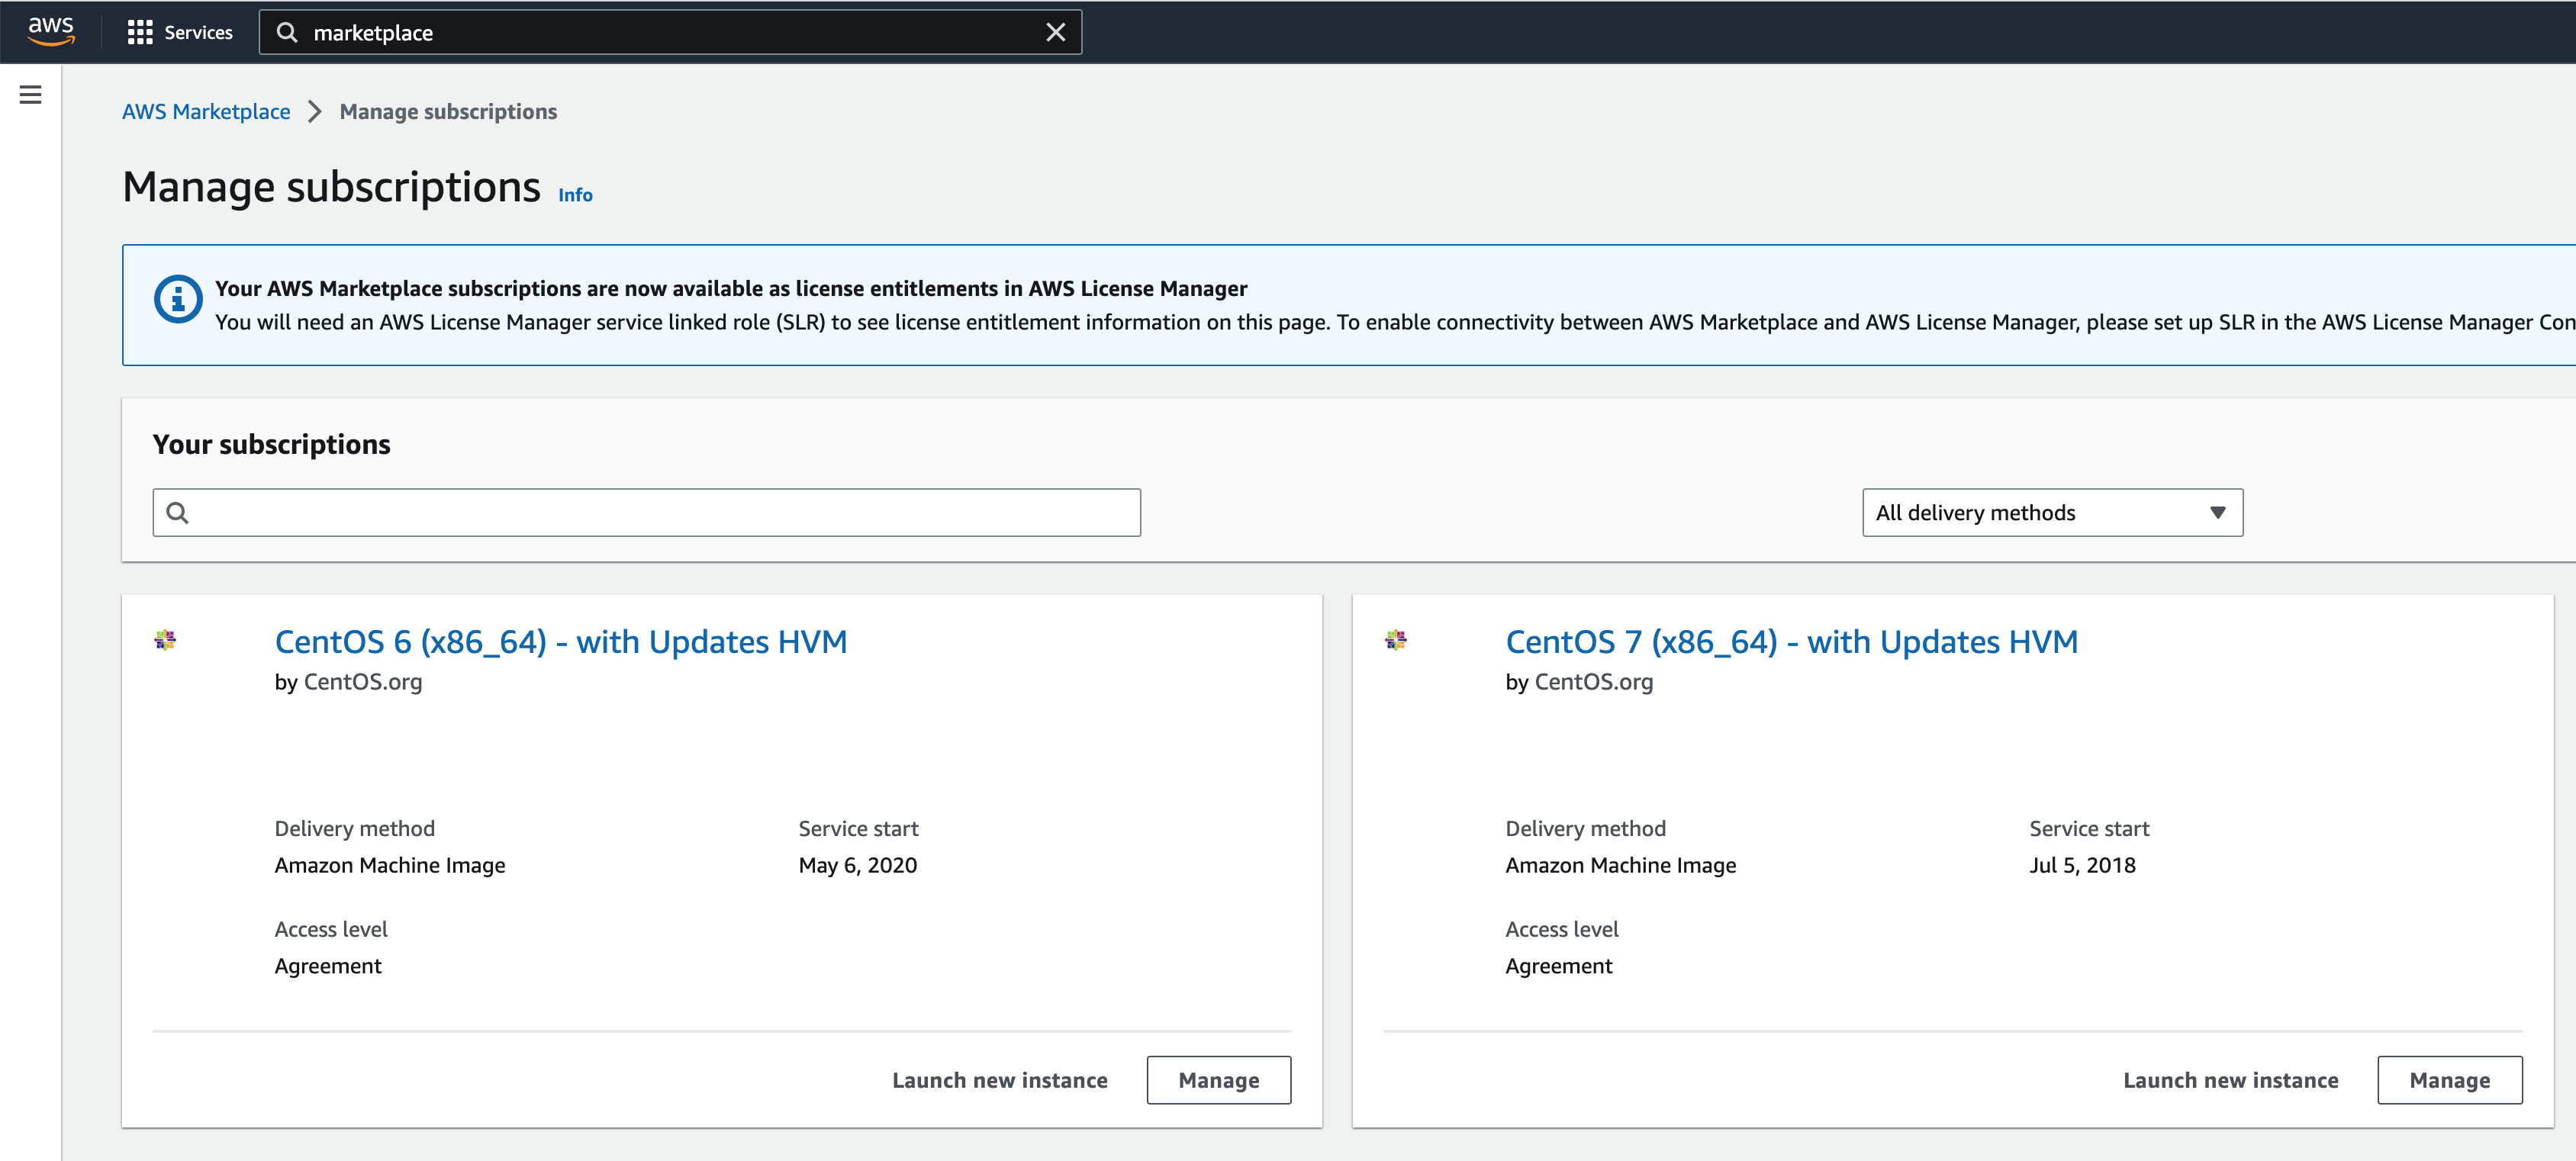
You might see your subscriptions as I have with CentOS when the service is accessed. You can manage them, launch new EC2 instances from that subscription, and more.
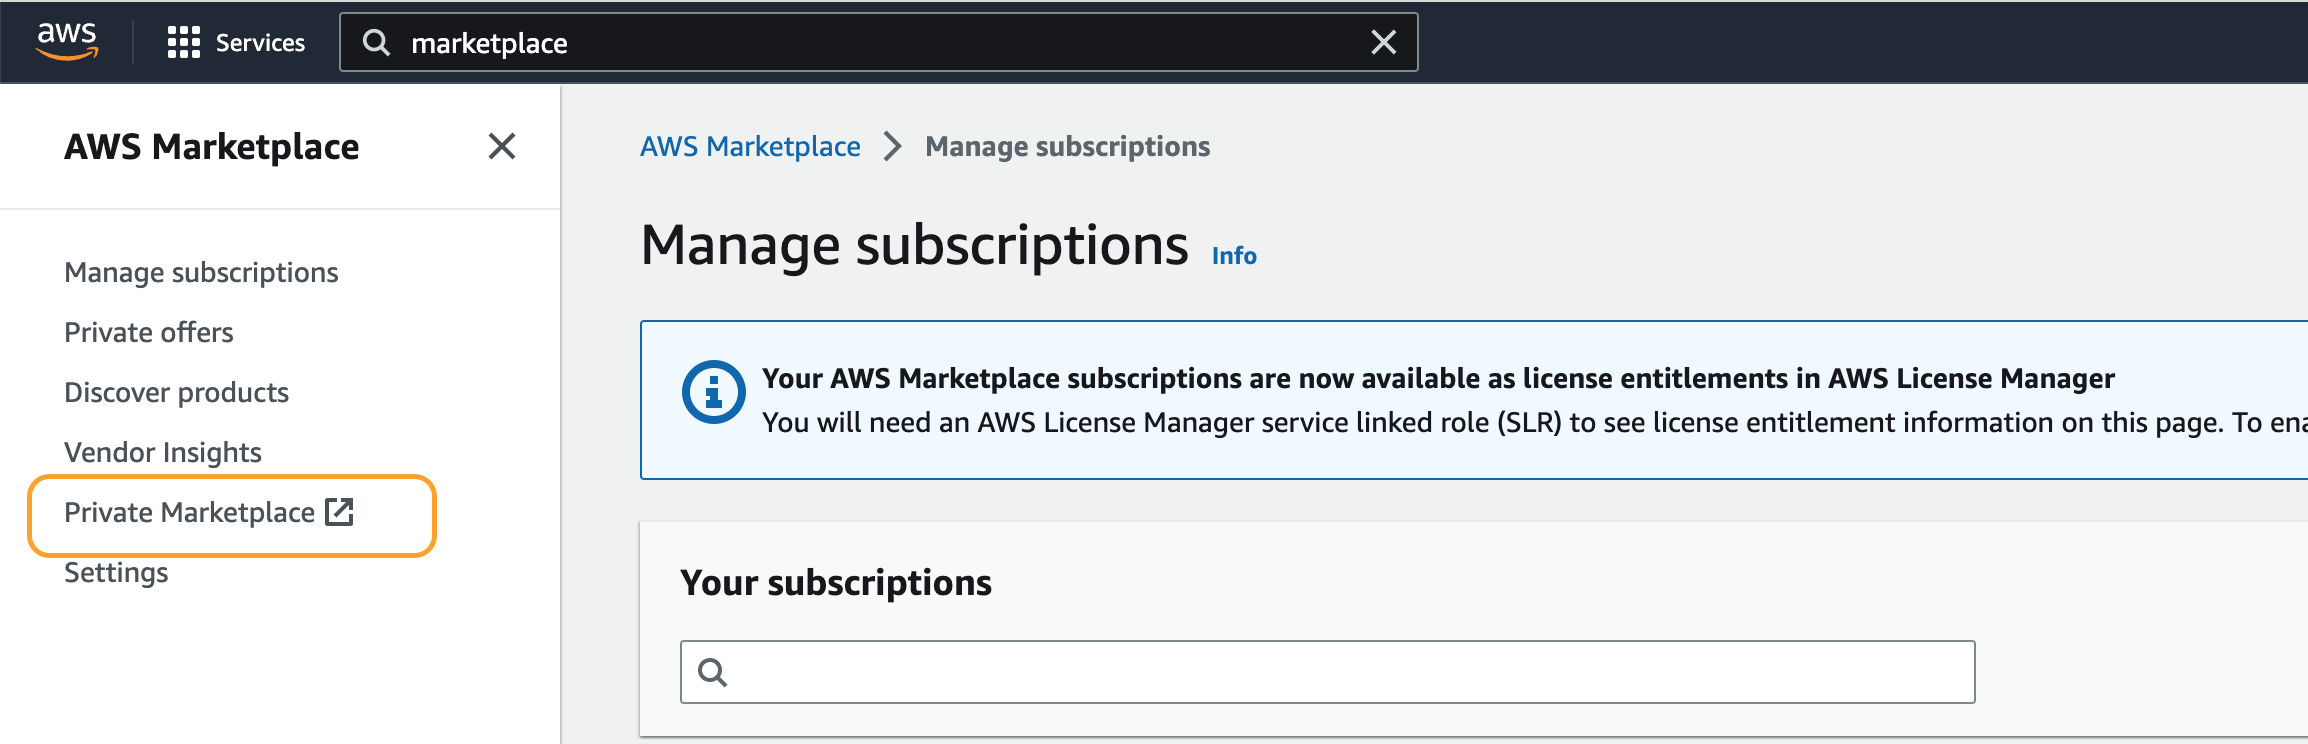
Opening up the left side handed menu, we will find a menu entry named Private Marketplace, an external link to the Marketplace.
Following the link, we will get great information about the private Marketplace. Feel free to read a bit more about it. But let’s enable and test it out. I am using a standalone AWS Account without any Organization settings available.
Welcome …
… to the private AWS Marketplace Administration!
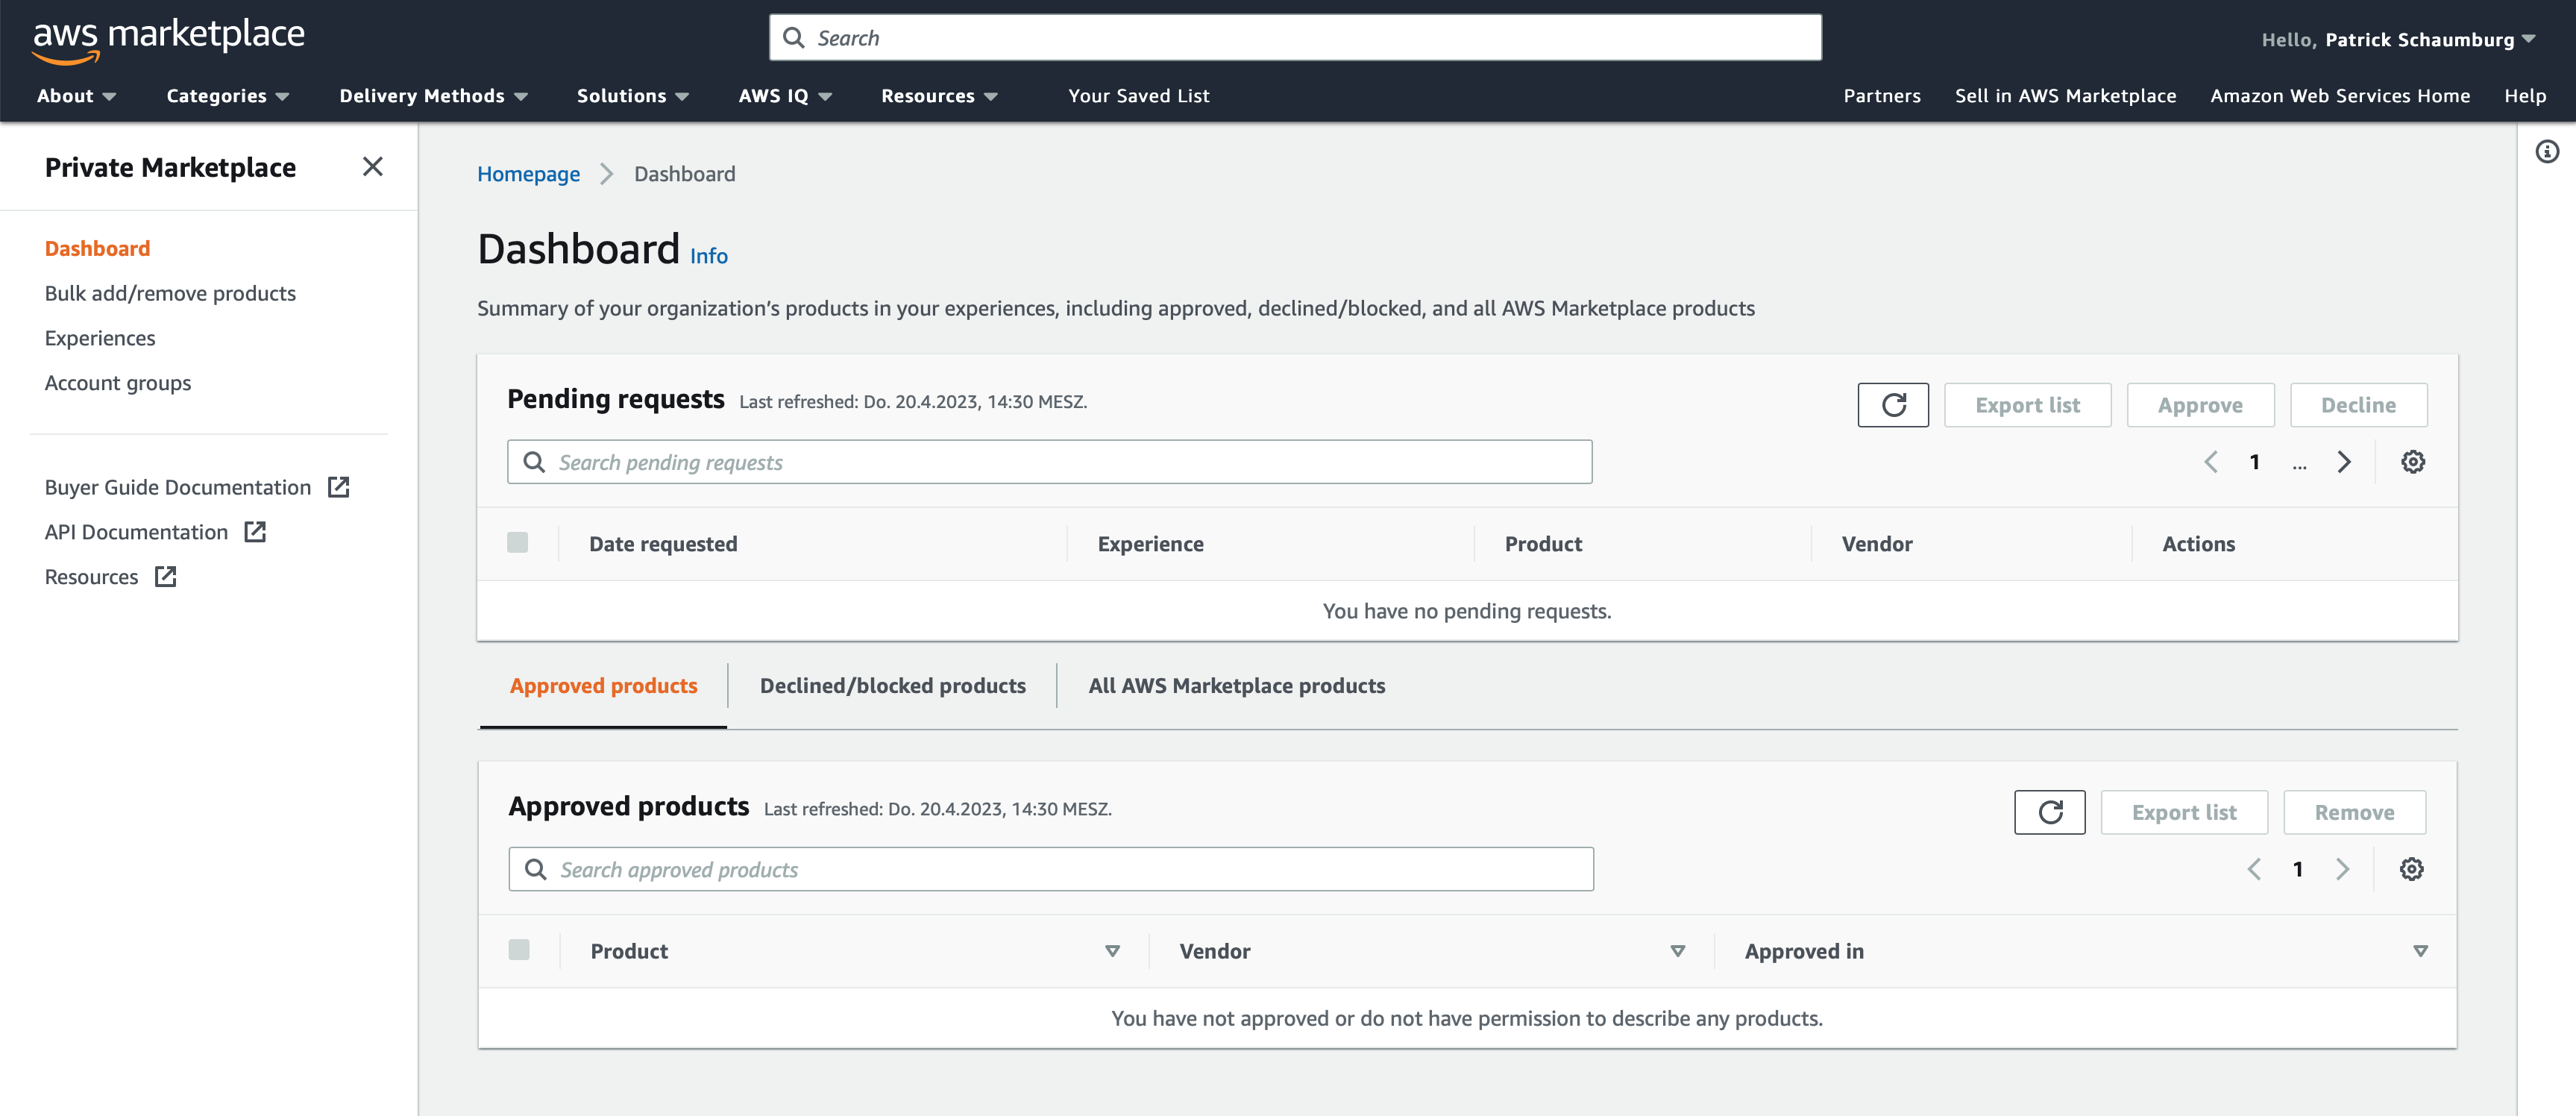
I was stunned by the tremendous clean look of the private Marketplace administration. It looks great, and if you take a glimpse into the menu on the left, you will see only four options to choose from:
- Dashboard: See the current pending requests for accessing new products and approved/declined/blocked/all products
- Bulk add/remove products: Add multiple products chosen with a filter to one or more of your private Marketplaces
- Experiences: Another word for private Marketplaces
- Account Groups: An Account group represents a 1:1 association between a single AWS Account to a single private Marketplace
Start with our first private Marketplace
INFO! When saving anything within the Marketplace administration, please make a note of my experience:
- Saving will need some time (sometimes several minutes)
- Try to click only once on a Save button
- The private Marketplace administration works with frames, so that you might have two or more scrolling bars
- Most problems that might occur are placed in the top part of the frames. So scroll as high as possible. It will also bring you the
in Progressinformation
Create an Experience (private Marketplace)
When accessing the Experience menu, you should already have an existing one available.
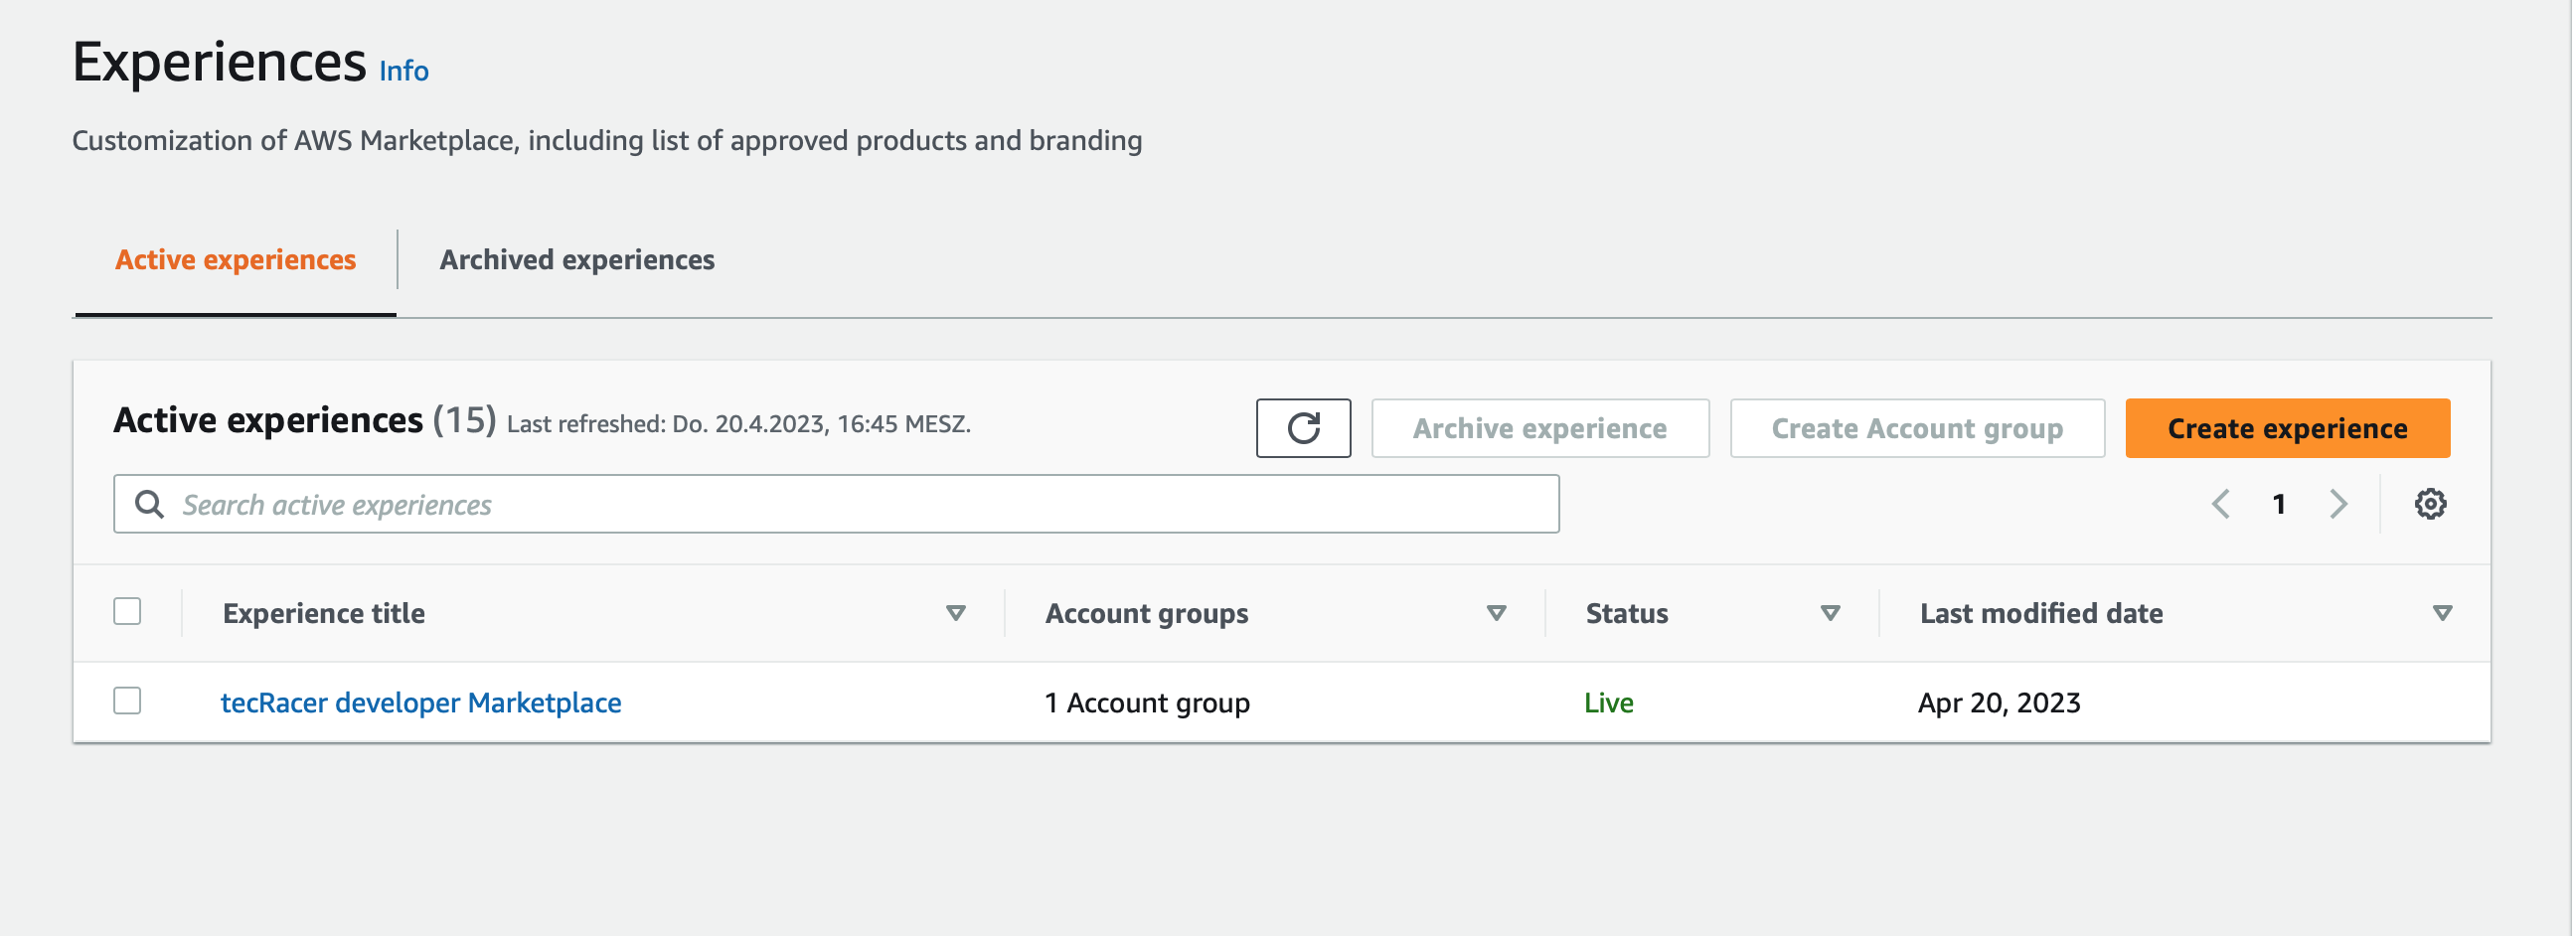
Initially, there is already an Experience available. So open it, and you will see three different tabs:
- Associated AWS Accounts: This could be one of more Account Groups
- Products: The same information which you can see in the Dashboard just filtered only for the current opened Experience
- Settings
- Set the Experience to
LiveorNot Live, select if the Experience should be archived, Allow or Deny requests for Accessing new products - Experience: Change the name and description (this is only for the administration)
- Public Profile: Change the name, and description and add a logo for your private Marketplace
- Set the Experience to
To see what the settings are changing, I have changed different settings:
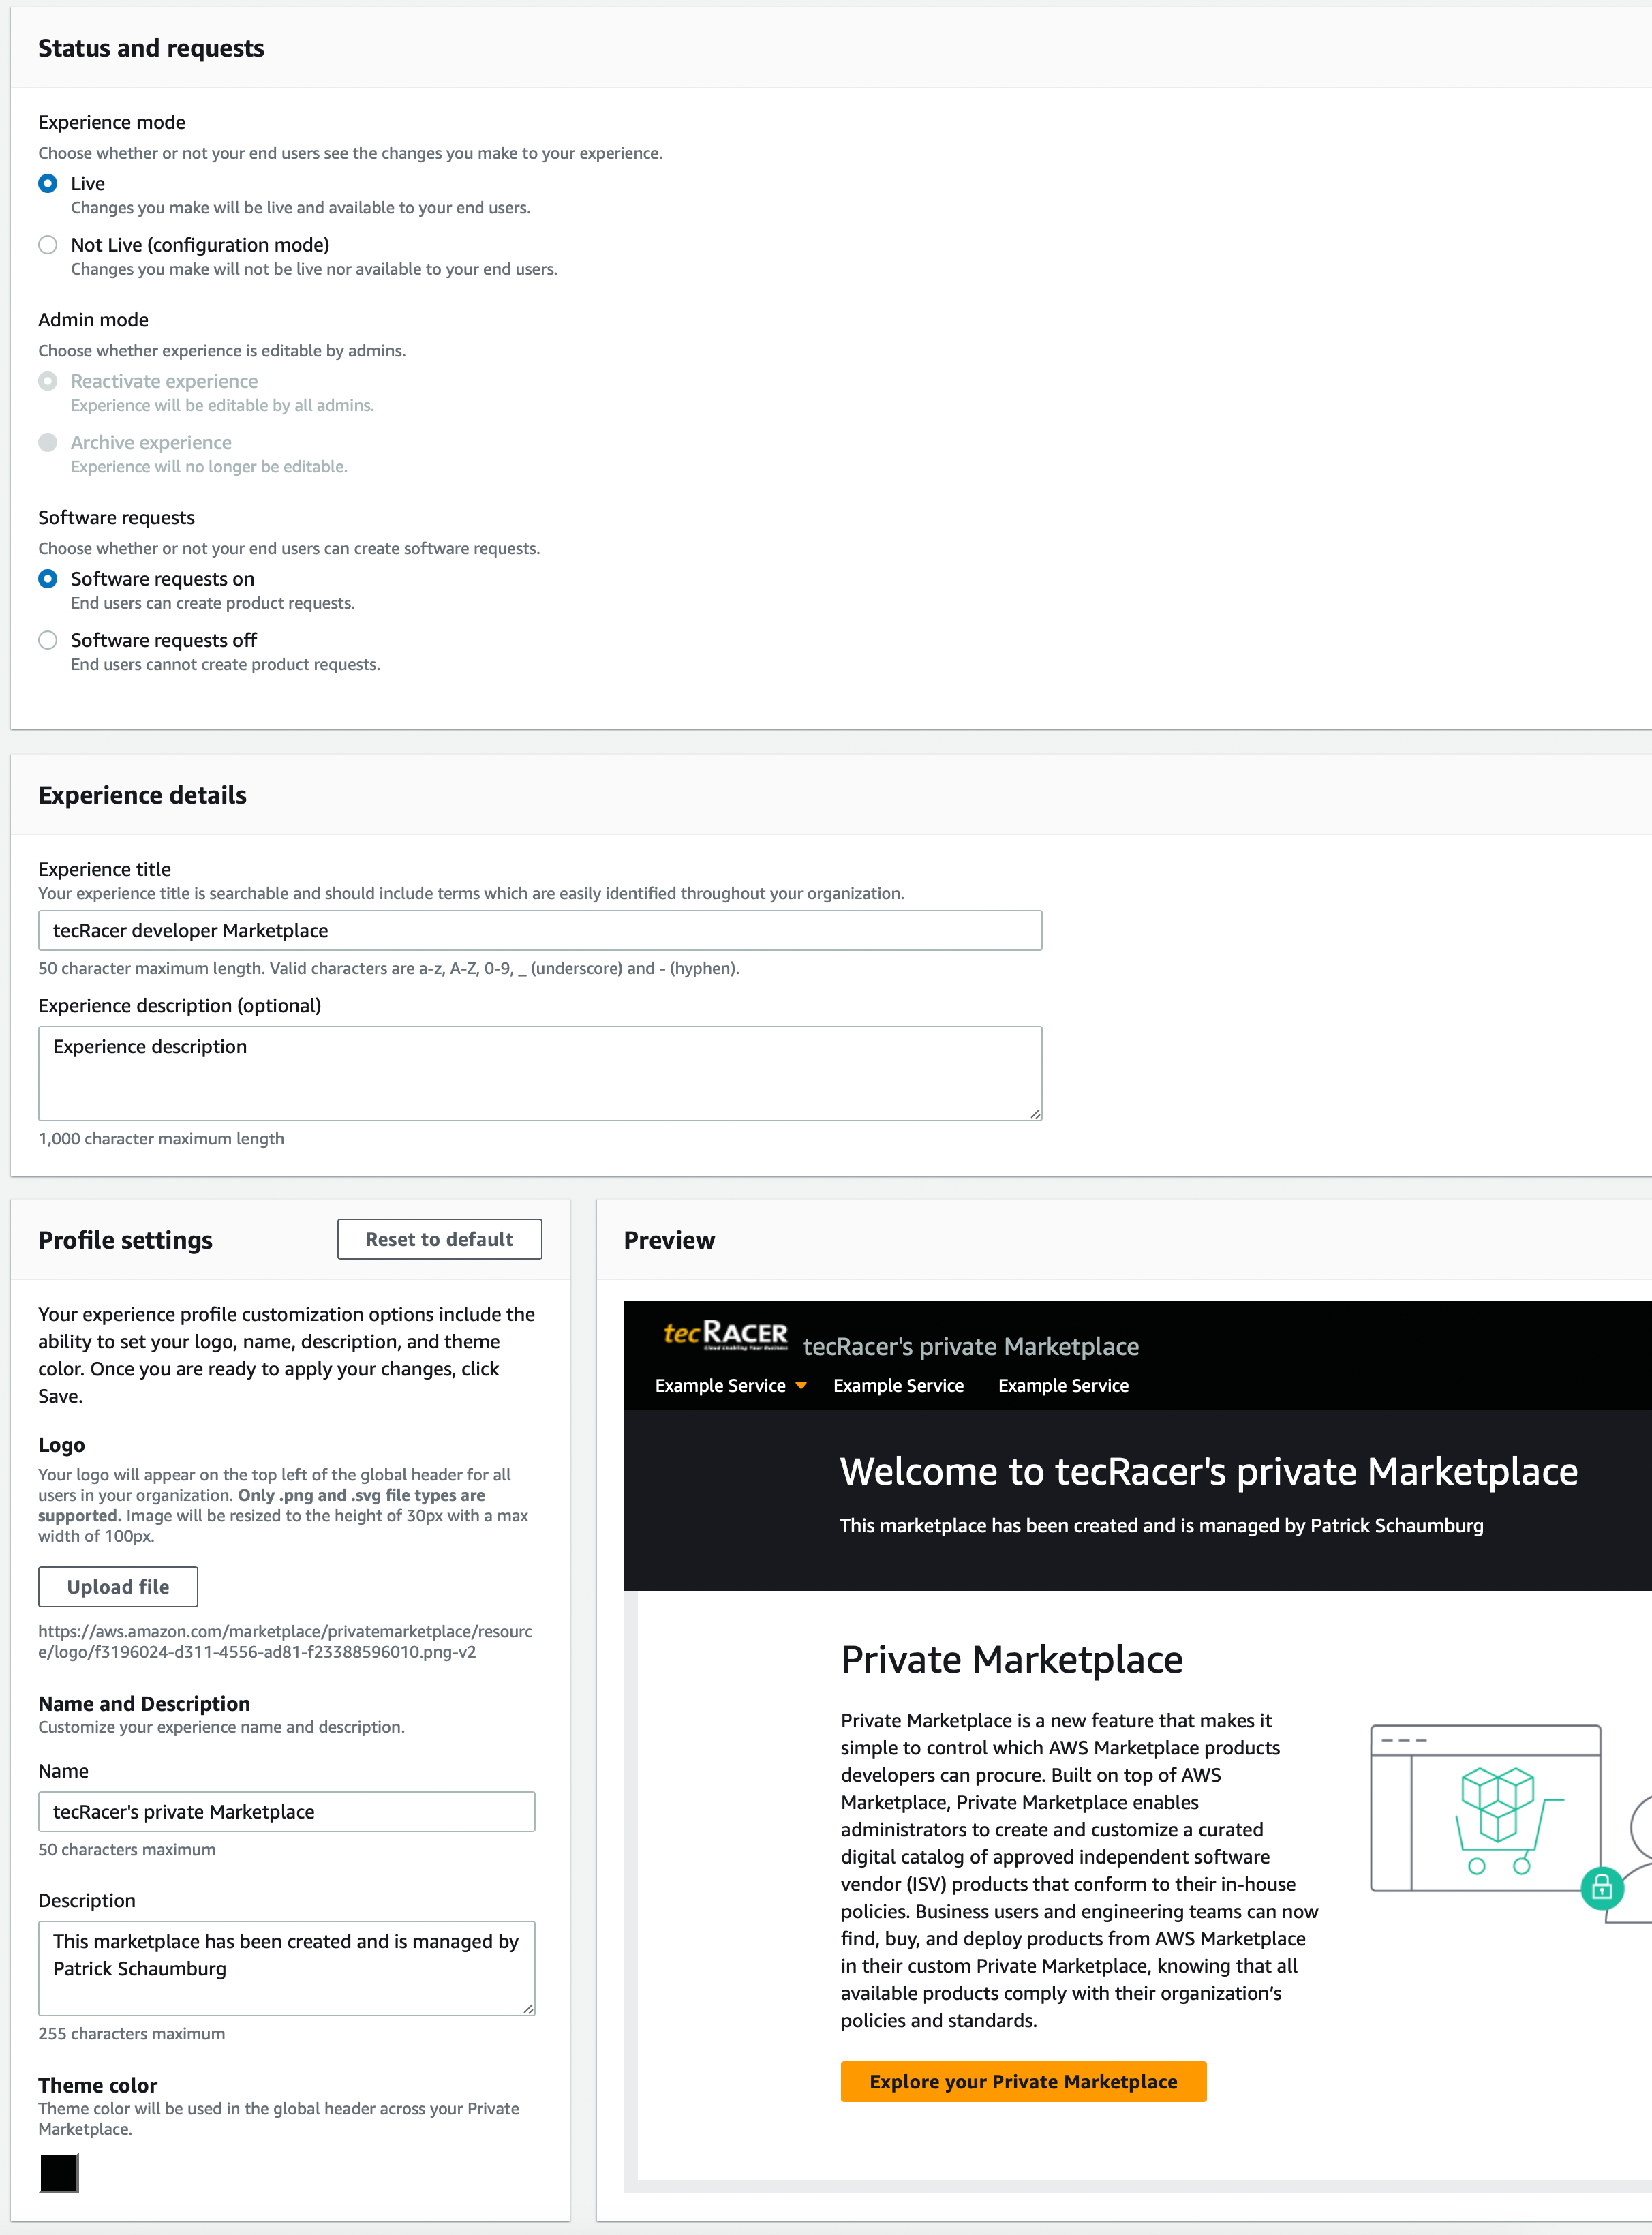
The cool thing about the Public Profile settings is the live preview of everything you do. So whenever the Experience is live, you will get the same view.
When you are ready with your changes, move on by clicking on Save. As mentioned, this will need some minutes. So move on with the Account Group when the Experience has been updated.
Create an Account Group (associate AWS Account with a private Marketplace)
You now have your Experience configured, but we still need to tell which account we want to roll out this Experience.
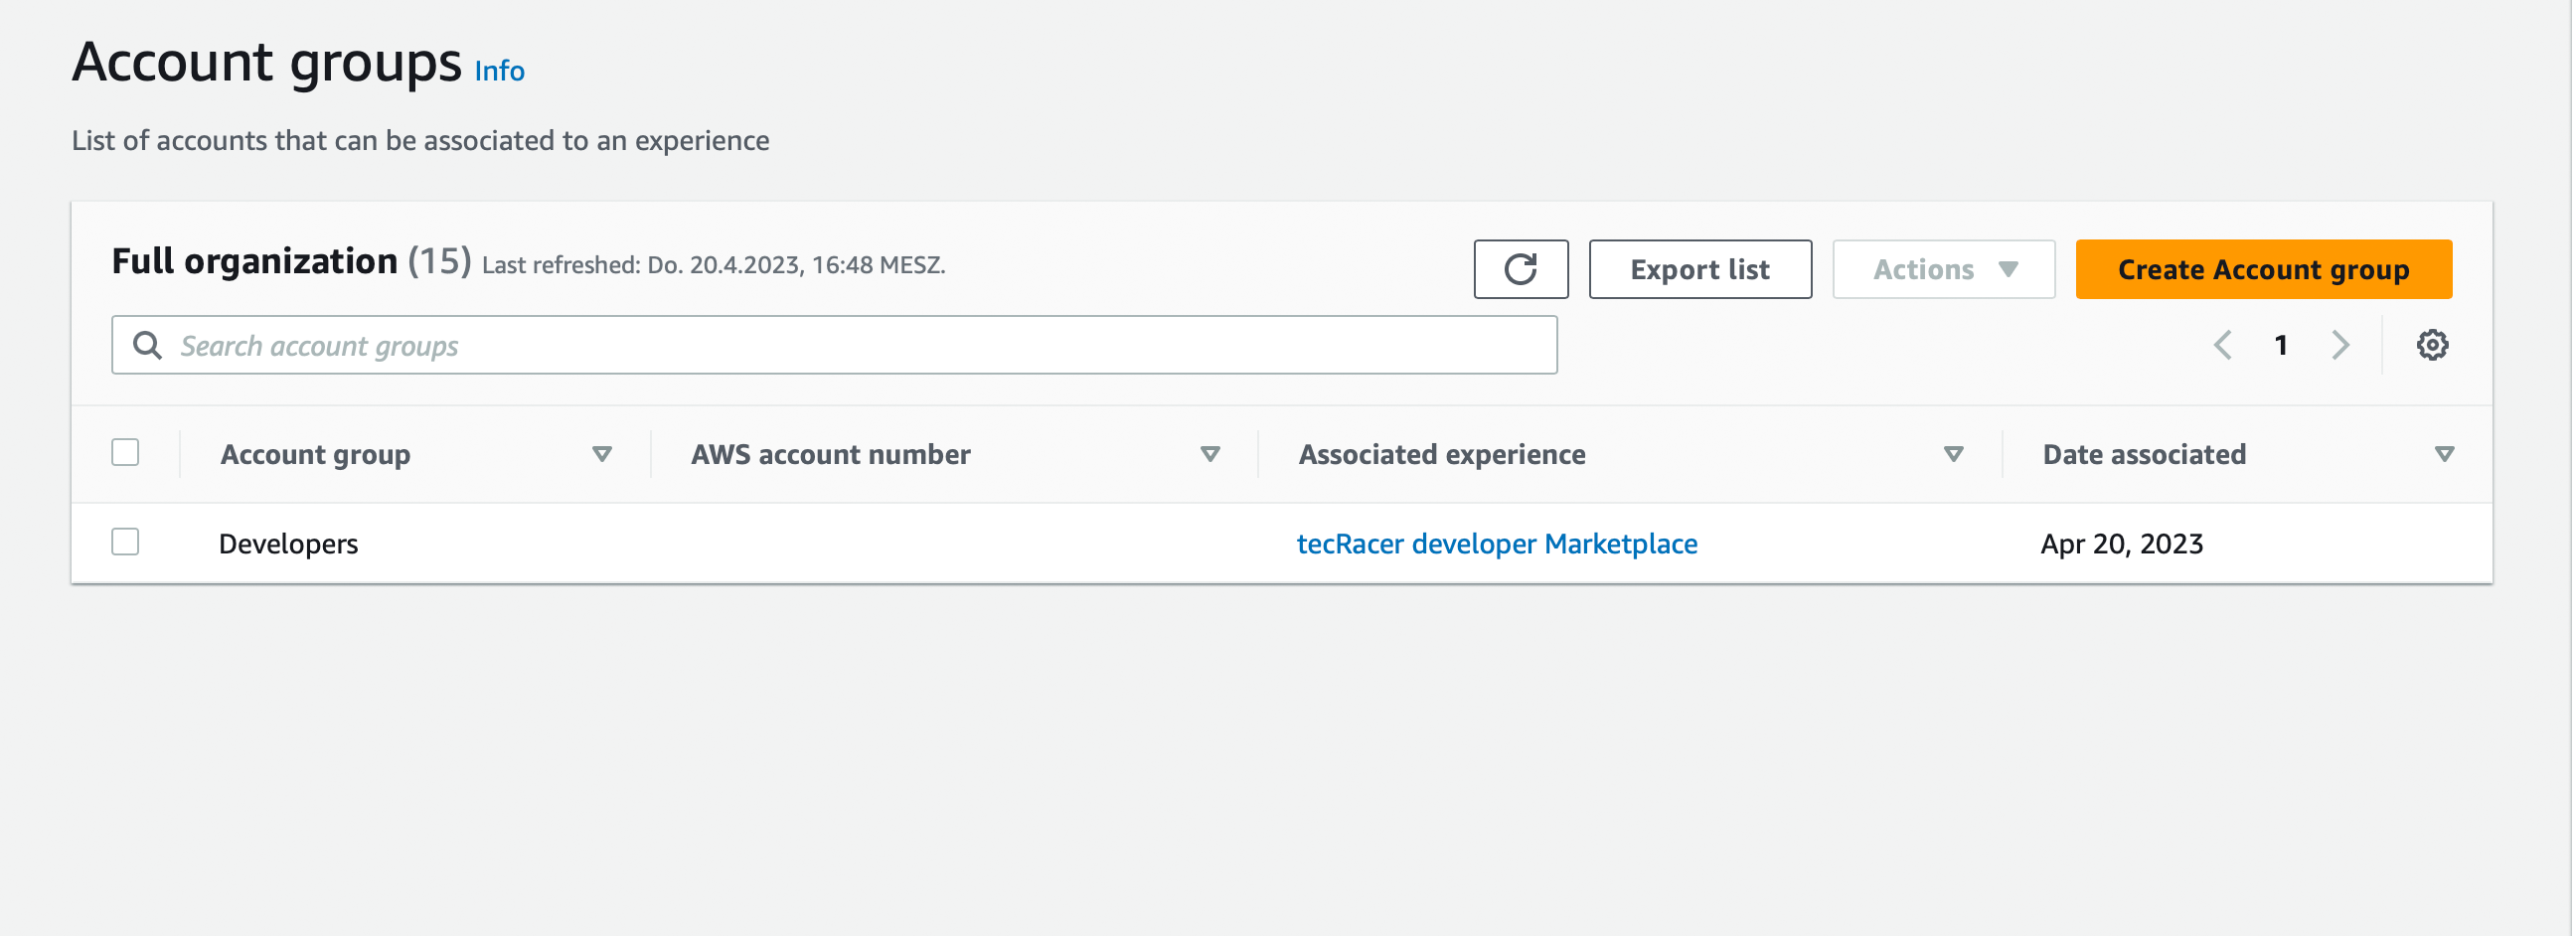
For this, we create an Account Group. I use the same AWS Account where the private Marketplace has been enabled. Please enter a Title (which I’d give the AWS Account name) and add the ID of your current AWS Account.
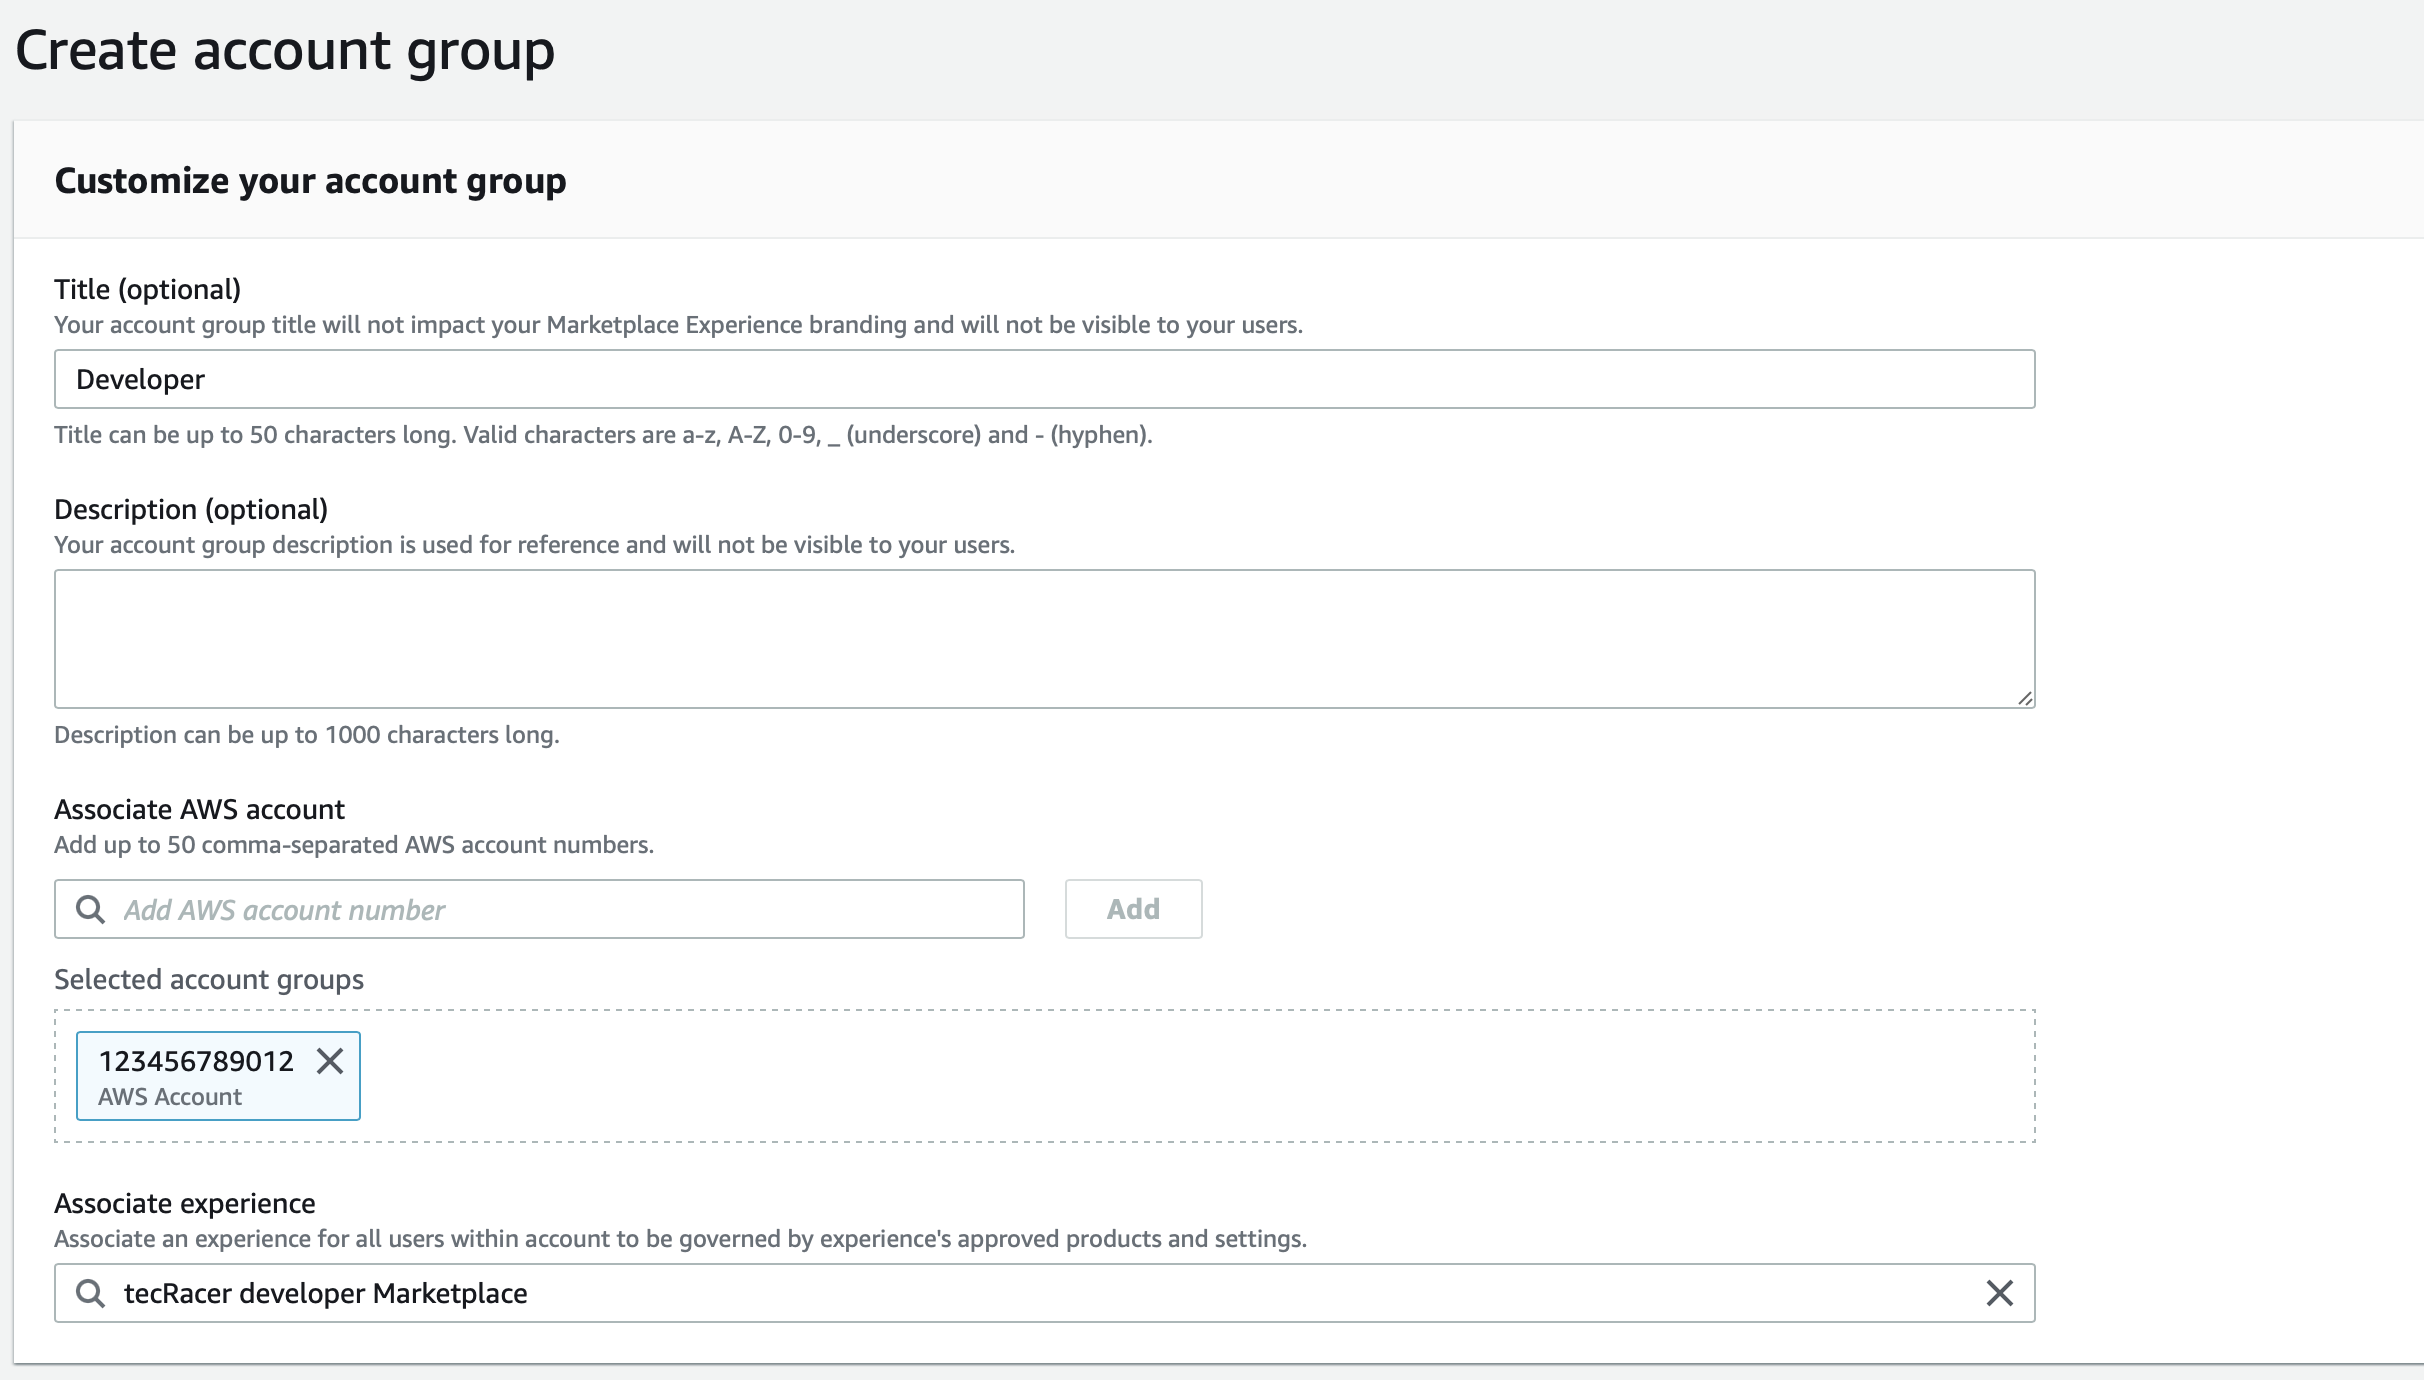
Your private Marketplace is ready to be used when the creation process has finished.
Add some products to our Experience
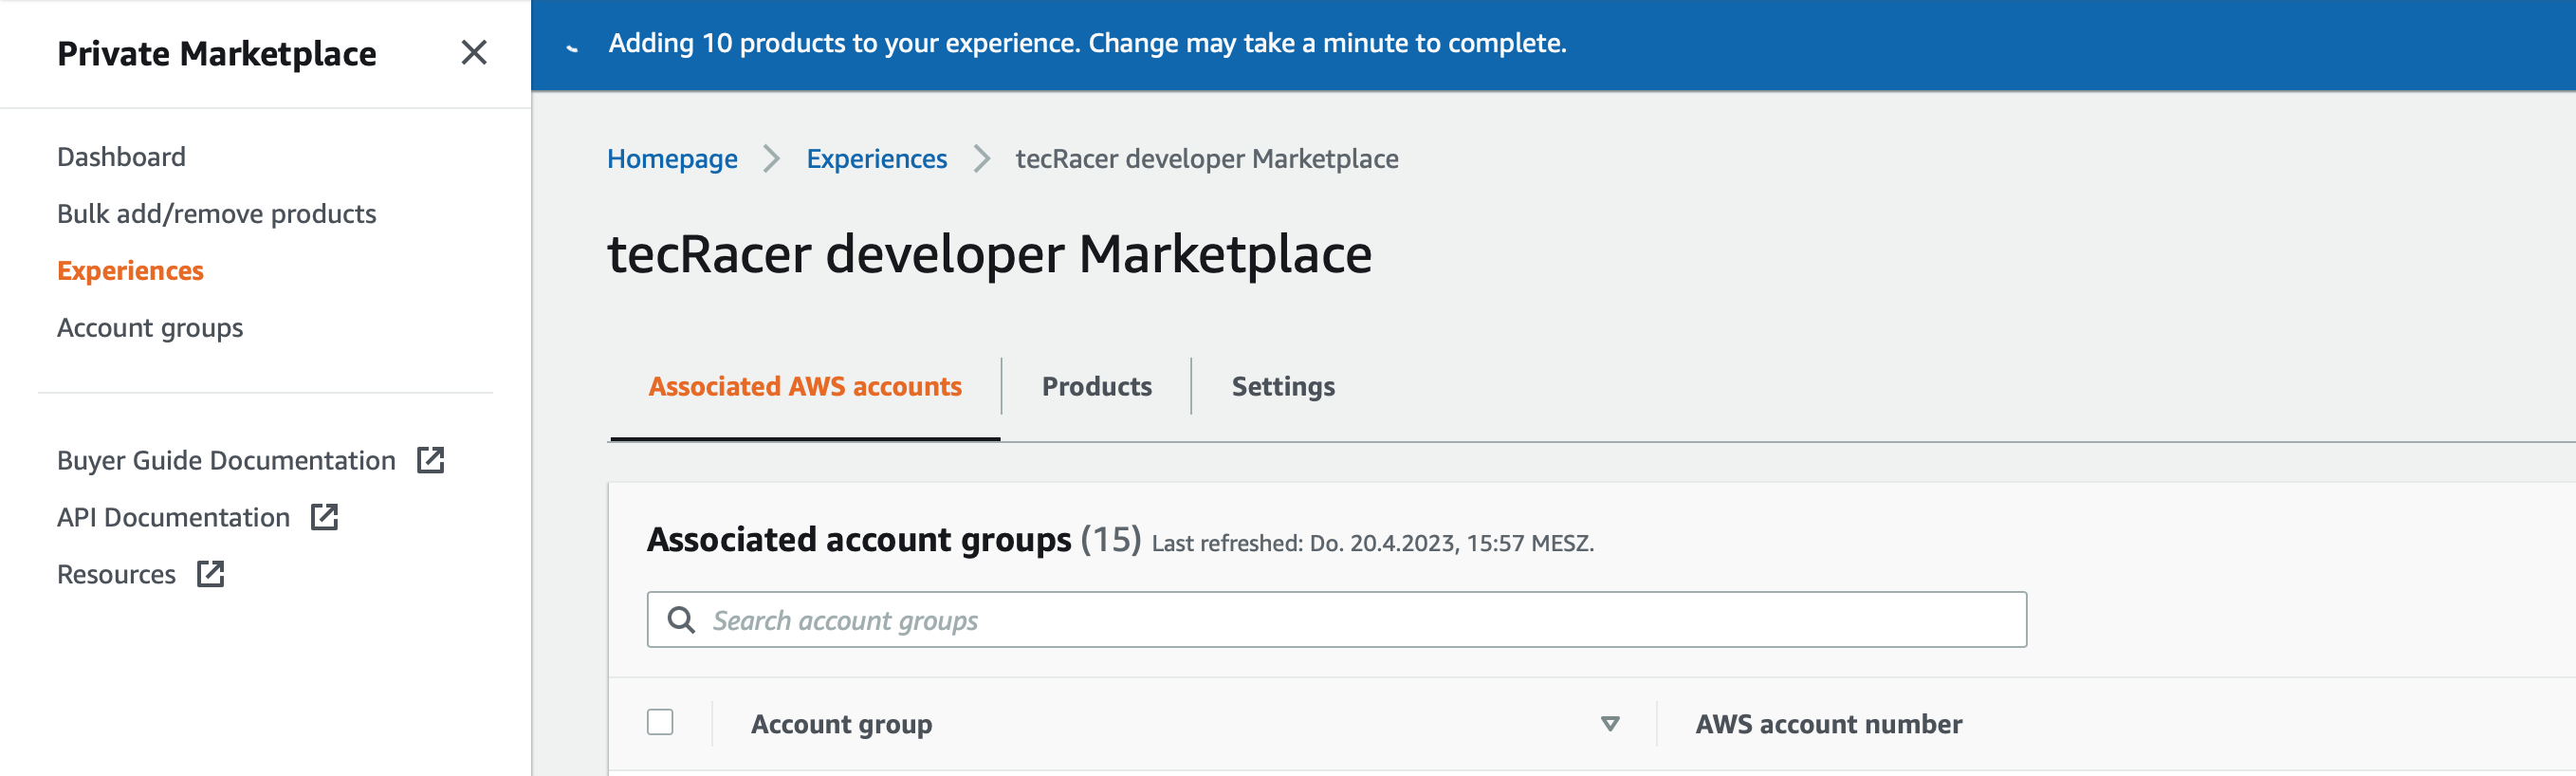
The Experience (private Marketplace) is enabled and ready to be used. Now we need some products we want to approve initially. To do so, go to your created Experience, go to the Products tab, scroll down to the Approved Products section and select All AWS Marketplace products.
I am searching for NetApp as we partner with them and want to allow others to use their Marketplace products.
Select all of the first 10 results and click on Add. This will take some minutes again to finish.
Your approved products are now available in the private Marketplace.
Access the private Marketplace from a user (non-admin) perspective
To access the private Marketplace, I am using a regular user with no admin permissions (just with the managed policy AWSPrivateMarketplaceRequests - we will need this soon).
With this user logged in, I am opening the public AWS Marketplace.
The user is immediately redirected to the private Marketplace and can click on Explore your private Marketplace.
Next, you will see the private Marketplace and a predefined filter for Approved Products.
This is the first time you are accessing your private Supermarket from a user perspective.
Some might say: Remove the filter! Yes, let’s do it!
Requesting new products
Removing the filter will bring back all products of the public AWS Marketplace.
Searching for a product like Chef Professional Service Consulting will return you a result.
When clicking on the product, you will get a big red banner on top of the page.

Within this banner, you can request product approval.
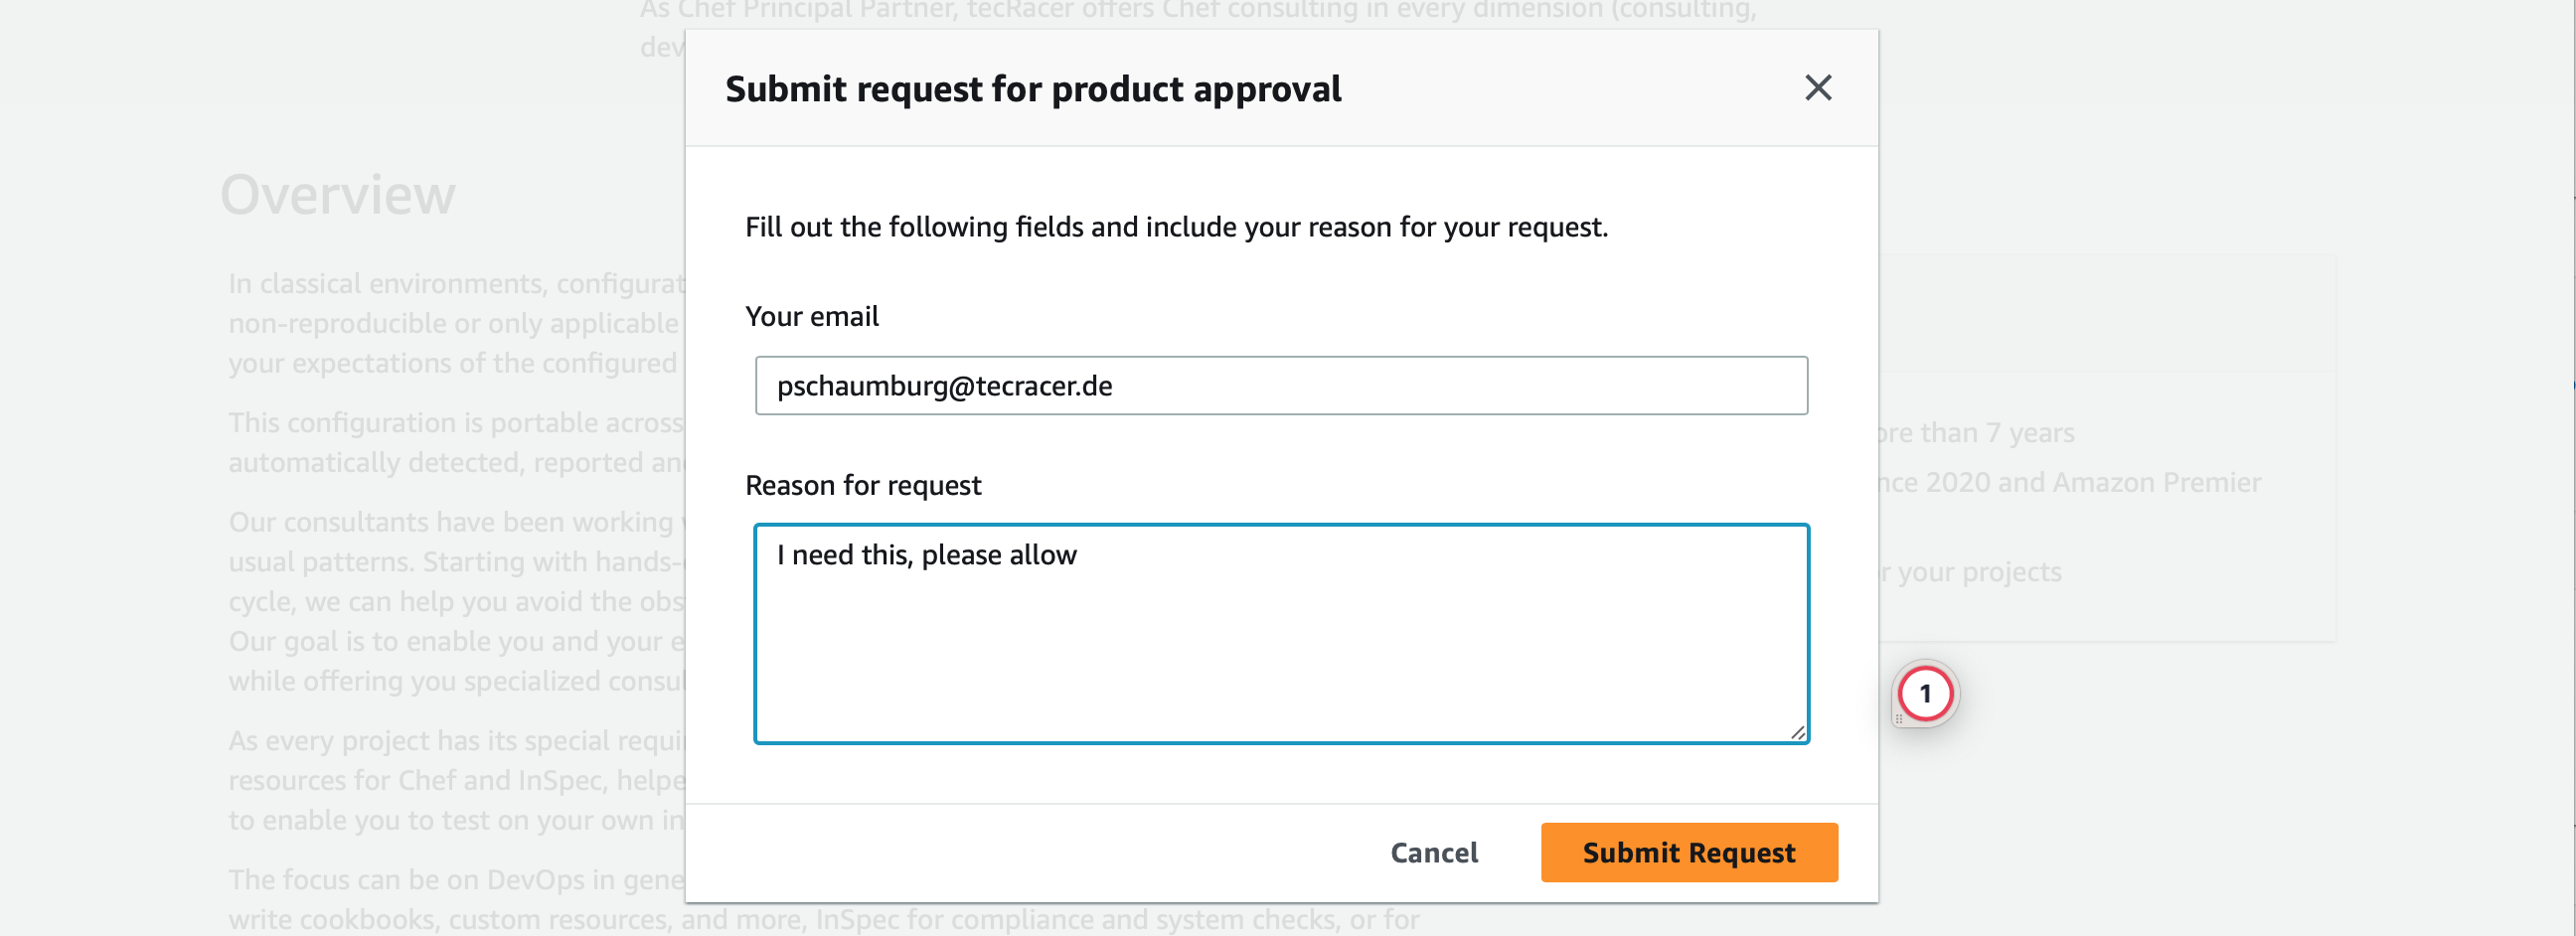
The request will then show up in the private Marketplace administration.
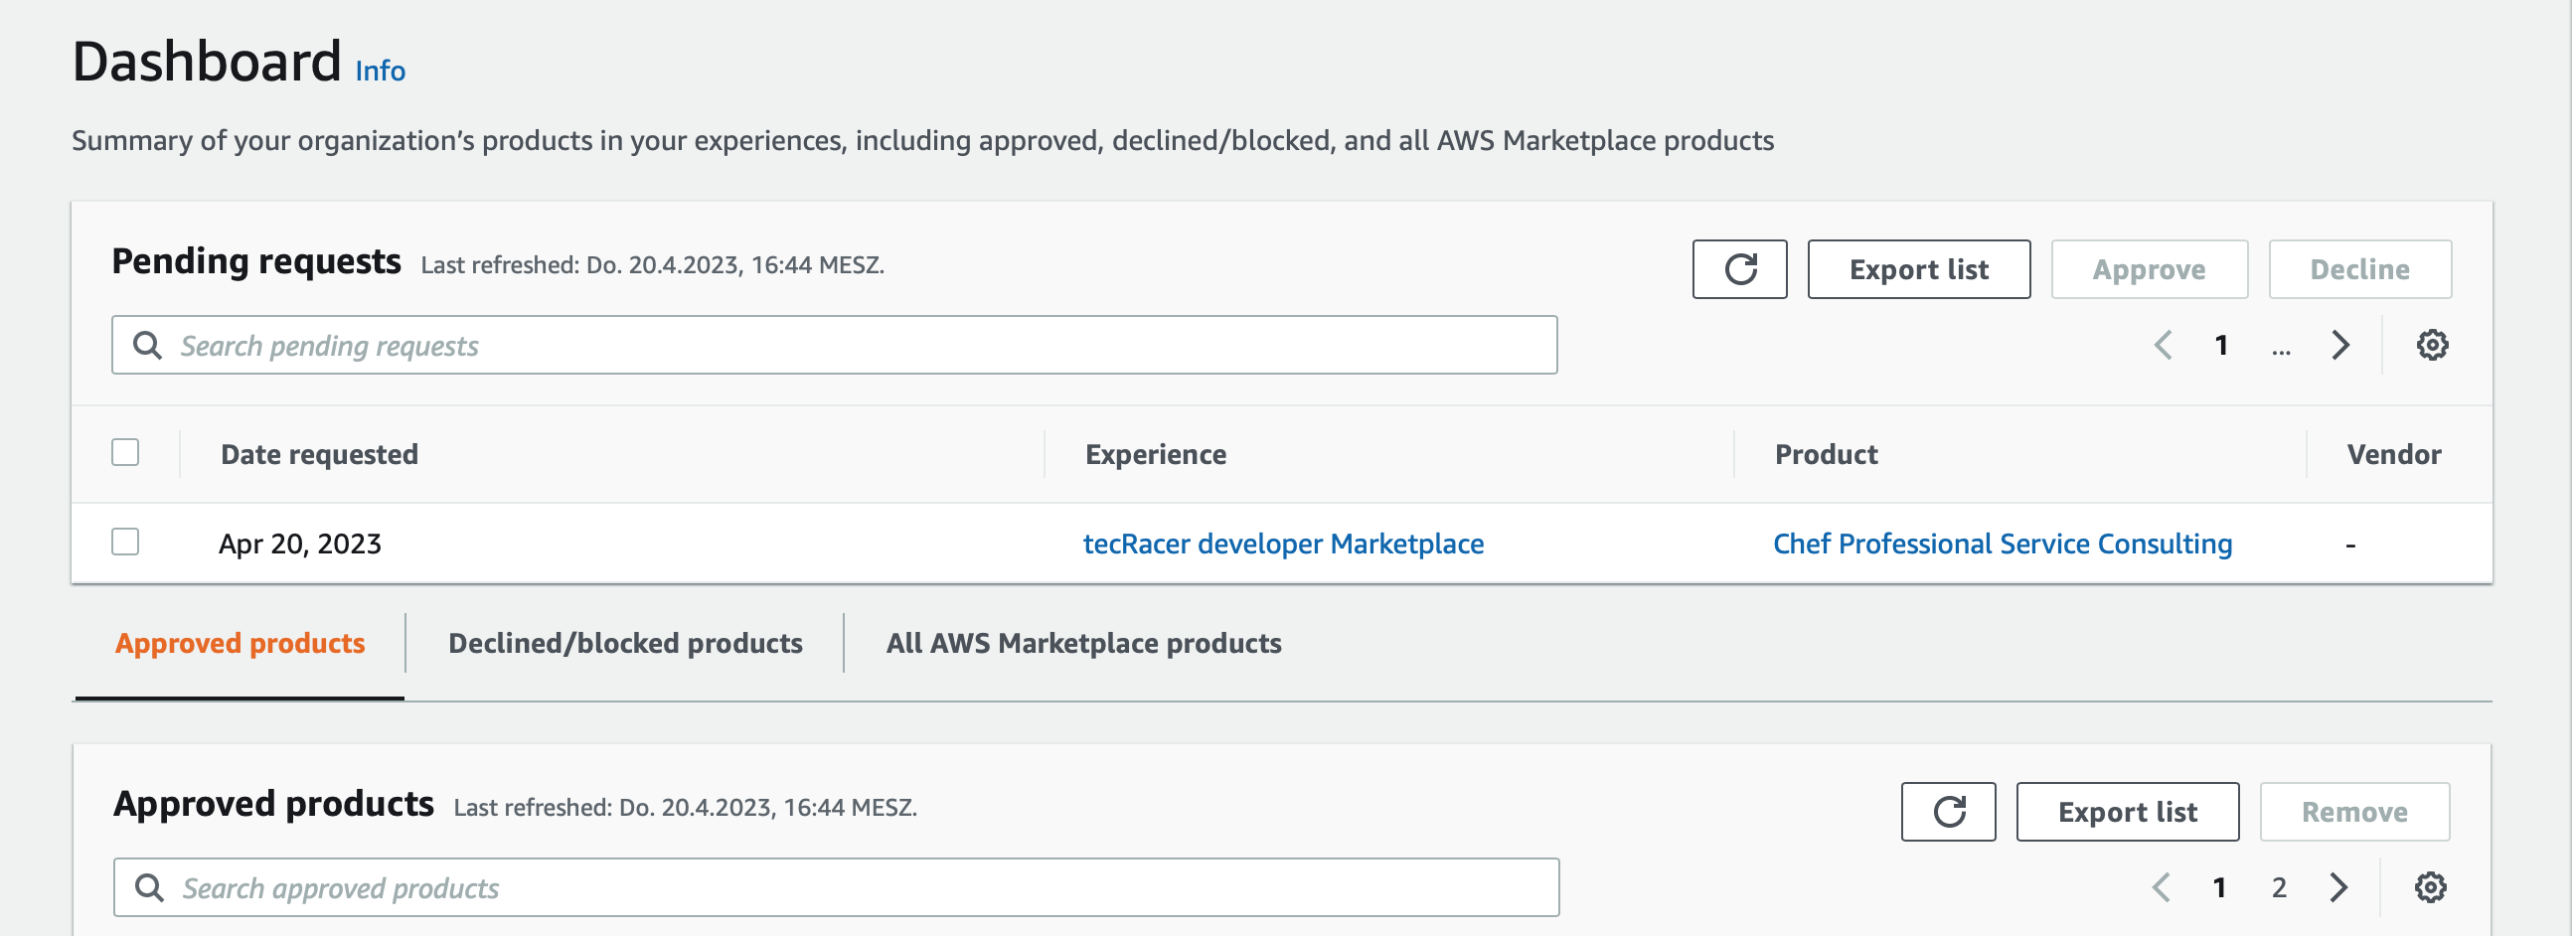
You can now get more details about the request and can approve or decline it. When approved, it will be published within some minutes.
The usage of the private Marketplace is from now on the same like the regular marketplace.
Summary
Every organization should use the AWS Marketplace. Implementing the private Marketplace does not only bring an excellent addition to the existing company-wide policies. It also brings a considerable security measure to your environment. It is easy to create, administrate and use.
When you have any questions about it, give me a ping.
— Patrick
Thanks to
Photo by Julia Fiander on Unsplash