Place free AMI product on the AWS Marketplace
The last time I showed the registration as a seller for the AWS Marketplace. Let’s move on with adding a new free AMI to it. I will bring you into a position to publish your first AMI into the AWS Marketplace as a free version and give you the necessary information on what this means.
Prerequisites
We have two preparations we need to make before we can publish the AMI to the AWS Marketplace.
First, we must ensure the AMI is available within our AWS Marketplace Account in the us-east-1 region. This is required as different services like CloudFront or IAM are mainly or only managed in that region. The AWS Marketplace is also one of them.
In addition to the AMI, we must create an IAM Role within the AWS Marketplace Account. An IAM Role for another AWS Account is not allowed.
Create, configure, and prepare the AMI
Let’s spin up an EC2 instance in the us-east-1 region. Then install and configure your software and system. I will use nginx on an Amazon Linux. Amazon Linux is my preferred Operating System as it already brings all the necessary components like cloud-init.
Once the installation of nginx with the command sudo yum install nginx -y was successful, I’d like to make it visible. For this I am updating the default nginx document at /usr/share/nginx/html/index.html with vim. The index.html file now also contains my first name.
When you have everything installed and configured, you have to make sure that you remove all existing and generated keys (like authorized_keys and host keys). Using Amazon Linux, for example, will automatically run cloud-init that generates those files automatically while booting when they are not already present. (Using another Operating System will need some more adjustments.)
To do the cleanup, you can run the following commands/script. They follow the guidelines from AWS for shared AMIs.
sudo passwd -l root
sudo shred -u /etc/ssh/*_key /etc/ssh/*_key.pub
Gladly, relying on an existing Amazon Linux, we have kept everything else the same. When you are making more changes to your AMI, please also follow the AMI-based product requirements and policies and the AMI product checklist
Stop your EC2 instance now and create an AMI. The settings can be left as they are.
Create and configure the IAM Role
The next step is to prepare an IAM Role. This IAM Role needs to have a trust relationship for assets.marketplace.amazonaws.com. So the Trust Policy looks like
{
  "Version": "2012-10-17",
  "Statement": [
    {
      "Sid": "",
      "Effect": "Allow",
      "Principal": {
        "Service": "assets.marketplace.amazonaws.com"
      },
      "Action": "sts:AssumeRole"
    }
  ]
}
The IAM Policy attached to the IAM Role is a managed policy named AWSMarketplaceAmiIngestion and contains the following contents.
{
  "Version": "2012-10-17",
  "Statement": [
    {
      "Action": [
        "ec2:ModifySnapshotAttribute"
      ],
      "Effect": "Allow",
      "Resource": "arn:aws:ec2:us-east-1::snapshot/snap-*"
    },
    {
      "Action": [
        "ec2:DescribeImageAttribute",
        "ec2:DescribeImages",
        "ec2:DescribeSnapshotAttribute",
        "ec2:ModifyImageAttribute"
      ],
      "Effect": "Allow",
      "Resource": "*"
    }
  ]
}
With this combination of the IAM Role and the managed policy, the AWS Marketplace Service can change your AMI and Snapshots attributes and settings. I want to give you a small insight into each action from the above policy.
- ModifySnapshotAttribute: Allow changes to permission settings for snapshots
- DescribeImageAttribute: Describe all information of an AMI
- DescribeImages: This is, besides the listing of all AMIs available and their information, to get the information about the EBS volumes/block devices of the AMI
- DescribeSnapshotAttribute: The reading part of the ModifySnapshotAttribute action from above
- ModifyImageAttribute: Allow changes to attributes of an AMI
The ModifySnapshotAttribute is why the AMI has to be available in your AWS Marketplace AWS Account. An assumed Role for another AWS Account isn’t possible that way.
To sum it up:
- the AMI must be in the us-east-1 region
- create an IAM Role with the managed policy AWSMarketplaceAmiIngestion
- follow the AMI-based product requirements and policies
- follow the AMI product checklist
- everything must be available in the AWS Marketplace Account
A recommendation is always to use a DevOps approach that includes Continuous Integration and Continuous Delivery (CICD). Utilizing AWS CodePipeline, which uses CodeCommit, CodeBuild, and CodeDeploy, brings you to that position. That Pipeline does not need to be within the AWS Marketplace Account. It could also be a separate AWS Account that copies the AMI to the AWS Marketplace Account.
How to publish your own Marketplace AMI
We have finished the preparation of the AMI and IAM Role and are moving on with creating a new product.
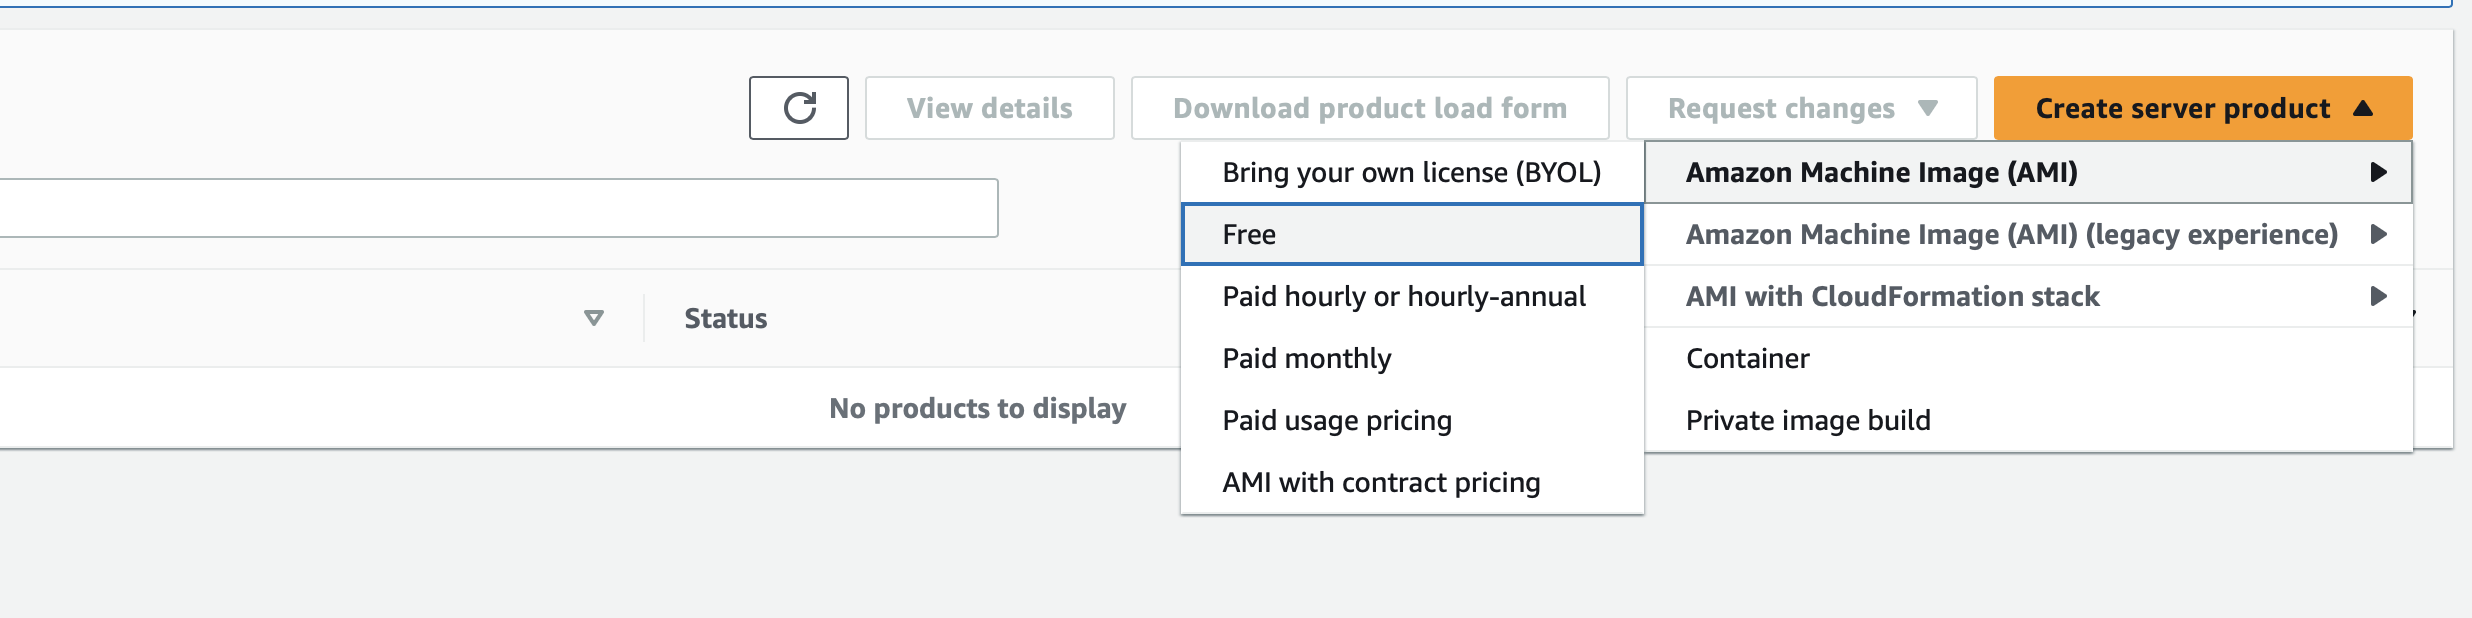
Choose within the top menu Products and choose the category Server. From now on, click on Create server product > Amazon Machine Image (AMI) > Free
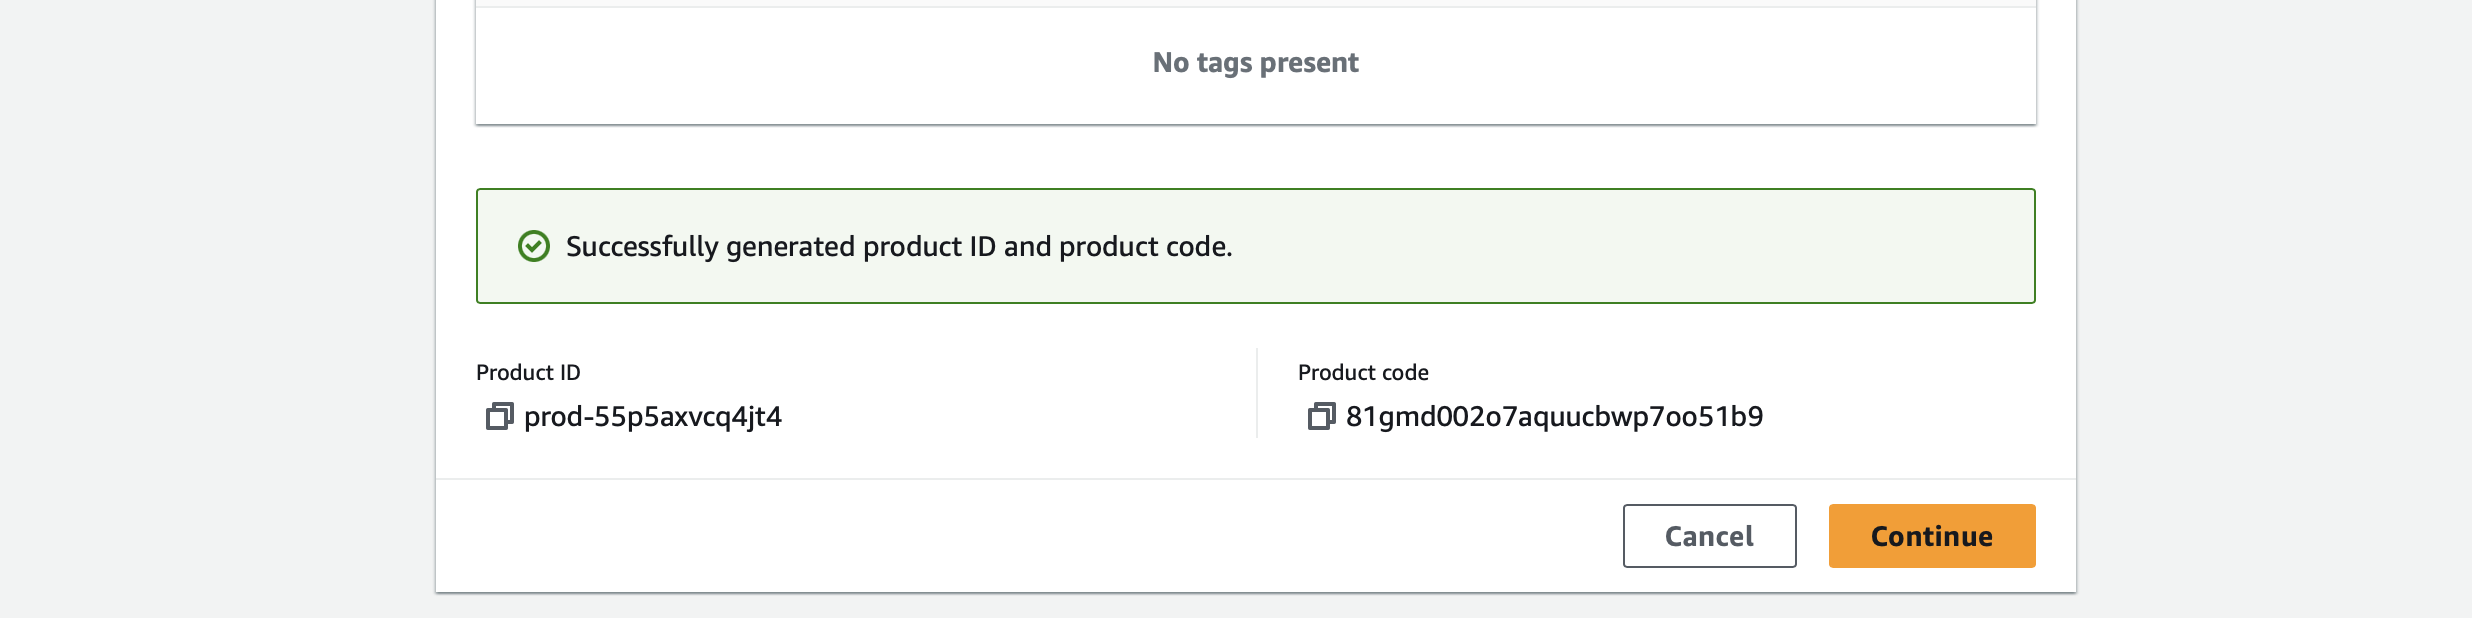
The first thing to do is to get a new product ID and a product code. Both are required in any case and are generated by AWS when clicking on Generate product ID and product code, so they will be unique.
Moving forward, we have to add more information about the product itself. It is necessary only initially and has some required fields (I won’t list the optional ones).
- Product title: The name within the AWS Marketplace
- Short description: The description will be shown in the general listings and next to the title when opening the product
- Long description: It will be shown when opening the product
- Product logo URL: This needs to be a S3 URL
- Highlights 1-3: Only one highlight is needed
- Product categories: Choose the category of your product that fits the best
- Keywords: Your product name is already a keyword, so choose others to be found better when searching
- Support details: This is a freeform text
When everything required is filled, we are moving to the next step: Region availability
In this step, you can to choose the regions where you want to publish your AMI. Choose the ones where it should be published. One of the best options here is to automatically roll out the product to each new region once it becomes available.
When you choose your regions, choose your possible instance types. Each type you haven’t selected and added won’t be available when creating a new EC2 instance.
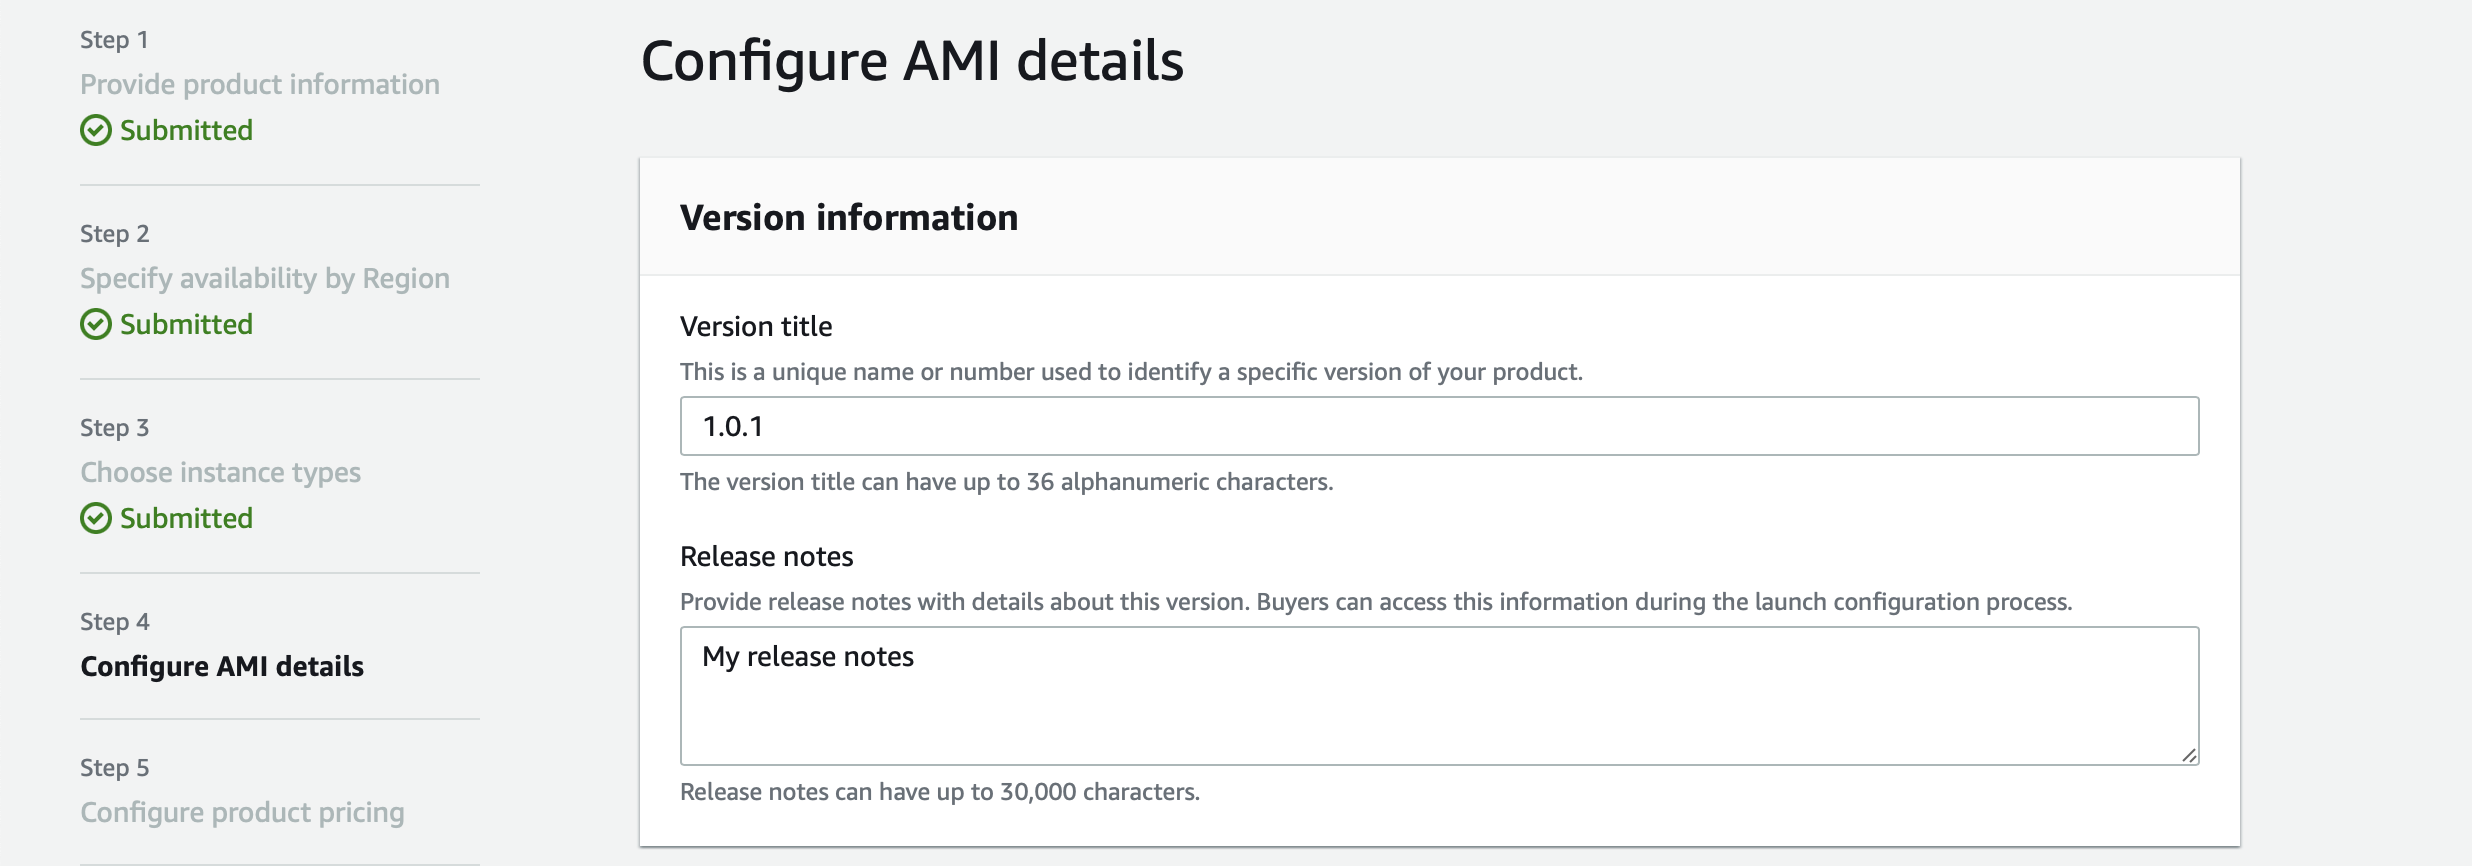
Configure AMI details: This is one of the most crucial steps in creating the new product. When you are not ready, you can click on Save and exit in the bottom left area. So you can resume this step later. The following steps can only be accessed when you have completed this step.
The version information is the first part that needs to be added. It is used as meta info. It will allow you to have multiple versions available at the same time. Adding and publishing a new version of your product will also automatically inform everyone who has a subscription about the availability of a new version.
You can enter your version format, but I’d recommend always relying on semantic versioning. It is used frequently in the software industry and build tools.
Release notes can be fully written in Markdown with all the basic formatting like headlines, bold, italic etc.
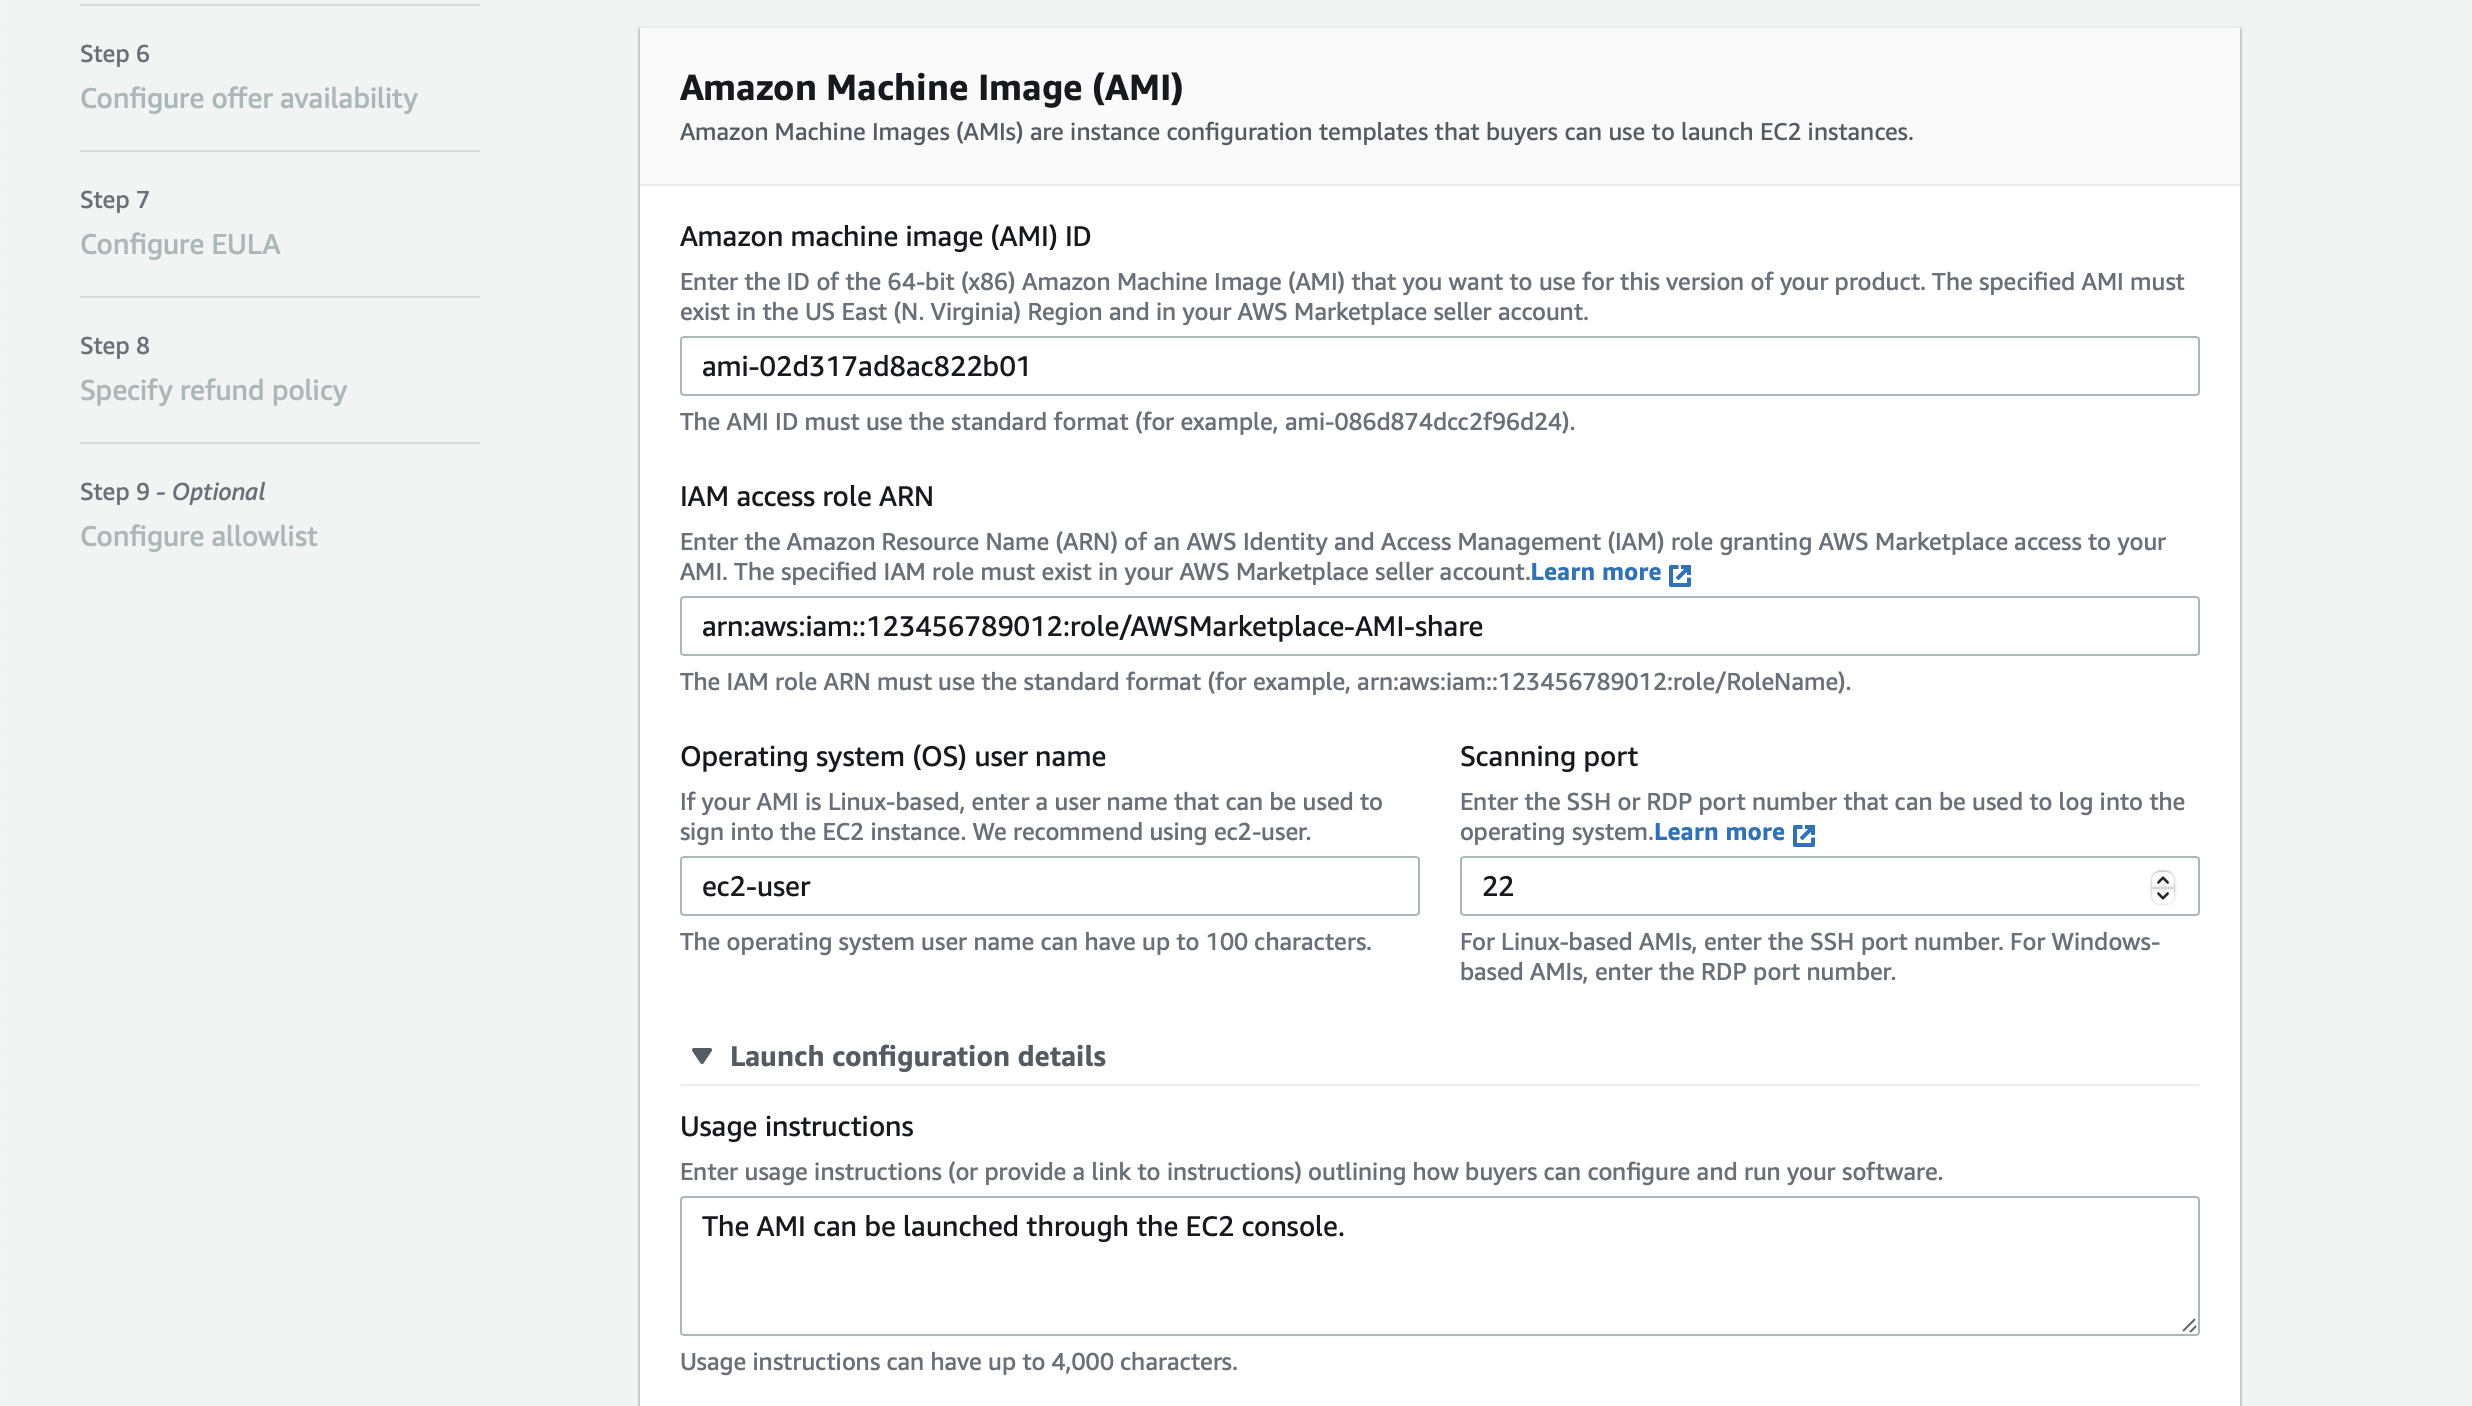
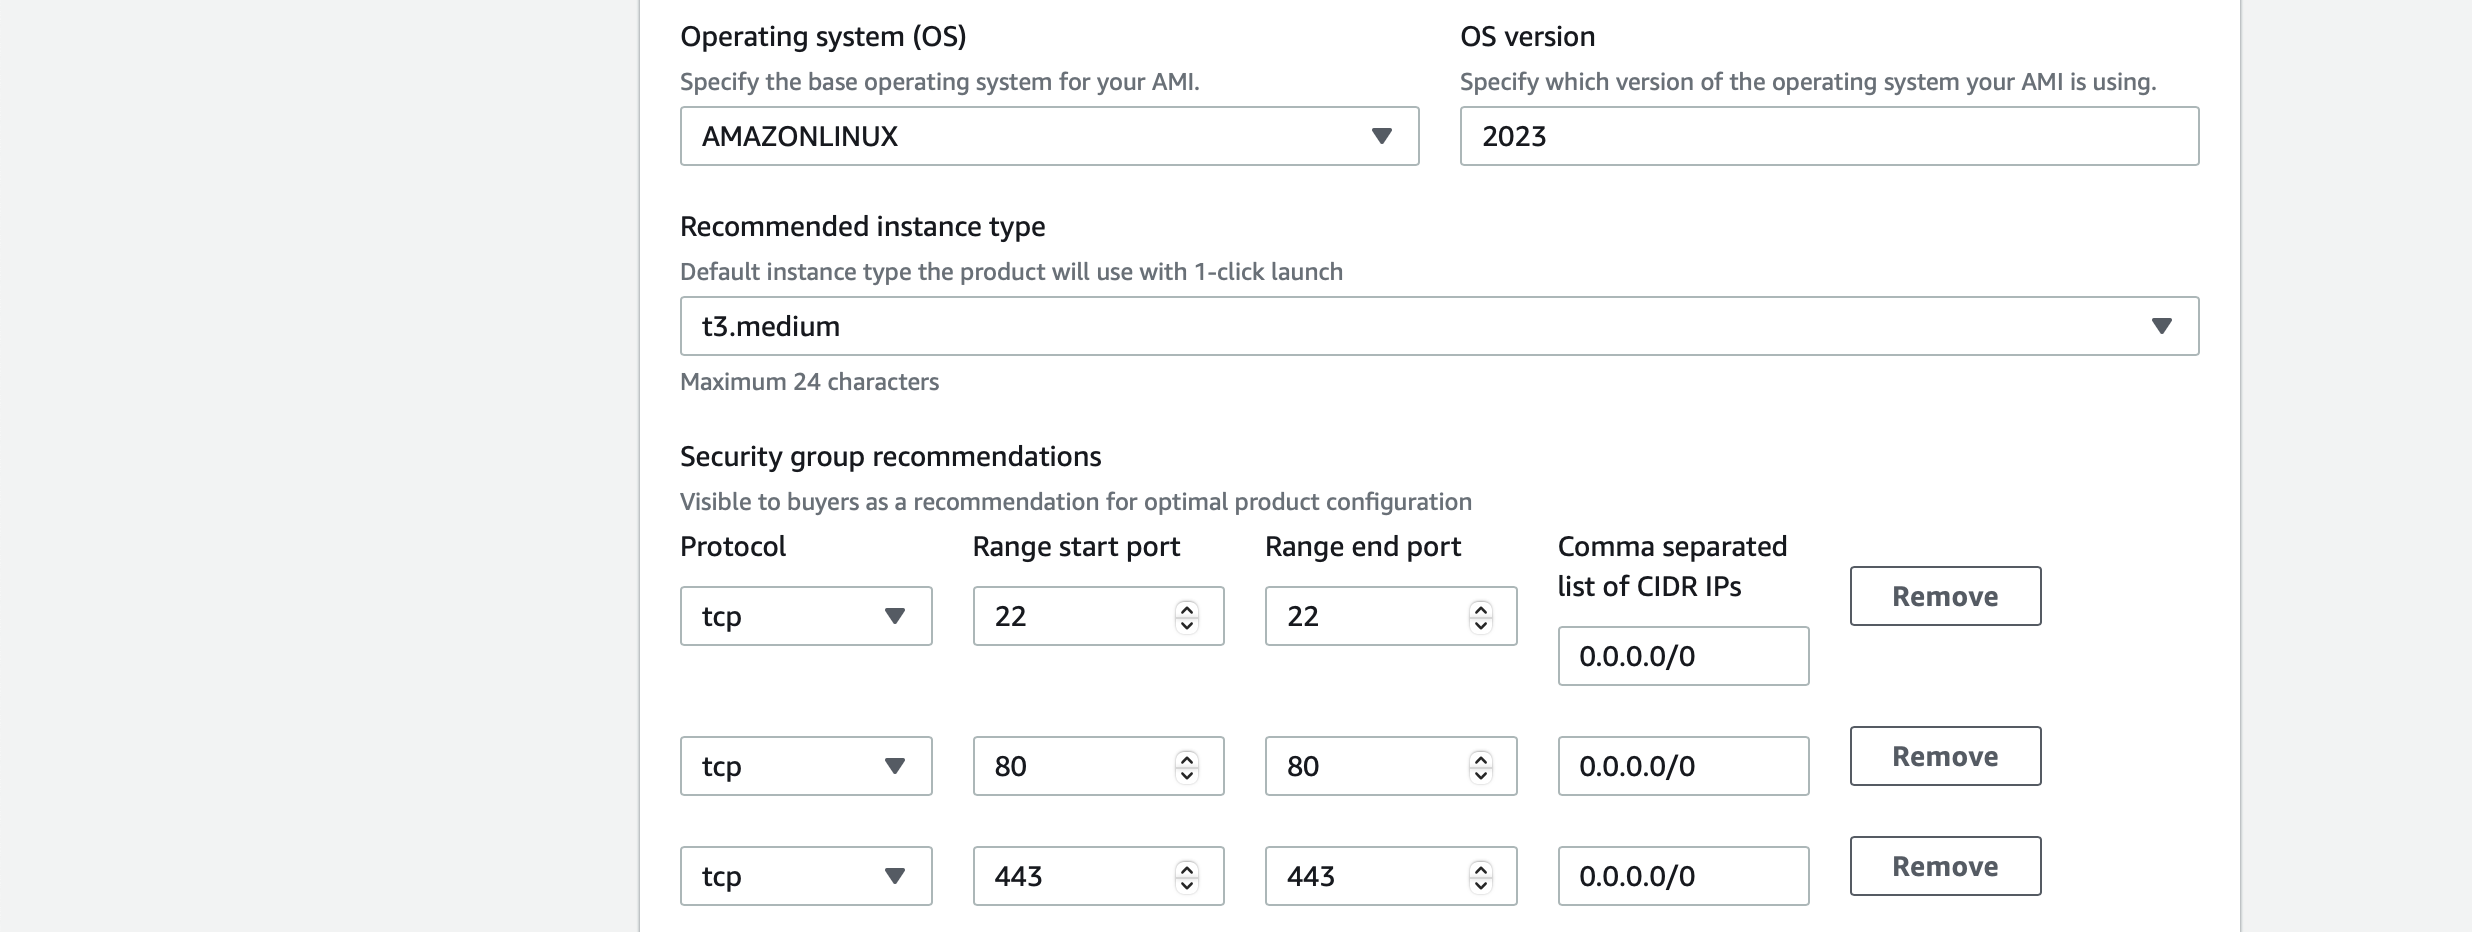
Following now are the main information in regards to the AMI.
- AMI ID: The ID for the AMI that is available within your AWS Marketplace Account in the us-east-1 region
- IAM Access Role: The ARN of the IAM Role with the necessary policies attached (see prerequisites)
- OS User: This will be ec2-user on Amazon Linux
- Scanning Port: Should be one of RDP (3389) or SSH (22). It is used by the AWS Marketplace that scans the AMI for vulnerabilities
- Usage instructions: Describe a short how-to use the AMI or refer to the documentation with a link
Besides the information about the AMI itself, it is also required to add information about the OS. So choose the OS from a dropdown menu and enter the OS version.
Add also a Security Group recommendation. This will allow the usage of the launch-wizard, which can automatically create a new security group with the settings that you add here.
If you entered an IAM Role ARN did it anyway, you will get an error message when saving your draft with Save and exit at any step after Step 4: Configure AMI details.
The following steps are straightforward. For product pricing, you are choosing free, configure the product availability to all countries, use the standard Contract for AWS Marketplace (SCMP) as EULA, add a short refund policy (could be: no refunds possible as this is free), and skip the allowlist.

After submitting your product, some changes are made: Give permissions to a shared AWS Account ID for the AMI itself and add multiple AWS Accounts to the allowlist. Don’t be worried, these are internal AWS Accounts that are used, for example, to scan the AMI for critical vulnerabilities and for publishing the AMI to the selected regions. The scan and publication officially need one hour, which I can confirm.
Now your product has gained the status Limited. The result is that only your AWS Marketplace account (plus the ones within the allowlist) is allowed to see your AMI when searching for it. To find it, you must also be logged into the AWS Marketplace.
To make your product available to all customers, go to Products > Server > [select your product] > Request changes > Update product visibility.
Everything works the same from now on when creating a new EC2 instance from an AWS Marketplace AMI.
I will also give you a quick info about paid products in the next section.
How paid products work
Every paid AWS product in the AWS Marketplace has at least one pricing dimension. This could be one of the four primary dimensions: users, data, bandwidth, or hosts. Besides that, there could be a fee for your software as well.
When the question about having your custom pricing for, let’s say, every request that is served or every byte that has been transformed, none of the four dimensions work. Now the AWS Marketplace Metering Service comes into the game.
With this service, you are able to establish a direct connection to the Metering Service API. Using the Metering Service API allows you to add a custom dimension.
To post the current usage of an AMI, you have to call the Metering Service API every hour. Then you can publish a Payload that contains the required information:
{
    "ProductCode" : "81gmd002o7aquucbwp7oo51b9", // this is generated automatically when creating a new product
    "UsageDimension" : "string", // Define your own dimension name
    "Timestamp": Date // The timestamp in UTC
}
In Java an example implementation would look like the following
import com.amazonaws.services.marketplacemetering.AWSMarketplaceMetering;
import com.amazonaws.services.marketplacemetering.AWSMarketplaceMeteringClientBuilder;
import com.amazonaws.services.marketplacemetering.model.MeterUsageRequest;
import com.amazonaws.services.marketplacemetering.model.MeterUsageResult;

import java.util.Date;

public class MeterUsage {
    private static final String PRODUCT_CODE = "YourProduct-CODE";
    private final AWSMarketplaceMetering awsMarketplaceMetering;

    public MeterUsage() {
        awsMarketplaceMetering = AWSMarketplaceMeteringClientBuilder.standard().build();
    }

    public void callMeterUsage(String dimension, int quantity, Date timestamp) {
        MeterUsageRequest meterUsageRequest = new MeterUsageRequest()
                .withProductCode(PRODUCT_CODE)
                .withUsageDimension(dimension)
                .withTimestamp(timestamp);
        MeterUsageResult meterUsageResult = awsMarketplaceMetering.meterUsage(meterUsageRequest);
    }
}
As the implementation of custom metering would be a separate blog, please refer to the official AWS custom metering documentation
Thank you for reading!
— Patrick