Building a static website with Hugo and the CDK
This content is more than 4 years old and the cloud moves fast so some information may be slightly out of date.
Building a static website with Hugo and the CDK
If you ever wanted to host your personal website or blog on AWS this article is right for you. We’re going to build a static website with Hugo, CodeBuild and CodePipeline and host it using CloudFront and S3. We will set up everything you need to build and deploy new versions of the Website.
I won’t go too much into details into how Hugo works, I suggest you have a look at their documentation if you’re unfamiliar with that. I’m going to assume familiarity with the basic AWS services involved and the CDK as well - this is a level-400 article after all.
If you want to try this for yourself, you can find the project in our cdk-templates repository on Github. Feel free to repurpose it for your own projects.
This is going to be a longer article, so I suggest you grab a cup of coffee/tea/your beverage of choice before continuing - it’s time for a break anyway!
With these introductory words out of the way, let’s look at what we’re going to build.
Architecture
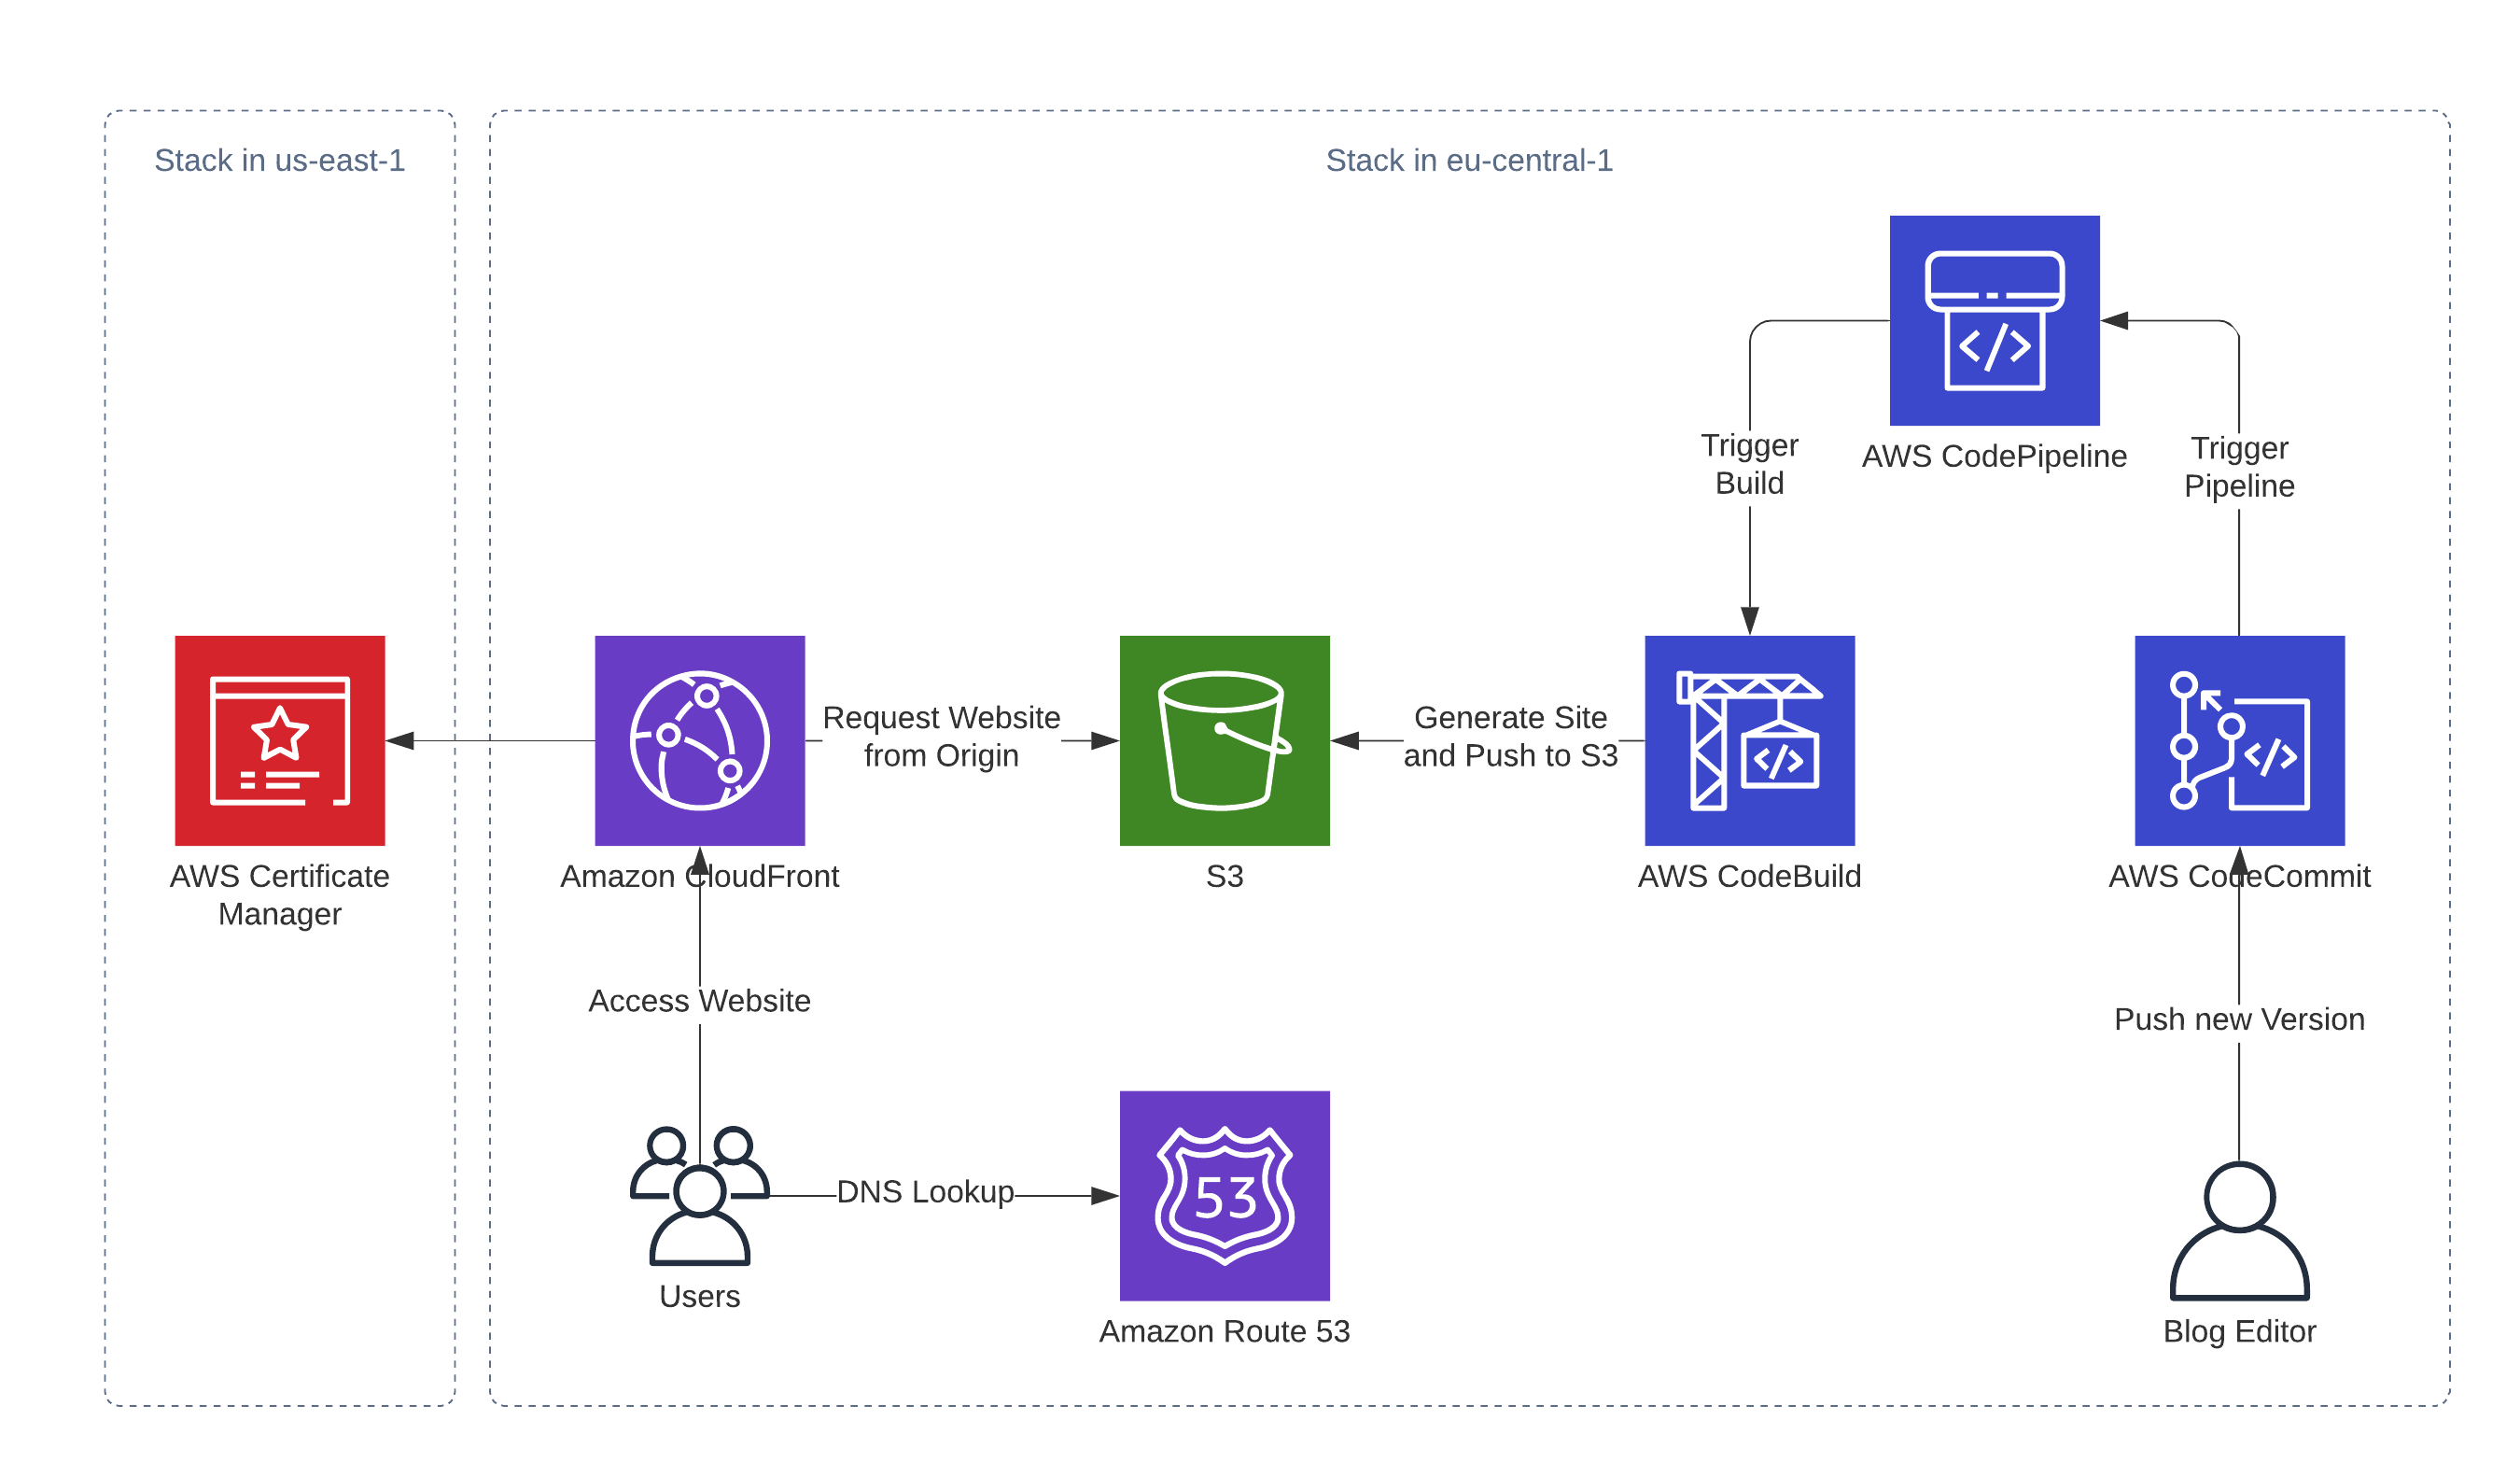
Let’s look at this from two perspective - the user-facing side and the editor-facing side.
Our users will first look up the DNS-Name of the blog, which is done with Route53. Route53 will then return IP-Addresses to CloudFront and the users’ browser picks one of them and establishes a connection. After a secure HTTPS-connection is established (for which the certificate from the certificate manager is used), the browser requests the content from CloudFront. CloudFront either serves the content directly from the edge location if it’s cached. Uncached content will be requested, cached and served from the origin. The origin in this case is a S3 bucket that hosts our static website.
From an Editors perspective we don’t interact with the user-facing parts of our infrastructure directly. We work with a git repository that’s hosted in CodeCommit and create our blog posts the way we like them. Once we push these to CodeCommit, a CodePipeline is triggered, which will use CodeBuild to take the repository and generate the static website from it. This static website is then synced to S3, where the User-facing infrastructure will be able to pick up the changed version.
If you take a closer look at the diagram you’re going to see, that the solution will be deployed in two stacks in different regions. The certificate lives in us-east-1 (North Virginia), which is required for certificates that get used by CloudFront. The other resources are located in eu-central-1 (Frankfurt), which is “my” local region, but feel free to deploy it wherever you like.
In the next section I’m going to quickly recap what the involved AWS Services do since we’re using a few of the more uncommon ones. Feel free to skip it, if you’re already familiar with them.
AWS Services in our architecture
- Route53 is the DNS-Service in AWS. It deeply integrates with other AWS services and provides aside from the usual record types (A, AAAA, CNAME, …) ALIAS-records that can point to AWS resources.
- CloudFront is a Content Delivery Network. It’s main purpose is to cache and serve content close to the end-users. CloudFront has more than 200 edge locations/ points of presence where that is done. It can also be used for TLS termination and integrates with the AWS Web Application Firewall.
- Certificate Manager is a service that can among other things provide free SSL/TLS-certificates for secure communication. These certificates can be used in CloudFront and the different AWS Load Balancers.
- S3 is one of the oldest AWS services and probably the most famous. It’s object storage, meaning you upload and retrieve objects/files with a size limit of 5TB. Objects are stored in a bucket and there is no size-limit on the bucket.
- CodeCommit is a hosted git solution, which is similar to something like GitHub or the repositories in Azure DevOps or GitLab.
- CodePipeline is a service that can be used to orchestrate complex build, testing and deployment processes in AWS.
- CodeBuild is a build service that can be used to compile or build software in a serverless manner. You only pay for the capacity you use and don’t manage your own build hosts.
- Cloud Development Kit (CDK) is a library that can be used to describe your infrastructure as code in several languages such as Python, Typescript or Java.
Let’s do this
We’ll do this in three sections - first we build the user facing infrastructure and then we take care of the infrastructure of the business end. Last but not least we’re going to take a look at the build process.
Party in the front
If you check out the repository, you’re going to see quite a few files in the directory. We’re going to start off with these two:
app.pyinfrastructure/infrastructure.py
They define the infrastructure that you could see in the architecture diagram above.
The app.py instantiates the stacks that are defined in infrastructure/infrastructure.py and supplies them with a few parameters.
This is the file you need to customize when you want to use this stack for your own purposes.
HOSTED_ZONE_ID = "ZECQVEY17GSI4"
HOSTED_ZONE_NAME = "mb-trc.de"
WEBSITE_DOMAIN_NAME = "blog.mb-trc.de"

# Insert the value for the certificate stack here
CLOUDFRONT_CERTIFICATE_ARN = "<arn-of-certificate>"
You need to customize the three constants above depending on your environment.
The CLOUDFRONT_CERTIFICATE_ARN variable can’t be filled in yet when you start off.
This is not a detailed guide on how to deploy this with in your environment, for that I’m going to refer you to the Readme.md file that comes with the code. Here I’m going to focus more on explaining which resources we deploy and why.
Let’s start with the CertificateForCloudFrontStack which is located in the infrastructure/infrastructure.py file. This stack is fairly simple, it gets a couple of parameters when it’s initialized and takes care of creating a SSL/TLS certificate using the Certificate Manager in our public hosted zone. This also validates the Certificate by setting the appropriate DNS-records in Route53 - something you had to previously implement yourself using a Custom Resource in CloudFormation. The CDK achieves this using a custom resources as well, but it takes care of provisioning and managing that, which in my opinion is reason enough to give the CDK a try.
class CertificateForCloudFrontStack(core.Stack):

    def __init__(self, scope: core.Construct, id: str, hosted_zone_id: str,
                hosted_zone_name: str, website_domain_name: str,
                **kwargs) -> None:
        super().__init__(scope, id, **kwargs)

        hosted_zone = route53.HostedZone.from_hosted_zone_attributes(
            self,
            "HostedZone",
            hosted_zone_id=hosted_zone_id,
            zone_name=hosted_zone_name
        )

        # SSL/TLS Certificate
        tls_cert = certificatemanager.DnsValidatedCertificate(
            self,
            "Certificate",
            hosted_zone=hosted_zone,
            domain_name=website_domain_name
        )

        core.CfnOutput(self, "CertificateArn", value=tls_cert.certificate_arn)
If we now jump back to the app.py we can take a look at how this is instantiated. As you can see the constants/global variables we have defined above make an appearance here. They are the main pieces of information that get passed on to the stack aside from an environment. This environment just makes sure the stack is provisioned in the region us-east-1 because that’s where we need to have our TLS/SSL Certificate for CloudFront.
us_east_1 = core.Environment(region="us-east-1")
eu_central_1 = core.Environment(region="eu-central-1")

certificate_stack = CertificateForCloudFrontStack(
    app,
    "certificate-stack",
    hosted_zone_id=HOSTED_ZONE_ID,
    hosted_zone_name=HOSTED_ZONE_NAME,
    website_domain_name=WEBSITE_DOMAIN_NAME,
    env=us_east_1
)
After a cdk deploy certificate-stack you should see something like this in the output:
Outputs:
    certificate-stack.CertificateArn = arn:aws:acm:us-east-1:123123123123:certificate/4d45bfb4-19f4-4dbd-8cd6-b510f4fdf8b4
That’s the ARN of the certificate you need to enter in the CLOUDFRONT_CERTIFICATE_ARN in the app.py before proceeding.
Now that we have created the certificate in us-east-1 we can take care of our main stack and take a look at how that works. It’s created in the app.py like this:
static_website_stack = StaticWebsiteStack(
    app,
    "static-website-stack",
    hosted_zone_id=HOSTED_ZONE_ID,
    hosted_zone_name=HOSTED_ZONE_NAME,
    website_domain_name=WEBSITE_DOMAIN_NAME,
    certificate_in_us_east_1_arn=CLOUDFRONT_CERTIFICATE_ARN,
    env=eu_central_1
)

static_website_stack.add_dependency(certificate_stack,
    reason="The certificate needs to exist in US-EAST-1!")
That looks familiar you might say and you’d be right - the stack takes almost the same parameters as the certificate stack with the addition of the certificate arn and the fact that it will be created in Frankfurt (eu-central-1). Also there is an explicit dependency to the certificate stack which will make sure the CDK deploys the certificate stack first.
Great, with that stack being created we’re done - with a few lines of code we’ve created a static website with a deployment pipeline and code repo. Just kidding, the magic happens in the StaticWebsiteStack in the infrastructure/infrastructure.py file which we’re going to take a look at now. Let’s go through this section by section.
We start by checking if the certificate ARN is actually an ARN in us-east-1 - if this isn’t the case, the deployment fails. Afterwards we create an S3 bucket that will host our static website. Since all Buckets are private by default, we need some way for CloudFront to get access to the bucket in order to serve our website content. This is achieved by the OriginAccessIdentity that acts like a technical user and can be granted read access to the bucket which we give it.
class StaticWebsiteStack(core.Stack):

    def __init__(self, scope: core.Construct, id: str, hosted_zone_id: str,
                hosted_zone_name: str, website_domain_name: str,
                certificate_in_us_east_1_arn: str, **kwargs) -> None:
        super().__init__(scope, id, **kwargs)

        # Raise an exception if we get a certificate that
        # doesn't live in us-east-1
        check_us_east_1_cert(certificate_in_us_east_1_arn)

        # The S3 Bucket that will store our website
        website_bucket = s3.Bucket(self, "WebsiteBucket")

        # The Origin Access Identity is a way to allow CloudFront
        # Access to the Website Bucket
        origin_access_identity = cloudfront.OriginAccessIdentity(
            self, "OriginAccessIdentity",
            comment="Allows Read-Access from CloudFront"
        )

        # We tell the website bucket to allow access from CloudFront
        website_bucket.grant_read(origin_access_identity)
Next we create a certificate object from the ARN we have received in order to pass it to CloudFront. Speaking of CloudFront: we set up the distribution that serves our content to the end users. Note that we configure the S3 bucket to be the origin and CloudFront to use the “technical user” to access it. Furthermore we tell CloudFront to use a default TTL of an hour - this means static content will be cached at the edge for an hour before requesting it from the origin again. We also tell CloudFront where the document for 404 errors lives and tell it to use our certificate from the certificate stack.
# Import the cert from the arn we get as a parameter
tls_cert = certificatemanager.Certificate.from_certificate_arn(
    self, "Certificate", certificate_arn=certificate_in_us_east_1_arn)

# We set up the CloudFront Distribution with the S3 Bucket as
# the origin and our certificate
cloudfront_distribution = cloudfront.CloudFrontWebDistribution(
    self, "WebsiteDistribution",
    origin_configs=[
        cloudfront.SourceConfiguration(
            s3_origin_source=cloudfront.S3OriginConfig(
                s3_bucket_source=website_bucket,
                origin_access_identity=origin_access_identity
            ),
            behaviors=[
                cloudfront.Behavior(
                    is_default_behavior=True,
                    default_ttl=core.Duration.hours(1)
                )
            ],
        )
    ],
    error_configurations=[
        # Point CloudFront to our custom 404 error page when a 404 occurs
        cloudfront.CfnDistribution.CustomErrorResponseProperty(
            error_code=404,
            response_code=404,
            response_page_path="/404.html"
        )
    ],
    viewer_certificate=cloudfront.ViewerCertificate.from_acm_certificate(
        certificate=tls_cert,
        aliases=[website_domain_name]
    )
)
Having done that, we now create a DNS record for our domain and point it to the CloudFront distribution. We use an ALIAS record here, which is the fancy AWS version of a CNAME record.
# Set the DNS Alias for CloudFront
hosted_zone = route53.HostedZone.from_hosted_zone_attributes(
    self,
    "HostedZone",
    hosted_zone_id=hosted_zone_id,
    zone_name=hosted_zone_name
)

cloudfront_alias_record = route53.ARecord(self, "DNSAliasForCloudFront",
    zone=hosted_zone,
    target=route53.RecordTarget.from_alias(
        route53_targets.CloudFrontTarget(cloudfront_distribution)
    ),
    record_name=website_domain_name,
)
Now we have set up everything that’s required on the user facing side of our architectures. Any user accessing the website can use the CloudFront distribution to get content out of the S3 bucket. Unfortunately they won’t find anything there when they do, which brings us to our next topic.
Business in the back
Let’s now build a way to get the content into the website bucket. As discussed in the architecture section our editors will interact with a git repository to create content. Whenever something is pushed to the master branch we want a build process to start which creates the static website and deploys it to the S3 bucket. So this is what we’re going to build next.
We’re still in the infrastructure/infrastructure.py where we left off in the previous section. First we set up a CodeCommit repository which is our git repository. Then we define a CodeBuild Project and tell it to execute the instructions in the buildspec.yml which is part of the repository (more on that later). This build project also gets some environment variables that inject the base-url for the website (sort of the root for all absolute URLs to start from) as well as the name of the website bucket. In the end the build project gets read/write access to the website bucket. So we now have a repository to hold our source code and a build project which can turn it into a website and upload it to S3.
# Repo for the website
repository = codecommit.Repository(
    self, "Repository",
    repository_name=website_domain_name,
    description=f"Repository for the website {website_domain_name}"
)

website_build_project = codebuild.PipelineProject(self, "WebsiteBuild",
    build_spec=codebuild.BuildSpec.from_source_filename(
        "buildspec.yml"
    ),
    environment=codebuild.BuildEnvironment(
        build_image=codebuild.LinuxBuildImage.STANDARD_4_0
    ),
    environment_variables={
        "baseurl": codebuild.BuildEnvironmentVariable(
            value=f"https://{website_domain_name}/"),
        "bucket": codebuild.BuildEnvironmentVariable(
            value=website_bucket.bucket_name)
    }
)
website_bucket.grant_read_write(website_build_project.grant_principal)
We’re almost done with the infrastructure, now we just need to tie everything together which is the job of a Code Pipeline. First we define an Artifact that can be passed between the different stages of the pipeline. Then we set up the Pipeline itself, which is a two-step pipeline. First it checks out the code from the repository and stores it in the Artifact we have just created. Then it passes that artifact to the CodeBuild project we have set up earlier which will in turn use it to build and deploy the website.
source_output = codepipeline.Artifact()

website_build_pipeline = codepipeline.Pipeline(self, "WebsiteBuildPipeline",
    stages=[

        # Check Out the Code From the Repo
        codepipeline.StageProps(
            stage_name="Source",
            actions=[
                codepipeline_actions.CodeCommitSourceAction(
                    action_name="CheckoutCode",
                    repository=repository,
                    output=source_output
                )
            ]
        ),

        # Build and deploy the Website to S3 (this uses the sync command
        # with the delete option, which the codebuild action to deploy to
        # S3 doesn't support)
        codepipeline.StageProps(
            stage_name="BuildAndDeploy",
            actions=[
                codepipeline_actions.CodeBuildAction(
                    action_name="BuildAndDeployWebsite",
                    project=website_build_project,
                    input=source_output
                )
            ]
        )
    ]
)
Now we’ve set up everything that is necessary for a push to the repository to result in a deployment of the website on the infrastructure level. We haven’t actually deployed it to AWS yet, so let’s call cdk deploy static-website-stack to do just that. This might take a couple of minutes. As described in the README.md you need to commit your code to the repository before actually seeing the content of the website - for this process I’m going to refer you to the aforementioned README.md.
In the mean time let’s have a closer look at the build process that creates and deploys our static website.
The build process
Building and deploying the website is done in the CodeBuild process we have set up earlier. I alluded to the buildspec.yml already and now we’re going to have a look at what it does and how it looks. The buildspec.yml is essentially the configuration of how the build process works - it’s the equivalent of something like a Jenkinsfile. It has multiple sections which we’re going to explore now.
It starts with a general configuration and sets up a few environment variables such as the version of Hugo we’re going to use to build the website. After the general setup several phases of the build process are described. The install phase installs the AWS CLI on the build host as well as Hugo in the version we specified earlier.
version: 0.2

env:
  variables:
    hugo_version: "0.64.1"
    # bucket - set from the outside, S3-Bucket with the website content
    # baseurl - set from the outside, URL of the website

phases:
  install:
    runtime-versions:
      golang: 1.12
    commands:
      - mkdir $HOME/src
      - cd $HOME/src
      - pip install --user --upgrade pip
      - pip install --user awscli
      - USER_BASE_PATH=$(python -m site --user-base)
      - export PATH=$PATH:$USER_BASE_PATH/bin
      - wget "https://github.com/gohugoio/hugo/releases/download/v${hugo_version}/hugo_${hugo_version}_Linux-64bit.deb"
      - dpkg -i hugo_${hugo_version}_Linux-64bit.deb
    finally:
      - hugo version
The next phase is called build and fetches the theme for the website before running Hugos step itself. Note the HUGO_UGLYURLS=true environment variable before the build step. From the name it seems like something you don’t want to set to true and that’s correct - you don’t want to do that. This means that hugo will generate all links in such a way that they include the suffix of the files they refer to - so something like https://example.com/article/test.html instead of https://example.com/article/test. Unfortunately this is necessary, because CloudFront and S3 don’t add the suffix themselves, which a more traditional webserver would do - so this is a tradeoff that’s currently necessary. Hopefully CloudFront improves in that regard in the future.
  build:
    commands:
      - echo Fetching Theme
      - cd $CODEBUILD_SRC_DIR
      - cd website
      - git init
      # TODO: Add your own theme here!
      - git submodule add https://github.com/budparr/gohugo-theme-ananke.git themes/ananke
      - ls -l
      - echo Building Website content
      - HUGO_UGLYURLS=true hugo --baseURL ${baseurl}
      - echo Built hugo on `date`
After we built the website we just need to transfer it to the S3 bucket, which our post_build phase does. For the deployment it uses the AWS CLI to sync the website/public bucket to our S3 bucket. Note the --delete option which ensures that content that’s no longer in the repo gets removed from S3 as well.
  post_build:
    commands:
      - echo Deploying Website to S3
      - cd $CODEBUILD_SRC_DIR
      - ls -l website/public
      - cd website/public && aws s3 sync . s3://${bucket}/ --delete
Now that we’ve set up the infrastructure let’s see how the workflow of an editor looks like.
Editor’s Workflow
As an editor the process is fairly straightforward:
- Create an article in the git repository and optionally preview it locally
- Use
git addandgit committo commit the finished article to the local repository. - Use
git pushto sync the changes to the remote repository. - This will trigger the code pipeline and in turn the deployment of the new version of the website.
There’s really not more to it - you could think about more complex workflows with branches and pull requests for reviews etc. but this shouldn’t affect the infrastructure we’ve set up here.
Conclusion
In this article I showed you how to build up the infrastructure for hosting a hugo-based static website in S3 behind CloudFront and how to build a pipeline that automates the deployment of the website.
If you want to try this for yourself, you can find the project in our cdk-templates repository on Github.
Thank you for investing so much of your valuable time in reading this till the end - if you have feedback, questions or suggestions feel free to reach out to me on Twitter or any of the other social media channels mentioned in my bio below.