R can not be pushed in Production - deprecated!
This content is more than 4 years old and the cloud moves fast so some information may be slightly out of date.
Running Shiny on Fargate
Some guys still thinking R cannot be used at scale or only in a limited way. I still do not understand the reason why people are like this. Since my last post about AWS Batch, which is a Docker-based service within AWS, which enables you to work with R, I spend a lot of time with Fargate, another Docker-based service on AWS. This time my boss wanted a BI app. He talked about Tableau and PowerBI, while I was thinking about Shiny web apps. Why? Because you can create them fast, they are good looking and powerful. A problem about those apps comes up if multiple users are using them at the same time. The R runtime will function in a queued manner. Therefore, I decided to use Fargate. Spinning up multiple Shiny apps according to the CPU or memory usage seemed to be a good idea. And this enables you to run R with Docker at scale in a cheap manner.
Blogging about Shiny? With Docker? Seriously? Yes!
Starting my project, I found a bunch full of tutorials how to put Shiny into Docker. But I felt like being the first who wanted to put those apps on Fargate. So actually this Blog is about this part.
Our sample Shiny Web App
So just for simplicity, open Rstudioand choose the little plus symbol. Next, choose Shiny Web App
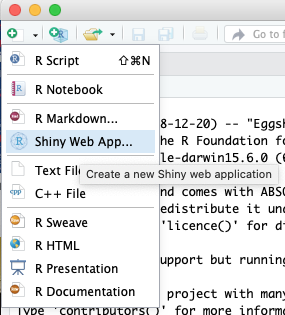
Give your Shiny App a name and choose - again for simplicity - the Single File(app.R) solution. Click create and your done.

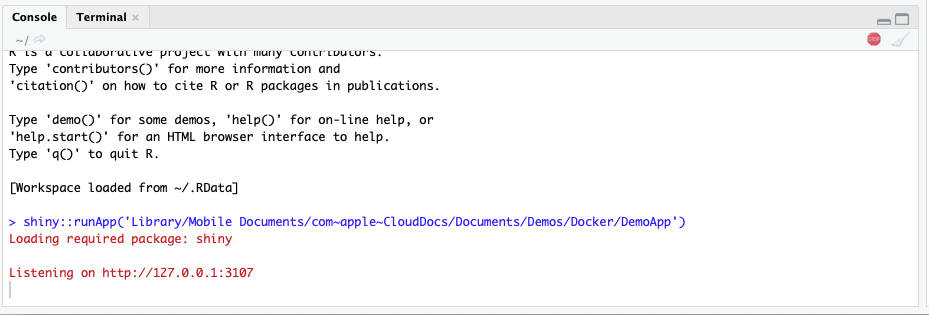
Within RStudio click on Run App to have a look. After launching the you will be prompt to your to browser. Otherwise, you will see this output on the RStudio Console.
Dockerize the app.R
To put the app.R I created this Dockerfile with touch Dockerfile. I chose rocker/shiny-verse:3.5as base image. Addtionally, because I wanted to use the Identity and Access Management (IAM) service on AWS, I installed an additional package to make the aws cli work within my Docker container.
FROM rocker/shiny-verse:3.5

# Logging path
RUN mkdir -p /var/lib/shiny-server/bookmarks/shiny

# Install presequities
RUN apt-get update \
    && apt-get install -y --no-install-recommends \
    file \
    git \
    libapparmor1 \
    libcurl4-openssl-dev \
    libedit2 \
    libssl-dev \
    lsb-release \
    psmisc \
    procps \
    python-setuptools \
    sudo \
    wget \
    libclang-dev \
    libclang-3.8-dev \
    libobjc-6-dev \
    libclang1-3.8 \
    libclang-common-3.8-dev \
    libllvm3.8 \
    libobjc4 \
    libgc1c2 \
    python-pip \
    dialog \
    nano \
    && pip install virtualenv \
    && pip install awscli
Running Shiny with additional AWS services
If you want to use your Shiny Web App together with other AWS Services like S3 or Athena you need to add the following commands within your Dockerfile:
# Install Java to run queries with Athena
RUN apt-get install openjdk-8-jdk -y
RUN R CMD javareconf
RUN apt-get install r-cran-rjava -y
RUN chown shiny:shiny /tmp/
RUN chown shiny:shiny /usr/local/lib/R/site-library/AWR.Athena/java
We need Java to connect our app with Amazon Athena which can be done via a JDBC/ODBC driver. To make use of this service, I worked sucessfully with the R package AWR.Athena, which requires rjava and RJDBC. For S3 usage, I used the cloudyr packages aws.ec2metadata, aws.signature and aws.s3. We are also going to install all the other needed R packages, like ggplot2.
# Download and install R packages
RUN R -e "install.packages(c('ggplot2', 'RJDBC', 'dplyr','aws.ec2metadata','aws.signature','AWR.Athena','aws.s3', 'DT'), repos='http://cran.rstudio.com/')"
A crucial part: Adaption of shiny-server.sh
This part took a while to figure out. But finally, it’s pretty easy to test your Dockerzied Shiny App on your local machine in the same way as on AWS. We need to configure the shiny-server.sh. By default the script looks like this:
# Make sure the directory for individual app logs exists
mkdir -p /var/log/shiny-server
chown shiny.shiny /var/log/shiny-server

if [ "$APPLICATION_LOGS_TO_STDOUT" = "false" ];
then
    exec shiny-server 2>&1
else
    # start shiny server in detached mode
    exec shiny-server 2>&1 &

    # push the "real" application logs to stdout with xtail
    exec xtail /var/log/shiny-server/
fi
Within Fargate or on our local machine we cannot use curl http://169.254.169.254/meta-data like on EC2. Instead, we need to use the respective URI of each Task. And this needs to be done again and again, as long as your Task will run (because of the temporary credentials provided by the Security Token Service (STS)). So we just need to add the following line to the shiny-server.sh:
# Whether on Fargate or not, write credentials to .Renviron
env | grep AWS_ >> /home/shiny/.Renviron
chown shiny.shiny /home/shiny/.Renviron
By doing so, we can avoid any usage of hard coded credentials within your app.R. The credentials will be passed to the AWS services.
Finishing and Testing the Dockerfile
We need to finish our Dockerfile.
# Copy custom shiny-server.sh for environment variables
COPY shiny-server.sh /usr/bin/shiny-server.sh
RUN chmod 755 /usr/bin/shiny-server.sh

# Copy the app to the image
COPY DemoApp /srv/shiny-server/

# Make all app files readable
RUN chmod -R 755 /srv/shiny-server/

# Avoid using root, so use the pre-built user shiny
USER shiny

# Port for our Shiny WebApp
EXPOSE 3838

# Execute the Container
CMD ["/usr/bin/shiny-server.sh"]
To make testing fast, I used the following script. To make this work, you need the aws cli on your local machine, a cli profile and a IAM-role within your AWS account your are allowed to assume. This role can be used later on for Shiny Web App on Fargate.
#!/bin/bash

# Here you need to set up the the permissions accordingly
tokens=$(aws sts assume-role --role-arn "arn:aws:iam::ACCOUNT_ID:role/Role_ShinyWebApp" --role-session-name "ShinyWebApp" --profile YOUR_CLI_PROFILE)

AWS_ACCESS_KEY_ID=$(echo $tokens | jq -r .Credentials.AccessKeyId)
AWS_SECRET_ACCESS_KEY=$(echo $tokens | jq -r .Credentials.SecretAccessKey)
AWS_SESSION_TOKEN=$(echo $tokens | jq -r .Credentials.SessionToken)

# Build the Docker image
docker build -t ShinyWebApp:$1 /path/to/your/directory

# Run the Docker image as Docker Container
# With env | grep AWS_ the shiny-servers.sh get's passed the credentials
docker run -it --rm \
    -e AWS_ACCESS_KEY_ID=$AWS_ACCESS_KEY_ID \
    -e AWS_SECRET_ACCESS_KEY=$AWS_SECRET_ACCESS_KEY \
    -e AWS_SESSION_TOKEN=$AWS_SESSION_TOKEN \
    -e AWS_DEFAULT_REGION=eu-central-1 \
    --name ShinyWebApp \
    -p 80:3838 ShinyWebApp:$1 # use http (80) or https (443)
With ./dockerrun.sh YOUR_TAG you can build your Docker image and run it afterwards. You can access the Shiny App with your browser.
How to grant Access to your ShinyApp?
This is another pain point. If you want to run such an application on the Internet, you need to secure it. Thats why I decided to use this architecture on AWS.
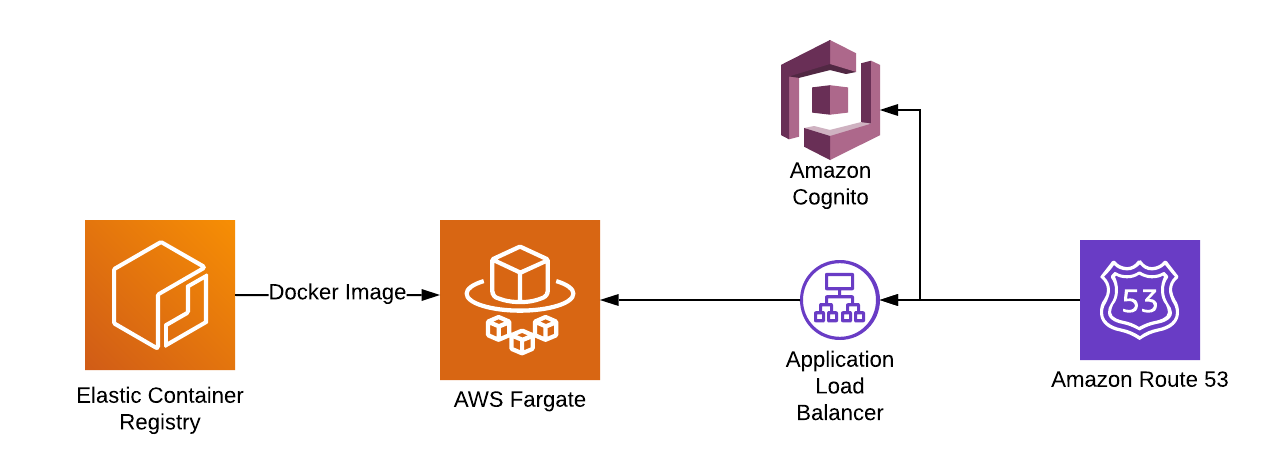
I built a Docker Cluster with the Elastic Container Servce (ECS) and created a Task with Fargate as launchtype. With this configuration, AWS takes care about patching and cluster orchestration. We can freely scale the amount of tasks. For each Task, the Docker image comes from the Elastic Container Registry (ECR).
To provide access to the Shiny Web App, I used an Application Loadbalancer (ALB). This service is able to scan your browser headers for JSON web tokens. A user without those tokens will be redirected to Amazon Cognito and needs to sign in or to register. In my case I send invitations to my colleagues, so no one from outside can sign up by himself.
After signing in the ALB you will get redirected by the ALB to my Fargate Docker Cluster. Finally, and just to make things beautiful, you can use Route53 for assigning an URL and the Amazon Certificate Manager to provide https access to your Shiny Web App.
Creating the Fargate Service and a Task Definitionen
Let’s create a service.
- Login in into your AWS Management Console.
- Search for ECS.
- Click on
Get Started

Afterwards choose custom and configure it to use your own Docker image.
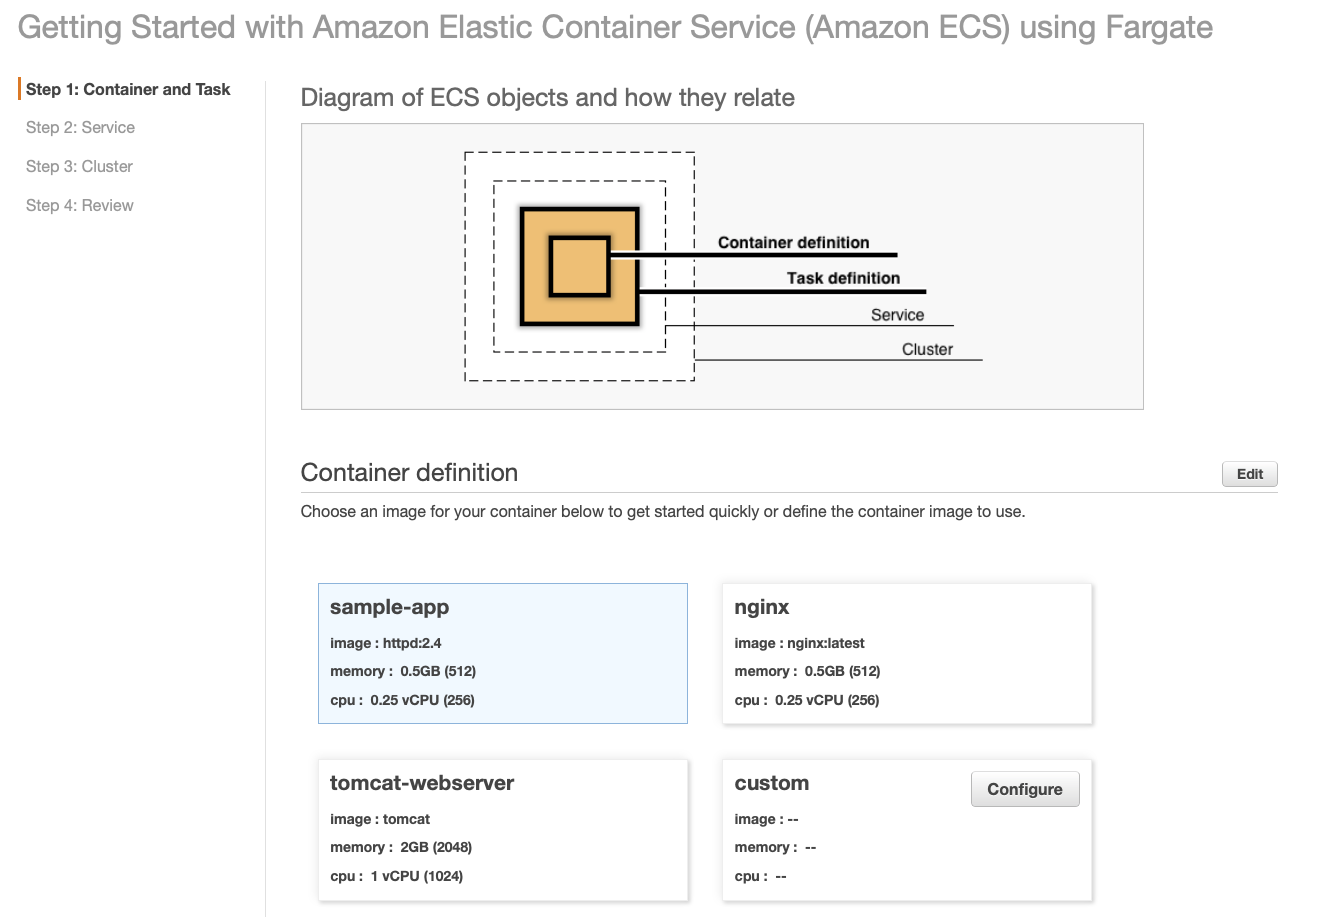
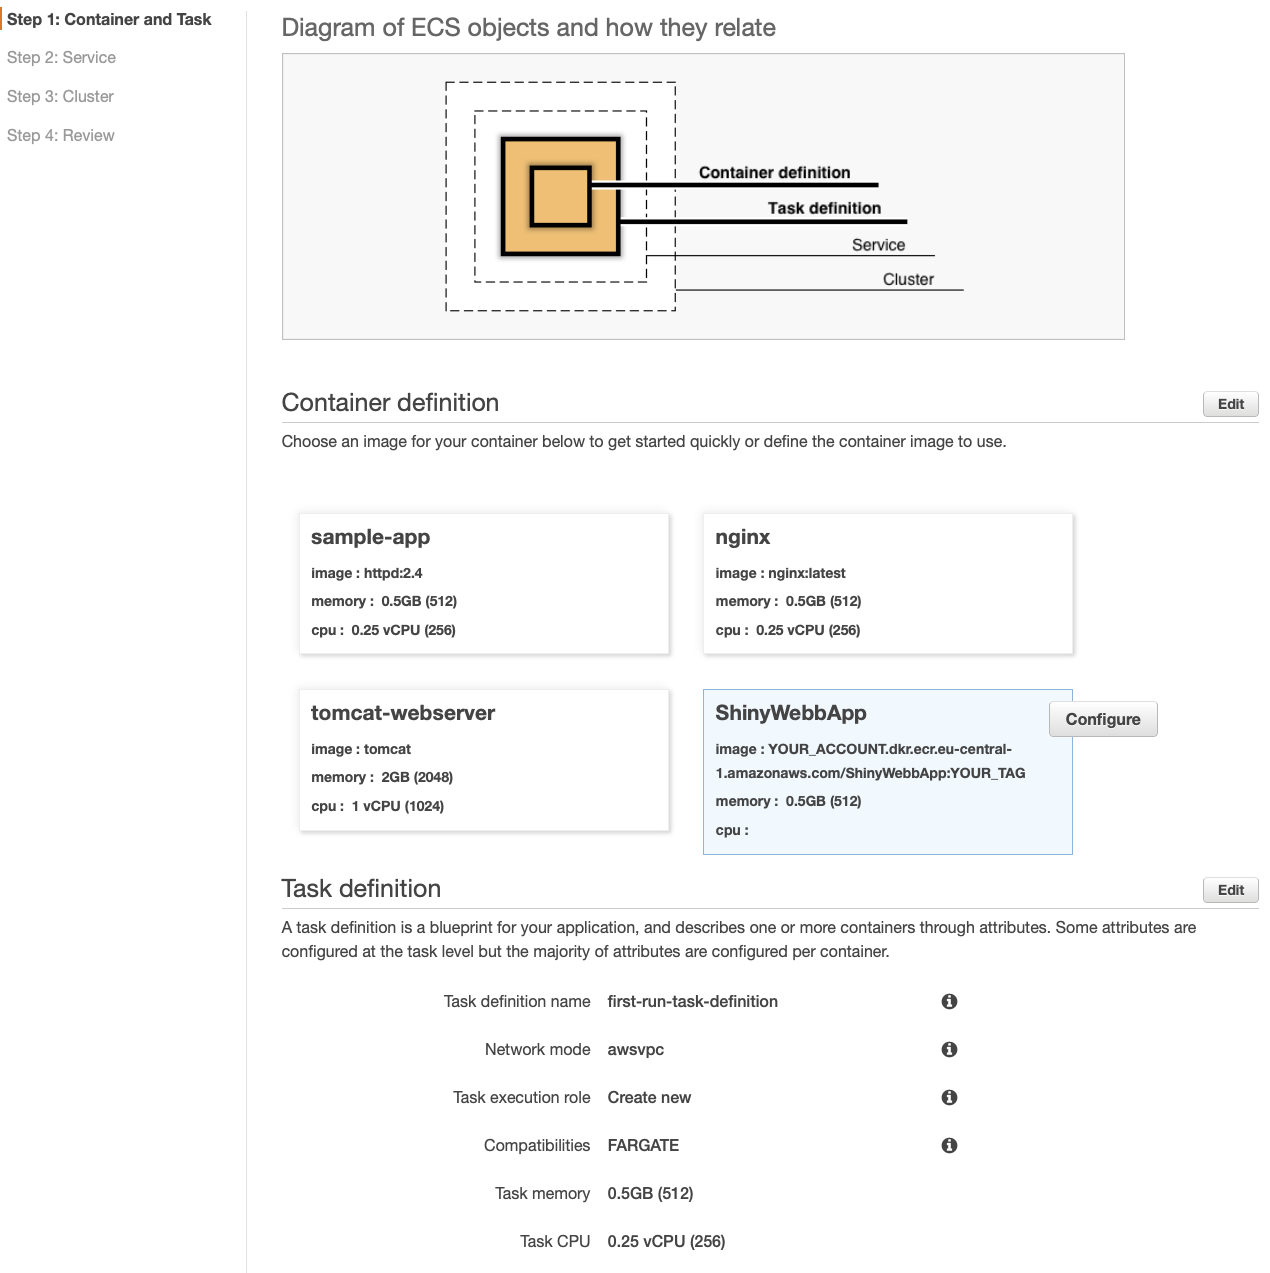
On the next step, you need to choose the right name of your Shiny Web App and the correct ECR image uri.
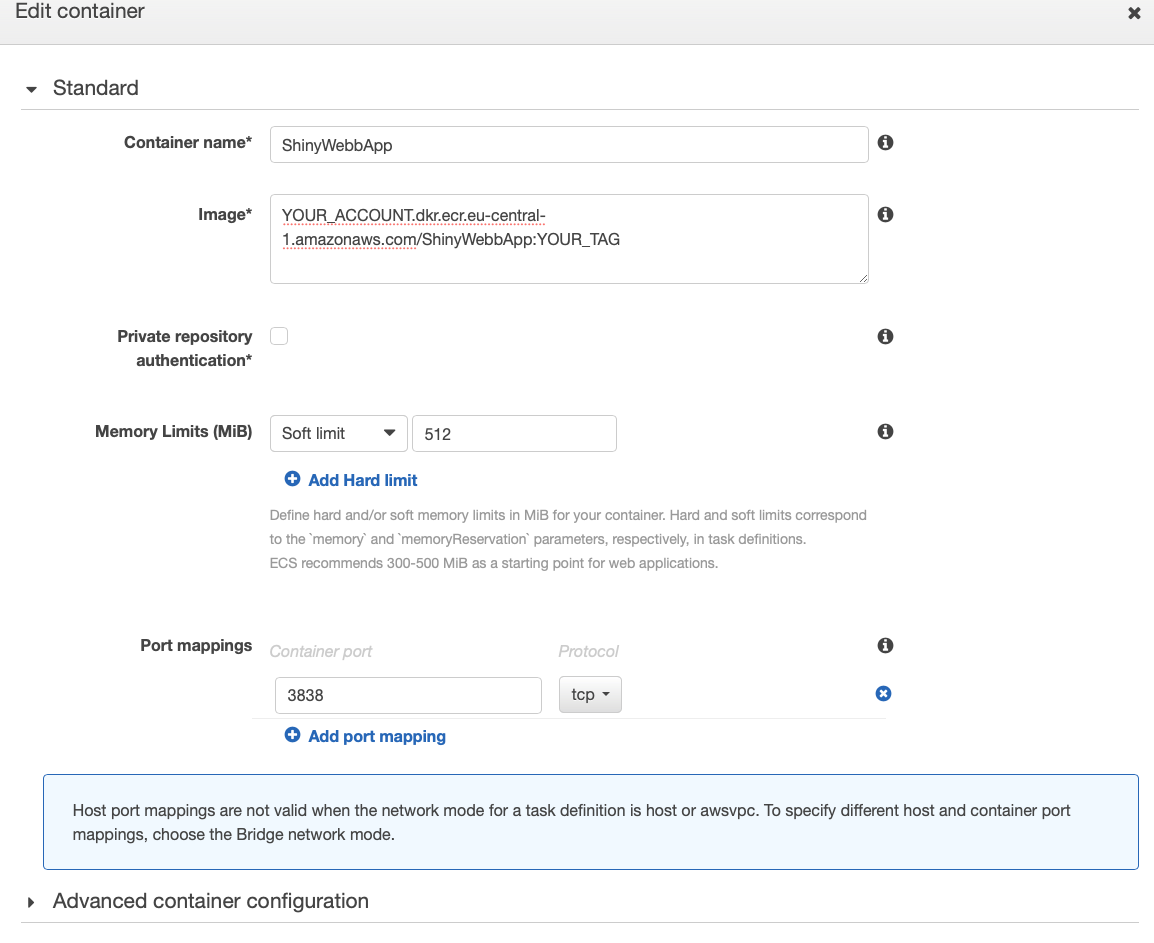
My experience shows that 512 (MiB) as memory limit is sufficient. But you need to monitor this for your application! On the Port mappings section you choose Port 3838 the same port, we specified within the Dockerfile. Under Advanced container configurations we do not need to make any further changes. If you specified further commands via docker run on your local machine, you can specify them under this section. Closing this dialog, you will see a page like this.
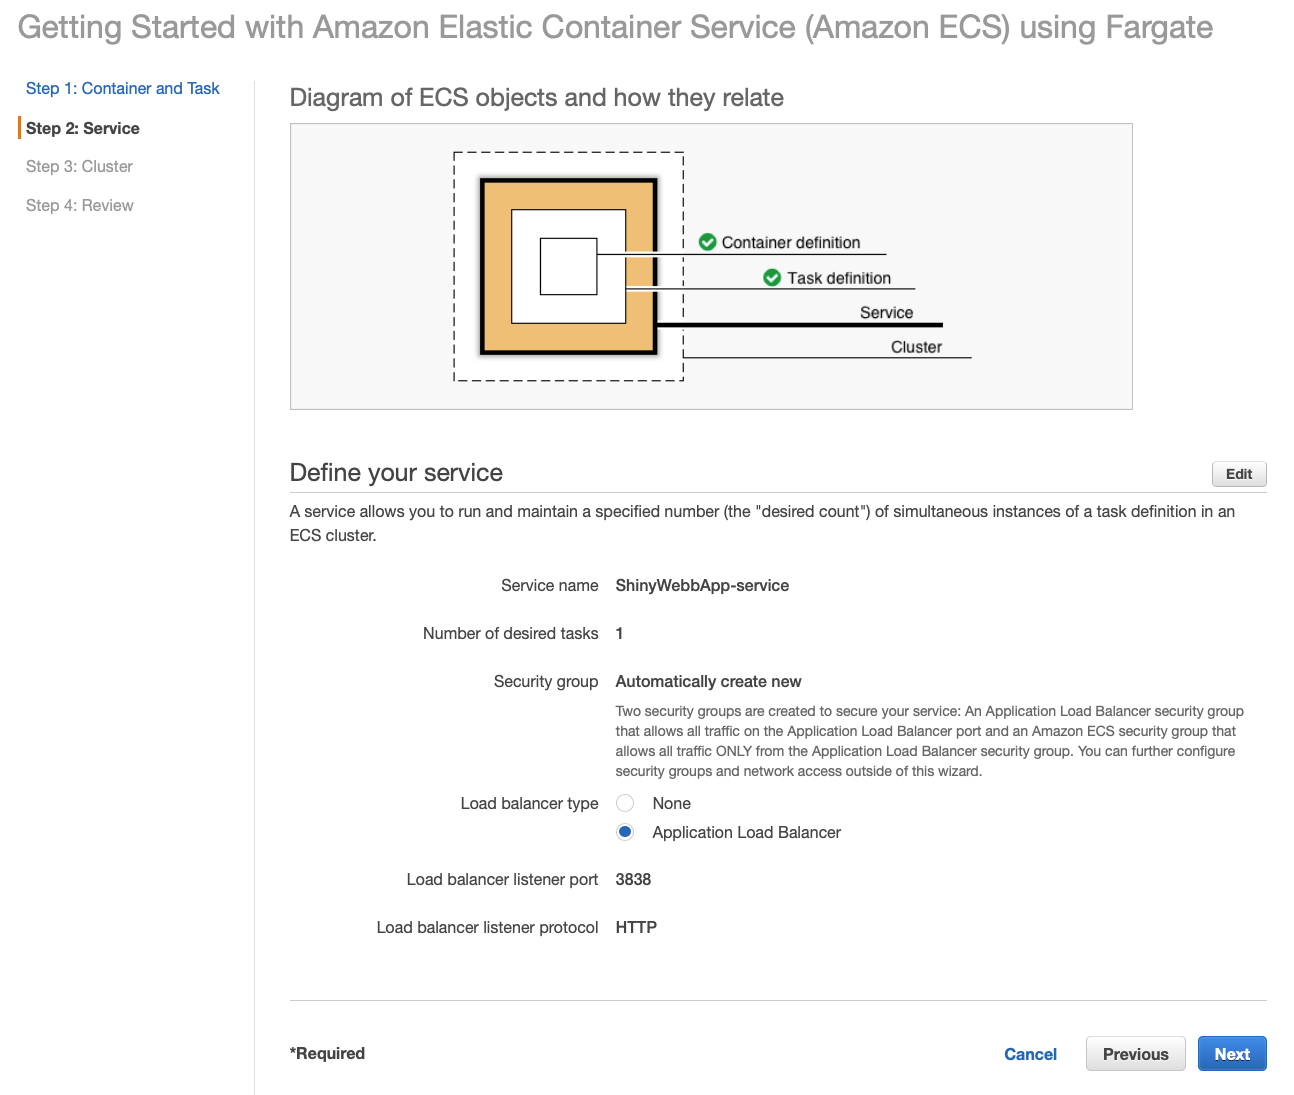
Next, we will define our Service. So far we defined our Container and the Task. If you want to use Cognito in the same way like I do, you need to choose Application Load Balancer for Load balancer type. Now, click Next.
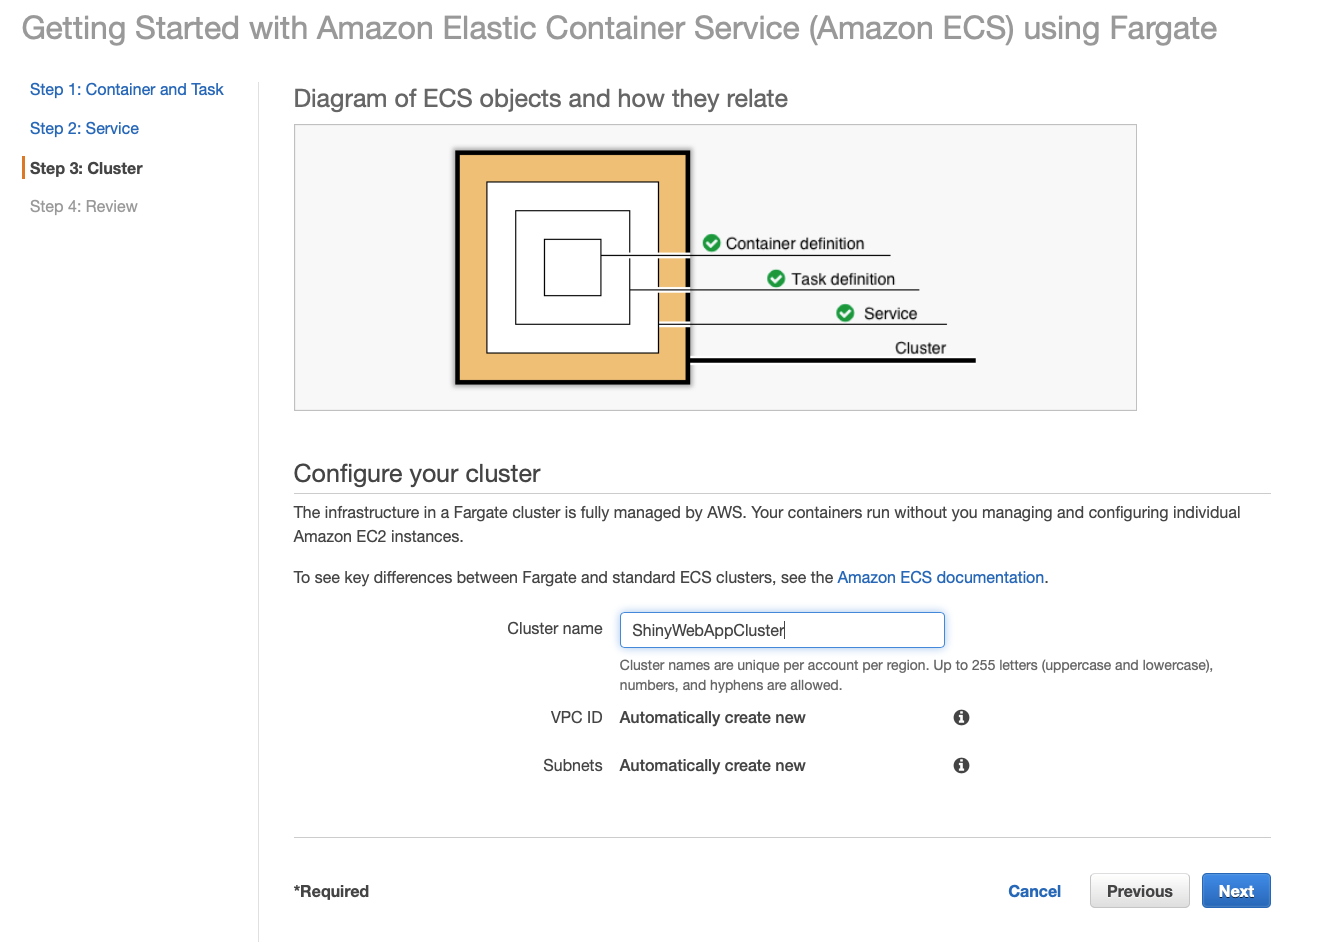
On the last page, you will need to name your cluster.
Click Nextand Create
The creation process will tale up to 15 minutes. After finishing the creation, you can check whether you app works by pasting in the DNS name of your ALB. If everything works, you will see your Shiny Web App.
Creating the Cognito User Authentication
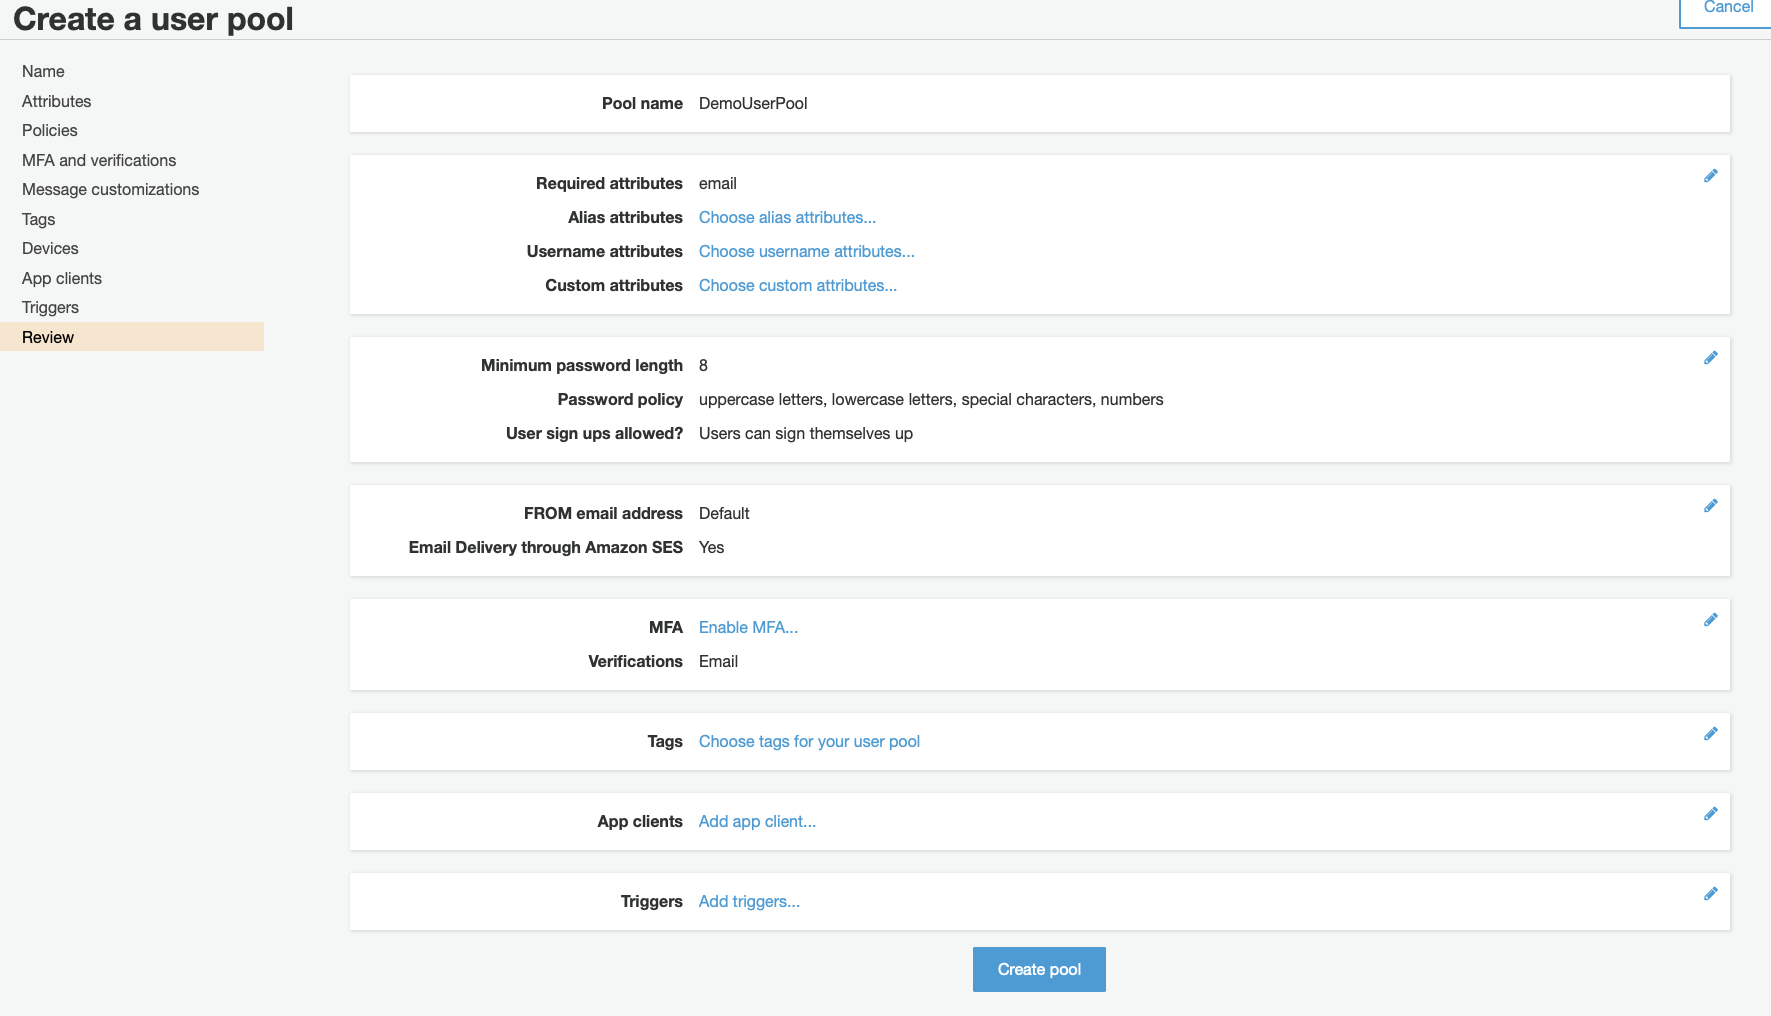
Go to the Cognito console, click on Manage User Poolsand Create a user pool. Name your User pool. And choose Review defaults and click Create pool.
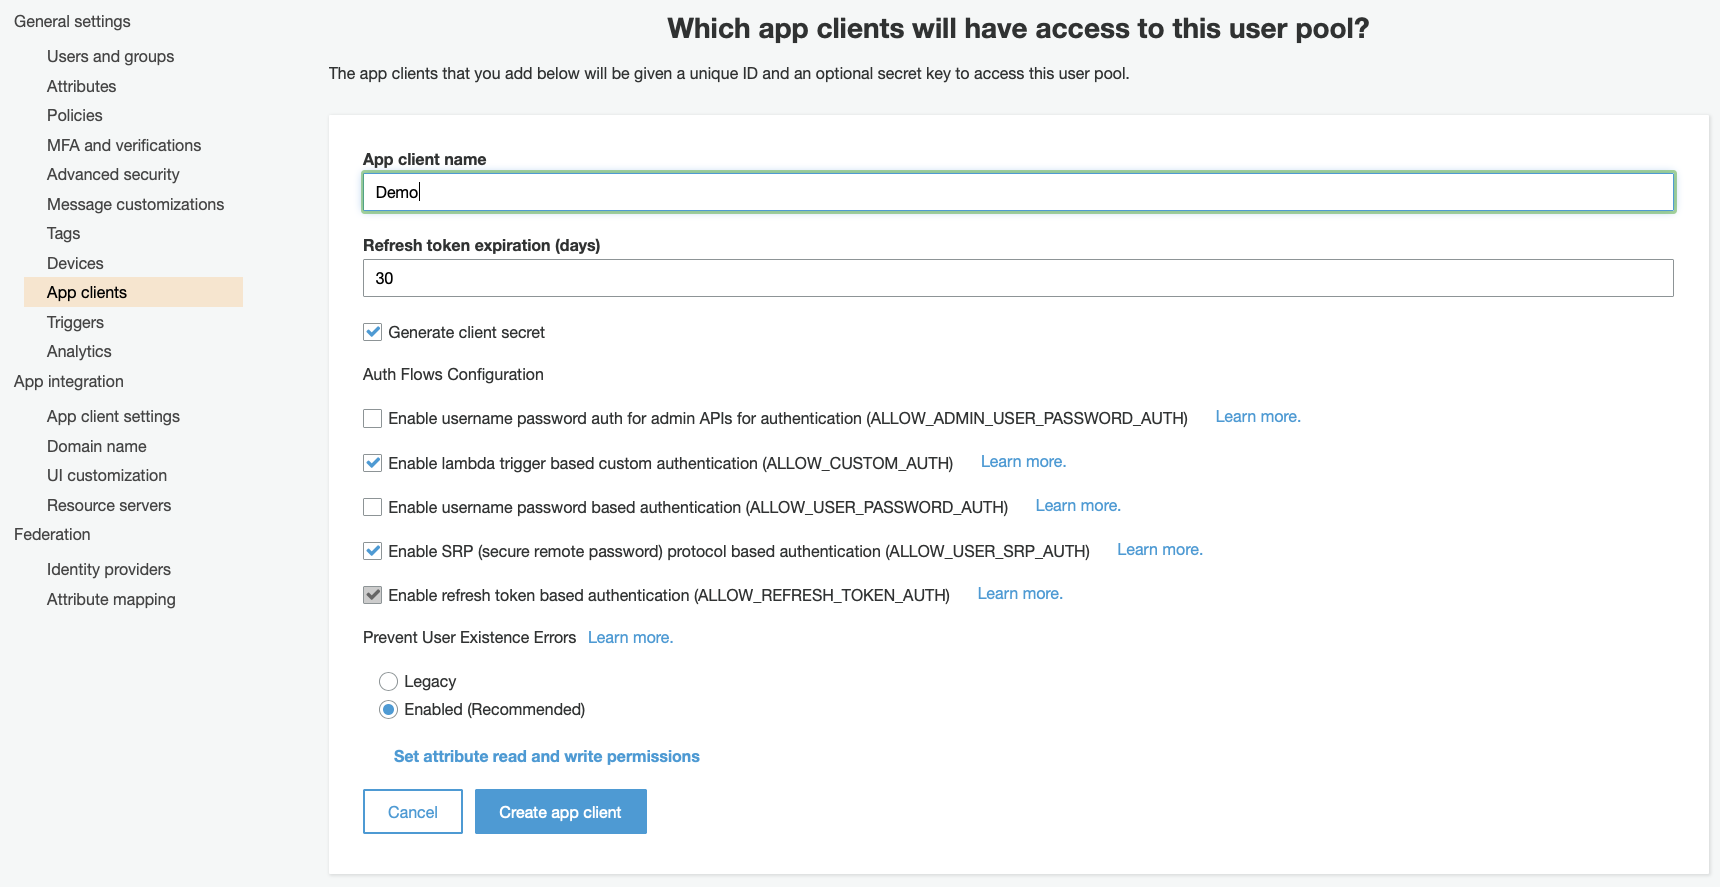
Second, you need to create an App client. This App client will be integrated later on in your ALB. Just create a new one and leave all defaults untouched.
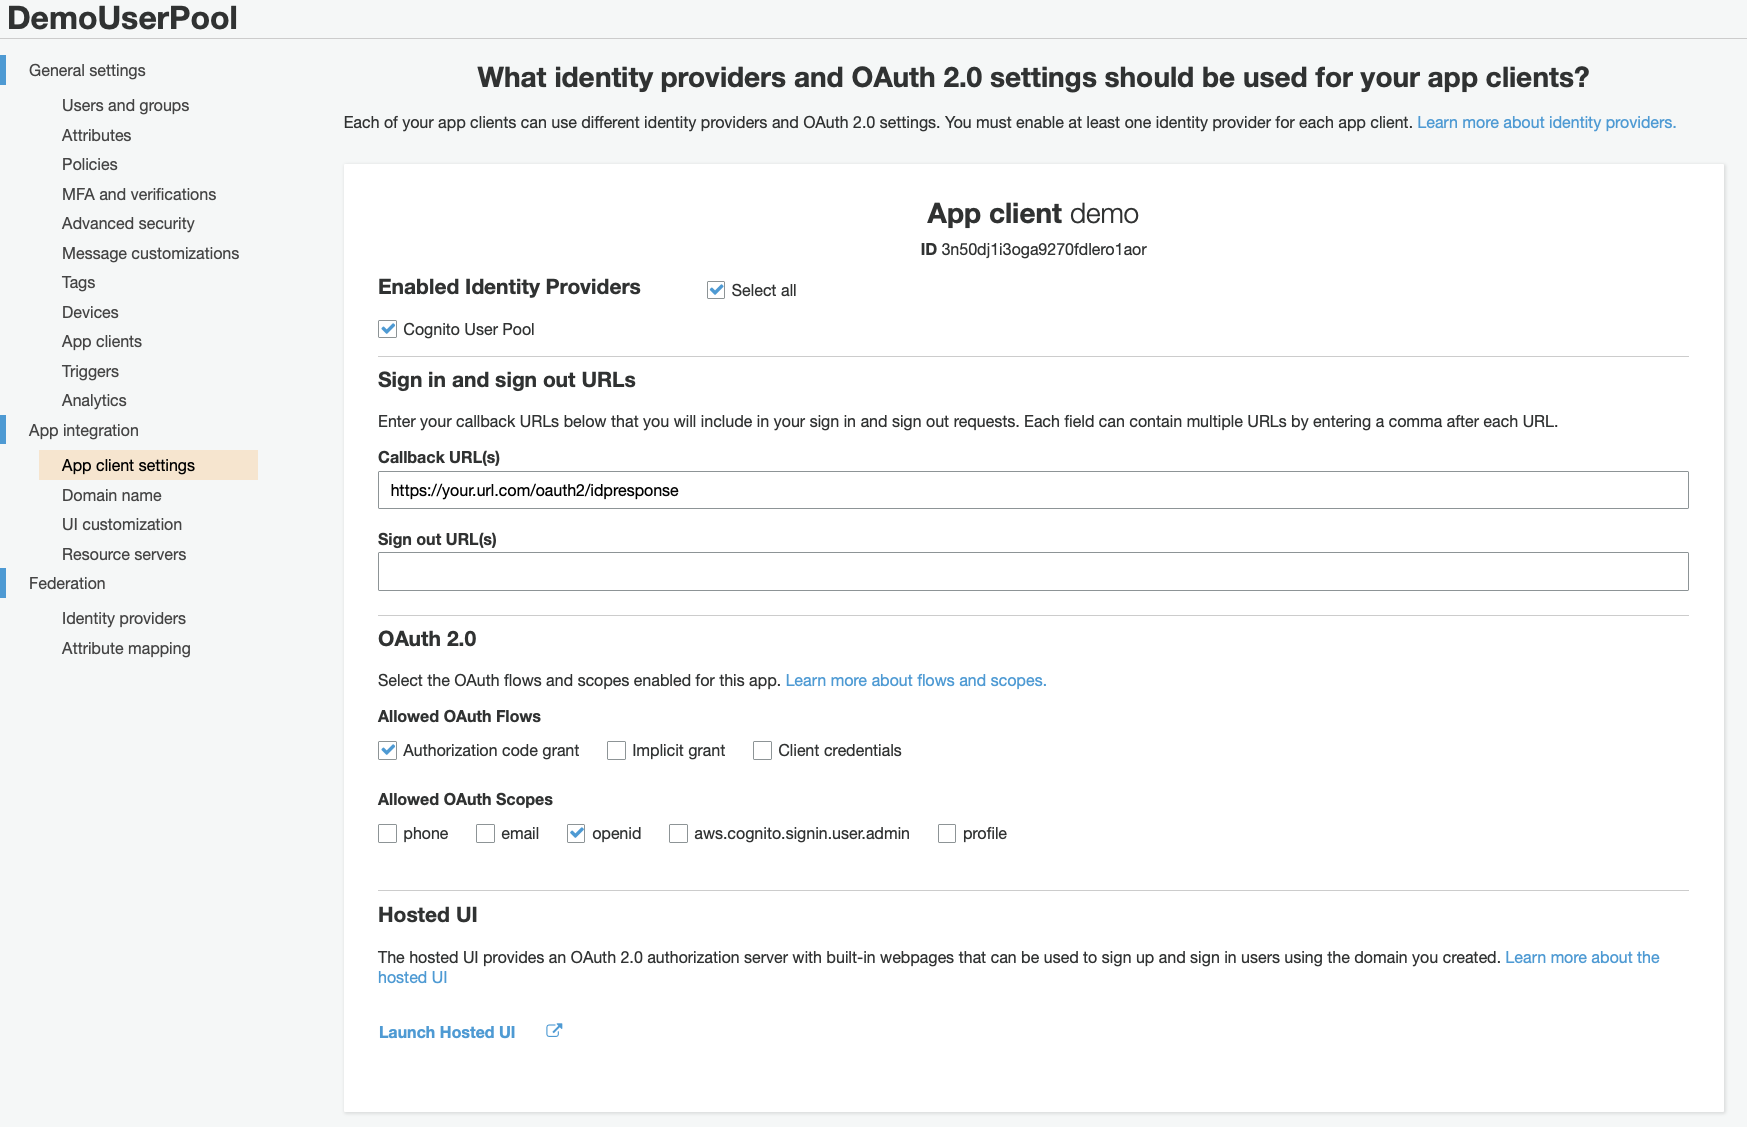
Under App integration, choose App client settings. Select the following options accordingly. This will create our JSON Web Tokens with OpenID. If you don’t have an URL just type in the ALB’s DNS name.
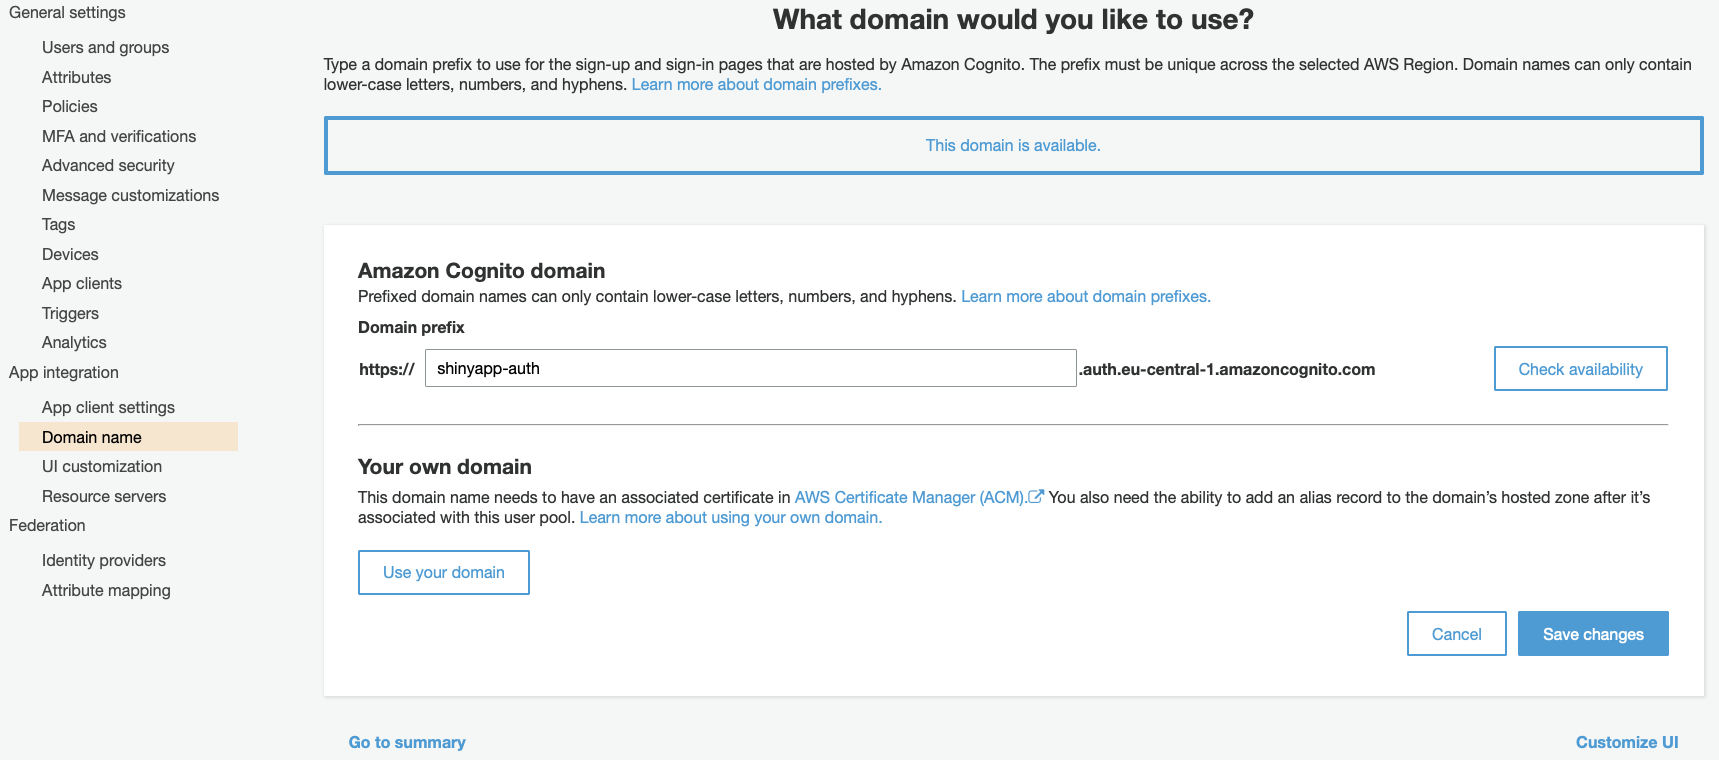
Under Domain name, you will create your Log-In page. Don’t worry! You don’t need to code anything and you don’t need any URL here. AWS will provide you a ready to use template and will give you a authentication domain.
That’s it. Go now to the EC2 console.
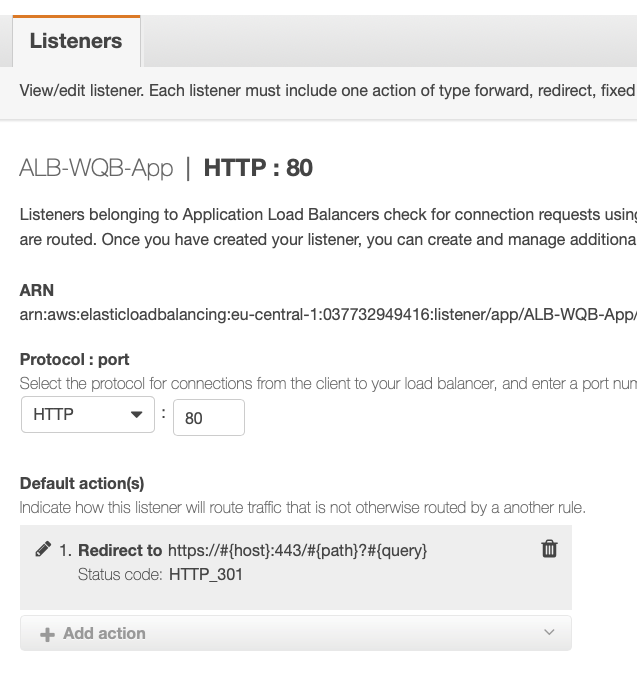
Define the routing paths for the Application Load Balancer
Finally, go to your ALB. Go to Listeners Panel. We want to create two Listeners Rule sets. First, we want to redirect all request on Port 80 (http) to Port 443 (https).
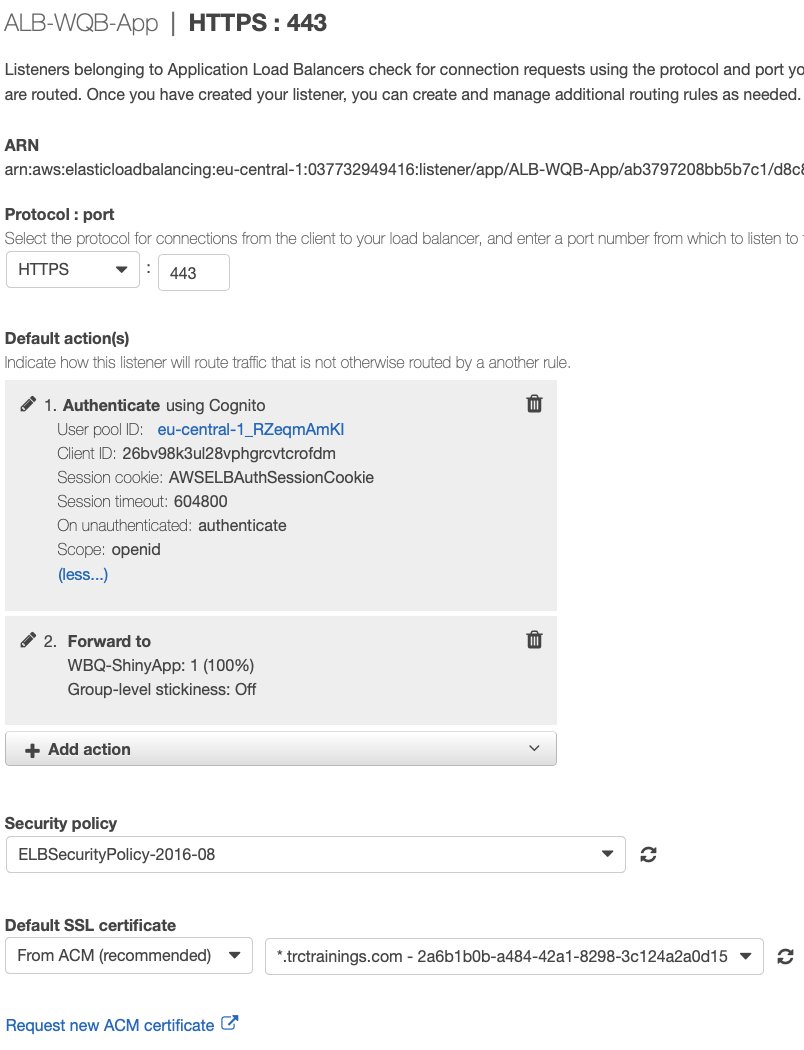
Second, all request on Port 443 should be evaluated and if authenticated redirected to your Shiny Web App. Use your User pool id and App client id here
Going further
You should treat Shiny Web Apps as stateless, meaning that all data should be loaded from an external storage system like S3. Additionally, you should think about scaling your app up and down. Running one Task per day will lead to a service fee of 3 Dollars. That’s why I start the app at 8 am in the morning will stop it at 6 pm. This is pretty easy done with an Amazon Cloudwatch Rule and AWS Lambda. You just need to set the desired task count from 1 to 0 and the other way round. As a result the service fee decreased to 1 Dollar per day. And my boss was pretty happy about not spending a lot of money for software licensing.
And guys: Please stop telling fairytales about R. Cheers!