Hello Slurm! - Getting started with High Performance Computing on AWS
High Performance Computing or HPC is coming up when thinking about analyzing models or while working at universities and other research and development organizations. In this article I will show you how to setup HPC, giving you some background information how it works in AWS and to run a small script in your own Cluster.
How HPC works in AWS
AWS itself states on its landing page creating a High Performance Cluster in AWS is to Accelerate innovation with fast networking and virtually unlimited infrastructure. This is true and, in the end, pretty easy as we base it on the tool aws-parallelcluster (GitHub).
It runs a CloudFormation Stack (through CDK), creating the necessary resources like VPC, Launch Templates, and EC2 instances. Everything is based on the configuration you are defining.
Install and run your first High Performance Cluster
As initially stated, creating an HP Cluster is no big deal. First of all, we need a system where the necessary opensource software (aws-parallelcluster) is installed on. We will then follow the next steps with the configuration and rollout. This will be done on an EC2 instance (Cloud9 or your local system is also possible). The name of the EC2 instance will be HPC-Base.
aws-parallelcluster is an opensource software that is maintained by AWS itself. It allows users to create High Performance Clusters like you would have in your own on-premise datacenter or research facility, just based and aligned with AWS Services.
The scheduler will be Slurm as it is mostly the standard for customers when having conversations about HPC (AWS Batch is also possible but not covered in this article).
I will guide you through the steps to have your first HPC up and running.
Prerequisites
The prerequisites are needed later on during the configuration of the first cluster. Please make sure you have prepared all steps below.
- An SSH Key Pair created in the AWS Console
- A VPC including Subnets and NAT Gateways where everything should run (this is required for the HPC-Base we are managing our HPC)
I have added the VPC part as a prerequisite to remove additional complexity in the next steps. It is also possible to let it automatically be created.
Create HPC-Base EC2 instance
As stated above, we will initially need a system to run aws-parallelcluster. I am using an EC2 instance for this as it allows me to use an IAM Role with the necessary rights. The name HPC-Base is a result from multiple customers that used that name.
Settings
- Name:
HPC-Base(choose a name that fits your environment) - OS:
Amazon Linux 2023 - Network settings: Choose your preferred Subnet and IP settings where the EC2 instance has access to download python, nodejs, and yum packages
- Security Group: Remove any inbound rules as we are relying on the AWS Systems Manager Session Manager
- IAM instance profile: Add a new one with the necessary rights (for this demo purpose, I am using the policy
AdministratorAccess- please change this accordingly to the required services + AWS Systems Manager Session Manager, based on least privilege)
The following steps are the most important ones:
- Login to your HPC-Base instance with Session Manager
- Switch to ec2-user with
sudo su -followed bysu - ec2-user - Install pip:
sudo yum install python3-pip nodejs -y - Install the virtual environment for python:
python3 -m pip install --user --upgrade virtualenv - Create a virtual environment:
python3 -m virtualenv ~/hpc-ve - Activate the virtual environment:
source ~/hpc-ve/bin/activate - Install aws-parallelcluster:
pip install aws-parallelcluster==3.5.0 && pip install flask==2.2.3
Important: The version constraint is set to aws-parallelcluster==3.5.0 and flask==2.2.3 as we would run otherwise into a bug. The bug should be fixed soon, but until then, let’s rely on a fully working version.
When the installation succeeds, run the pcluster version command. It should return a JSON with the version 3.5.0.
Configure HPC-Base instance
As our parallelcluster is working, we have to configure it. pcluster has a great widget that will ask you for all the required configuration parts and adds this to a local configuration file.
Run: pcluster configure --config cluster-config.yaml --region=eu-west-1
Please note that this command contains the region we want to connect to.
- Choose the EC2 Key Pair Name added in the prerequisites step
- Choose the scheduler to be used:
slurm - Choose the Operating System:
alinux2(Amazon Linux 2) - Choose the HeadNode instance type:
t3.micro - Number of queues: default (1)
- Name of queue: default (queue1)
- Number of compute resources for queue1: default (1)
- Compute instance type for queue1: t3.micro
- Maximum instance count: default (10)
- Automate VPC creation: default
- Set VPC settings: no automated creation; choose your created subnets during the prerequisites step
Let’s review our cluster-config.yaml. It contains all the necessary (minimum) configuration parts, which you can update in the file.
Region: eu-west-1
Image:
  Os: alinux2
HeadNode:
  InstanceType: t3.micro
  Networking:
    SubnetId: subnet-12121212
  Ssh:
    KeyName: hpc-cluster
  Imds:
    Secured: false
Scheduling:
  Scheduler: slurm
  SlurmQueues:
  - Name: queue1
    ComputeResources:
    - Name: t3micro
      Instances:
      - InstanceType: t3.micro
      MinCount: 0
      MaxCount: 10
    Networking:
      SubnetIds:
      - subnet-12121212
I recommend having different configuration options to spin up the environments as quickly as possible. Having multiple configurations also allows you to add more automation, like the internal booking for HPC environments, easily.
Start the first High Performance Cluster
As we now have our configuration available, run the following:
pcluster create-cluster --cluster-configuration cluster-config.yaml --cluster-name test-cluster --region eu-west-1
Running this command will automatically create an S3 Bucket that contains all necessary configuration files, CloudFormation templates and custom resources for CloudFormation. The CloudFormation Stack is rolled out afterwards and contains a lot of things that are deployed:
- Route53: A private hosted zone that contains a DNS A record for each queue items assigned instance
- DanamoDB Tables: One holds the queue items of slurm with the assigned instance id; The other one the current status of the compute fleet
- IAM Roles: Several roles for Lambda Functions, HeadNode, Compute Nodes, Custom CloudFormation Resources
- IAM Policies: Those are used for the IAM Roles based on least privilege
- Lambda Functions: For cleanup the Route53 private hosted zone
- CloudWatch Log Groups: For log delivery that are combined afterwards in the Dashboard
- CloudWatch Dashboard: With information about current utilization, logs from HeadNode, Slurm, cfn-init, supervisord
- Launch Templates: One for the HeadNode and one for the Compute Nodes
- Security Groups: For all components that require one and that are allowing ssh connections from HPC-Base to HeadNode for example
- EC2 Instance: The HeadNode is created with all necessary software and settings pre-installed. This also contains the daemons for the whole management of the cluster (so no external start/stop/terminate mechanism is necessary).
I have created a lightweight overview about the main components of the High Performance Cluster. Be aware that it does not contain all resources that are created through CloudFormation.
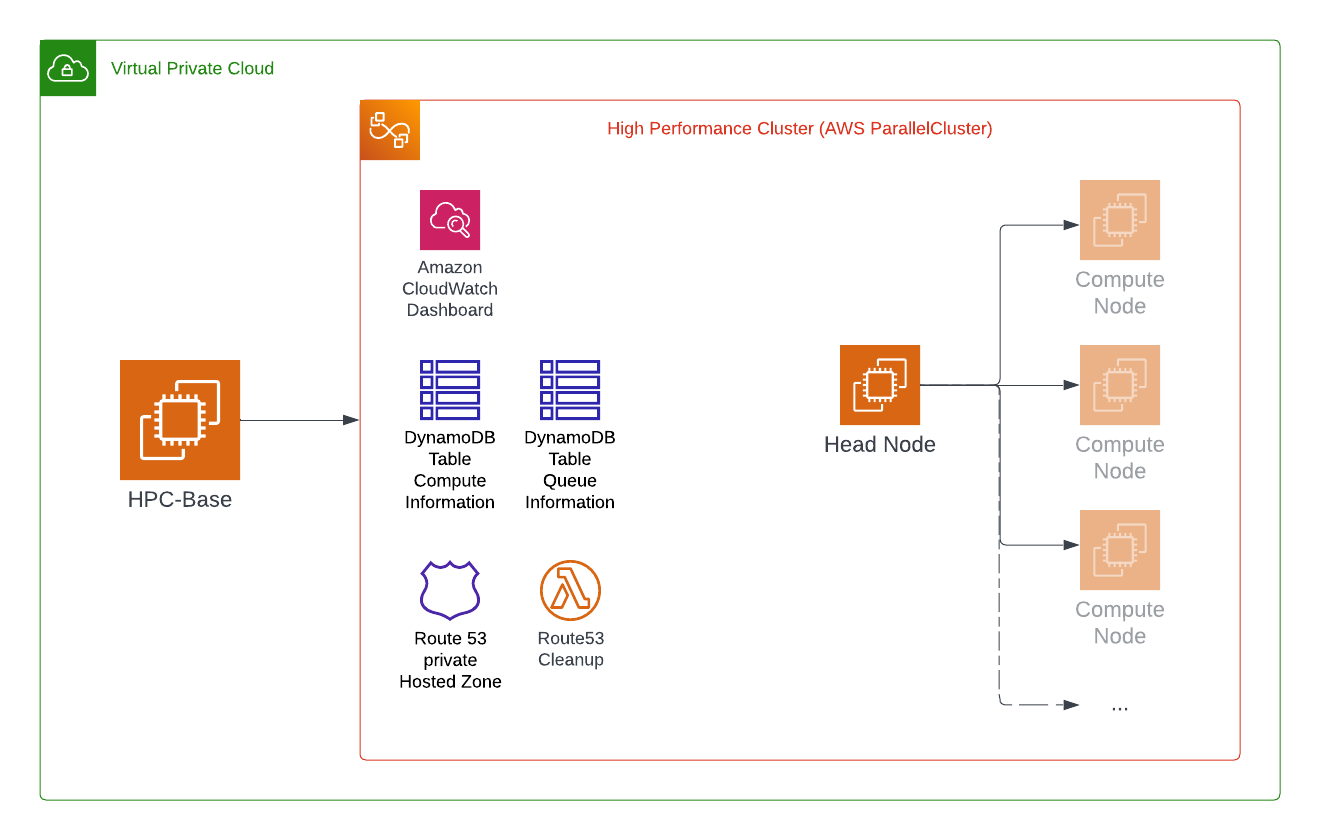
The cluster creation will need some time to complete. But to get the current state, run:
pcluster describe-cluster --cluster-name test-cluster --region=eu-west-1
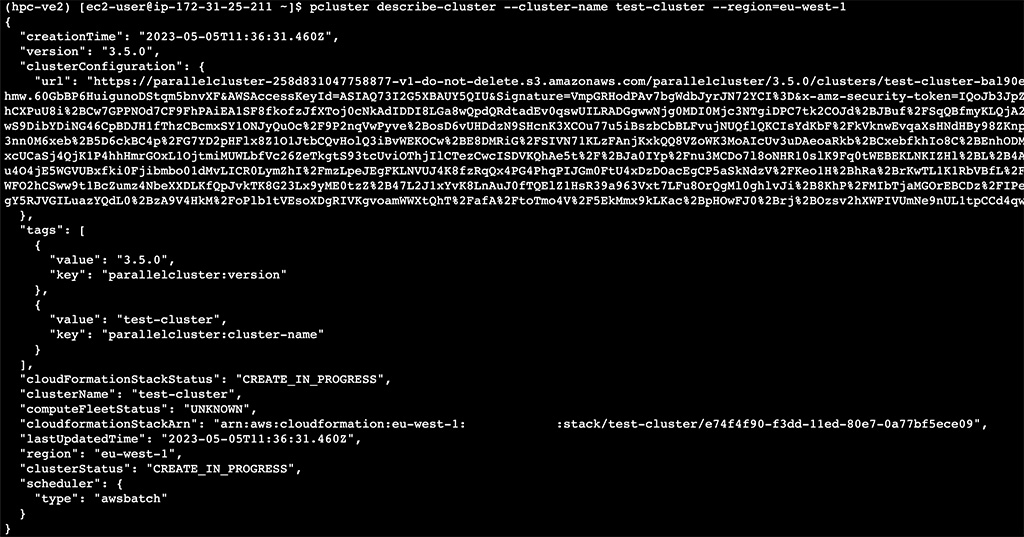
It will show you all configured parts, the CLUSTER_STATUS and cloudFormationStackStatus.
When the infrastructure creation has finished, you will see both with the value CREATE_COMPLETE.
You should now see within the AWS Management Console within EC2 that you have a second EC2 instance up and running. Your HeadNode.
How to use the cluster
Let’s start a small script to demonstrate if the cluster is working. Before doing so, ssh into your HeadNode with the command:
pcluster ssh --cluster-name test-cluster -i ~/.ssh/ssh_key.pem --region=eu-west-1
The ssh_key.pem is the one you created in the prerequisites (copy it to your machine and use chmod 600 for that file).
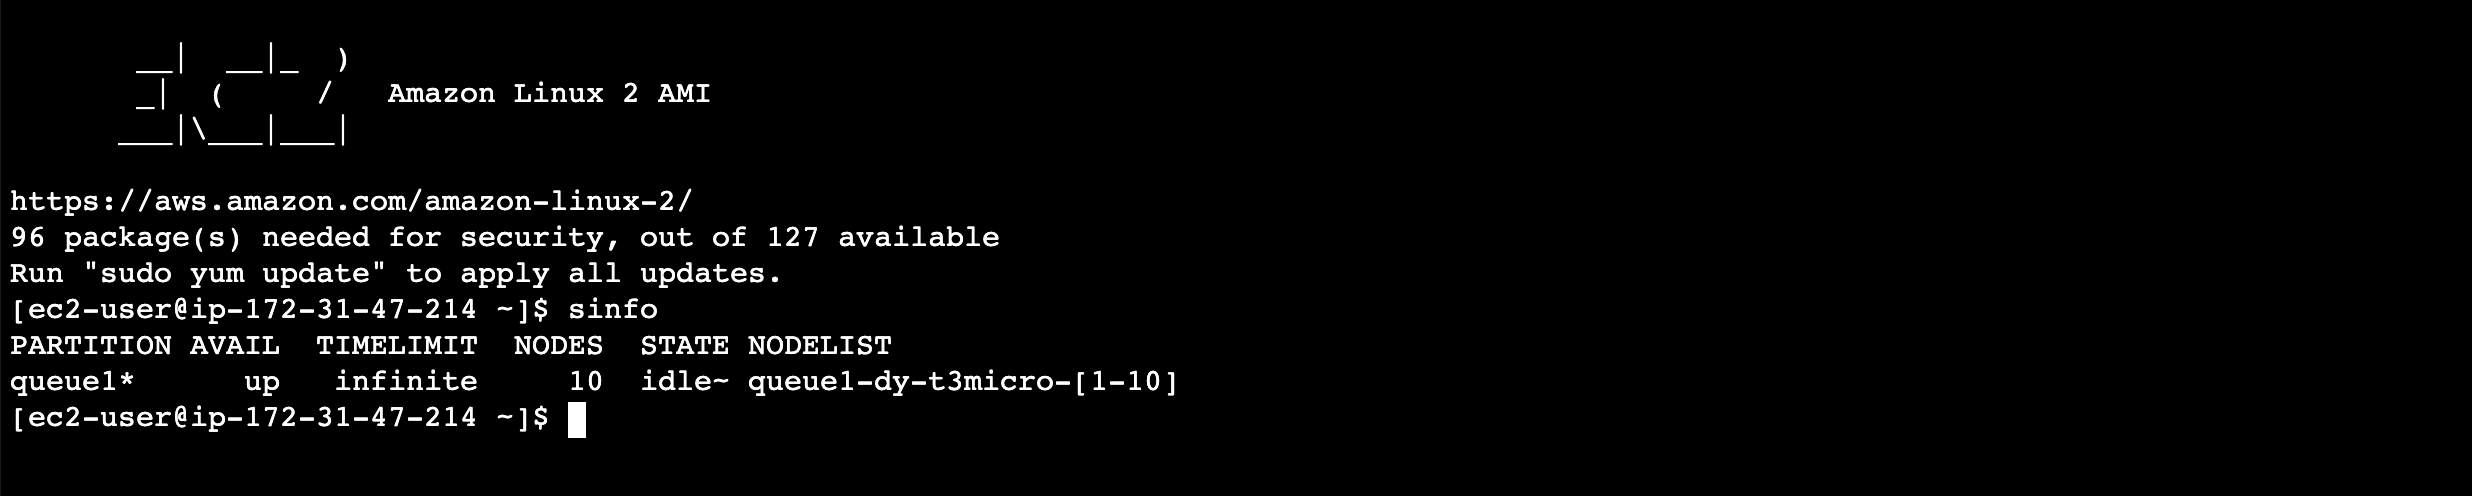
You should now see the screen of a typical Amazon Linux 2.
Run sinfo in the shell, and you will see the information from Slurm.
Assign a job to a queue and run a script
Let’s go a bit deeper into how to assign a job to that queue. For this, I am creating a small bash script that returns the current hostname of the queue. Create a file named script.sh with the following contents:
#!/bin/bash
sleep 30
echo "Hello World from $(hostname)"
To assign this script to the queue, run sbatch script.sh
Running the previous command will now automatically spin up a new EC2 instance with the name Compute as only the HeadNode currently runs the scheduler with it’s daemons on it is available. We need the nodes that are actually doing the work for us.
To allow each Compute node to execute your script.sh file, it uses NFS with the package nfsd. It is configured automatically and allows access from within my VPCs CIDR.
/home 172.31.0.0/16(rw,sync,no_root_squash)
/opt/parallelcluster/shared 172.31.0.0/16(rw,sync,no_root_squash)
/opt/intel 172.31.0.0/16(rw,sync,no_root_squash)
/opt/slurm 172.31.0.0/16(rw,sync,no_root_squash)
For this test it is okay to rely on NFS. For every other project I would prefer and recommend using EFS or FSx for NetApp ONTAP.
Rerunning the same command multiple times will return you each time a new job number. It will also create new EC2 instances within your environment. Not for each, but this is part of the logic within the scheduler.
To see what is within the current queue, run squeue

What happened now is:
- create a new Compute node
- execute the script.sh on that Compute node
- return the output of the script to the local directory of the HeadNode as
*.outfiles
I ran the command nine times, so I received the same amount of .out-files.

Each file contains the hostname where the queue has been running on.

Now you know how to install, configure and execute a script with aws-parallelcluster.
Delete the cluster
Make sure to remove the High Performance Cluster from your environment. To do so, delete the cluster with the command
pcluster delete-cluster --cluster-name test-cluster --region=eu-west-1
This will terminate the whole environment and remove the CloudFormation Stack.
What you can consider now
It is always considerable to add the following:
- add shared storage like FSx for ONTAP or EFS
- create custom bootstrap script
- create custom AMI
Thanks for reading!
— Patrick