Pass parameters into your AppStream Session with Session Context
Most people think AppStream 2.0 sessions are static as you can only run a single image and run static scripts executed as SYSTEM or within the user context. But what happens when you have the requirement to pass parameters into that session?
The use case example
You are ready to go with this blog post when you have already created an AppStream 2.0 session. The basic AWS example relies on creating a new session and opening a browser with a specific URL. That URL has been placed through the Session Context.
Another possibility is to pass user credentials and a path to mount in your AppStream 2.0 session. This would allow an automated script to run as a session script.
The environment
The environment we are working in is pretty easy, so I am using Terraform to spin it up for me.
General Terraform
This part is required. Otherwise, we can not rely on the official AWS Provider in the AppStream 2.0 hcl part.
It’s mostly a single file we call providers.tf.
terraform {
  required_version = ">= 1.0, < 2.0"

  required_providers {
    aws = {
      source = "hashicorp/aws"

      version = ">= 4.50, < 5.0"
    }
  }
}
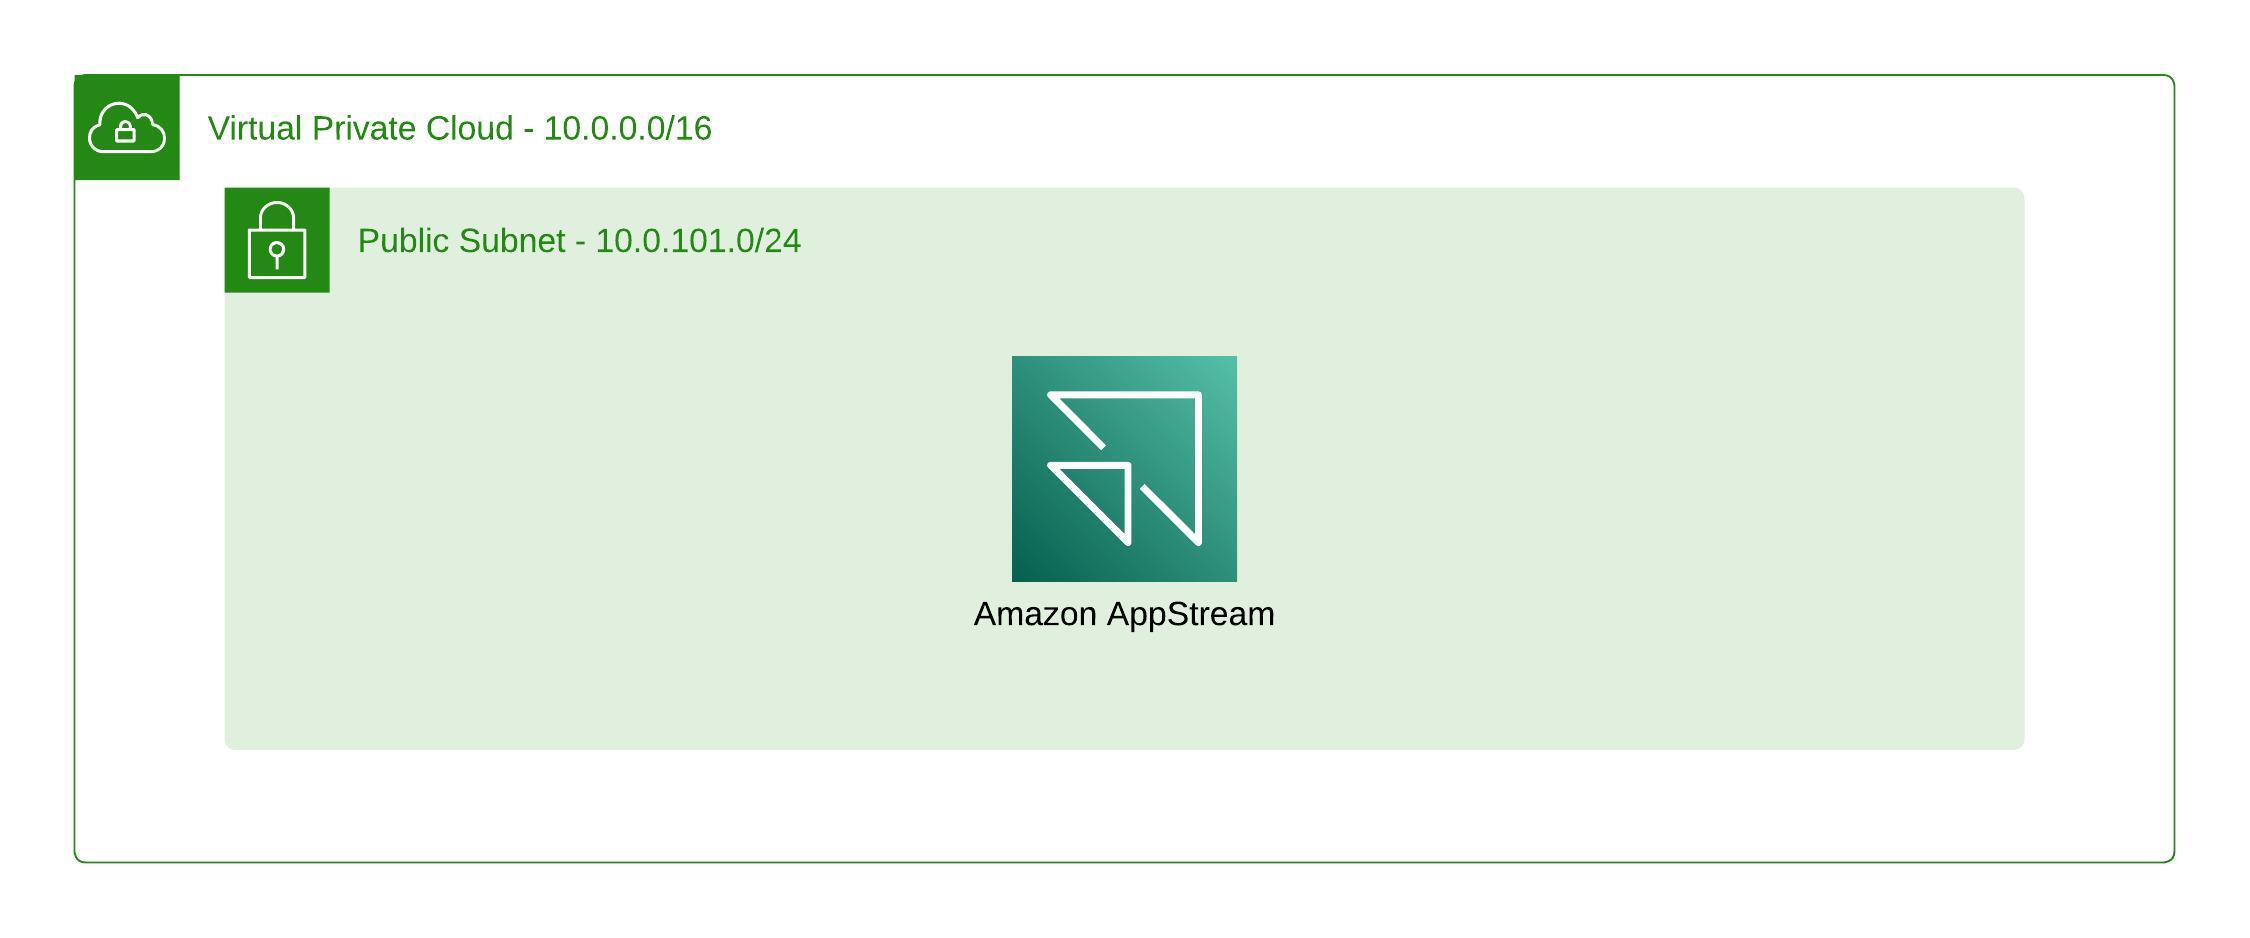
The VPC
The VPC is required for the creation of new AppStream 2.0 Fleet instances. They won’t show up in EC2 as it is a managed service by AWS. We still require this, even when we don’t have any IAM Role or Security Group attached to our AppStream 2.0 Fleet.
If you want to use your own, skip this part and adjust the AppStream 2.0 Terraform code accordingly to your environment.
Using this module will create the following:
- Availability Zone:
eu-central-1a - VPC CIDR:
10.0.0.0/16 - Public Subnet CIDR: Publicly available
10.0.101.0/24 - Internet Gateway: attached to the VPC + Route tables
- Route Table:
0.0.0.0/0as destination and the Internet Gateway as target, attached to the Public Subnet
module "vpc" {
  source = "terraform-aws-modules/vpc/aws"

  # name = "my-vpc"
  cidr = "10.0.0.0/16"

  azs             = ["eu-central-1a"]
  public_subnets  = ["10.0.101.0/24"]
}
AppStream 2.0
The AppStream 2.0 Terraform code will create a Fleet that is then referenced by the Stack. We will need both names (Fleet + Stack) for the create-streaming-url cli command later on.
The Fleet itself only get’s the minimum configuration necessary.
- instance_type:
stream.standard.smallthe smallest one possible - image_name: The latest
Amazon Linux 2image available today - stream_view: Using the
DESKTOPas the easiest way of interaction - fleet_type:
ON_DEMANDas we don’t want to spend too much for it - compute_capacity: Set to 1 to get at least one AppStream 2.0 session running and accessible after rollout
- vpc_config: Required and set to the VPC module from above to use the first
public_subnet
The Stack contains only a name without any further configuration. The name is fetched from the Fleet.
#######################################################
# Fleet
resource "aws_appstream_fleet" "fleet" {
  name          = "session-context-tecracer-aws-blog"

  instance_type = "stream.standard.small"
  image_name    = "AppStream-AmazonLinux2-03-15-2023"
  stream_view   = "DESKTOP"
  fleet_type    = "ON_DEMAND"

  compute_capacity {
    desired_instances = 1
  }

  vpc_config {
    subnet_ids = [ module.vpc.public_subnets[0] ]
  }
}

#######################################################
# Stack
resource "aws_appstream_stack" "stack" {
  name = aws_appstream_fleet.fleet.name
}

#######################################################
# Associate Stack + Fleet
resource "aws_appstream_fleet_stack_association" "association" {
  fleet_name = aws_appstream_fleet.fleet.name
  stack_name = aws_appstream_stack.stack.name
}
Create a Session Context for your AppStream 2.0 instance
When you apply the Terraform Stack from above, you are ready to move on to the next step. As of now, we have a dedicated VPC only for AppStream 2.0 instances, a running Fleet, and a Stack that are both connected.
To start our first AppStream 2.0 session, we can easily use our command line with the following command.
aws appstream create-streaming-url \
  --stack-name "session-context-tecracer-aws-blog" \
  --fleet-name "session-context-tecracer-aws-blog" \
  --user-id "pschaumburg@tecracer.de" \
  --application-id Desktop \
  --session-context "MySessionContext"
The --session-context parameter is the most crucial part in here. It is required to forward any dynamic content you want to bring into your AppStream 2.0 session.
Running this command, the output will return a JSON block like the following. Please copy the URL of StreamingURL and open it in your browser (this should be a supported one like Chrome, Firefox, Safari, or similar).
{
    "StreamingURL": "https://appstream2.eu-central-1.aws.amazon.com/authenticate?parameters=base64EncodedParameters%3D%3D&signature=4jDHwWYcLNXopEQ",
    "Expires": "2023-04-19T11:03:44.057000+02:00"
}
As you can see, the StreamingURL contains a parameters section. This string is encoded as base64 and contains essential data formatted as JSON.
It also contains the userContext, the same as session-context.
{
  "type": "END_USER",
  "expires": "1681972161",
  "awsAccountId": "123456789012",
  "userId": "pschaumburg@tecracer.de",
  "catalogSource": "stack/session-context-tecracer-aws-blog",
  "fleetRef": "fleet/session-context-tecracer-aws-blog",
  "applicationId": "Desktop",
  "userContext": "MySessionContext",
  "maxUserDurationInSecs": "57600"
}
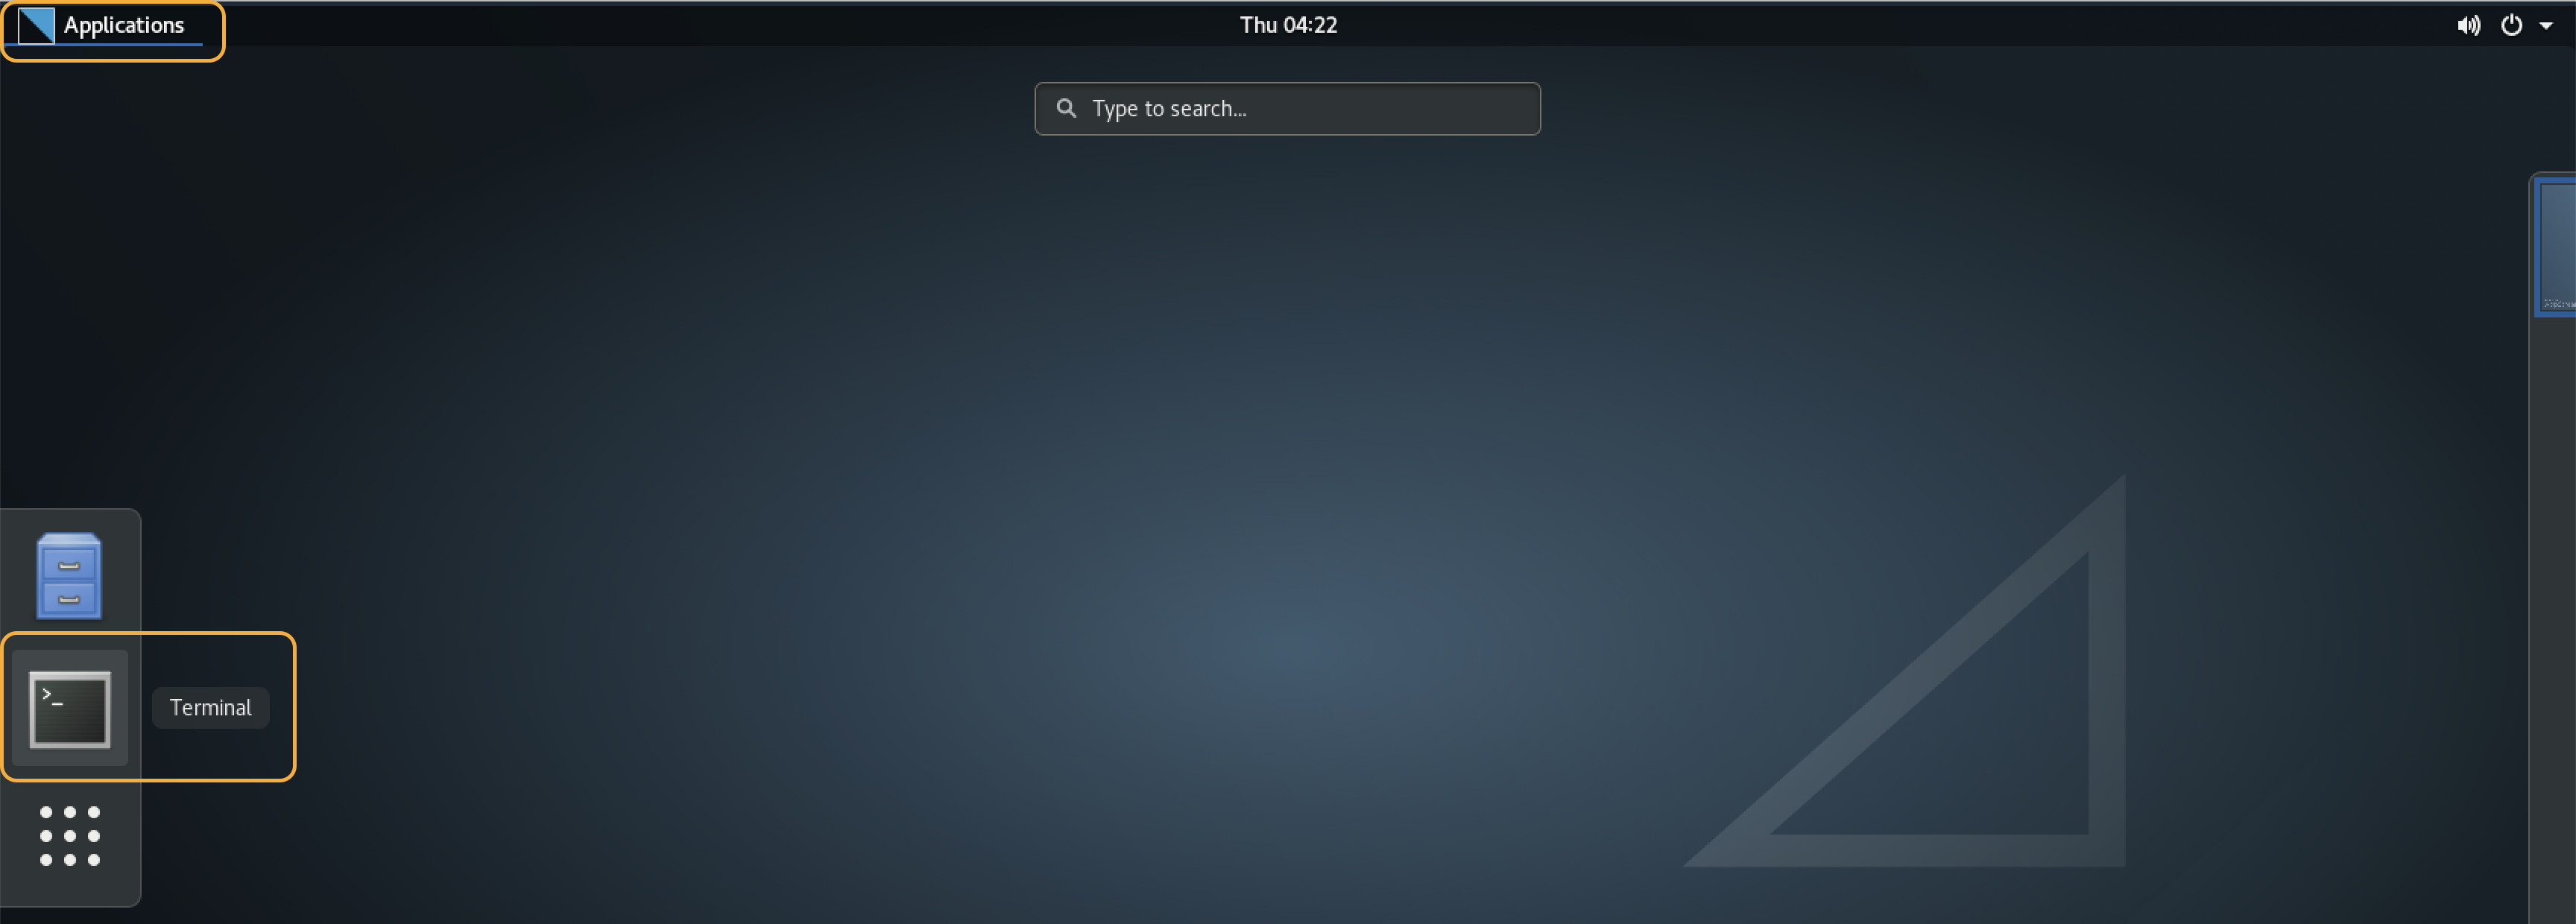
You should now see the loading screen of AppStream. When it finishes loading, it will open the Desktop of Amazon Linux.
Now open the Terminal. It can be found when you click in the top left on Applications and then on the left-hand side on Terminal.
Let’s check if the session context has been placed as expected. Use one of both commands below to check.
printenv APPSTREAM_SESSION_CONTEXT
env | grep APPSTREAM_SESSION_CONTEXT
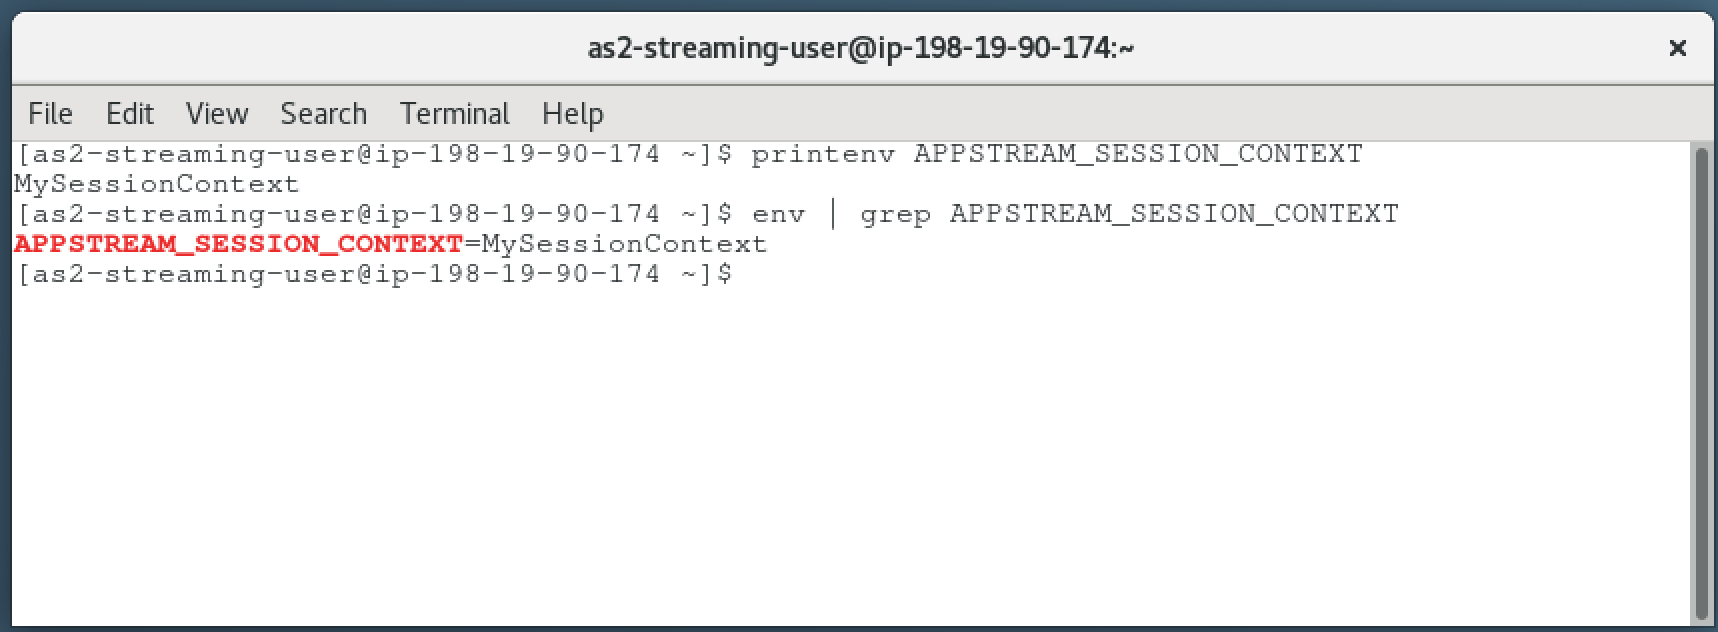
You see that the session context has been passed from the CLI command into our AppStream 2.0 instance. This is the only way of adding dynamic data to user sessions.
As you can imagine now, there are a lot of great ways you can do with the dynamic session context. To give you at least some ideas:
- Passing one-time passwords into a session
- Add arguments for starting software that is dedicated only to a single user
- Run scripts
Thank you for reading!
When you are done, please don’t forget to destroy your Terraform Stack afterward with terraform destroy.
Important
Please be aware that passing sensitive information like user credentials could lead to exposing those to the public. Every information passed into the Session Context will be part of the generated URL. Use this feature only when you know what you are doing or using one-time credentials.
— Patrick