First Steps with Amazon Braket SDK
In this article, we will install and deploy a circuit with a Bell State using AWS Braket SDK. Some minimal knowledge requirements are expected from the reader, namely concepts such as: Qubit, Superposition, Quantum Logical Gates (and a bit of math by association), Bell State, Python and perhaps AWS CLI.
Preface
Who is this article directed to? This article is directed at people who are familiar with QC and perhaps already know a bit how to use the AWS console. It will give a glimpse on how to navigate around Amazon Braket. It will also address how to install and use Amazon Braket SDK (CLI), followed by the implementation of a small circuit example of a Bell state.
What this article is not about? The purpose of this article is not to explain what quantum computing is.
Let’s Start Off
The installation and usage of Amazon Braket SDK takes place in the big stage that is AWS CLI (Command Line Interface).
What is AWS CLI?
It is a tool that allows us to manage AWS sevices through the command line and, for instance, to run automation scripts. It is expected that you already have the AWS CLI in place before we jump on to the next section. Installation guidelines can be found here. Furthermore, the SDK allows also to run tasks on a local simulator - a simulator that is ran in your local enviroment.
Tool Requirements
First off, we will need to take care of some dependencies, each of which are assumed to be done before the SDK installation. Please check the following hyperlinks as per requirement:
- Python 3.7.2 or greater
- Git tools
- IAM User or a role with the required permissions to access Braket
- Boto3 and setting up AWS Credentials
What is Amazon Braket?
Amazon Braket is a service provided by AWS which allows users to run jobs and tasks of quantum algorithms in physical devices and simulators. These algorithms are expressed using python to write out how to build circuits with gates – such as a solution for the Elitzer-Vaidman Problem – and techniques – such as depth reduction, via transpilation. We should also take into account each circuit’s number of qubits, their layout, noise and type of employed technology.
Why is this important? Understanding these parameters allows for the writing of a more suitable program, rendering it an effective run. In practice, this means cost reduction, time reduction and noise reduction. While it is important to know this, it won’t have much relevance for our simple circuit later.
Braket Structure
As mentioned, we can deploy our programs in either simulators or QPUs (Quantum Processing Units), each of which are represented by their own ARN. These physical devices are hosted by other companies with which AWS operates.
ARN? An Amazon Resource Name (or ARN) is a resource’s identification path that allows us to reference it across all AWS.
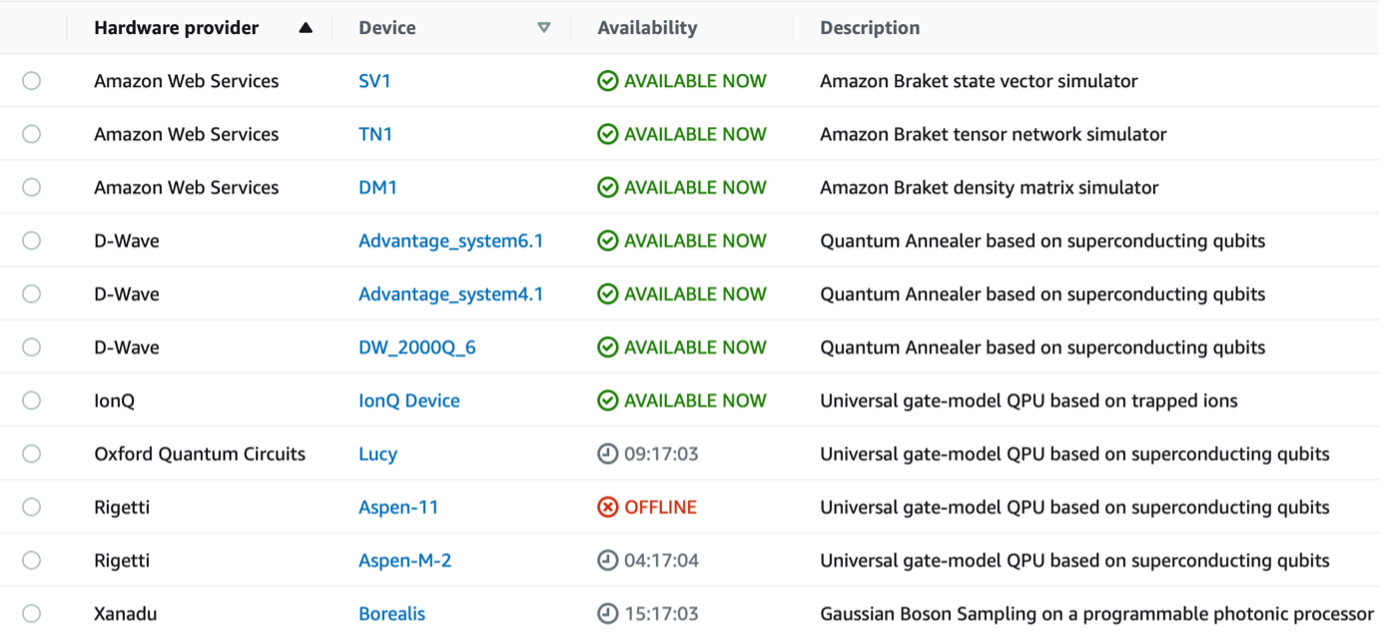 Figure 1 – Screenshot of available QPUs and Simulators taken from the AWS Console.
Amazon Braket is part of the AWS Free tier catalog which in practice means that we have 1 hour per month to run any job without incurring costs as long as we use AWS Simulators (SV1, DM1, TN1) or some combinations of these.
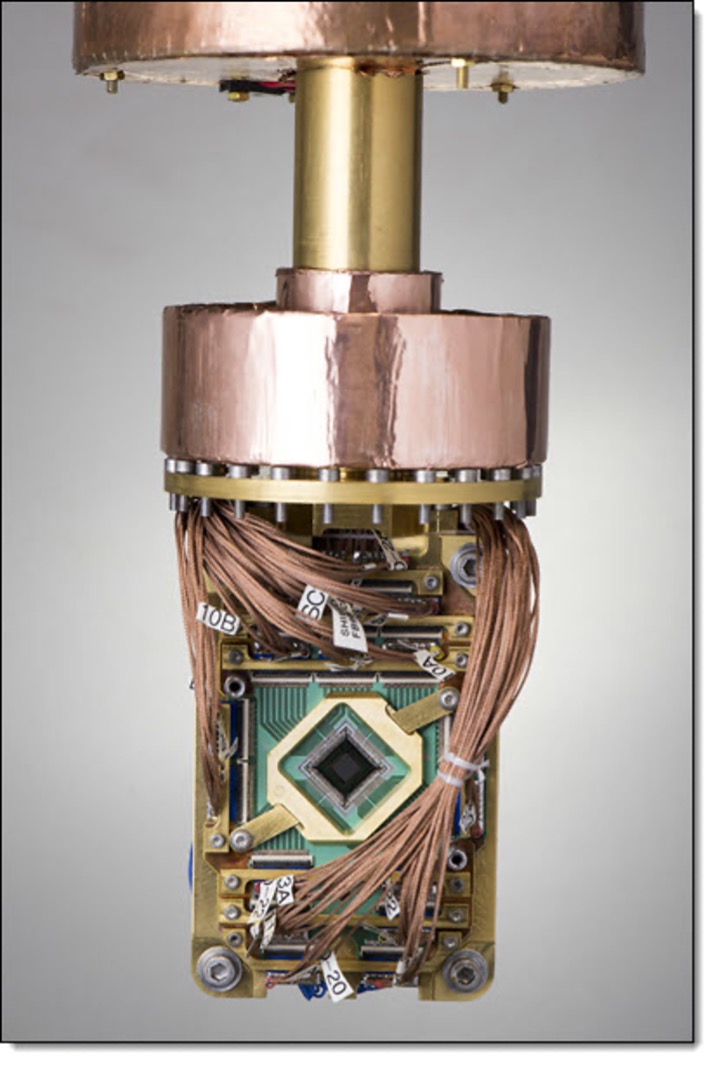
Figure 2 - Example of a QPU: D-Wave’s 2000Q - one of the quantum computers used by AWS Braket - without the whole cryogenic apparatus.
Installing the SDK
Let’s open our command line – you should have it already opened if you followed the Requirements section – and execute the following
$pip install amazon-braket-sdk
And, if we ever need to update the SDK, just execute the following:
$pip install amazon-braket-sdk --upgrade --upgrade-strategy eager
Using the SDK
Call your Profile
Through the command line you should add, if you haven’t already, an adequate profile, by means of changing the credentials file:
$nano ~/.aws/credentials
Which should have the following layout:
 Figure 3 - Credentials file change using the command line.
aws_credentials_id? aws_secrete_access_key? On your console you can find or create new credentials by…
- Going to the console and click on the menu with your username in the upper right corner;
- Press Security Credentials;
- Under Access keys for CLI, SDK, & API access, click on Create access key.
We can go ahead use the us-east-1 region.
Afterwards, configure a named profile. In this example the profile is named joao, thus:
$aws configure --profile joao
Region
When choosing a QPU, it is rather important to beware picking an adequate region, according to the table below.
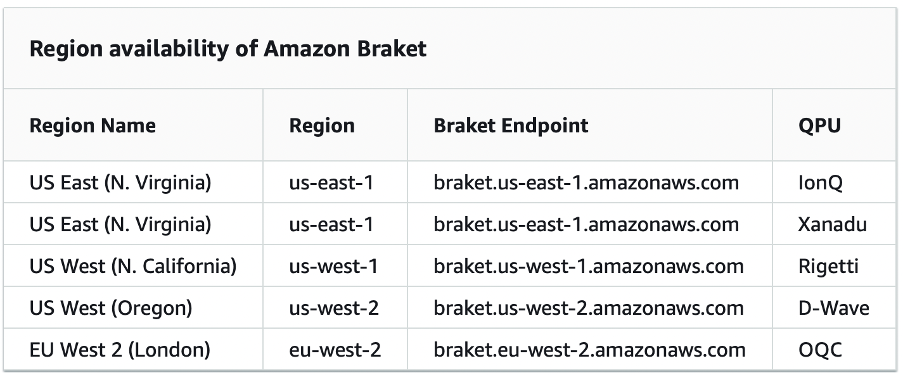 Figure 4 - Region per QPU taken from the Console.
Furthermore, simulators are available in the following regions:
- SV1 (State Vector Simulator) - eu-west-2, us-east-1, us-west-1, us-west-2;
- TN1 (Tensor Network Simulator) - eu-west-2, us-east-1, us-west-2;
- DM1 (Density Matrix Simulator) - eu-west-2, us-east-1, us-west-1, us-west-2;
More information can be seen at the AWS console by choosing the Amazon Braket service and then selecting Devices.
Bell State Design
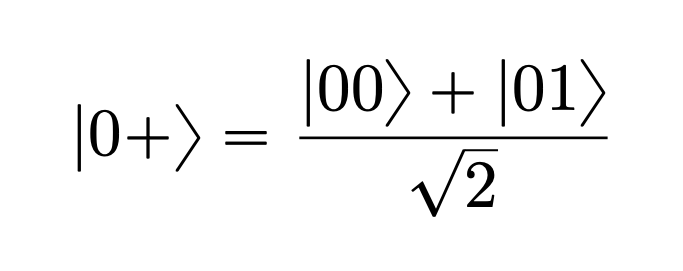
Notwithstanding the sections above, we now have all the necessary tools an knowledge to start writing code. Let us then design a standard circuit of two qubits: we will take two ground states q1 and q2, represented by |q2 q1⟩.
First, we apply an Hadamard gate to q1 which will transform the state into a superposition:
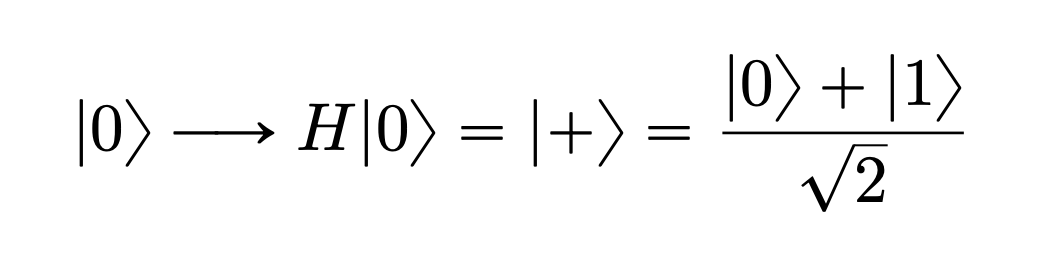
Which, in relation to the second qubit, q2, we get that:
In turn, we then apply CNOT gate with q2 as a target and q1 as a control, effectively converting our initial couple of qubits into one Bell state (out of four…):

By result of these operations is a circuit as follows:
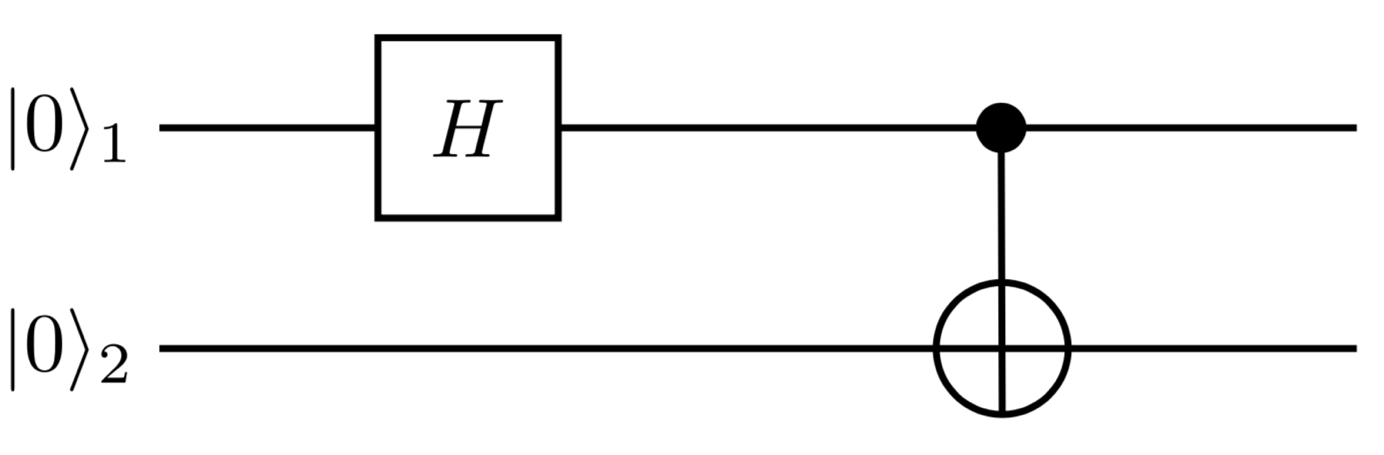 Figure 5 - Circuit encoding one Bell State.
Code
What device shall we use? Let’s go with the simplest one, as per figure 1, the state vector simulator does the trick. To use it we need to fetch our intended device ARN, which can be easily done by searching for the devices on the Braket Service through the Console.
There are many ways to deploy the code, for instance, we can either write on some code editor such as VSCode and run it there, or we could write and run it on Jupyter Notebook, or even run it through the command line. Here, we will use the latter.
Now, create a file named example.py and write the following:
import braket._sdk as braket_sdk
import boto3
from braket.aws import AwsDevice
from braket.circuits import Circuit
import numpy as np
import matplotlib.pyplot as plt

sv_device = AwsDevice("arn:aws:braket:::device/quantum-simulator/amazon/sv1")

bell = Circuit().h(0).cnot(control=0,target=1)
The device ARN, as we wrote for the sv_device, can be obtained by going back to the console and running:
$aws braket search-devices --filters
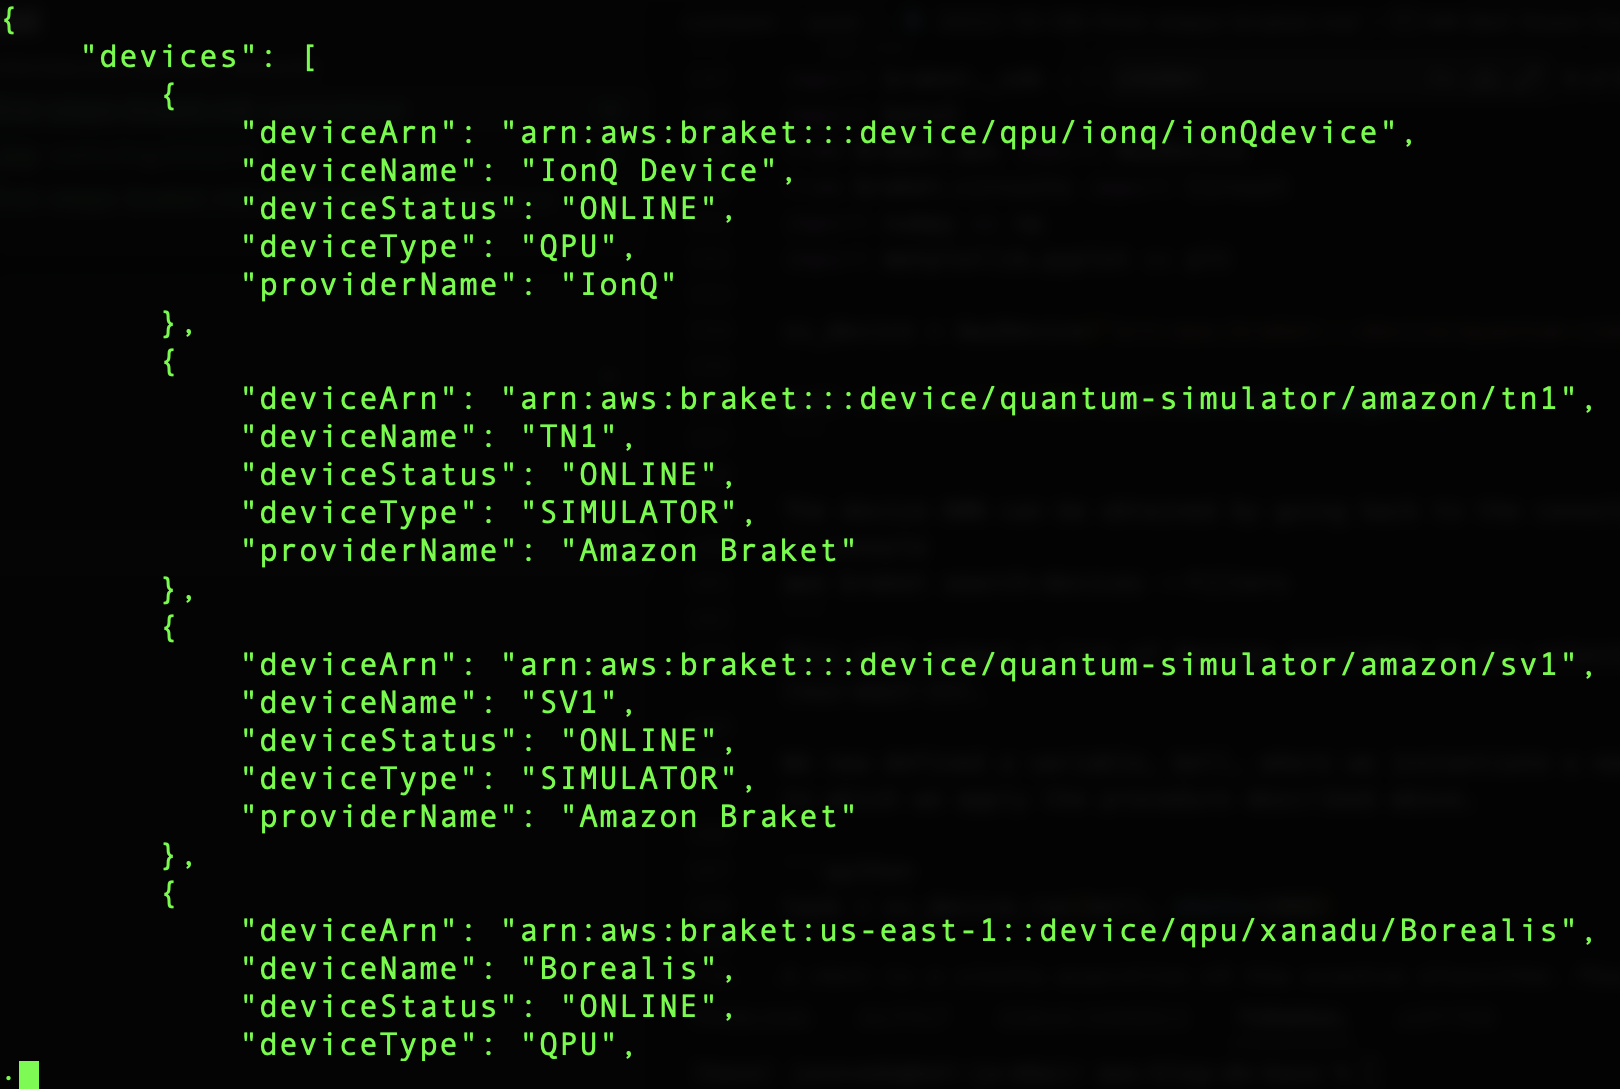
Figure 6 - Output of a list of devices available in our selected region (us-east-1), as a result of the previous command.
We have also now defined a variable called bell where we instantiated a new circuit object, Circuit(), and to which we applied the procedure described in figure 5.
task = sv_device.run(bell, shots=1000)
A shot is a single execution of the quantum algorithm. Therefore, the higher the number of shots the higher the accuracy.
print (bell)
print (task.result().measurement_counts)
The first print will output a ASCII visual of our circuit in the command line. And, the latter, will print out the result of 1000 shots for the entangled states.
plt.bar(counts.keys(), counts.values())
plt.xlabel('bitstrings')
plt.ylabel('counts')
plt.show()
This last piece will gives a prettier visual of the results.
Results
We can now save the changes made to the file and run it at the command line:
Reminder: be sure to be in the same directoy as the the file you are trying to access.
$ python example.py
Finally, we get our long-waited results – not that long though because it only took a few seconds.
$ Counter({'11':508, '00':492})
The line above - the output in the command line - shows the number of counts per entangled pair of qubits. And below we have a column chart representation of the same thing.
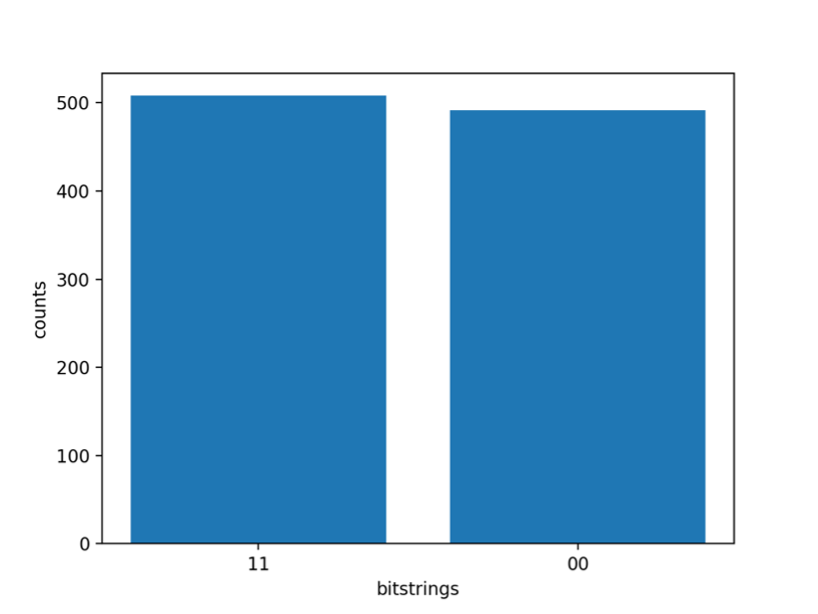
Figure 7 – Number of counts per entagled pair.
As we can see, from the |00⟩ state we got a Bell state |Φ+⟩, where we have nearly 50% probability of being measured in the state |00⟩ and 50% of being measured in |11⟩. We get a state truly entangled which in practice means that measuring one qubit will determine the state of the other qubit: for instance, if we measure the q1 qubit and we obtain a |0⟩, then the other entangled qubit must also be necessarily a |0⟩.
Final Remarks
Congratulations! 🎉 You’ve created and run your first quantum circuit through Amazon Braket SDK! Hopefully this showed you how easy it is to deploy a quantum circuit and to obtain results straight from the command line.
tecRacer has a Quantum Computing team! Apart from architecting solutions, we also give workshops as well on the topic. For more information feel free to visit us at our website or contact us 😁 via quantumcomputing@tecracer.de